
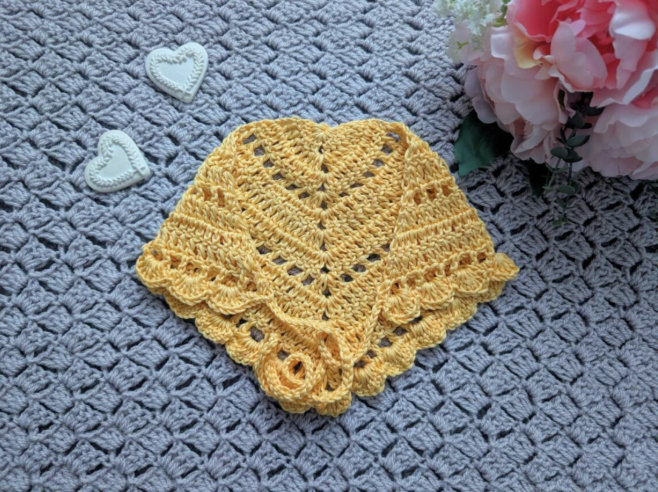

The Crochet Delicate Dream Bandana is a beautiful small crochet project that combines simplicity, delicate texture, and practical styling. Designed with a triangular silhouette and finished with a decorative shell stitch border, this handmade accessory has a soft vintage-inspired character while remaining easy enough for beginners to enjoy.
This project is especially appealing if you enjoy crochet accessories that can be completed without a large amount of yarn. The main body develops through a carefully repeated sequence of double crochet rows and openwork rows, while the two long ties allow the finished bandana to be adjusted comfortably when worn.
The original design uses Drops Muskat in shade 30 Vanilla Yellow, a light 3/DK 100% cotton yarn, together with a 4 mm crochet hook. The result is a lightweight accessory that works beautifully for warmer seasons and can also add a handmade accent to an everyday outfit.
Understanding the Construction Before You Begin
One of the easiest ways to approach this project is to understand how the bandana is constructed before picking up the hook. The design begins with a small ring and then expands outward through a series of rows. A central chain-2 space helps establish the point and remains an important reference throughout the project.
The first three rows create the initial triangular foundation. Row 4 introduces the openwork pattern, while Row 5 creates a more solid section. These instructions are then repeated in a specific sequence through Row 12.
The final stage has two distinct parts. First, the first tie is created with chain 45. The yarn remains attached, allowing the crocheter to continue directly into the decorative shell stitch border. After the border reaches the opposite side, the second chain-45 tie is added.
This means there is no separate sewing step for attaching the ties. They are incorporated into the crochet construction itself.

Pattern Details at a Glance
- Pattern level: Easy/beginner
- Finished size: 9” x 16” (23 cm x 40,5 cm), excluding ties on each side
- Gauge: 4” (10 cm): 6 rows
- Yarn: 1 skein of Drops Muskat, shade 30 Vanilla Yellow
- Alternative yarn: Light 3/DK 100% cotton yarn
- Hook: 4 mm crochet hook
- Terminology: US terms, with British terms in brackets
The finished measurement refers only to the main bandana and does not include the ties on either side. Keep this distinction in mind when assessing the size of your finished project.
Materials for the Project
You only need a few basic supplies to make the Delicate Dream Bandana. The original pattern calls for one skein of Drops Muskat in shade 30 Vanilla Yellow. This is the yarn used for the original design, although the pattern allows for a preferred light 3/DK 100% cotton yarn as an alternative.
- 1 skein of Drops Muskat in shade 30 Vanilla Yellow, or preferred light 3/DK 100% cotton yarn
- 4 mm crochet hook
- A pair of scissors
- A tapestry needle
The cotton yarn is particularly suited to the open structure of the design. The stitch pattern creates spaces throughout the fabric, allowing the finished accessory to retain a delicate appearance rather than becoming visually heavy.
Abbreviations Used in the Pattern
The instructions use US crochet terminology. If you normally use UK terminology, take special care with the stitch names because the same abbreviations can represent different stitches in different systems.
- Ch: Chain
- St: Stitch
- Sl st: Slip stitch
- Sp: Space
- SC: Single Crochet (UK Double Crochet)
- DC: Double Crochet (UK Treble Crochet)
- EOR: End of row
Starting the Bandana
Begin by making a slip knot. Chain 4, then slip stitch through the first chain to form a ring.
This small ring is the foundation of the entire project. The first row is worked directly into it, so make sure the ring is secure before continuing.
Row 1
Chain 3, which counts as a DC. Work 5 DC into the ring. Chain 2, then work 6 DC into the ring.
The chain-2 section is important because it creates the central space that will later help define the triangular shape.
Row 2
Chain 3, which counts as a DC, and turn your work. Place a DC in the first stitch, creating 2 DC together in one stitch.
Continue by placing a DC into each stitch across until you reach the chain-2 space at the top. In the chain-2 space, place 2 DC, chain 2, and 2 DC.
Continue with a DC in each stitch across until you reach the end of the row. Place 2 DC into the last stitch to finish the row.
Row 3
Repeat Row 2.
At this stage, the central structure of the triangle is established. Keeping the middle chain-2 space easy to identify will make the remaining rows much easier to follow.

Introducing the Lacework
The fourth row changes the visual character of the project. Instead of working continuous double crochet stitches across the row, chain spaces and skipped stitches are introduced. These openings create the airy lace effect that makes the bandana so delicate.
Row 4
Chain 3, which counts as a DC, then place a DC into the same first stitch. Turn your work.
Work the following sequence until you reach the penultimate stitch before the chain-2 space at the top of the project: chain 1, skip 1 stitch, DC.
Skip the last stitch. In the chain-2 space, place 2 DC, chain 2, and 2 DC.
Then skip 1 stitch and continue with DC in the next stitch, chain 1, skip 1 stitch, and DC until you reach the last stitch. Place 2 DC into the last stitch.
This row is worth working slowly if you are new to lace crochet. The combination of chain spaces and skipped stitches is what creates the open structure, so maintaining the sequence is more important than working quickly.

Building the Middle Section
Once Row 4 is complete, the pattern returns to a simpler double crochet structure. This gives the crocheter a useful rhythm: an open lace row followed by repeated rows of double crochet.
Row 5
Chain 3, which counts as a DC, and turn your work. Place another DC into the first stitch.
Continue by placing a DC into the next stitch until the end of the row, including the chain spaces from the previous row.
Rows 6–7
Repeat Row 5.
These repeated rows allow the bandana to grow while keeping the construction straightforward. If you are a beginner, this is a good point to establish a consistent crochet rhythm.
Row 8
Repeat Row 4.
Because Row 8 repeats the lace instruction, it recreates the openwork pattern and keeps the visual structure of the bandana consistent.
Row 9
Repeat Row 5.
Rows 10–11
Repeat Row 5.
Row 12
Repeat Row 4.
After Row 12, the main body is ready for the final border and ties.
Visualizing the Growing Triangle
As the rows accumulate, the bandana develops into a distinctive triangular accessory. The repeated central increases and the chain-2 space at the top help maintain the direction of the triangle, while the alternating lace and double crochet sections add visual depth.
At this stage, avoid focusing only on the overall size. Instead, check the structure of the rows. The original pattern is based on a specific sequence, so following the row numbers accurately is more important than trying to make the project look a particular size before Row 12.

Creating the First Adjustable Tie
The first tie is created before beginning the final shell stitch border. This is an important point in the pattern because you should not fasten off after Row 12.
Keep the yarn attached to the project and chain 45.

Once the chain of 45 has been completed, skip the first chain. Slip stitch through the second chain and continue slip stitching through each chain across until you reach the first chain.
Then slip stitch into the DC from the last row to secure the tie.
The tie is now attached to the bandana. Keep the yarn attached because the next step is the decorative shell stitch edging.
The Decorative Shell Stitch Border
The final border gives the bandana its most decorative finish. Instead of a simple straight edge, the pattern uses groups of 7 DC to create shell shapes, separated by SC stitches.
The border is worked as Row 13.
Row 13: Shell Stitch Border
Begin by slip stitching through the next 8 stitch before reaching the chain space from row 13.
Place 7 DC in this space. Then go directly into the next space with a SC.
Continue by placing 7 DC into the next space, followed by a SC into the next space. Repeat this sequence until you reach the last two stitches before the chain-2 space at the top of the project.
When you reach the last two stitches before the chain-2 space, slip stitch through both stitches. Then place 7 DC into the top space.

Now slip stitch through the next two stitches. Place a SC into the next space from Row 13.
Continue the shell sequence by placing 7 DC into the next space, followed by a SC into the next space. Repeat this sequence until you reach the last two stitches at the end of the row.
Slip stitch through the final two stitches.
Adding the Second Tie
After completing the shell stitch border, the second tie is created.
Chain 45. Skip the first chain, then slip stitch through the second chain and each chain across until you reach the first chain. Slip stitch into the DC from the last row to secure the tie.
Once the second tie is secured, fasten off and tidy up all loose ends.
How to Keep the Lacework Neat
The beauty of this bandana comes partly from the spaces created between the double crochet stitches. When working Row 4 and the later repetitions of that row, pay attention to every chain and skipped stitch.
It can be useful to pause at the end of each lace row and inspect the fabric before continuing. The goal is not to pull the work into a particular shape but to make sure the sequence has been followed consistently.
Rows 4, 8, and 12 are especially useful checkpoints because they repeat the lace instruction. If one of these rows looks noticeably different from the previous lace section, review the chain-1 and skip-1 sequence before continuing.
Working With the Central Chain-2 Space
The chain-2 space at the center is one of the most important landmarks in the entire pattern. Several rows instruct you to work 2 DC, chain 2, and 2 DC in this space.
For this reason, avoid losing sight of the center as the project grows. When working across a row, identify the chain-2 space before beginning the section that leads toward it. This can make it easier to understand where the increases belong.
The same principle applies during the final border. The pattern specifically instructs you to work 7 DC into the top space, making this central point part of the decorative finishing.
Working the Pattern as a Beginner
This pattern is rated easy/beginner, but beginners may still find it helpful to divide the project into stages instead of viewing all thirteen rows at once.
- Build the starting ring and complete Row 1.
- Complete Rows 2 and 3 to establish the initial triangle.
- Learn the lace sequence in Row 4.
- Use Row 5 as the repeated construction row.
- Follow the row sequence through Row 12.
- Create the first chain-45 tie.
- Work the shell stitch border.
- Create the second chain-45 tie.
- Fasten off and tidy the loose ends.
Breaking the pattern into these stages can make the construction feel much more manageable, particularly if this is your first triangular lace accessory.
Color Options and Handmade Style
The original bandana is made in Drops Muskat shade 30 Vanilla Yellow, giving it a soft and delicate appearance. However, the design can be crocheted in many different colors.
A single color keeps the focus on the lacework and the scalloped border. A different shade can give the same construction a completely different personality, from subtle and neutral to bright and playful.
The source also notes that the bandana can be made in two colors. Since the original written pattern does not specify a separate two-color row sequence, the exact color arrangement is not part of the technical instructions and should be treated as an optional styling variation.

Styling the Finished Crochet Bandana
The adjustable construction makes this accessory useful for several different hairstyles. The ties can be secured at the back, allowing the bandana to sit comfortably while adding a handmade detail to the overall look.
Wear it with loose hair for a relaxed appearance, combine it with braids for a playful handmade style, or use it with a messy bun for a casual boho-inspired outfit.
The lace construction also makes the accessory particularly appealing during warmer seasons. The open spaces create a light visual effect, while the cotton yarn maintains the handmade character of the piece.
The triangular silhouette can also complement a softer or more refined outfit. The scalloped border adds enough decoration to make the bandana noticeable without requiring additional embellishments.
Common Mistakes to Avoid
Fastening Off Too Early
After Row 12, do not fasten off. The first tie is created while the yarn remains attached to the project, and the shell stitch border follows immediately afterward.
Confusing US and UK Stitch Terms
The pattern uses US terminology. Remember that the source specifically identifies SC as Single Crochet (UK Double Crochet) and DC as Double Crochet (UK Treble Crochet).
Losing the Central Space
The chain-2 space at the top is a key reference point. Keep it easy to identify while working the rows.
Changing the Row Sequence
The pattern alternates between the lace instruction and the repeated double crochet instruction. Row 4 is repeated for Rows 8 and 12, while Row 5 is repeated throughout the specified sections. Follow the original row numbers rather than improvising the sequence.
Skipping the Final Border Details
The shell stitch border is an important part of the finished design. The 7 DC shell groups and SC separators create the decorative scalloped edge, so work these instructions carefully.
Pattern Reference Checklist
- Starting point: Slip knot
- Foundation: Ch 4 and sl st through first chain to form a ring
- Row 1: Ch 3, 5 DC in ring; ch 2, 6 DC in ring
- Rows 2–3: Repeat Row 2
- Row 4: Lace sequence with ch-1 spaces and skipped stitches
- Row 5: DC across, including previous chain spaces
- Rows 6–7: Repeat Row 5
- Row 8: Repeat Row 4
- Row 9: Repeat Row 5
- Rows 10–11: Repeat Row 5
- Row 12: Repeat Row 4
- First tie: Chain 45 before the final border
- Row 13: Shell stitch border
- Second tie: Chain 45
- Finishing: Fasten off and tidy all loose ends
Finishing the Project
Once the second tie has been secured, fasten off and use the tapestry needle to tidy all loose ends. The final finishing stage should be handled carefully because the bandana is made from delicate openwork and has a decorative shell edge.
The finished main body should measure 9” x 16” (23 cm x 40,5 cm), excluding the ties on each side. The stated gauge is 4” (10 cm): 6 rows.
Remember that the pattern’s finished measurement refers specifically to the bandana body and not the adjustable ties. The ties extend beyond the stated dimensions and are designed to provide the final wearable fit.
Frequently Asked Questions
How difficult is the Delicate Dream Bandana?
The original pattern is rated easy/beginner. The design uses chain stitches, slip stitches, single crochet, double crochet, skipped stitches, repeated rows, and shell stitches.
What type of yarn should I use?
The original pattern uses 1 skein of Drops Muskat in shade 30 Vanilla Yellow. It also specifies that a preferred light 3/DK 100% cotton yarn can be used.
What crochet hook size is required?
The specified crochet hook is 4 mm.
What size will the finished bandana be?
The main finished bandana measures 9” x 16” (23 cm x 40,5 cm), excluding the ties on each side.
What is the gauge?
The stated gauge is 4” (10 cm): 6 rows.
How many chains are used for each tie?
Each tie begins with chain 45.
Can the bandana be made in another color?
Yes. The source notes that the bandana can be made in many different colors and can also be made in two colors. The original written pattern itself uses Drops Muskat shade 30 Vanilla Yellow.
When should I fasten off?
Do not fasten off after Row 12 because the first tie is created while the yarn remains attached. Fasten off after the second tie has been secured and all the border work is complete.
Why This Is a Great Small Crochet Project
The Delicate Dream Bandana is a good example of how a relatively compact crochet project can combine several useful techniques in one finished accessory. Beginners can practice basic stitches while also learning how chain spaces and skipped stitches create lace effects.
The project also provides experience with shaping. The repeated central construction teaches the importance of working accurately around a central space, while the final border introduces a decorative shell technique.
Perhaps most importantly, the finished project is practical. Rather than becoming another decorative item that stays in a basket, this crochet bandana can be worn in different ways and adjusted using its two ties.
Final Thoughts
The Crochet Delicate Dream Bandana brings together soft cotton yarn, simple shaping, airy lacework, and a decorative shell border to create a feminine handmade accessory. Its easy/beginner rating makes it approachable, while the finished design has enough visual detail to feel special.
For the cleanest result, concentrate on the row sequence, keep the central chain-2 space easy to locate, and take your time with the lace rows. When you reach the finishing section, remember that the first chain-45 tie is created before the shell border and that the second tie is added after the border is completed.
With its adjustable ties and lightweight triangular shape, this bandana can become a versatile addition to a handmade wardrobe. Make it in the original Vanilla Yellow for a soft vintage-inspired appearance, or explore other color choices while keeping the original construction intact.
The finished result is a small but eye-catching reminder of what makes crochet so enjoyable: a simple collection of stitches can become a thoughtful, wearable accessory through careful repetition, shaping, and finishing.