
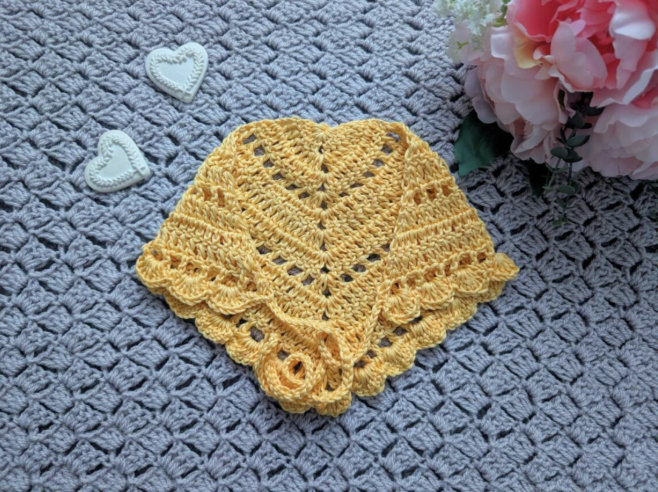

If you love handmade accessories that combine a soft vintage feeling with a modern, wearable shape, the Crochet Delicate Dream Bandana is a beautiful project to add to your crochet list. This lightweight triangle bandana features an airy openwork design, a decorative shell stitch border, and adjustable ties that make it easy to wear comfortably.
The project has a particularly feminine character because of the combination of delicate lacework, soft cotton yarn, and the scalloped edging. Although the finished accessory looks intricate, the pattern is classified as easy/beginner, making it an approachable project for crocheters who are becoming more comfortable with basic stitches and simple lace construction.
This tutorial follows the original pattern instructions and uses US crochet terminology, with the British equivalents provided in brackets. The construction is worked from the center outward, gradually creating the triangular shape before the decorative shell border and two adjustable ties are added.
What Makes the Delicate Dream Bandana Special?
A crochet bandana is one of those small projects that can make a surprisingly strong style statement. It does not require a large amount of yarn, yet the finished piece can completely change the appearance of an outfit or hairstyle. The Delicate Dream Bandana takes this idea further by combining a structured triangular silhouette with open spaces that keep the accessory light and airy.
The lace pattern creates a geometric rhythm across the body of the bandana. As the rows progress, the central point remains visually defined while the sides expand outward. This gives the project its characteristic triangle shape without making the finished accessory feel heavy.
The final shell stitch edging adds another layer of detail. Instead of leaving the outer edge plain, the pattern finishes it with repeated groups of 7 DC separated by SC stitches. This creates the decorative scalloped appearance that gives the bandana its romantic and vintage-inspired character.

Project Overview
The Delicate Dream Bandana is designed to tie at the back, so the finished accessory can be adjusted for a comfortable fit. The ties are deliberately created as part of the crochet construction rather than being added separately afterward.
Before beginning the final decorative border, the first tie is made by chaining 45 and slip stitching back along the chain. After the shell border has been completed around the bandana, the second tie is constructed in exactly the same basic way.
This construction makes the accessory versatile. It can be worn with loose hair, braids, or a messy bun, and the adjustable ties make it possible to secure the bandana at the back of the head.
Finished Measurements and Gauge
- Level: Easy/beginner
- Gauge: 4” (10 cm): 6 rows
- Finished bandana size: 9” x 16” (23 cm x 40,5 cm), excluding ties on each side
- Terminology: US terms, with British terms in brackets
The finished measurement is given without counting the ties on either side. This distinction is important because the ties are created separately from the main measured triangular body of the accessory.
Materials You Need
- Yarn: 1 skein of Drops Muskat in shade 30 Vanilla Yellow, or your preferred light 3/DK 100% cotton yarn
- Crochet hook: 4 mm
- Scissors: 1 pair
- Tapestry needle: 1
The original design uses Drops Muskat in shade 30 Vanilla Yellow. The light cotton yarn contributes to the delicate appearance of the finished bandana, while the mercerized cotton gives the stitches a defined look that works especially well with the open lace structure.
If you choose a different yarn, keep in mind that the original pattern specifies a light 3/DK 100% cotton yarn. The source does not provide a different hook size or alternate quantities for other yarn choices, so the stated 4 mm hook and the original yarn specification remain the technical reference for this pattern.
Crochet Abbreviations
The pattern uses the following abbreviations:
- Ch: chain
- St: stitch
- Sl st: slip stitch
- Sp: space
- SC: Single Crochet (UK Double Crochet)
- DC: Double Crochet (UK Treble Crochet)
- EOR: End of row
If you normally crochet using British terminology, pay particular attention to the difference between SC and DC terminology. The original pattern specifically states that US terms are being used, with British equivalents in brackets.
Beginning the Triangle
The construction begins with a small ring. This ring forms the starting point from which the triangular bandana expands. Because the first round is compact, take your time when working the stitches into the ring so that the foundation remains secure and easy to identify.
Start by making a slip knot. Then chain 4 and slip stitch through the first chain to form a ring.
Row 1
Chain 3, which counts as a DC. Work 5 DC in the ring. Chain 2, then work 6 DC in the ring.
This first row establishes the central construction and the chain-2 space that will become the important top point of the triangular shape.
Row 2
Chain 3, which counts as a DC, and turn your work. Place a DC in the first stitch, creating 2 DC together in one stitch. Continue by placing a DC into each stitch across until you reach the chain-2 space at the top.
In the chain-2 space, place 2 DC, chain 2, and 2 DC. Continue once again by placing a DC into each stitch across until the end of the row, placing 2 DC into the last stitch to finish the row.
Row 3
Repeat Row 2.

Creating the Open Lace Pattern
After the first three rows, the pattern changes from the solid beginning into an airy openwork design. This is where the bandana begins to develop the delicate visual quality that defines the finished accessory.
Row 4
Chain 3, which counts as a DC, then place a DC into the same first stitch. Turn your work.
Work the following sequence: chain 1, skip 1 stitch, DC, repeating this pattern until the penultimate stitch before the chain-2 space at the top of the project. Skip the last stitch, then place 2 DC, chain 2, and 2 DC in the chain-2 space.
Next, skip 1 stitch and continue with DC in the next stitch, chain 1, skip 1 stitch, DC until you reach the last stitch. Place 2 DC into the last stitch.
The chain spaces introduced in this row are responsible for the open appearance of the lace section. When working this row, keep the sequence consistent and pay close attention to the central chain-2 space.

Rows 5 Through 12
The next section is intentionally repetitive. This makes it easier to establish a steady rhythm while the triangular bandana continues to grow.
Row 5
Chain 3, which counts as a DC, and turn your work. Place another DC into the first stitch. Then place a DC into the next stitch until the end of the row, including the chain spaces from the previous row.
Rows 6–7
Repeat Row 5.
Row 8
Repeat Row 4.
Row 9
Repeat Row 5.
Rows 10–11
Repeat Row 5.
Row 12
Repeat Row 4.
At this point, the main body of the bandana is complete and the project is ready for the ties and decorative shell stitch border. Before beginning the final row, the first tie must be created while the yarn remains attached to the project.

How to Make the First Tie
Before starting the final shell stitch border, do not fasten off. The yarn must remain attached to the project.
Chain 45.

Once you have finished chaining 45, skip the first chain. Slip stitch through the second chain and each chain across until you reach the first chain. Then slip stitch into the DC from the last row to secure the tie.
The tie is now attached to the bandana body, and the yarn remains ready for the decorative edging. Do not fasten off at this stage because the shell stitch border is worked immediately afterward.
Working the Shell Stitch Border
The final border is one of the most decorative elements of the project. Groups of 7 DC create the shell shapes, while SC stitches separate the shells. The repeated rhythm produces the scalloped edge visible on the finished bandana.
Row 13: Shell Stitch Border
Begin by slip stitching through the next 8 stitch before reaching the chain space from row 13. Place 7 DC in this space; go directly into the next space with a SC.
Then repeat the following sequence: place 7 DC into the next space, then place a SC into the next space. Continue repeating this sequence until you reach the last two stitches before the chain-2 space at the top of the project.
Once you reach the last two stitches before the chain-2 space, slip stitch through both stitches before placing 7 DC into the top space.

Now slip stitch through the next two stitches, then place a SC into the next space from row 13. Repeat the shell sequence: place 7 DC into the next space, followed by a SC into the next space. Continue until you reach the last two stitches at the end of the row.
Slip stitch through the last two stitches, and then create the second tie.
Creating the Second Tie
The second tie follows the same basic construction as the first. Chain 45. Once you have finished chaining 45, skip the first chain, then slip stitch through the second chain and each chain across until you reach the first chain. Slip stitch into the DC from the last row to secure the tie.
After the second tie has been secured, fasten off and tidy up all loose ends.
Why the Repetition Matters in This Pattern
Although the pattern is beginner-friendly, the repeated rows are important for maintaining the shape of the bandana. Rows 2 and 3 establish the initial expansion, while Row 4 introduces the openwork structure. The repeated Row 5 sections then build the fabric between the lace rows.
For beginners, it can be helpful to treat each row as its own checkpoint rather than rushing through the complete sequence. Before moving on, compare the shape of your work with the expected triangular structure and make sure the central chain-2 area remains easy to identify.
When you reach Rows 8 and 12, remember that these are repetitions of Row 4. These rows are particularly important because they recreate the open lace structure between the solid sections.
Beginner Tips for a Neat Result
- Keep your tension consistent. The lace sections look best when the chain spaces are neither extremely tight nor excessively loose.
- Identify the central chain-2 space. This space is used repeatedly to maintain the central point of the triangular shape.
- Count your rows carefully. Rows 1 through 12 follow a specific sequence, with Rows 4, 8, and 12 repeating the lace instruction.
- Do not fasten off before the first tie. The original construction requires the yarn to remain attached when the chain-45 tie is created.
- Work the ties carefully. When slip stitching back across the chain, avoid accidentally skipping the second chain or losing the chain sequence.
- Pay attention to the shell border. The repeated 7 DC shells are the main decorative feature of the final edge.
Keeping the Bandana Symmetrical
Symmetry is especially noticeable in a triangular accessory. The central chain-2 space acts as the visual center, so it is useful to check that the stitches worked into this area are easy to locate throughout the pattern.
During Rows 2 and 3, the central space receives 2 DC, chain 2, and 2 DC. Row 4 uses the same central space for another 2 DC, chain 2, and 2 DC. Keeping this central construction clear helps the triangular shape develop correctly.
The two ties should also be approached with the same care. Each tie uses chain 45 and slip stitches back across the chain, creating matching adjustable ends on both sides of the bandana.
Color Ideas for the Delicate Dream Bandana
The original project uses Drops Muskat in shade 30 Vanilla Yellow, creating a soft and delicate appearance. The pattern can also be made in other colors, making it a useful project for experimenting with your preferred palette.
A single color emphasizes the lace pattern and lets the geometric structure remain the main visual feature. The source also notes that the bandana can be made in two colors, giving you another way to personalize the finished accessory without changing the construction of the pattern.
When selecting yarn for a color variation, the technical reference remains a light 3/DK 100% cotton yarn. The original pattern does not specify a separate color-change sequence, so any color arrangement beyond the original single-color design should be treated as a styling choice rather than a change to the written construction.

Styling the Finished Bandana
The finished accessory is designed to be versatile. Because it ties at the back, it can be adjusted to suit different hairstyles and styling preferences. It can be worn with loose hair for a relaxed handmade look, with braids for a more playful appearance, or with a messy bun for an effortless boho-inspired style.
The openwork construction also makes the bandana particularly suitable for warmer seasons. Rather than creating a heavy head covering, the lace structure gives the accessory a light visual and physical quality.
For a more romantic outfit, the soft triangular shape and scalloped edging can complement a dress or other feminine clothing. For casual styling, the same bandana can add a handmade detail to a simple everyday outfit.
Common Troubleshooting Checks
The Triangle Does Not Look Even
First, check the central chain-2 space and the stitches worked into it. The pattern repeatedly uses this central space to develop the triangle, so it is an important reference point throughout the construction.
The Lace Looks Too Tight
Check your tension around the chain spaces and skipped stitches. The openwork appearance depends on maintaining the chain-and-stitch sequence described in Row 4 and the later repeated rows.
The Border Does Not Look Scalloped
Review the shell sequence in Row 13. The decorative shells are formed by placing 7 DC into the appropriate spaces, followed by SC stitches between the shells.
The Ties Are Uneven
Both ties are created with chain 45. When working the slip stitches back along each chain, follow the same process on both sides so the finished ties have matching construction.
Quick Pattern Checklist
- Make a slip knot.
- Chain 4 and slip stitch through the first chain to form a ring.
- Work Row 1.
- Work Rows 2 and 3 as instructed.
- Work Row 4 to introduce the lace structure.
- Work Row 5.
- Repeat Row 5 for Rows 6–7.
- Repeat Row 4 for Row 8.
- Repeat Row 5 for Row 9.
- Repeat Row 5 for Rows 10–11.
- Repeat Row 4 for Row 12.
- Before the final row, create the first tie with chain 45.
- Work the shell stitch border as Row 13.
- Create the second chain-45 tie.
- Fasten off.
- Tidy all loose ends.
Final Finishing Advice
The finishing stage is small but important. Once the second tie has been completed, fasten off and tidy up all loose ends with a tapestry needle. A clean finish helps the delicate lacework remain the focus of the accessory.
Because the bandana has a decorative shell border, take a moment to look around the complete edge after fastening off. Make sure the loose ends are secured neatly without interfering with the scalloped appearance.
The finished size of the main bandana is 9” x 16” (23 cm x 40,5 cm), excluding the ties on each side. The ties are an integral part of the wearable design and provide the adjustable fit described in the original pattern.
Frequently Asked Questions
Is this bandana suitable for beginners?
Yes. The original pattern is rated easy/beginner. It uses basic crochet stitches, repeated rows, chain spaces, slip stitches, and a final shell stitch border.
Which crochet terminology does the pattern use?
The pattern uses US crochet terms, with British equivalents provided in brackets. In particular, SC is Single Crochet in US terminology and UK Double Crochet in British terminology, while DC is Double Crochet in US terminology and UK Treble Crochet in British terminology.
What yarn is used for the original bandana?
The original design uses 1 skein of Drops Muskat in shade 30 Vanilla Yellow. The pattern also states that a preferred light 3/DK 100% cotton yarn may be used.
What crochet hook size is required?
The specified hook size is 4 mm.
How large is the finished bandana?
The finished bandana measures 9” x 16” (23 cm x 40,5 cm), excluding the ties on each side.
How long are the crochet ties?
Each tie begins with a chain of 45. The pattern then instructs you to skip the first chain and slip stitch through the second chain and each chain across.
When are the ties made?
The first tie is created before starting the final shell stitch border, while the yarn remains attached. The second tie is created after the shell border has been completed around the bandana.
What is the gauge?
The stated gauge is 4” (10 cm): 6 rows.
A Delicate Handmade Accessory for Any Crochet Wardrobe
The Crochet Delicate Dream Bandana is a lovely example of how a relatively small crochet project can combine practical wearability with decorative craftsmanship. The triangular construction gives it a recognizable silhouette, while the open lace sections keep the design light and airy. The shell stitch border adds the final feminine detail, and the chain-45 ties make the finished accessory adjustable.
For beginners, the pattern also offers useful practice with several fundamental crochet techniques: forming a starting ring, building a triangular shape through a central chain space, working repeated rows, creating chain-space lace, slip stitching, and finishing with shell stitches.
The original color, Drops Muskat shade 30 Vanilla Yellow, gives the design a soft and delicate character, but the pattern can also be explored in other colors. Whether worn with loose hair, braids, or a messy bun, the finished bandana can add a handmade touch to an everyday outfit or a more romantic look.
Most importantly, the project demonstrates the charm of slow crochet. Each row contributes to the final shape, and the combination of repeated stitches and decorative details turns a small amount of cotton yarn into a wearable accessory with a distinctly handmade personality.
If you enjoy vintage-inspired crochet, delicate lacework, and quick accessories, this beginner-friendly bandana is a rewarding project to keep in your handmade wardrobe. Follow the row sequence carefully, keep the central chain-2 space easy to identify, and give special attention to the final shell border and matching ties for a polished result.