
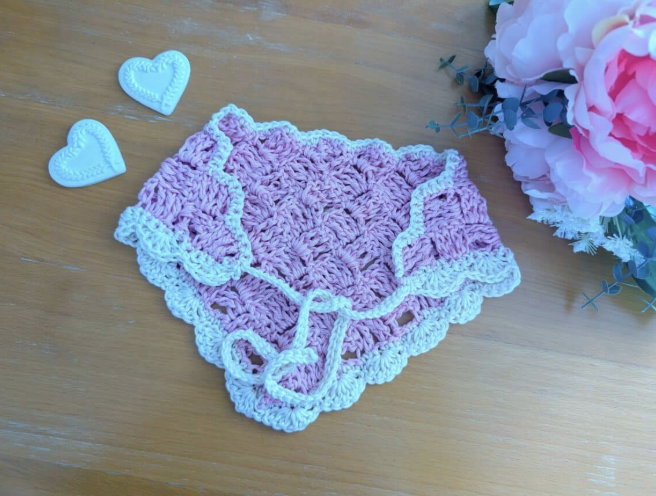
Handmade accessories have a special charm because even a small project can add a personal touch to an everyday outfit. This delicate crochet bandana is a beautiful example. It combines a soft Desert Rose main color with an Off White decorative finish, creating a romantic accessory with a lightweight, textured appearance.
The project is rated Easy/beginner and is built around a Treble C2C construction. The main fabric grows through connected square sections, creating the characteristic diagonal texture of corner-to-corner crochet. Once the body is complete, a contrasting border and two ties are added, followed by a Shell Stitch edging along the V sides.
This complete guide focuses on understanding the project from start to finish. Along the way, each important construction point is highlighted so you can check your work before moving to the next stage. The technical instructions remain faithful to the original pattern, while the surrounding explanations are designed to make the process easier to follow.

Project Overview
The finished bandana measures 7,7” (19 cm) x 16” (40,5 cm). Its construction is relatively compact, making it an approachable project for anyone who wants to practice a textured crochet technique without committing to a large garment or complicated accessory.
The body uses Treble Crochet throughout the C2C section. The height of the treble stitches gives the fabric a graceful quality and a slightly open, airy feel. Instead of using a solid conventional fabric construction, the pattern develops through small square sections that are joined as the rows progress.
Once the main section is finished, the yarn changes from Desert Rose to Off White. The border begins with single crochet, incorporates two long ties, and then receives the decorative Shell Stitch treatment along the two V sides.
The combination of geometric C2C squares and rounded shell shapes gives the accessory a balanced appearance. The body looks structured and diagonal, while the edge becomes softer and more decorative.
Materials Checklist
Gather all the materials before beginning. Having both colors available from the start makes the transition between the main construction and the finishing stage easier to manage.
- 1 skein Drops Muskat yarn in shade Desert Rose, or 1 skein preferred 100% mercerized cotton yarn in a light 3/DK weight.
- 1 skein Drops Muskat yarn in shade Off White, or 1 skein preferred 100% mercerized cotton yarn in a light 3/DK weight.
- 4,5 mm crochet hook.
- Scissors.
- Tapestry needle.
The original pattern specifies a light 3/DK weight and 100% mercerized cotton for the preferred yarn alternative. Keeping the yarn specification in mind is useful because the finished appearance of a delicate accessory depends on both the stitch construction and the yarn used.
Gauge and Finished Size
The stated gauge is 4” (10 cm) x 4” (10 cm), measured as 4 “clusters” of the C2C pattern.
The finished size is 7,7” (19 cm) x 16” (40,5 cm).
These details provide useful checkpoints when assessing your work. If your tension differs, the dimensions may naturally vary, so it is helpful to understand that gauge and finished size are reference points from the original design rather than instructions to change the pattern.
US Crochet Terms and Abbreviations
The source uses US crochet terminology and provides British equivalents in brackets. Keep this distinction in mind, especially when moving between the main C2C section and the border.
- Ch: Chain.
- St: Stitch.
- Sl st: Slip stitch.
- SC: Single Crochet (UK Double Crochet).
- TC: Treble crochet (UK Double Treble Crochet).
- DC: Double Crochet (UK Treble Crochet).
- EOR: End of Round/end of row.
One useful way to stay organized is to remember that the main body relies heavily on TC, while the decorative second round uses DC. The SC stitch is used for the first border round and as part of the Shell Stitch repeat.
Stage One: Starting the Treble C2C Body
Begin with the Desert Rose yarn.
Make a slip knot. This is the starting point for the C2C body and leads directly into the first chain sequence.
Row 1
Chain 7. Work a TC in the 5th chain from the hook and in each stitch along, giving a total of 4 TC.
This short foundation row establishes the first group that will become part of the diagonal C2C structure. For a beginner, it is worth checking the stitch count immediately: the completed row should contain 4 TC.
Do not worry if the piece looks very small at this stage. The design is intentionally built by expanding the number of connected square sections as the rows progress.
Stage Two: Forming the First Square
Row 2 begins the expansion of the C2C shape.
Chain 7 and turn the work. Work a TC in the 5th chain from the hook and in each stitch along, again producing 4 TC.
Turn the work to slip stitch in between the 3rd and 4th TC from the previous row. Then chain 4, which counts as a TC throughout the pattern. Add 3 TC in between the 3rd and 4th TC from the previous row to form a square.

The position of the slip stitch is an important construction detail. It connects the new section to the previous square and establishes the arrangement that will be repeated in the following rows.
Stage Three: Learning the Repeating C2C Rhythm
Row 3 introduces the repeating movement that will carry the project through the remainder of the main body.
Row 3
Chain 7 and turn the work. Work a TC in the 5th chain from the hook and a TC in each stitch along, giving 4 TC.
Slip stitch to the previous square in between the 3rd and 4th TC.
Next, chain 4, counting as a TC, and add 3 TC in that space. Slip stitch to the previous square in between the 3rd and 4th TC.
Then chain 4, again counting as a TC, and add 3 TC in that space. Finish by slip stitching to the previous square in between the 3rd and 4th TC.
Once you have completed this row, the basic expansion method should become easier to recognize. Each additional square is created in the appropriate space and joined back to the previous square through a slip stitch.

Stage Four: Rows 4-11
Rows 4-11 repeat the construction used in Row 3, adding the required number of squares as you progress along each row.
This section is where consistency becomes more important than speed. The pattern does not provide a new independent stitch formula for every row. Instead, it tells you to repeat Row 3 while adding the required number of squares.
For beginners, it can help to treat every newly created square as a checkpoint. Complete the square, connect it to the previous square with the required slip stitch, and then continue to the next square. This keeps the construction organized without changing the written pattern.
Remember that the source does not provide invented stitch totals for Rows 4-11. The instruction is specifically to repeat Row 3 and add the required number of squares as you go along. Follow that structure rather than introducing additional counts.
After completing Row 11, fasten off the Desert Rose yarn.
Checking the Main Body
Before beginning the border, take a moment to inspect the C2C section. The fabric should display the diagonal texture created by the connected Treble C2C squares.
Look carefully at the joins. The slip stitches should have connected the individual sections according to the written instructions, and the overall piece should have the developing shape shown by the construction sequence.
This pause is especially useful for beginners. Once the Off White border is attached, it becomes less convenient to correct a problem in the main body. Checking your work now keeps the finishing stage cleaner and more enjoyable.
Stage Five: Switching to Off White
After fastening off the Desert Rose yarn, attach the Off White yarn to the project in the stitch where you fastened off.
The first border round is worked across three sides of the project. The construction begins across the “straight” edge and continues around the two other sides that form the “V” part of the bandana.
This color change is more than a simple finishing detail. The creamy Off White creates a clear visual frame around the Desert Rose body and prepares the project for the shell decoration that follows.
Round 1: Building the Border and Ties
Begin Round 1 with chain 1, which counts as a SC.
Work SC all across the “straight” edge, following the edge placement shown in the source.
At the first corner, create the first tie.
First Tie
Chain 45. Slip stitch into the second chain and continue slip stitching through the chain until the end. Then slip stitch into the project to anchor the tie.
The chain-45 tie is an integral part of Round 1. It does not need to be created separately and sewn onto the bandana afterward.
After anchoring the first tie, continue with SCs across the V side of the bandana.

Creating the Second Tie
At the other corner, create the second tie in exactly the same way.
Chain 45, slip stitch into the second chain, and continue slip stitching along the chain until the end. Slip stitch into the project to anchor the tie.
Continue the SC border across the remaining V side as instructed.
The two matching ties give the bandana its practical finishing feature. Because they are made during the border round, they become visually integrated with the edge instead of looking like separate additions.
The Important Round 1 Stitch Requirement
The source does not specify an exact number of SCs across the bandana. However, it clearly states that the SCs across the bandana need to be a multiple of 5.
This is an important technical checkpoint. Do not replace this instruction with an invented stitch total. The multiple-of-5 requirement prepares the edge for the decorative repeat used in the next round.
If you are checking your work, count the SCs across the bandana and confirm that the number satisfies the stated multiple-of-5 requirement.
Stage Six: The Shell Stitch Finish
Round 2 is worked only on the two sides of the “V.” The straight edge does not receive this shell-style round.
Begin with chain 1. This chain does not count as a stitch.
Work a SC into the first stitch. Skip 2 stitches. Work 5 DC into the next stitch. Skip 2 stitches, then work a SC into the next stitch.
Repeat the sequence until EOR.
- SC into the first stitch.
- Skip 2 stitches.
- Work 5 DC into the next stitch.
- Skip 2 stitches.
- SC into the next stitch.
- Repeat until EOR.
The five DC stitches grouped into one stitch create the rounded shell effect. The skipped stitches provide space between the shell groups, while the SC stitches establish the rhythm along the edge.

When the repeat reaches EOR, fasten off and tidy the loose ends.
Why the Border Works So Well with C2C
The main body and the border use contrasting visual ideas. The C2C section is made from connected square units, producing a diagonal and geometric texture. The Shell Stitch border is rounded and flowing.
This contrast gives the accessory a finished appearance without requiring a complicated decorative technique throughout the entire body. The shell groups are concentrated along the V sides, so the center remains dominated by the Treble C2C texture.
The Off White yarn reinforces this distinction. Against the Desert Rose body, the pale border becomes a visible frame that highlights the shape of the bandana.
Finishing Tips for a Clean Result
The final details are worth taking slowly. After fastening off, use the tapestry needle to tidy the loose ends. Avoid leaving unfinished yarn tails where they can distract from the shell edging or ties.
Inspect both ties and make sure they have been anchored correctly. Because each tie begins with Chain 45 and is secured with slip stitches, the connection point should be part of the completed border construction.
Look along the V sides and check that the shell groups are easy to distinguish. The decorative sequence should follow the written repeat of SC, skip 2, 5 DC in the next stitch, skip 2, SC in the next stitch.
Beginner Masterclass: What to Watch While Crocheting
Keep your terminology consistent
This pattern uses US terms, so remember that TC means Treble Crochet and DC means Double Crochet in the source terminology. The British equivalents are supplied in brackets in the abbreviation list.
Do not rush the joins
The slip stitches connecting the C2C squares are an essential part of the construction. Paying attention to the space between the 3rd and 4th TC helps maintain the intended structure.
Separate the colors
Keep Desert Rose as the main-body yarn and Off White ready for the finishing stage. The pattern changes color after the C2C body has been completed and the Desert Rose yarn has been fastened off.
Respect the border placement
Round 1 covers three sides, beginning with the straight edge and continuing around the V sides. Round 2 is only worked on the two V sides.
Use the multiple-of-5 checkpoint
The source specifically requires the SCs across the bandana to be a multiple of 5. This detail is important because the following decorative repeat is built around groups of stitches.
Quick Pattern Reference
- Main yarn: Desert Rose.
- Border yarn: Off White.
- Hook: 4,5 mm.
- Row 1: Ch 7, TC in 5th ch from hook and in each st along = 4 TC.
- Row 2: Ch 7, turn, 4 TC; join to previous row and create the first square.
- Row 3: Ch 7, 4 TC; join and create the additional square sections as written.
- Rows 4-11: Repeat Row 3, adding the required number of squares as you go along.
- After Row 11: Fasten off Desert Rose.
- Round 1: Attach Off White; work SC across the three sides and create two ties.
- Each tie: Chain 45, slip stitch into the second chain and through the chain, then anchor to the project.
- Round 2: Work only across the two V sides.
- Shell repeat: SC, skip 2, 5 DC in next stitch, skip 2, SC in next stitch.
- Finishing: Fasten off and tidy loose ends.
Styling the Finished Bandana
The finished accessory can be worn in several ways. For a vintage-inspired look, tie it under the chin. The Desert Rose color and soft scalloped edge create a romantic appearance that suits this style particularly well.
For a more relaxed hairstyle accessory, drape it over the hair as a headscarf. The ties can also be used around a bun or ponytail, giving the hairstyle a handmade decorative element.
Another option is to wear the bandana as a delicate neck accessory. This allows the C2C texture and shell border to remain visible while adding a small handcrafted detail to an outfit.
Frequently Asked Questions
What skill level is this crochet bandana?
The original source describes it as Easy/beginner. The construction uses basic crochet actions repeatedly, although beginners should pay particular attention to the C2C joins and the stitch placement in the border.
What is the gauge?
The gauge is 4” (10 cm) x 4” (10 cm), with 4 “clusters” of the C2C pattern.
What is the finished size?
The finished bandana measures 7,7” (19 cm) x 16” (40,5 cm).
How many TC are in Row 1?
Row 1 contains 4 TC after chaining 7 and working a TC in the 5th chain from the hook and in each stitch along.
What happens in Rows 4-11?
Rows 4-11 repeat the Row 3 construction, adding the required number of squares as you progress along each row. The source does not provide a separate invented stitch total for these rows.
When does the color change happen?
The Desert Rose yarn is used for the main C2C body. After Row 11, fasten off the Desert Rose yarn. Then attach the Off White yarn in the stitch where you fastened off and begin the border.
How long are the ties?
Each tie begins with Chain 45. The chain is then worked back with slip stitches, beginning in the second chain, before being anchored to the project.
Where is the Shell Stitch edging worked?
The Shell Stitch edging is worked during Round 2 only on the two sides of the “V.”
Does Chain 1 count as a stitch in Round 2?
No. In Round 2, Chain 1 does not count as a stitch.
Final Project Inspection
Before considering the bandana complete, look at the entire piece from the center outward. The Desert Rose C2C body should form the main textured section, while the Off White border should frame the edges and provide the two ties.
Confirm that the main construction reaches Row 11 and that the border has been worked according to its specific placement. Check that Round 1 includes the two Chain 45 ties and that the SCs across the bandana satisfy the stated multiple-of-5 requirement.
Finally, inspect Round 2. It should appear only along the two V sides and should show the repeated shell sequence created by 5 DC worked into the appropriate stitch.

Final Thoughts
This delicate crochet bandana demonstrates how a small accessory can combine simple techniques into a distinctive finished piece. The Treble C2C construction provides the main texture and diagonal movement, while the contrasting Off White border gives the project a polished frame.
The Shell Stitch edging is particularly effective because it introduces soft scalloped curves against the geometric C2C squares. Together, these details create the romantic and feminine appearance that makes the bandana suitable for a variety of everyday styling ideas.
For a beginner, the project offers valuable practice in reading repeated rows, joining C2C squares, changing colors, creating integrated ties, and following a decorative stitch sequence. The most useful approach is to work through the pattern one checkpoint at a time rather than trying to memorize the complete project.
Start with the Desert Rose yarn and complete the C2C body through Row 11. After fastening off, introduce Off White for the three-sided first border round and its two ties. Finish the V sides with the Shell Stitch sequence, tidy the loose ends, and your handmade accessory is ready to wear.
With its soft colors, airy Treble C2C texture, graceful shape, and scalloped finish, this bandana is a lovely project for anyone who enjoys creating delicate crochet accessories by hand.