
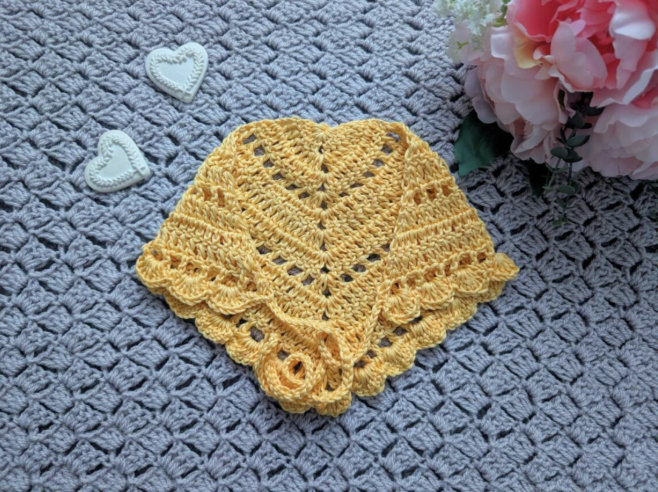

Small crochet accessories can be some of the most satisfying projects to make. They do not require a large quantity of yarn, they can often be completed relatively quickly, and they give you an opportunity to practice several useful techniques while creating something you can actually wear. The Crochet Delicate Dream Bandana is a wonderful example of this kind of project.
This feminine crochet accessory is built around a triangular shape and decorated with openwork lace and a shell stitch edging. The result is light, delicate, and versatile enough to complement loose hair, braids, or a messy bun. Adjustable ties at both sides allow the bandana to be secured comfortably at the back.
The original design uses Drops Muskat in shade 30 Vanilla Yellow, together with a 4 mm crochet hook. The pattern is classified as easy/beginner and uses US crochet terminology, with British terminology given in brackets.
In this guide, we will walk through the construction in a workshop-style format, focusing on the purpose of each stage, the important checkpoints, and the finishing details that help you keep the triangular shape and delicate lace appearance neat.
Before Picking Up Your Crochet Hook
Before beginning, it is helpful to understand the overall journey of the project. The bandana is not constructed as a separate triangle that later receives ties. Instead, the triangle, first tie, decorative edging, and second tie are all connected as part of one continuous sequence.
The project begins with a slip knot and a chain-4 ring. Row 1 establishes the first group of double crochet stitches around the ring. Rows 2 and 3 expand the beginning of the triangle.
Row 4 introduces the openwork. The pattern then alternates between the lace-style Row 4 and the more solid Row 5 according to the specified row sequence. Row 12 completes the main body.
Before beginning Row 13, the first tie is made using chain 45. The yarn stays attached while the shell stitch border is worked. Finally, another chain-45 tie is created on the opposite side.

Your Project Checklist
Gather all of your supplies before starting so that you can concentrate on the stitch sequence without interruptions.
- Yarn: 1 skein of Drops Muskat in shade 30 Vanilla Yellow
- Alternative yarn: Your preferred light 3/DK 100% cotton yarn
- Crochet hook: 4 mm
- Scissors: A pair
- Tapestry needle: A tapestry needle for finishing
The original pattern specifies light 3/DK 100% cotton yarn. The stated yarn is Drops Muskat in shade 30 Vanilla Yellow. If you select another yarn, the source does not provide additional technical measurements or alternate hook specifications, so the original 4 mm hook and stated yarn category remain the pattern reference.
Gauge and Finished Measurements
- Gauge: 4” (10 cm): 6 rows
- Finished size: 9” x 16” (23 cm x 40,5 cm)
- Measurement note: The finished size excludes the ties on each side
- Level: Easy/beginner
The gauge is given as 6 rows over 4” (10 cm). The finished size of 9” x 16” (23 cm x 40,5 cm) refers to the main bandana body, with the ties excluded from that measurement.
Know Your Crochet Language
This pattern uses US crochet terminology. If you normally follow UK patterns, make sure you use the equivalents supplied in the original instructions.
- Ch: Chain
- St: Stitch
- Sl st: Slip stitch
- Sp: Space
- SC: Single Crochet (UK Double Crochet)
- DC: Double Crochet (UK Treble Crochet)
- EOR: End of row
The difference between US and UK terminology is particularly important for this pattern because both SC and DC appear in the final edging.
Workshop Stage One: Forming the Starting Ring
Begin with a slip knot.
Chain 4, then slip stitch through the first chain to form a ring.
This small ring is the foundation for Row 1. Make sure the ring is secure and that you can clearly identify the center opening before beginning the double crochet stitches.
Row 1
Chain 3, which counts as a DC.
Work 5 DC in the ring. Then chain 2. Work 6 DC in the ring.
The chain-2 section is an important part of the emerging center structure. As the project grows, this central space will continue to be used as a reference point for shaping the triangle.
Workshop Stage Two: Establishing the Triangle
Row 2
Chain 3, which counts as a DC, and turn your work.
Place a DC in the first stitch, creating 2 DC together in one stitch. Continue with a DC into each stitch across until you reach the chain-2 space at the top.
In the chain-2 space, place 2 DC, chain 2, and 2 DC.
Continue once again with a DC into each stitch across until you reach the end of the row. Place 2 DC into the last stitch to finish.
Row 3
Repeat Row 2.
Rows 2 and 3 are the first major shaping section of the project. The repeated construction around the central chain-2 space allows the triangular form to begin expanding.

Workshop Stage Three: Learning the Lace Row
Row 4 is the first major texture checkpoint. It introduces the chain-1 spaces and skipped stitches that give the bandana its airy openwork appearance.
Row 4
Chain 3, which counts as a DC. Place a DC into the same first stitch, then turn your work.
Work the following sequence until the penultimate stitch before the chain-2 space at the top of the project: chain 1, skip 1 stitch, DC.
Skip the last stitch. In the chain-2 space, place 2 DC, chain 2, and 2 DC.
Continue on the other side by skipping 1 stitch, then working DC in the next stitch, chain 1, skip 1 stitch, and DC until you reach the last stitch.
Place 2 DC into the last stitch.

For a beginner, this is a useful point to slow down. The lace effect depends on the relationship between the chains, skipped stitches, and double crochets. If you work the row too quickly, it can be easy to lose track of where the next DC belongs.
Workshop Stage Four: The Repeating Structure
Once Row 4 has been completed, the pattern becomes more repetitive. This repetition is helpful because it allows you to become familiar with the stitch rhythm while the bandana continues to grow.
Row 5
Chain 3, which counts as a DC, and turn your work.
Place another DC into the first stitch. Continue by placing a DC into the next stitch until EOR, including the chain spaces from the previous row.
Rows 6–7
Repeat Row 5.
These rows create the next section of the bandana using the same basic DC construction.
Row 8
Repeat Row 4.
This brings another openwork row into the design and restores the lace rhythm.
Row 9
Repeat Row 5.
Rows 10–11
Repeat Row 5.
Row 12
Repeat Row 4.
After completing Row 12, the main triangular body has reached the stage where the finishing details can be added.

A Useful Row Checkpoint
Before moving into the finishing stage, review the row sequence:
- Row 1: Foundation around the ring
- Rows 2–3: Repeat Row 2
- Row 4: Lace row
- Row 5: Double crochet row
- Rows 6–7: Repeat Row 5
- Row 8: Repeat Row 4
- Row 9: Repeat Row 5
- Rows 10–11: Repeat Row 5
- Row 12: Repeat Row 4
Rows 4, 8, and 12 are the lace checkpoints. Rows 5, 6, 7, 9, 10, and 11 follow the Row 5 instruction. Keeping this sequence in mind makes it easier to navigate the project without accidentally adding or removing rows.
Workshop Stage Five: Making the First Tie
The first tie is created before the final shell stitch border. This is an important transition in the pattern.
Do not fasten off after Row 12.
With the yarn still attached to the project, chain 45.

Once the 45 chains have been made, skip the first chain. Slip stitch through the second chain and each chain across until you reach the first chain.
Then slip stitch into the DC from the last row to secure the tie.
This produces the first long adjustable end of the bandana. The yarn remains attached because the decorative border is worked next.
Workshop Stage Six: Creating the Shell Stitch Border
The shell border changes the character of the accessory once again. Instead of leaving the outer edge plain, the pattern uses groups of 7 DC to create decorative shells.
Row 13: Shell Stitch Border
Begin by slip stitching through the next 8 stitch before reaching the chain space from row 13.
Place 7 DC in this space. Go directly into the next space with a SC.
Then repeat the following sequence: place 7 DC into the next space, followed by a SC into the next space.
Continue this repeated shell-and-SC sequence until you reach the last two stitches before the chain-2 space at the top of the project.
Slip stitch through both of those stitches before placing 7 DC into the top space.

Now slip stitch through the next two stitches. Place a SC into the next space from Row 13.
Continue with the same sequence: 7 DC into the next space, then a SC into the next space. Repeat until you reach the last two stitches at the end of the row.
Slip stitch through the last two stitches.
Workshop Stage Seven: Completing the Second Tie
After the shell stitch border has been completed, create the second tie.
Chain 45. Skip the first chain, then slip stitch through the second chain and each chain across until you reach the first chain.
Slip stitch into the DC from the last row to secure the tie.
Once the second tie is attached, fasten off and tidy up all loose ends.
Why the Shell Border Works So Well
The final border provides a strong visual contrast to the openwork sections in the main body. The central triangle is defined by airy spaces, while the edge becomes more decorative through the repeated 7-DC shell groups.
Each shell creates a rounded scalloped effect. The SC stitches between the shells separate the larger stitch groups and help establish the repeated decorative rhythm.
For this reason, the border deserves the same attention as the main body. Even though it is the final row, it contributes significantly to the finished appearance of the accessory.
Tips for Maintaining an Even Triangle
The central chain-2 space is the most useful landmark when checking the shape of your work. Rows 2 and 3 repeatedly build around this space, and Row 4 continues the same central construction.
When turning your work, take a moment to identify the center before beginning the next row. This is especially helpful after working several repetitive rows because the growing fabric can make the central point less immediately obvious.
Another useful habit is to check the lace rows individually. Since Rows 4, 8, and 12 repeat the same instruction, they can act as visual checkpoints. If the three lace sections look structurally consistent, that is a useful indication that the repeated openwork sequence has been followed carefully.
Tips for Working the Chain Ties
The ties are simple, but they should be worked carefully because their construction affects how the finished accessory sits when worn.
Both ties use chain 45. After creating the chain, the pattern instructs you to skip the first chain and slip stitch through the second chain and each chain across.
Keep the chain relaxed enough to work the slip stitches comfortably. The goal is to follow the written sequence accurately rather than trying to make the chain unusually tight or loose.
The first tie is created before the shell border, while the second tie is created after the border. Remembering this difference prevents accidentally fastening off at the wrong point.
Exploring Different Colors
The original version uses Drops Muskat shade 30 Vanilla Yellow, which gives the bandana a soft, understated appearance. The source also notes that this design can be made in many different colors.
The openwork pattern makes the project particularly suitable for experimenting with color because the spaces allow the yarn itself to remain visually prominent.
The bandana can also be made in two colors. However, because the original written instructions do not prescribe a specific two-color sequence, the exact placement of alternate colors is not part of the supplied technical pattern.

Styling Ideas for the Finished Accessory
The adjustable ties make the Delicate Dream Bandana especially versatile. The accessory can be secured at the back of the head and adjusted according to the desired fit.
For a relaxed everyday look, wear the bandana with loose hair. The triangular lace shape adds a handmade detail without overwhelming the rest of the outfit.
For another option, combine the bandana with braids. The delicate openwork works particularly well with hairstyles that already have a soft, relaxed appearance.
A messy bun is another natural pairing. The ties can help position the bandana around the head while the triangular body adds a decorative layer to the hairstyle.
The lightweight lace structure also makes this project particularly appealing for warmer seasons.
Beginner Troubleshooting Guide
My First Rows Look Uneven
Check the stitches worked around the starting ring and review Rows 2 and 3 carefully. The central chain-2 space should remain identifiable as the project expands.
I Cannot Find the Center of the Triangle
Look for the chain-2 space at the top. This space is repeatedly used for the central 2 DC, chain 2, and 2 DC construction in the earlier rows.
My Lace Section Looks Too Closed
Review Row 4 and make sure the chain-1 and skip-1 sequence has been followed. The open spaces are intentionally created through this combination of chains, skipped stitches, and DC stitches.
The Border Does Not Have Clear Shells
Check the final border sequence and make sure each shell uses 7 DC in the designated space, followed by a SC in the next space.
I Accidentally Fastened Off After Row 12
The original pattern instructs you not to fasten off before making the first tie. If you are following the pattern from the beginning, keep the yarn attached after Row 12 so that the chain-45 tie and shell border can be worked continuously.
Finishing Checklist
- Complete Row 12.
- Keep the yarn attached.
- Chain 45 for the first tie.
- Skip the first chain.
- Slip stitch through the second and each chain across.
- Secure the tie to the DC from the last row.
- Work the Row 13 shell stitch border.
- Complete the shell sequence on both sides of the central top space.
- Slip stitch through the final two stitches.
- Chain 45 for the second tie.
- Slip stitch back along the tie.
- Secure the second tie to the DC from the last row.
- Fasten off.
- Tidy all loose ends.
Quick Reference for the Full Pattern
For convenient checking while crocheting, the complete row progression is summarized below.
- Ch 4 and sl st through the first chain to form a ring.
- Row 1: Ch 3 (= DC), 5 DC in ring; ch 2, 6 DC in ring.
- Row 2: Follow the central chain-2 construction with 2 DC, ch 2, 2 DC.
- Row 3: Repeat Row 2.
- Row 4: Work the chain-1, skip-1, DC lace sequence.
- Row 5: Work DC across, including previous chain spaces.
- Rows 6–7: Repeat Row 5.
- Row 8: Repeat Row 4.
- Row 9: Repeat Row 5.
- Rows 10–11: Repeat Row 5.
- Row 12: Repeat Row 4.
- First tie: Chain 45 and slip stitch back across the chain.
- Row 13: Work the shell stitch border.
- Second tie: Chain 45 and slip stitch back across the chain.
- Fasten off and tidy loose ends.
What Makes This Project Beginner Friendly?
The pattern contains repetition, which is useful when learning. Once the crocheter understands Row 4 and Row 5, much of the middle section consists of repeating those established instructions according to the specified row numbers.
The project also does not require complicated shaping techniques. The triangle grows through the repeated construction around the central chain-2 space. The final decorative border uses a clear repeated shell sequence.
At the same time, the project introduces techniques that can be useful in future crochet work. These include working into a starting ring, maintaining a central shaping point, creating openwork with chains and skipped stitches, making long crochet ties, and producing shell edging.
Keeping the Finished Bandana Looking Delicate
The character of this accessory comes from its combination of open spaces and decorative edging. When finishing the project, avoid allowing loose ends to become tangled with the lace sections or shell border.
Use the tapestry needle to tidy the loose ends after fastening off. A neat finishing stage helps preserve the clean appearance of the triangular shape and keeps the decorative edge clearly visible.
The original finished size is 9” x 16” (23 cm x 40,5 cm), excluding the ties on each side. The stated gauge is 4” (10 cm): 6 rows.
Frequently Asked Questions
Is this a quick crochet project?
The original description presents the bandana as a pretty and fast crochet accessory. Its relatively compact size and simple construction make it a practical project for crocheters who enjoy handmade accessories.
Can a beginner make this bandana?
Yes. The original pattern is rated easy/beginner. Familiarity with chain stitches, slip stitches, single crochet, and double crochet will make the instructions easier to follow.
What size crochet hook should I use?
The original pattern specifies a 4 mm crochet hook.
What yarn does the original design use?
The original design uses 1 skein of Drops Muskat in shade 30 Vanilla Yellow, or a preferred light 3/DK 100% cotton yarn.
What is the finished size?
The main bandana measures 9” x 16” (23 cm x 40,5 cm), excluding the ties on each side.
How many rows are in the main body?
The main body is worked through Row 12. Row 13 is the shell stitch border and is part of the finishing stage.
How are the ties made?
Each tie begins with chain 45. The first chain is skipped, and slip stitches are worked through the second chain and each chain across. The tie is then secured to the DC from the last row.
Does the pattern use US or UK crochet terminology?
The pattern uses US crochet terms, with British terms in brackets.
Final Thoughts on the Delicate Dream Bandana
The Crochet Delicate Dream Bandana is a charming project for anyone who enjoys wearable crochet with a vintage-inspired touch. Its design balances simple construction with enough decorative detail to make the finished accessory feel special.
The triangular body is built through a clear sequence of rows, with the central chain-2 space acting as an important shaping landmark. The lace rows introduce airiness, while the repeated double crochet rows provide a simple rhythm for the crocheter to follow.
The finishing details complete the look. Two chain-45 ties provide adjustability, and the shell stitch border creates the scalloped edge that gives the bandana its distinctive feminine character.
Whether you keep the original Vanilla Yellow color or choose another shade, the finished accessory offers plenty of styling possibilities. Wear it with loose hair, braids, or a messy bun, and enjoy the satisfaction of turning a skein of cotton yarn into a practical handmade piece.
Most importantly, take your time with the central shaping and lace rows. Once those sections become familiar, the rest of the project follows a comfortable rhythm. With careful attention to the original row sequence and finishing instructions, the result is a delicate crochet bandana that is both wearable and beautifully handmade.