
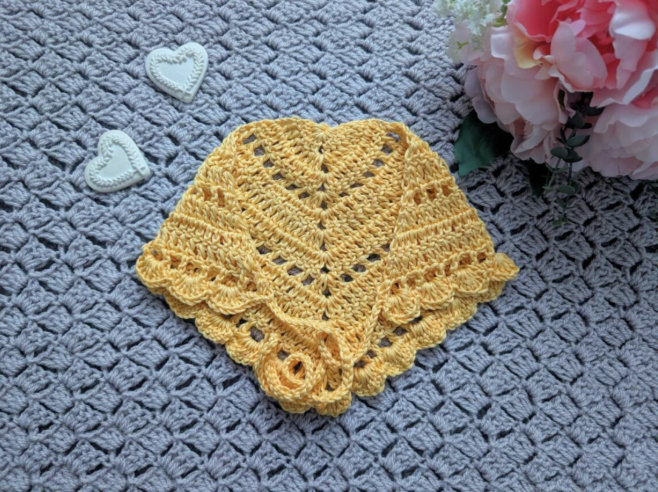

The Crochet Delicate Dream Bandana is a lovely project for crocheters who enjoy delicate texture, vintage-inspired details, and practical handmade accessories. Its triangular construction creates a graceful shape that sits beautifully around the head, while the long ties make it possible to adjust the fit. The finished design combines a simple center-point construction with open lace sections and a decorative scalloped shell-stitch border.
This pattern is rated easy and is worked using US crochet terminology, with British terminology provided in brackets. Although the finished accessory looks intricate, its construction is based on a manageable sequence of repeated rows. The most useful way to approach this project is to work with clear stitch checkpoints rather than rushing through the entire pattern at once.
Throughout this guide, the focus is on recognizing where you are in the pattern, checking the shape as it grows, understanding the transitions between solid and openwork rows, and finishing the two adjustable ties neatly. The technical instructions remain faithful to the original pattern, including the exact hook, yarn, gauge, measurements, row sequence, stitch placement, and tie construction.
Project at a Glance
The Delicate Dream Bandana is designed as a soft crochet head accessory with a triangular shape and decorative scalloped edging. It can be worn with loose hair, braids, or a messy bun, and its feminine appearance also makes it suitable for casual, festival, handmade, vintage, or more refined outfits.
The original version uses Drops Muskat shade 30 Vanilla Yellow, a light 3/DK 100% cotton yarn with a mercerized finish. The pattern can also be made with a preferred light 3/DK 100% cotton yarn. The original design demonstrates how a relatively small amount of yarn can create a visually detailed accessory through lace spacing and shell stitches.
- Skill level: Easy / Beginner
- Yarn: 1 skein Drops Muskat, shade 30 Vanilla Yellow, or preferred light 3/DK 100% cotton yarn
- Hook: 4 mm
- Gauge: 4 inches (10 cm): 6 rows
- Finished size excluding ties on each side: 9 inches x 16 inches (23 cm x 40.5 cm)
- Terminology: US crochet terms, with British terms in brackets
- Additional tools: Scissors and tapestry needle
Because this project depends on the shape expanding evenly from the center, stitch awareness is especially useful. Instead of treating every row as an isolated instruction, think of the project as a sequence of checkpoints: the opening ring, the first increases, the lace rows, the repeated solid rows, the final decorative border, and finally the ties.
Materials and Preparation
Before beginning, gather the yarn, 4 mm crochet hook, scissors, and tapestry needle. The original yarn is Drops Muskat shade 30 Vanilla Yellow. It is a light 3/DK 100% cotton yarn, and the original pattern uses 1 skein.
Choosing the specified yarn weight and hook helps you work toward the stated gauge and finished measurements. If you choose a different yarn, keep it within the stated light 3/DK 100% cotton category rather than changing the project construction.
The stated gauge is 4 inches (10 cm): 6 rows. Gauge is useful as a checkpoint before you assume your finished bandana will match the stated size. Remember that crochet tension can vary between people, so working consistently is more important than trying to force every stitch to look identical to someone else’s work.
Abbreviations to Keep Beside You
The pattern uses a small collection of common crochet abbreviations. Keeping these meanings available makes the row instructions much easier to follow.
- Ch: Chain
- St: Stitch
- Sl st: Slip stitch
- Sp: Space
- SC: Single Crochet (UK Double Crochet)
- DC: Double Crochet (UK Treble Crochet)
- EOR: End of row
One important point is that the original pattern is written in US terminology. Therefore, DC means Double Crochet in this pattern, while the British equivalent is Treble Crochet. SC is Single Crochet, with Double Crochet given as the British equivalent.
Checkpoint 1: Creating the Foundation Ring
Start by making a slip knot. Then chain 4 and slip stitch through the first chain to form a ring.
This small ring becomes the center from which the triangular bandana grows. At this stage, do not worry about the final appearance. The important checkpoint is simply confirming that your 4-chain foundation has been joined into a ring securely.
A neat center ring gives the first row a stable starting point. Keep your slip stitch firm enough to close the ring, but avoid pulling so tightly that it becomes difficult to work the stitches into it.
Rows 1–3: Building the Triangle

Row 1 begins with chain 3, which counts as a DC. Work 5 DC into the ring, then chain 2, followed by 6 DC into the ring.
The chain-2 space created in the center is important because it becomes the top point of the growing triangle. Treat this space as a visual landmark throughout the pattern. As you continue, the increases around this center space are what help the fabric expand into its characteristic triangular form.
For Row 2, chain 3, which counts as a DC, and turn. Place a DC into the first stitch, creating 2 DC together in one stitch. Continue with a DC into each stitch across until reaching the chain-2 space at the top.
In the chain-2 space, work 2 DC, chain 2, and 2 DC. Continue with a DC into each stitch across until the end of the row, placing 2 DC into the last stitch.
Row 3 repeats Row 2.
The best checkpoint here is the center chain-2 space. If you are unsure where the middle of the project is, look for this space. It remains a useful reference point as the triangular shape develops.
Shape Check: What to Watch for After Row 3
At the end of Row 3, the fabric should already show the beginnings of a symmetrical triangular form. The center point should remain identifiable, and the two sides should expand outward from it.
This is a good moment to pause and compare both sides visually. You do not need to stretch the fabric aggressively. Simply lay it flat and check that the center is easy to locate and that the rows have been turned consistently.
If the shape looks uneven, check the previous rows before continuing. In particular, review the first stitch, the center chain-2 space, and the last stitch. These are important locations in the increase structure.
Rows 4 and 5: Introducing Open Lace Texture

Row 4 changes the visual rhythm of the project. Begin with chain 3, which counts as a DC, then place a DC into the same first stitch. Turn.
Work the following sequence: chain 1, skip 1 stitch, DC. Continue this sequence until the penultimate stitch before the chain-2 space at the top. Skip the last stitch, then place 2 DC, chain 2, and 2 DC in the chain-2 space.
On the opposite side, skip 1 stitch and work DC in the next stitch, followed by chain 1, skip 1 stitch, and DC. Continue this sequence until the last stitch. Place 2 DC into the last stitch.
The important checkpoint in this row is the repeating chain-1 and skipped-stitch rhythm. These openings create the lace effect that becomes more visible as the bandana grows.
Row 5 begins with chain 3, turn, and another DC into the first stitch. Then place a DC into the next stitch until EOR, including the chain spaces from the previous row.
Rows 6 and 7 repeat Row 5.
When working into chain spaces from the previous row, pay attention to the wording of the pattern rather than trying to reinterpret the structure. The purpose of these rows is to work DC stitches through the established openwork while maintaining the expanding triangular construction.
Rows 8–12: Repeating the Established Rhythm
Row 8 repeats Row 4. This brings the open lace structure back into the design.
Row 9 repeats Row 5.
Rows 10–11 repeat Row 5.
Row 12 repeats Row 4.
At this point, the pattern has a clear alternating rhythm. Row 4 establishes the open chain-and-skip texture, while Row 5 creates a more solid DC row by working into the stitches and chain spaces from the preceding row.
For a beginner, this is one of the most useful places to stop thinking about the project as a long list of instructions. Instead, recognize the repeated pattern sequence:
- Row 4: Open lace structure
- Row 5: DC row
- Rows 6–7: Repeat Row 5
- Row 8: Repeat Row 4
- Row 9: Repeat Row 5
- Rows 10–11: Repeat Row 5
- Row 12: Repeat Row 4
Do not add or remove rows from this sequence. The row numbers are part of the original construction and should remain exactly as written.
Checkpoint 2: Evaluating the Main Triangle
After Row 12, pause before beginning the tie and final shell-stitch border. Lay the piece flat and inspect its proportions. The stated finished size, excluding the ties on each side, is 9 inches x 16 inches (23 cm x 40.5 cm).
This is not a replacement for the pattern’s instructions; it is simply a useful visual checkpoint. If the fabric is noticeably tighter, looser, narrower, or wider than expected, look at your tension and gauge rather than changing the stitch sequence.
Also check that the central chain-2 space remains easy to identify. A clearly defined center helps when you begin the final border because the shell edging is worked around the existing spaces and stitches.
Creating the First Adjustable Tie

Do not fasten off after Row 12. The first tie is created before the final shell-stitch border.
Chain 45. Skip the first chain, then slip stitch through the second chain and each chain across until reaching the first chain. Slip stitch into the DC from the last row to secure the tie.
This is a useful point to slow down because the tie is long and narrow compared with the main triangular section. Keep the chain tension consistent so that the tie remains flexible and easy to use.
The purpose of the tie is practical as well as decorative. Once the second tie is completed at the opposite side, the two lengths can be used to adjust how the bandana is worn.
Row 13: The Decorative Shell-Stitch Border

Row 13 is where the delicate triangular fabric receives its most decorative finishing detail. The border uses groups of 7 DC to form shell-like scallops, separated by SC stitches and supported by slip stitches in selected areas.
Begin by slip stitching through the next; 8 stitch before reaching the ch space from Row 13. Place 7 DC in this space, then go directly into the next space with SC.
From there, repeat the following sequence: place 7 DC into the next space, then SC into the next space. Continue this sequence from the asterisk until reaching the last two stitches before the chain-2 space at the top.
Slip stitch through both stitches before placing 7 DC into the top space.
Then slip stitch through the next two stitches and place SC into the next space from Row 13.
Repeat the sequence of 7 DC into the next space, followed by SC into the next space, until reaching the last two stitches at the end of the row.
Slip stitch through the last two stitches, then create the second tie.
The wording around the Row 13 chain space is retained from the original source. When working the border, follow the original placement instructions rather than trying to alter the row number or reinterpret the pattern.
Why the Shell Border Matters
The shell border is more than a decorative extra. It changes the character of the accessory by adding repeated scallops along the edge. The 7-DC groups create fullness, while the SC stitches between them separate the shells and establish the rhythm of the edging.
Because the shells are worked into spaces, it is helpful to keep your attention on spaces rather than only counting solid stitches. This is especially important when transitioning from the main body to the border.
If a shell appears too close to the previous shell, pause and check which space the pattern specifies. Avoid adding an extra shell simply because the edge looks visually uneven while you are still working. Follow the written sequence first.
Creating the Second Tie
After completing the decorative edging, create the second tie.
Chain 45. Skip the first chain, then slip stitch through the second chain and each chain across until reaching the first chain. Slip stitch into the DC from the last row to secure the tie.
Once the second tie is secured, fasten off and tidy the loose ends.
The two ties should provide the adjustable finishing feature described in the original design. Because both ties use the same chain-45 construction, keeping your chain tension consistent helps the finished accessory look balanced from side to side.
Final Construction Check
Before considering the project complete, use a simple finishing checklist.
- Confirm that the bandana follows the triangular shape.
- Check that the stated finished size excluding the ties is 9 inches x 16 inches (23 cm x 40.5 cm).
- Confirm that both ties contain the specified chain-45 construction.
- Check that each tie is secured as instructed.
- Inspect the shell border for complete 7-DC shell groups and SC sections according to the pattern.
- Make sure all loose ends have been tidied with the tapestry needle.
- Check that the fabric has not been unintentionally stretched or distorted during finishing.
Common Beginner Checkpoints and Troubleshooting
The triangle does not look symmetrical. First, review the turning and the first and last stitches of the affected rows. The pattern uses increases at important edge locations, so accidentally missing one can affect the overall shape.
I cannot find the center. Look for the chain-2 space created at the center of Row 1 and used again in subsequent rows. This space is one of the most important landmarks in the construction.
The lace openings look inconsistent. Review Row 4 carefully. The open structure depends on the sequence of chain 1, skip 1 stitch, and DC. Keeping the sequence consistent helps the spaces line up visually.
The fabric looks too dense in the solid sections. Remember that Rows 5, 6, 7, 9, 10, and 11 repeat the DC-based instruction. These rows intentionally contrast with the openwork created by Row 4.
The shell edging does not look even while I am working. Do not immediately change the pattern. Recheck the spaces where the 7 DC shells and SC stitches are placed. The border has a specific sequence that should be followed as written.
The ties look different lengths. Check that both ties were made with chain 45 and that your chain tension was reasonably consistent. Differences in tension can affect the visual length even when the same number of chains is used.
Finishing Without Losing the Delicate Look
The appeal of this project comes partly from its light and delicate character. Finishing should therefore be gentle. Avoid pulling aggressively on the scalloped edge or the narrow ties. Instead, use your fingers to arrange the fabric naturally.
The tapestry needle is used to tidy loose ends after fastening off. Work the ends in securely without creating bulky areas that could distract from the lace texture.
Because the bandana is made from cotton, handling the finished piece carefully will help preserve its handmade appearance. The goal is a neat finish that allows the triangle, lace sections, scalloped border, and ties to remain the visual focus.
Styling the Finished Bandana

The finished accessory is especially suited to relaxed hairstyles because the adjustable ties make it practical to position around the head. It can complement loose hair, braids, and messy buns while adding a vintage-inspired handmade detail.
The delicate lace construction also makes the accessory adaptable to different personal styles. A soft color can emphasize the romantic appearance, while a stronger color can make the crochet texture more noticeable.
The original project uses Vanilla Yellow, but the source notes that the accessory can be crocheted in different colors. The construction itself remains the same when changing color; only the yarn color choice changes.

Visualizing the Lace Progression
The finished bandana becomes easier to understand when you view it as a progression of textures. The beginning establishes the triangle. The repeated DC rows strengthen the body of the fabric, while the repeated Row 4 sections introduce the openwork. The final Row 13 adds the scalloped shell border.
This combination is what gives the accessory its delicate appearance without requiring a complicated collection of stitches. The pattern relies on familiar crochet movements—chains, double crochet, single crochet, skipped stitches, spaces, and slip stitches—but places them in a carefully arranged sequence.
For beginners, this is an excellent reminder that visual complexity does not always mean technical complexity. Careful placement and consistent tension can create an elaborate-looking result from straightforward stitches.
Quick Row Reference
- Foundation: Slip knot; chain 4; slip stitch through first chain to form a ring.
- Row 1: Ch 3 (= DC), 5 DC in ring; ch 2; 6 DC in ring.
- Row 2: Ch 3 (= DC), turn; 2 DC together in first stitch; DC across; 2 DC, ch 2, 2 DC in top space; DC across; 2 DC in last stitch.
- Row 3: Repeat Row 2.
- Row 4: Open lace sequence with ch 1, skipped stitches, DC, and the central 2 DC, ch 2, 2 DC.
- Row 5: Ch 3, turn, another DC into first stitch; DC across, including chain spaces from the previous row.
- Rows 6–7: Repeat Row 5.
- Row 8: Repeat Row 4.
- Row 9: Repeat Row 5.
- Rows 10–11: Repeat Row 5.
- Row 12: Repeat Row 4.
- First tie: Do not fasten off; chain 45; skip first chain; slip stitch across the chain and secure to the DC from the last row.
- Row 13: Decorative shell-stitch border using 7 DC shells, SC, and slip stitches according to the original instructions.
- Second tie: Chain 45; skip first chain; slip stitch through the remaining chains and secure to the DC from the last row; fasten off and tidy loose ends.
Beginner Success Checklist
Use this checklist as you work through the project rather than waiting until the end to discover a missed section.
- Have you prepared the specified light 3/DK 100% cotton yarn and 4 mm hook?
- Have you checked the stated gauge of 4 inches (10 cm): 6 rows?
- Did you form the starting ring with chain 4 and a slip stitch through the first chain?
- Did you identify the center chain-2 space?
- Did you repeat Row 2 for Row 3?
- Did you follow the openwork sequence correctly in Row 4?
- Did you repeat Row 5 for Rows 6–7?
- Did you repeat Row 4 for Row 8?
- Did you repeat Row 5 for Row 9?
- Did you repeat Row 5 for Rows 10–11?
- Did you repeat Row 4 for Row 12?
- Did you make the first tie with chain 45 before beginning the final shell-stitch border?
- Did you follow the shell and SC placement for Row 13 exactly?
- Did you make the second tie with chain 45?
- Did you fasten off and tidy the loose ends?
Frequently Asked Questions
Is this bandana suitable for beginners?
Yes. The original pattern is rated easy/beginner. The most helpful strategy is to work one row at a time and use the center chain-2 space and the row sequence as checkpoints.
What yarn is used in the original pattern?
The original pattern uses 1 skein of Drops Muskat shade 30 Vanilla Yellow. It is a light 3/DK 100% cotton yarn. The pattern also allows a preferred light 3/DK 100% cotton yarn.
What crochet hook size is required?
The specified hook size is 4 mm.
What is the gauge?
The stated gauge is 4 inches (10 cm): 6 rows.
What is the finished size?
The finished size excluding the ties on each side is 9 inches x 16 inches (23 cm x 40.5 cm).
How long are the ties?
Each tie begins with a chain of 45. The first tie is made before the final shell-stitch border, and the second tie is made after completing the border.
Does the pattern use US or UK crochet terms?
The pattern uses US crochet terminology, with British terms provided in brackets. In particular, DC means Double Crochet, with UK Treble Crochet given as the equivalent, while SC means Single Crochet, with UK Double Crochet given as the equivalent.
Can the bandana be made in another color?
Yes. The original design can be crocheted in different colors, including two-color possibilities. The original yarn color is Drops Muskat shade 30 Vanilla Yellow.
When should I fasten off?
Do not fasten off after Row 12 because the first tie is made directly from the working yarn. After the second tie is secured following Row 13, fasten off and tidy the loose ends.
A Delicate Project Built from Clear Checkpoints

The Crochet Delicate Dream Bandana is a satisfying project because its construction can be broken into recognizable stages. The opening ring establishes the center, Rows 1–3 build the first part of the triangle, Row 4 introduces lace texture, and the repeated DC rows develop the body. Rows 8 and 12 return to the open lace structure, creating visual continuity across the design.
The final section transforms the simple triangular fabric into a finished accessory. The first chain-45 tie establishes one adjustable side, Row 13 adds the shell-stitch border, and the second chain-45 tie completes the opposite side. Once the loose ends are tidied, the bandana is ready to wear.
The most important lesson for a beginner is not to rush. Use the center space as a landmark, respect the row numbers, follow the repeated sequences exactly, and check the shape at natural stopping points. With those habits, the delicate appearance of the finished accessory becomes much less intimidating to create.
Whether you make the original Vanilla Yellow version or explore another color, the same pattern structure provides a graceful handmade accessory with vintage-inspired character. The combination of triangular shaping, open lace, scalloped shells, and adjustable ties gives the Delicate Dream Bandana its distinctive feminine finish while keeping the actual construction approachable for an easy-level crochet project.