
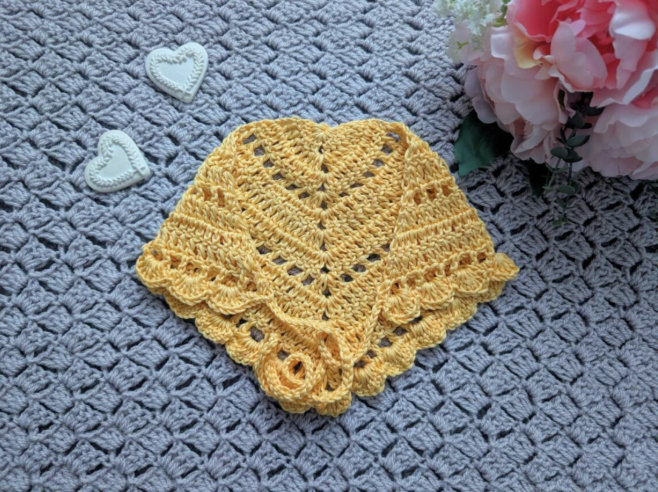

There is something especially charming about a handmade crochet accessory that looks delicate without requiring an intimidating level of technique. The Crochet Delicate Dream Bandana is a beautiful example. Its triangular silhouette, open lace sections, scalloped border, and adjustable ties create a vintage-inspired accessory that can become a practical part of an everyday wardrobe.
This beginner masterclass takes you through the project from preparation to finishing, with special attention to the details that help the finished bandana look neat and balanced. Rather than treating the pattern as one long sequence, you can approach it as a collection of small stages: establish the center, build the triangle, introduce the lace sections, complete the repeated rows, create the first tie, work the decorative border, and finish with the second tie.
The original pattern is rated easy and uses US crochet terminology, with British terms in brackets. The instructions below preserve the original technical information, including the specified yarn, hook, gauge, finished measurements, row numbers, stitch placement, repeats, and tie construction.
What Makes This Bandana Special?
The Delicate Dream Bandana combines several simple crochet elements to create a more elaborate visual effect. The body begins with a small ring and gradually expands into a triangle. Solid double crochet sections alternate with openwork rows, giving the fabric both structure and lightness.
The decorative finish is particularly distinctive. Row 13 creates a shell-stitch border using groups of 7 DC separated by SC stitches and supported by slip stitches in specified areas. The result is a scalloped edge that gives the accessory its soft, feminine character.
The two adjustable ties make the finished piece practical. Each tie is made from chain 45, with the first tie worked before the final shell-stitch border and the second tie worked after the border.
Materials You Need Before Starting
Gather everything before beginning so that you can concentrate on your stitch placement rather than stopping midway through the project.
- Yarn: 1 skein Drops Muskat shade 30 Vanilla Yellow
- Alternative yarn: Preferred light 3/DK 100% cotton yarn
- Hook: 4 mm
- Scissors
- Tapestry needle
The original yarn is a light 3/DK mercerized cotton. Drops Muskat shade 30 Vanilla Yellow provides the original soft yellow color shown in the pattern. The source also notes that the accessory can be crocheted in different colors, making this a useful design for experimenting with your own palette while keeping the construction unchanged.
Gauge and Finished Measurements
The stated gauge is 4 inches (10 cm): 6 rows. Gauge provides a useful reference for understanding the intended scale of the project and can help explain why two crocheters using the same written instructions might produce slightly different dimensions if their tension varies.
The finished size, excluding the ties on each side, is 9 inches x 16 inches (23 cm x 40.5 cm).
These measurements belong to the original pattern and should not be altered as part of the instructions. If your tension differs, use the gauge as a reference rather than changing the row sequence or inventing additional rows.
Pattern Language: US Crochet Terms
The pattern uses US crochet terminology, with British equivalents shown in brackets. This distinction is important because the same abbreviation can refer to different stitches depending on the terminology system.
- Ch: Chain
- St: Stitch
- Sl st: Slip stitch
- Sp: Space
- SC: Single Crochet (UK Double Crochet)
- DC: Double Crochet (UK Treble Crochet)
- EOR: End of row
Keeping this list nearby can make the repeated sections easier to follow, especially when moving between DC rows and the decorative Row 13 border.
Stage One: Form the Starting Ring
Begin with a slip knot.
Chain 4, then slip stitch through the first chain to form a ring.
This small ring is the starting point for the entire triangular piece. Take a moment to make sure the ring is secure and that you can comfortably insert your hook into it for the first row.
Because the first row is worked directly into this ring, keeping the center open enough for your hook will make the beginning much easier.
Stage Two: Establish the Center with Row 1
For Row 1, chain 3, which counts as a DC. Work 5 DC in the ring. Chain 2, then work 6 DC in the ring.
The chain-2 section becomes a central landmark for the design. It is especially useful to remember this space because later rows repeatedly build around the chain-2 space at the top.
At this stage, the project will still be small. The triangular shape becomes much more obvious as the increases are added in the following rows.
Stage Three: Build the First Triangle with Rows 2 and 3
For Row 2, begin with chain 3, which counts as a DC, and turn. Work a DC into the first stitch, giving you 2 DC together in one stitch.
Continue with DC into each stitch across until you reach the chain-2 space at the top. In this chain-2 space, work 2 DC, chain 2, and 2 DC.
Continue with DC into each stitch across until EOR, placing 2 DC into the last stitch.
Row 3 repeats Row 2.
The repeated increase pattern is the foundation of the triangle. One of the best beginner habits here is to identify the first stitch, central chain-2 space, and last stitch as three important landmarks. These locations help you understand where the increases are happening.

Beginner Masterclass Tip: Follow the Center
When crochet fabric becomes wider, beginners sometimes lose track of where the center is. This pattern gives you a useful built-in landmark: the chain-2 space at the top.
As you work, keep checking that this space remains easy to identify. It is not necessary to mark it unless you personally find a stitch marker helpful. Simply understanding that the chain-2 space is the central point can make the later rows much easier to visualize.
When the project is laid flat, the center space should help you see the two sides of the triangle. If one side seems noticeably different from the other, review the relevant row before continuing.
Stage Four: Introduce the Lace in Row 4

Row 4 introduces a noticeably different texture.
Begin with chain 3, which counts as a DC. Place a DC into the same first stitch and turn.
Then work the sequence of chain 1, skip 1 stitch, DC until reaching the penultimate stitch before the chain-2 space at the top. Skip the last stitch.
In the chain-2 space, place 2 DC, chain 2, and 2 DC.
On the opposite side, skip 1 stitch, then work DC in the next stitch, followed by chain 1, skip 1 stitch, and DC. Continue until the last stitch. Place 2 DC into the last stitch.
The repeated chain-and-skip structure creates open spaces in the fabric. This is one of the defining visual features of the bandana.
Stage Five: Strengthen the Fabric with Row 5
For Row 5, chain 3, turn, and place another DC into the first stitch.
Then place DC into the next stitch until EOR, including the chain spaces from the previous row.
This instruction is important because the previous row deliberately created chain spaces. Row 5 works across the established structure, creating a different visual density from Row 4.
Rows 6–7 repeat Row 5.
Rather than trying to memorize the entire pattern, treat Row 5 as the solid companion to Row 4. This mental distinction can help you remember the overall rhythm without changing any of the original instructions.
The Middle Pattern Rhythm: Rows 6–12
Once Row 5 is understood, the middle section becomes much more manageable.
- Row 6: Repeat Row 5.
- Row 7: Repeat Row 5.
- Row 8: Repeat Row 4.
- Row 9: Repeat Row 5.
- Row 10: Repeat Row 5.
- Row 11: Repeat Row 5.
- Row 12: Repeat Row 4.
This sequence creates the visual balance between open and more solid sections. The repeated Row 4 sections add lace texture, while the Row 5 repeats build the body between them.
Do not add or remove rows. The original pattern specifically calls for Rows 6–7 to repeat Row 5, Row 8 to repeat Row 4, Row 9 to repeat Row 5, Rows 10–11 to repeat Row 5, and Row 12 to repeat Row 4.
Checkpoint: Inspect the Main Fabric Before the Border
After completing Row 12, pause before starting the tie and border.
This is an excellent time to place the piece on a flat surface and look at the overall structure. The triangle should now be clearly recognizable, and the lace sections should create a decorative rhythm across the body.
Compare the shape visually from one side to the other. Check the central chain-2 area, the outer edges, and the spacing created by the openwork rows.
The stated finished body size, excluding the ties on each side, is 9 inches x 16 inches (23 cm x 40.5 cm). Use that measurement as a reference point for the original design, while remembering that crochet tension can affect the appearance of the fabric.
Stage Six: Create the First Tie

Do not fasten off.
Chain 45. Skip the first chain, then slip stitch through the second chain and each chain across until reaching the first chain. Slip stitch the DC from the last row to secure the tie.
This narrow chain forms one side of the adjustable fastening. Keep your tension reasonably consistent while making the 45 chains so the tie has a neat and flexible appearance.
It can be helpful to count the chain carefully rather than estimating its length visually. The number 45 is part of the original construction and should remain unchanged.
Stage Seven: Complete the Decorative Row 13

The final border is the most decorative section of the pattern.
Begin by slip stitching through the next; 8 stitch before reaching the ch space from row 13.
Place 7 DC in this space, then go directly into the next space with SC.
Continue by placing 7 DC into the next space, then SC into the next space. Repeat from the asterisk until reaching the last two stitches before the chain-2 space at the top.
Slip stitch through both stitches before placing 7 DC into the top space.
Then slip stitch through the next two stitches and place SC into the next space from Row 13.
Continue the sequence of 7 DC into the next space followed by SC into the next space until reaching the last two stitches at the end of the row.
Slip stitch through the last two stitches, then create the second tie.
The wording concerning the chain space and Row 13 is retained from the original source. It should be followed as written rather than silently corrected or replaced with a different stitch sequence.
Understanding the Shell Stitch Pattern
The repeated groups of 7 DC are what create the scalloped appearance of the border. Each shell has visual fullness because seven double crochets are worked into the designated space.
The SC stitches separate these groups, giving the border a repeating rhythm. The slip stitches near the specified edge and center locations help transition the edging through the required areas.
When working this section, focus on the spaces specified by the pattern. The body of the bandana has already established a combination of stitches and spaces, and the border uses those spaces as locations for the decorative shells.
Stage Eight: Finish with the Second Tie
After completing the shell-stitch border, create the second tie.
Chain 45. Skip the first chain, then slip stitch through the second chain and each chain across until reaching the first chain. Slip stitch the DC from the last row to secure the tie.
Finally, fasten off and tidy the loose ends.
Both ties therefore use the same chain-45 construction. This gives the finished accessory its adjustable character and creates a balanced finish on both sides.
Finishing Guide: Making the Bandana Look Polished

Once the second tie is complete, inspect the entire accessory before putting it away or styling it.
Start by checking the loose ends. Use the tapestry needle to tidy them so that they do not distract from the lace texture.
Next, look along the shell border. The scalloped edge should be visually continuous, with the 7-DC shells and SC sections following the original sequence.
Finally, gently arrange the triangular fabric so that the center and edges lie naturally. The goal is not to force the fabric into an artificial shape but to allow the crochet structure to show clearly.
Common Mistakes to Avoid
Changing the Hook Size to Make the Project Grow Faster
The specified hook is 4 mm. Changing the hook can affect tension, gauge, and finished measurements. If you want to reproduce the original project as closely as possible, work with the specified hook rather than changing it to compensate for difficulty.
Changing the Yarn Weight
The original yarn is light 3/DK 100% cotton. Substituting a significantly different yarn weight can change the proportions and texture of the finished accessory. If substituting yarn, the source specifically allows a preferred light 3/DK 100% cotton yarn.
Losing Track of the Center Space
The chain-2 space at the center is one of the most useful landmarks in the entire pattern. Keep it in mind during the increase rows and while working the border.
Skipping a Repeated Row
The pattern contains several repeated rows, so it is easy to accidentally move ahead. Keep a written checklist and mark each completed row. The exact sequence is part of the finished shape.
Adding Extra Shells
The border may look tempting to improvise, but the original design uses specific spaces for its 7-DC shells and SC stitches. Follow the stated sequence instead of adding decorative shells based on appearance alone.
Forgetting the First Tie
Do not fasten off after Row 12. The first tie is created before the final shell-stitch border. If you fasten off too early, the construction will no longer follow the original instructions.
How to Keep Your Crochet Tension Consistent
Consistent tension is especially useful in a project that combines openwork with solid rows. If your chain stitches are extremely tight while your DC stitches are loose, the lace openings may look different from one another.
Try to hold the hook and yarn comfortably rather than gripping them tightly. When making the 45-chain ties, use a similar level of tension from the beginning of the chain to the end.
Consistency also helps the two sides of the finished accessory look balanced. You do not need to force every stitch to be identical, but a steady rhythm can make the final result noticeably neater.
Color Ideas Without Changing the Construction

The original pattern uses Drops Muskat shade 30 Vanilla Yellow, but the source notes that the accessory can be crocheted in many different colors, including two-color possibilities.
Color changes can completely alter the mood of a small accessory. A soft neutral or pastel can emphasize its delicate vintage character, while a deeper shade can make the lace and scalloped edge more prominent.
If you choose a different color, keep the original technical construction intact. Color choice can change the visual effect without requiring changes to the row sequence, stitch counts, hook size, or measurements.
Quick Reference: Complete Construction
- Beginning: Slip knot; chain 4; slip stitch through the first chain to form a ring.
- Row 1: Ch 3 (= DC), 5 DC in ring; ch 2; 6 DC in ring.
- Row 2: Ch 3 (= DC), turn; DC in first stitch; DC across; 2 DC, ch 2, 2 DC in top ch-2 space; DC across; 2 DC in last stitch.
- Row 3: Repeat Row 2.
- Row 4: Ch 3 (= DC), DC in same first stitch; open chain-1 and skipped-stitch sequence; central 2 DC, ch 2, 2 DC; repeat the lace structure to the final 2 DC.
- Row 5: Ch 3, turn, another DC in first stitch; DC across, including previous chain spaces.
- Rows 6–7: Repeat Row 5.
- Row 8: Repeat Row 4.
- Row 9: Repeat Row 5.
- Rows 10–11: Repeat Row 5.
- Row 12: Repeat Row 4.
- First tie: Do not fasten off; chain 45; skip first chain; slip stitch through the second and each chain across; secure to the DC from the last row.
- Row 13: Work the shell-stitch border using 7 DC groups, SC stitches, and slip stitches according to the original instructions.
- Second tie: Chain 45; skip the first chain; slip stitch through the second and each chain across; secure to the DC from the last row; fasten off and tidy loose ends.
Final Measurement and Quality Check
Before calling the project finished, compare the piece with the original stated specifications.
- Hook: 4 mm
- Gauge: 4 inches (10 cm): 6 rows
- Finished size excluding ties: 9 inches x 16 inches (23 cm x 40.5 cm)
- First tie: Chain 45
- Second tie: Chain 45
- Original yarn: 1 skein Drops Muskat shade 30 Vanilla Yellow
- Yarn category: Light 3/DK 100% cotton
These checkpoints are especially helpful if you are making the project as a gift. They allow you to review the original specifications without changing the actual instructions.
Beginner FAQ
Is the Delicate Dream Bandana difficult to crochet?
The original pattern is rated easy/beginner. The project uses familiar stitches, but careful attention is useful because the construction alternates between solid and open sections and finishes with a detailed shell border.
What size hook does the pattern use?
The pattern uses a 4 mm crochet hook.
How much yarn is needed?
The original pattern uses 1 skein of Drops Muskat shade 30 Vanilla Yellow. It also allows a preferred light 3/DK 100% cotton yarn.
What is the finished body size?
Excluding the ties on each side, the finished size is 9 inches x 16 inches (23 cm x 40.5 cm).
What does DC mean in this pattern?
DC means Double Crochet because the pattern uses US crochet terminology. The British equivalent listed in the source is Treble Crochet.
What does SC mean?
SC means Single Crochet in US terminology. The British equivalent listed in the source is Double Crochet.
Can I make this bandana in another color?
Yes. The source specifically notes that the accessory can be crocheted in many different colors, including two-color possibilities.
When do I make the ties?
The first tie is made after Row 12 and before the final shell-stitch border. The second tie is made after completing Row 13.
Should I fasten off after Row 12?
No. The original instructions specifically say not to fasten off because the first chain-45 tie is made directly before the final shell-stitch border.
What makes the border look scalloped?
The border uses repeated groups of 7 DC worked into specified spaces, with SC stitches between the shell groups. This creates the decorative scalloped appearance.
Styling the Finished Accessory
The finished Delicate Dream Bandana is designed to be versatile. Its adjustable ties make it suitable for different hairstyles and ways of wearing it. Try it with loose hair for a relaxed handmade look, with braids for a more decorative style, or with a messy bun when you want a small vintage-inspired detail around the head.
The triangular shape also gives the accessory a graceful silhouette. The lace sections allow the crochet texture to remain visible, while the scalloped border adds a soft finishing line.
Because the original design uses a warm Vanilla Yellow color, it has a particularly gentle handmade appearance. Choosing another color can make the same construction feel completely different without changing the underlying pattern.
Why This Project Works Well as a Handmade Gift
A crochet bandana is a practical gift because it combines decoration with everyday use. It is also small enough to be approachable as a handmade project while still containing enough stitch variety to feel special.
The adjustable ties make the design more flexible than a fixed-size headband. The lace sections provide visual interest, and the shell border gives the finished item a recognizable handmade signature.
For someone learning crochet, completing this project can also build confidence with several important skills: working into a foundation ring, turning rows, increasing at specific points, reading chain spaces, repeating pattern sections, creating ties, and finishing with a decorative border.
Final Masterclass Checklist
- Prepare 1 skein of Drops Muskat shade 30 Vanilla Yellow or a preferred light 3/DK 100% cotton yarn.
- Use the specified 4 mm hook.
- Keep the US terminology abbreviations available while working.
- Form the chain-4 starting ring correctly.
- Complete Row 1 exactly as written.
- Repeat Row 2 for Row 3.
- Work Row 4’s open lace structure carefully.
- Repeat Row 5 for Rows 6–7.
- Repeat Row 4 for Row 8.
- Repeat Row 5 for Row 9.
- Repeat Row 5 for Rows 10–11.
- Repeat Row 4 for Row 12.
- Do not fasten off after Row 12.
- Create the first chain-45 tie.
- Complete Row 13 using the specified shell-stitch border.
- Create the second chain-45 tie.
- Fasten off.
- Tidy the loose ends with a tapestry needle.
- Check the finished body measurements and overall shape.
- Arrange the finished bandana gently before styling or gifting.
Final Thoughts

The Crochet Delicate Dream Bandana is a wonderful example of how straightforward crochet techniques can be combined to produce an elegant finished accessory. The construction starts with a simple ring, expands through carefully placed increases, introduces lace through chain spaces and skipped stitches, and finishes with a decorative shell border and two adjustable ties.
For beginners, the key is to work methodically. Keep the center chain-2 space in mind, track each row, respect the repeated sections, and avoid changing the technical instructions when the fabric looks different from what you expected. The pattern is designed around a specific sequence, and each section contributes to the final shape.
The finished result is feminine, delicate, and versatile. The original Vanilla Yellow version has a soft vintage character, while different colors can give the same design a completely new personality. Whether worn with loose hair, braids, or a messy bun, the adjustable bandana offers a practical way to add handmade crochet detail to an outfit.
Most importantly, this project demonstrates that an attractive lace accessory does not have to require an advanced pattern. With the correct materials, careful stitch placement, and a little patience during the border and ties, a beginner can work through the construction one checkpoint at a time and finish with a beautiful Crochet Delicate Dream Bandana.