
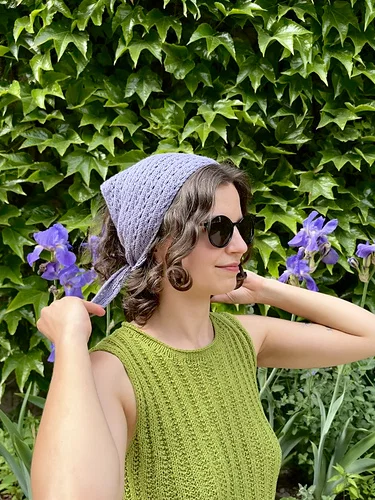
The Garden Vines Bandana is a delicate triangular knitting project designed by Gerda Wolf of My Knit Projects. It combines lace rib texture, eyelets, directional increases, carefully planned decreases, and a neat I-cord-style edge into a compact accessory that can be worn in several ways.
The construction is especially satisfying because the project begins at a single tip with only 5 stitches. The fabric gradually grows as one stitch is added on every right-side row, creating the triangular body. After the desired width is reached, the shaping reverses through a decrease sequence until the opposite tip is completed.
This guide follows the supplied Garden Vines Bandana pattern and keeps its technical information, measurements, stitch terminology, row numbering, chart transitions, and shaping instructions intact.
Garden Vines Bandana Project Overview
The pattern is written as a one-size design with two options. Option A is the larger bandana, while Option B creates a smaller scarf. Both versions use the same basic triangular construction, but they stop increasing at different points.
- Designer: Gerda Wolf / My Knit Projects
- Pattern: Garden Vines Bandana Ver 1.3
- Size: One size
- Craft: Knitting
- Construction: Worked flat from one tip to the other
- Main pattern: Lace rib
- Recommended yarn: Sunny Linen by Majo Garn
- Yarn specification: 50 g = 150 m
- Needles: 3.5 mm / US 4
- Gauge: 30 sts and 28 rows = 10 cm / 4 inches in lace rib pattern
The designer describes the project as a stash-busting single-skein design that can also be made in a variety of gauges and yarn weights. The supplied measurements are based on the sample knitted with the recommended yarn, so changing yarn or needle size can change the finished dimensions.
Option A and Option B
Option A – Bandana
The full bandana measures A = 90 cm / 36 inches and B = 20 cm / 8 inches. It requires 150 meters / 164 yards of Sunny Linen by Majo Garn.
For this version, work rows 1–12 until you reach the halfway point of your desired length or until you have used approximately half of your yarn. In the original sample, the designer stopped increasing after reaching 71 stitches on a row 6 repeat. The decrease section then begins.
Option B – Small Scarf
The small scarf measures A = 90 cm / 36 inches and B = 10 cm / 4 inches. It requires 115 meters / 125 yards of Sunny Linen by Majo Garn.
For this version, work rows 1–12 until the desired scarf width is reached. The pattern recommends stopping increases after row 12 with 26, 32, or 38 stitches on the needles. These stitch counts keep the lace rib pattern symmetrical. After stopping the increases, work straight without increases until you are ready to begin the decrease section.
Measurements and Gauge
The recommended needle size is 3.5 mm / US 4. The gauge is 30 stitches and 28 rows over 10 cm / 4 inches in lace rib pattern using 3.5 mm / US 4 needles.
The designer specifically explains that this gauge is a reference for the recommended yarn and that the pattern still works if you do not meet gauge and use different yarns or needles. Nevertheless, if reproducing the sample dimensions is important, the recommended yarn and needle combination provides the closest reference.
For either the bandana or small triangle scarf, the designer recommends a length A between 80–100 cm / 32–40 inches.
Yarn Requirements
The recommended yarn is Sunny Linen by Majo Garn, listed as 50 grams = 150 meters.
- Option A: 150 meters / 164 yards
- Option B: 115 meters / 125 yards
The project is therefore a relatively small yarn commitment. This is one of the reasons the design works well for a single skein or stash-busting project.
Understanding the Lace Rib Structure
The Garden Vines Bandana uses a repeating lace rib structure that combines knit stitches, purl stitches, yarn overs, and decreases. The eyelets create the open portions of the design while the rib sections keep the fabric organized and textured.
The lace pattern uses both k2tog-yo and yo-ssk combinations. These combinations are particularly important later because the last right-side lace combination determines which decrease chart should be followed.
The edge is also part of the knitting rather than a separate finishing step. The pattern repeatedly uses slipped stitches to create its narrow I-cord-style edge.
Chart Key and Edge Symbols
The supplied chart key identifies the symbols used throughout the six charts. A blank square represents knit on the right side and purl on the wrong side. A black dot represents purl on the right side and knit on the wrong side. An open circle is a yarn over.
The diagonal decrease symbols represent slip, slip, knit and knit 2 together. Grey squares indicate no stitch. The edge symbol represents slipping one stitch purlwise with yarn at the back on the right side and with yarn in front on the wrong side.
The increase symbols used in the first charts represent make 1 left and make 1 purlwise left leaning.
Abbreviations
- CO: Cast on
- k: Knit
- k2tog: Knit 2 together
- k3tog: Knit 3 together
- ssk: Slip, slip, knit
- m1l / m1lp: Make 1 left / make 1 left purlwise
- p: Purl
- p2tog: Purl 2 together
- RS: Right side
- sl2 k1 p2sso: Slip 2 stitches knitwise, k1, pass two slipped stitches over
- sl2p wyif: Slip 2 stitches purlwise with yarn in front
- st(s): Stitch(es)
- WS: Wrong side
- yo: Yarn over
Working the Left-Leaning Increases
The increases in this pattern are deliberately worked so that they lean to the left.
For m1l / m1lp, insert the left-hand needle under the bar formed by the stitch you just knitted and the stitch you are about to knit, moving from front to back. Then knit or purl through the back loop.
Keeping this technique consistent is important because the direction of the increase contributes to the appearance and balance of the growing triangle.
Beginning the Bandana
Start by casting on 5 stitches.
Row 1 (WS): Sl2p wyif, p1, sl2p wyif.
Row 2 (RS): K5.
Row 3: Sl2p wyif, p1, sl2p wyif.
Row 4: K2, p1, m1lp, k2.
Row 5: Sl2p wyif, k2, sl2p wyif.
Row 6: K2, p1, m1l, p1, k2.
Row 7: Sl2p wyif, k1, p1, k1, sl2p wyif.
Row 8: K2, p1, m1l, k1, p1, k2.
Row 9: Sl2p wyif, k1, p2, k1, sl2p wyif.
Row 10: K2, p1, m1lp, k2tog, yo, p1, k2.
Row 11: Sl2p wyif, k1, p2, k2, sl2p wyif.
Row 12: K2, p1, m1l, p1, yo, ssk, p1, k2.
Row 13: Sl2p wyif, k1, p2, k1, p1, k1, sl2p wyif.
Row 14: K2, p1, m1l, k1, p1, k2tog, yo, p1, k2.
Row 15: Sl2p wyif, k1, p2, k1, p2, k1, sl2p wyif.
Row 16: K2, p1, m1lp, k2, p1, yo, ssk, p1, k2.
Row 17: Sl2p wyif, k1, p2, k1, p2, k2, sl2p wyif.
Row 18: K2, p1, m1l, p1, k2, p1, k2tog, yo, p1, k2.
Row 19: Sl2p wyif, k1, p2, k1, p2, k1, p1, k1, sl2p wyif.
Row 20: K2, p1, m1l, k1, p1, k2, p1, yo, ssk, p1, k2.
Row 21: Sl2p wyif, k1, p2, k1, p2, k1, p2, k1, sl2p wyif.
At this point, the pattern has worked 9 increase rows and established the lace rib pattern. Continue by increasing one stitch on every right-side row while working the lace rib pattern.
Chart 1: Setting Up the Triangle
Chart 1 corresponds to the opening section and makes the triangular growth easy to visualize. The grey areas show places where there is no stitch, while the active squares show the stitches being worked as the piece grows.
The chart should be read together with the written instructions. Pay particular attention to the row numbers and to the difference between right-side and wrong-side symbols.
Chart 2: Repeating the Increase Section
After the initial setup, Chart 2 provides the repeating lace rib increase sequence.
Row 1 (RS): K2, p1, m1lp, k2tog, yo, *p1, k2, p1, k2tog, yo* repeat to 3 sts before end of row, p1, k2.
Row 2 (WS): Sl2p wyif, k1, *p2, k1* repeat to 3 sts before end of row, k1, sl2p wyif.
Row 3: K2, p1, m1l, p1, yo, ssk, *p1, k2, p1, yo, ssk* repeat to 3 sts before end of row, p1, k2.
Row 4: Sl2p wyif, k1, *p2, k1* repeat to 4 sts before end of row, p1, k1, sl2p wyif.
Row 5: K2, p1, m1l, k1, p1, k2tog, yo, *p1, k2, p1, k2tog, yo* repeat to 3 sts before end of row, p1, k2.
Row 6: Sl2p wyif, k1, *p2, k1* repeat to 5 sts before end of row, p2, k1, sl2p wyif.
Row 7: K2, p1, m1lp, k2, p1, yo, ssk, *p1, k2, p1, yo, ssk* repeat to 3 sts before end of row, p1, k2.
Row 8: Sl2p wyif, k1, *p2, k1* repeat to 3 sts before end of row, k1, sl2p wyif.
Row 9: K2, p1, m1l, *p1, k2, p1, k2tog, yo* repeat to 3 sts before end of row, p1, k2.
Row 10: Sl2p wyif, k1, *p2, k1* repeat to 4 sts before end of row, p1, k1, sl2p wyif.
Row 11: K2, p1, m1l, k1, *p1, k2, p1, yo, ssk* repeat to 3 sts before end of row, p1, k2.
Row 12: Sl2p wyif, k1, *p2, k1* repeat to 5 sts before end of row, p2, k1, sl2p wyif.
For Option A, repeat rows 1–12 until you reach the halfway point of the desired length or have used half the yarn. The sample stopped increasing after reaching 71 stitches on a row 6 repeat.
For Option B, repeat rows 1–12 until the desired width is reached. The recommended stopping points after row 12 are 26, 32, or 38 stitches. Then work straight without increases until you are ready to decrease.
How to Prepare for the Decrease Section
The decrease section depends on exactly where the increase section ended. The designer provides a specific transition table:
- Last WS increase Row 2 → First RS decrease Row 1
- Last WS increase Row 4 → First RS decrease Row 11
- Last WS increase Row 6 → First RS decrease Row 9
- Last WS increase Row 8 → First RS decrease Row 7
- Last WS increase Row 10 → First RS decrease Row 5
- Last WS increase Row 12 → First RS decrease Row 3
There is another important decision. Look at the final right-side row you worked. If its lace sequence used a k2tog-yo combination, follow Chart 3 for rows 1, 5, and 9 and Chart 4 for rows 3, 7, and 11.
If the last right-side row used a yo-ssk combination, follow Chart 4 for rows 1, 5, and 9 and Chart 3 for rows 3, 7, and 11.
Once the first decrease row has been found, continue with the same chart. The pattern specifically instructs knitters not to switch between Chart 3 and Chart 4.
Chart 3 Decrease Path
Chart 3 begins with a central double decrease and gradually reduces the width of the triangle.
Row 1 (RS): K2, p1, yo, Sl2 k1 p2sso, *p1, k2, p1, yo, ssk* repeat to 3 sts before end of row, p1, k2.
Row 2 (WS): Sl2p wyif, *k1, p2* repeat to 3 sts before end of row, k1, sl2p wyif.
Row 3: K2, p1, k2tog, *p1, k2, p1, k2tog, yo* repeat to 3 sts before end of row, p1, k2.
Row 4: Sl2p wyif, *k1, p2* repeat to 5 sts before end of row, k1, p1, k1, sl2p wyif.
Row 5: K2, p1, p2tog, k2, p1, yo, ssk, *p1, k2, p1, yo, ssk* repeat to 3 sts before end of row, p1, k2.
Row 6: Sl2p wyif, *k1, p2* repeat to 4 sts before end of row, k2, sl2p wyif.
Row 7: K2, p1, k2tog, k1, p1, k2tog, yo, *p1, k2, p1, k2tog, yo* repeat to 3 sts before end of row, p1, k2.
Row 8: Sl2p wyif, *k1, p2* repeat to 3 sts before end of row, k1, sl2p wyif.
Row 9: K2, p1, k2tog, p1, yo, ssk, *p1, k2, p1, yo, ssk* repeat to 3 sts before end of row, p1, k2.
Row 10: Sl2p wyif, *k1, p2* repeat to 5 sts before end of row, k1, p1, k1, sl2p wyif.
Row 11: K2, p1, p2tog, k2tog, yo, *p1, k2, p1, k2tog, yo* repeat to 3 sts before end of row, p1, k2.
Row 12: Sl2p wyif, *k1, p2* repeat to 4 sts before end of row, k2, sl2p wyif.
Repeat rows 1–12 until 13 stitches remain. Then continue with Chart 5.
Chart 4 Decrease Path
Chart 4 is the alternative decrease sequence and begins with k3tog.
Row 1 (RS): K2, p1, k3tog, yo, *p1, k2, p1, k2tog, yo* repeat to 3 sts before end of row, p1, k2.
Row 2 (WS): Sl2p wyif, *k1, p2* repeat to 3 sts before end of row, k1, sl2p wyif.
Row 3: K2, p1, k2tog, *p1, k2, p1, yo, ssk* repeat to 3 sts before end of row, p1, k2.
Row 4: Sl2p wyif, *k1, p2* repeat to 5 sts before end of row, k1, p1, k1, sl2p wyif.
Row 5: K2, p1, p2tog, k2, p1, k2tog, yo, *p1, k2, p1, k2tog, yo* repeat to 3 sts before end of row, p1, k2.
Row 6: Sl2p wyif, *k1, p2* repeat to 4 sts before end of row, k2, sl2p wyif.
Row 7: K2, p1, k2tog, k1, p1, yo, ssk, *p1, k2, p1, yo, ssk* repeat to 3 sts before end of row, p1, k2.
Row 8: Sl2p wyif, *k1, p2* repeat to 3 sts before end of row, k1, sl2p wyif.
Row 9: K2, p1, k2tog, p1, k2tog, yo, *p1, k2, p1, k2tog, yo* repeat to 3 sts before end of row, p1, k2.
Row 10: Sl2p wyif, *k1, p2* repeat to 5 sts before end of row, k1, p1, k1, sl2p wyif.
Row 11: K2, p1, p2tog, yo, ssk, *p1, k2, p1, yo, ssk* repeat to 3 sts before end of row, p1, k2.
Row 12: Sl2p wyif, *k1, p2* repeat to 4 sts before end of row, k2, sl2p wyif.
Repeat rows 1–12 until 9 stitches remain. Then continue with Chart 6.
Finishing with Chart 5
When Chart 3 leaves 13 stitches, the final 17 rows are worked as follows:
Row 1 (RS): K2, p1, p2tog, k2, p1, yo, ssk, p1, k2.
Row 2 (WS): Sl2p wyif, k1, p2, k1, p2, k2, sl2p wyif.
Row 3: K2, p1, k2tog, k1, p1, k2tog, yo, p1, k2.
Row 4: Sl2p wyif, k1, p2, k1, p2, k1, sl2p wyif.
Row 5: K2, p1, k2tog, p1, yo, ssk, p1, k2.
Row 6: Sl2p wyif, k1, p2, k1, p1, k1, sl2p wyif.
Row 7: K2, p1, p2tog, k2tog, yo, p1, k2.
Row 8: Sl2p wyif, k1, p2, k2, sl2p wyif.
Row 9: K2, p1, yo, sl2k1 p2sso, p1, k2.
Row 10: Sl2p wyif, k1, p2, k1, sl2p wyif.
Row 11: K2, p1, k2tog, p1, k2.
Row 12: Sl2p wyif, k1, p1, k1, sl2p wyif.
Row 13: K2, p1, p2tog, k2.
Row 14: Sl2p wyif, k2, sl2p wyif.
Row 15: K2, k2tog, k2.
Row 16: Sl2p wyif, p1, sl2p wyif.
Row 17: Bind off all sts.
Finishing with Chart 6
When Chart 4 leaves 9 stitches, use the following final 17 rows:
Row 1 (RS): K2, p1, p2tog, k2, p1, k2tog, yo, p1, k2.
Row 2 (WS): Sl2p wyif, k1, p2, k1, p2, k2, sl2p wyif.
Row 3: K2, p1, k2tog, k1, p1, yo, ssk, p1, k2.
Row 4: Sl2p wyif, k1, p2, k1, p2, k1, sl2p wyif.
Row 5: K2, p1, k2tog, p1, k2tog, yo, p1, k2.
Row 6: Sl2p wyif, k1, p2, k1, p1, k1, sl2p wyif.
Row 7: K2, p1, p2tog, yo, ssk, p1, k2.
Row 8: Sl2p wyif, k1, p2, k2, sl2p wyif.
Row 9: K2, p1, yo, k3tog, p1, k2.
Row 10: Sl2p wyif, k1, p2, k1, sl2p wyif.
Row 11: K2, p1, k2tog, p1, k2.
Row 12: Sl2p wyif, k1, p1, k1, sl2p wyif.
Row 13: K2, p1, p2tog, k2.
Row 14: Sl2p wyif, k2, sl2p wyif.
Row 15: K2, k2tog, k2.
Row 16: Sl2p wyif, p1, sl2p wyif.
Row 17: Bind off all sts.
Important Decrease Techniques
The designer provides detailed explanations for the decrease stitches used throughout the pattern.
K2tog: Insert the right needle knitwise into the first two stitches on the left needle at the same time from left to right. Knit through both loops at the same time to create one new stitch on the right needle.
K3tog: Insert the right needle knitwise into the first three stitches on the left needle at the same time from left to right. Knit through all three loops together to create one new stitch.
SSK: Slip the first stitch knitwise onto the right needle, then repeat with the second stitch. Insert the left needle into those two stitches from left to right and slip them back to the left needle. Knit the two stitches through the back loop together.
Sl2 k1 p2sso: Slip the next 2 stitches at the same time as if to k2tog onto the right needle. Knit the next stitch. Lift the 2 slipped stitches over the knit stitch and off the needle.
Three Useful Stitch Checkpoints
Checkpoint One: 5 Stitches
The project starts with CO 5 sts. This is the first confirmation that the setup has begun correctly.
Checkpoint Two: 71 Stitches
For the original Option A sample, the increase section stopped after reaching 71 stitches on a row 6 repeat. This is the sample’s specific stopping point and should not be treated as a universal stopping point for every variation.
Checkpoint Three: 13 or 9 Stitches
When following Chart 3, switch to Chart 5 after reaching 13 stitches. When following Chart 4, switch to Chart 6 after reaching 9 stitches.
Common Mistakes to Avoid
- Starting the wrong decrease row: Use the transition table based on the last wrong-side increase row.
- Choosing the wrong decrease chart: Check whether the final right-side lace combination was k2tog-yo or yo-ssk.
- Switching charts: Once the decrease chart is selected, continue with the same chart.
- Changing the increase direction: The pattern specifies left-leaning m1l and m1lp increases.
- Ignoring the slipped edge stitches: They are an intentional part of the design.
- Using the Option A stopping point for Option B: The two versions have different shaping instructions.
- Assuming the measurements cannot change: The source explains that yarn and needle choice can affect the finished size.
Beginner-Friendly Workflow
- Choose Option A or Option B.
- Prepare the appropriate yarn quantity.
- Use 3.5 mm / US 4 needles if following the recommended setup.
- Review the abbreviation list.
- Study the chart symbols before beginning the lace section.
- Cast on 5 stitches.
- Complete Rows 1–21.
- Continue with the lace rib increase sequence.
- Add one stitch on every right-side row.
- Record the row on which you stop increasing.
- For Option A, use the sample’s 71-stitch row 6 repeat as a reference if reproducing that sample.
- For Option B, use the recommended 26, 32, or 38 stitch stopping points after row 12 if desired.
- Determine the first decrease row from the transition table.
- Choose Chart 3 or Chart 4 according to the final right-side lace combination.
- Continue the same decrease chart without switching.
- Use Chart 5 at 13 stitches or Chart 6 at 9 stitches.
- Complete Row 17 and bind off all stitches.
Frequently Asked Questions
Is Garden Vines Bandana a crochet pattern?
No. It is a knitting pattern. The instructions use knitting terminology such as knit, purl, ssk, k2tog, k3tog, yarn over, and slipped stitches.
How many stitches are cast on?
The pattern begins with 5 stitches.
What yarn is recommended?
The recommended yarn is Sunny Linen by Majo Garn, with 50 grams equaling 150 meters.
How much yarn does the larger bandana use?
Option A uses 150 meters / 164 yards.
How much yarn does the small scarf use?
Option B uses 115 meters / 125 yards.
What needle size is recommended?
The recommended needles are 3.5 mm / US 4.
What is the stated gauge?
The stated gauge is 30 stitches and 28 rows = 10 cm / 4 inches in lace rib pattern on 3.5 mm / US 4 needles.
Can the pattern be worked with another yarn?
Yes. The designer states that the pattern works even if you do not meet the stated gauge and knit with different yarns or needles. The final measurements may vary.
Can the triangle be made larger?
The source states that the size and shape can be modified by adding more pattern repeats for a larger shawl or by working a straight section between the increase and decrease sections for a small scarf.
What is the difference between the two decrease charts?
The correct chart depends on the last right-side lace combination worked during the increase section. The pattern provides an exact selection method and instructs the knitter to continue with the selected chart rather than switching between them.
When is Chart 5 used?
Chart 5 is used after Chart 3 has reduced the work to 13 stitches.
When is Chart 6 used?
Chart 6 is used after Chart 4 has reduced the work to 9 stitches.
How does the pattern end?
Both final charts end with Row 17, which instructs you to bind off all stitches.
Final Project Checklist
- Option A or Option B selected.
- Recommended yarn quantity prepared.
- 3.5 mm / US 4 needles available.
- Gauge reference noted.
- 5 stitches cast on.
- Rows 1–21 completed.
- Lace rib increase section established.
- One stitch increased on every right-side row.
- Stopping point recorded.
- Correct decrease transition identified.
- Correct decrease chart selected.
- Same decrease chart maintained.
- Chart 5 or Chart 6 used at the correct stitch count.
- Final 17 rows completed.
- All stitches bound off.
Final Thoughts
The Garden Vines Bandana is an excellent small lace project for knitters who enjoy combining shaping and texture. Its construction is easy to visualize, but the lace rib sequence provides enough technical detail to keep the project engaging from beginning to end.
The most important part of the pattern is understanding the relationship between the increase section and the decrease section. Recording the final increase row and identifying the last right-side lace combination makes the transition into the decrease charts much more straightforward.
With its 3.5 mm / US 4 needle recommendation, 30-stitch by 28-row gauge, modest yarn requirement, and two shaping options, the design can function as either a compact bandana or a small triangular scarf. The original pattern also allows experimentation with yarn weights and gauges while maintaining the same fundamental construction.
Pattern credit: Garden Vines Bandana by Gerda Wolf / My Knit Projects. The supplied source identifies the pattern as Garden Vines Bandana Ver 1.3 © 2026 Gerda Wolf and states that it is for personal, non-commercial use only. The source also states that the pattern has not been tested or tech edited and provides contact information for questions or suspected errors.