
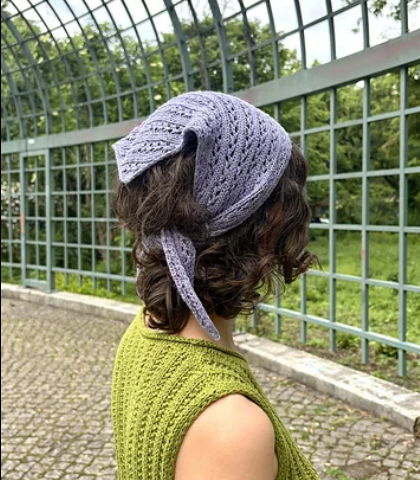
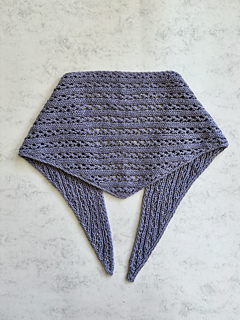
The Garden Vines Bandana is a small triangular knitting project designed by Gerda Wolf of My Knit Projects. Its combination of lace, rib texture, eyelets, and clean I-cord edging creates an accessory that looks delicate while remaining compact and practical. The design is worked flat from one tip, grows through increases on the right-side rows, reaches its widest point, and then reverses direction through decreases until the opposite tip is completed.
This makes the project especially interesting for knitters who enjoy watching a small number of stitches gradually develop into a clearly defined triangular shape. It is also a useful single-skein project. The pattern can be worked in different gauges and yarn weights, and the shape can be adapted by changing the number of repeats. The original design provides two options: a full bandana and a smaller scarf.
The instructions below follow the technical information supplied with the Garden Vines Bandana pattern. The original pattern is credited to Gerda Wolf, and the pattern document notes that it is for personal, non-commercial use only. The pattern itself has not been tested or tech edited, so the designer asks knitters to contact her if they have questions or believe they have found an error.
What Makes the Garden Vines Bandana Special?
The main visual feature of this project is the lace rib pattern. Instead of relying on one complicated motif throughout, the design combines knit and purl stitches with yarn overs and decreases. These techniques create repeated open areas that sit naturally between the denser ribbed sections.
The result is a fabric with both texture and lightness. The repeated eyelets add openness, while the rib structure keeps the fabric visually organized. The I-cord edge also gives the finished accessory a neat outline, helping the triangular shape look intentional and polished.
The project begins with only 5 stitches. Rather than casting on a large number of stitches and shaping the accessory afterward, the knitter builds the triangle progressively. During the increase section, one stitch is added on every right-side row. Once the desired width or length has been reached, the work changes to the decrease phase.
For the bandana option, the designer recommends working the increase section until the halfway point of the desired length or until half of the yarn has been used. For the sample, the increases stop after reaching 71 stitches on a row 6 repeat.
Garden Vines Bandana at a Glance
- Designer: Gerda Wolf / My Knit Projects
- Size: One size
- Craft: Knitting
- Construction: Worked flat from tip to tip
- Main stitch pattern: Lace rib
- Recommended yarn: Sunny Linen by Majo Garn
- Recommended yarn amount for Option A: 150 meters / 164 yards
- Recommended yarn amount for Option B: 115 meters / 125 yards
- Needles: 3.5 mm / US 4
- Gauge: 30 stitches and 28 rows = 10 cm / 4 inches in lace rib pattern on 3.5 mm / US 4 needles
- Option A measurements: A = 90 cm / 36 inches, B = 20 cm / 8 inches
- Option B measurements: A = 90 cm / 36 inches, B = 10 cm / 4 inches
Yarn Requirements and Yardage
The recommended yarn is Sunny Linen by Majo Garn, listed as 50 grams = 150 meters. For Option A, the Garden Vines Bandana requires 150 meters / 164 yards. For Option B, the small scarf requires 115 meters / 125 yards.
The pattern describes the project as a useful stash-busting single-skein knit. Although the sample measurements are based on the recommended yarn, the designer explains that the finished measurements can vary depending on needle size and yarn choice. The pattern also works even if the knitter does not exactly meet the stated gauge.
For the bandana or small triangle scarf, the recommended overall length is between 80 and 100 cm / 32 and 40 inches. The specific sample measurements are given separately for the two options, so the stated dimensions should be treated as the reference measurements for the original design rather than as a guarantee for every yarn and needle combination.
Needles and Gauge
The recommended needle size is 3.5 mm / US 4. The stated gauge is 30 stitches and 28 rows over 10 cm / 4 inches in the lace rib pattern.
Gauge is provided as a reference for the recommended yarn. The designer specifically notes that the pattern can still work if the knitter does not meet gauge and chooses a different yarn or needle size. This flexibility is one of the useful characteristics of the design, particularly for knitters who want to use yarn already in their stash.
Even with that flexibility, gauge remains useful when the goal is to reproduce the sample measurements as closely as possible. A different yarn weight or needle size can alter the dimensions, so the original measurements should always be considered together with the yarn and needle information.
Choosing Between the Two Options
Option A – Bandana
Option A produces the larger triangular bandana. Its stated measurements are A = 90 cm / 36 inches and B = 20 cm / 8 inches. The designer recommends working the increase section until reaching the halfway point of the desired length or until approximately half of the yarn has been used.
For the original sample, the increases were stopped after reaching 71 stitches on a row 6 repeat. The knitter then continues with the decrease section.
Option B – Small Scarf
Option B creates a smaller triangle scarf with a stated measurement of A = 90 cm / 36 inches and B = 10 cm / 4 inches.
For this version, the designer recommends stopping the increases after row 12 with, for example, 26, 32, or 38 stitches on the needles. These stitch counts are specifically recommended because they allow the lace rib pattern to remain symmetrical.
After reaching the chosen width, the knitter works straight without increases until ready to begin decreasing.
Understanding the Construction
The construction is easier to understand when divided into three major stages: the initial setup, the increase section, and the decrease section.
The project begins with a 5-stitch cast-on. The first 21 rows establish the edge treatment and set up the lace rib pattern. After these 9 increase rows have been completed, the pattern continues by increasing one stitch on every right-side row while working the lace rib pattern.
This setup is important because the opening rows are not simply repeated lace rib rows. They establish the structure that will later be repeated across the growing triangle.
Starting the Pattern
Cast on 5 stitches.
Row 1 (WS): Sl2p wyif, p1, sl2p wyif.
Row 2 (RS): K5.
Row 3: Sl2p wyif, p1, sl2p wyif.
Row 4: K2, p1, m1lp, k2.
Row 5: Sl2p wyif, k2, sl2p wyif.
Row 6: K2, p1, m1l, p1, k2.
Row 7: Sl2p wyif, k1, p1, k1, sl2p wyif.
Row 8: K2, p1, m1l, k1, p1, k2.
Row 9: Sl2p wyif, k1, p2, k1, sl2p wyif.
Row 10: K2, p1, m1lp, k2tog, yo, p1, k2.
Row 11: Sl2p wyif, k1, p2, k2, sl2p wyif.
Row 12: K2, p1, m1l, p1, yo, ssk, p1, k2.
Row 13: Sl2p wyif, k1, p2, k1, p1, k1, sl2p wyif.
Row 14: K2, p1, m1l, k1, p1, k2tog, yo, p1, k2.
Row 15: Sl2p wyif, k1, p2, k1, p2, k1, sl2p wyif.
Row 16: K2, p1, m1lp, k2, p1, yo, ssk, p1, k2.
Row 17: Sl2p wyif, k1, p2, k1, p2, k2, sl2p wyif.
Row 18: K2, p1, m1l, p1, k2, p1, k2tog, yo, p1, k2.
Row 19: Sl2p wyif, k1, p2, k1, p2, k1, p1, k1, sl2p wyif.
Row 20: K2, p1, m1l, k1, p1, k2, p1, yo, ssk, p1, k2.
Row 21: Sl2p wyif, k1, p2, k1, p2, k1, p2, k1, sl2p wyif.
After this setup, the lace rib pattern is established. From this point forward, the pattern uses the increase charts and the written instructions supplied with the design.
How the Lace Rib Pattern Works
The lace rib pattern combines several recurring techniques. The key stitches and symbols include knit, purl, yarn over, slip-slip-knit, knit 2 together, and the special slipped edge stitches used to maintain the I-cord-like border.
On the right side, the lace structure alternates between k2tog followed by yo and yo followed by ssk. These combinations help create the open eyelet sections while maintaining the overall balance of the fabric.
The wrong-side rows are comparatively structured. They repeatedly use the sequence of slipped stitches, knit stitches, and purl stitches. This contrast between the right-side lace shaping and the more organized wrong-side rows is what allows the motif to remain clear without requiring an overly complicated construction.
Increase Section
After the initial 21-row setup, continue by increasing one stitch on every right-side row while working the lace rib pattern.
The increase instructions use m1l and m1lp. The designer specifies that the increases lean to the left. For m1l / m1lp, insert the left-hand needle under the bar formed by the stitch just knitted and the stitch about to be knitted, moving from front to back, and then knit or purl through the back loop.
This detail matters because the direction of the increase contributes to the visual symmetry of the triangle. It is therefore important not to substitute a different increase without considering the effect on the pattern structure.
Chart 2 and the Repeating Increase Rows
The repeating increase section uses Chart 2. The written instructions begin with the following rows:
Row 1 (RS): K2, p1, m1lp, k2tog, yo, *p1, k2, p1, k2tog, yo* repeat to 3 sts before end of row, p1, k2.
Row 2 (WS): Sl2p wyif, k1, *p2, k1* repeat to 3 sts before end of row, k1, sl2p wyif.
Row 3: K2, p1, m1l, p1, yo, ssk, *p1, k2, p1, yo, ssk* repeat to 3 sts before end of row, p1, k2.
Row 4: Sl2p wyif, k1, *p2, k1* repeat to 4 sts before end of row, p1, k1, sl2p wyif.
Row 5: K2, p1, m1l, k1, p1, k2tog, yo, *p1, k2, p1, k2tog, yo* repeat to 3 sts before end of row, p1, k2.
Row 6: Sl2p wyif, k1, *p2, k1* repeat to 5 sts before end of row, p2, k1, sl2p wyif.
Row 7: K2, p1, m1lp, k2, p1, yo, ssk, *p1, k2, p1, yo, ssk* repeat to 3 sts before end of row, p1, k2.
Row 8: Sl2p wyif, k1, *p2, k1* repeat to 3 sts before end of row, k1, sl2p wyif.
Row 9: K2, p1, m1l, *p1, k2, p1, k2tog, yo* repeat to 3 sts before end of row, p1, k2.
Row 10: Sl2p wyif, k1, *p2, k1* repeat to 4 sts before end of row, p1, k1, sl2p wyif.
Row 11: K2, p1, m1l, k1, *p1, k2, p1, yo, ssk* repeat to 3 sts before end of row, p1, k2.
Row 12: Sl2p wyif, k1, *p2, k1* repeat to 5 sts before end of row, p2, k1, sl2p wyif.
For Option A, work rows 1–12 until reaching the halfway point of the desired length or until half of the yarn has been used. The sample stopped increasing after reaching 71 stitches on a row 6 repeat.
Working the Small Scarf Version
For Option B, work rows 1–12 until the desired scarf width has been reached. The original pattern recommends stopping the increases after row 12 with 26, 32, or 38 stitches on the needles. These stitch counts are specifically chosen so that the lace rib pattern remains symmetrical.
After the increases stop, continue working straight without increases until it is time to begin the decrease section.
Moving From Increases to Decreases
The transition into the decrease section depends on where the increase sequence was stopped. This is one of the most important parts of the pattern because the first decrease row is not necessarily the same for every project.
The designer provides the following relationship between the last wrong-side increase row and the first right-side decrease row:
- Last WS increase Row 2: First RS decrease Row 1
- Last WS increase Row 4: First RS decrease Row 11
- Last WS increase Row 6: First RS decrease Row 9
- Last WS increase Row 8: First RS decrease Row 7
- Last WS increase Row 10: First RS decrease Row 5
- Last WS increase Row 12: First RS decrease Row 3
The pattern also instructs the knitter to look at the last right-side row worked before selecting the decrease chart. If the last right-side row used a k2tog-yo combination for the lace pattern, follow Chart 3 for rows 1, 5, and 9, and Chart 4 for rows 3, 7, and 11.
If the last right-side row used a yo-ssk combination, follow Chart 4 for rows 1, 5, and 9, and Chart 3 for rows 3, 7, and 11.
Once the correct first decrease row and chart have been identified, continue using the same chart. The designer specifically states not to switch between charts.
Decrease Section: Charts 3 and 4
Chart 3 and Chart 4 provide the two decrease pathways. Both charts continue the lace rib appearance while progressively reducing the number of stitches.
Chart 3 begins with a central double decrease in Row 1:
Row 1 (RS): K2, p1, yo, sl2 k1 p2sso, *p1, k2, p1, yo, ssk* repeat to 3 sts before end of row, p1, k2.
Its wrong-side structure continues with the familiar slipped edge and knit-purl sequence.
Chart 4 begins differently:
Row 1 (RS): K2, p1, k3tog, yo, *p1, k2, p1, k2tog, yo* repeat to 3 sts before end of row, p1, k2.
Both charts are designed to reduce the triangle while maintaining the visual rhythm of the lace pattern. The correct chart depends on the final increase sequence, so the transition instructions should be followed carefully rather than choosing a chart based only on appearance.
Finishing the Triangle
Once Chart 3 has reduced the work to 13 stitches, continue with Chart 5. The final 17 rows are specifically written out in the pattern.
Chart 5 brings the project gradually toward the final point using decreases, yarn overs, the central double decrease, and the established edge treatment. The final sequence ends with Row 17, where all stitches are bound off.
When using Chart 4, continue until 9 stitches remain and then switch to Chart 6. Chart 6 also contains a final 17-row sequence and ends with the instruction to bind off all stitches on Row 17.
This final section is important because the last rows are not simply another repeat of the main lace chart. They progressively narrow the remaining stitches until the pointed end can be completed cleanly.
Understanding the Abbreviations
The pattern uses standard knitting abbreviations together with several specific lace techniques. Keeping the abbreviation list nearby can make the charts much easier to follow.
- CO: Cast on
- k: Knit
- k2tog: Knit 2 together
- k3tog: Knit 3 together
- ssk: Slip, slip, knit
- m1l / m1lp: Make 1 left / make 1 left purlwise
- p: Purl
- p2tog: Purl 2 together
- RS: Right side
- sl2 k1 p2sso: Slip 2 stitches knitwise, knit 1, pass two slipped stitches over
- sl2p wyif: Slip 2 stitches purlwise with yarn in front
- st(s): Stitch(es)
- WS: Wrong side
- yo: Yarn over
Increase Technique
The increases are worked so that they lean to the left. For m1l and m1lp, insert the left-hand needle under the bar formed by the stitch just knitted and the stitch about to be knitted, moving from front to back, and knit or purl through the back loop.
Maintaining this technique consistently helps preserve the intended direction of the increase and keeps the growing triangle visually balanced.
Decrease Techniques
The pattern gives detailed instructions for its main decreases.
K2tog: Insert the right needle knitwise into the first two stitches on the left needle at the same time from left to right. Knit through both loops together to create one new stitch on the right needle.
K3tog: Insert the right needle knitwise into the first three stitches on the left needle at the same time from left to right. Knit through all three loops together to create one new stitch on the right needle.
SSK: Slip the first stitch knitwise onto the right needle, then repeat with the second stitch. Insert the left needle into those two stitches from left to right and slip them back onto the left needle. Knit the two stitches together through the back loop.
Sl2 k1 p2sso: Slip the next two stitches at the same time as if to k2tog onto the right needle. Knit the next stitch, then lift the two slipped stitches over the knit stitch and off the needle. This creates the central double decrease used in the lace design.
Tips for Keeping the Lace Pattern Organized
Because the project combines increases, decreases, yarn overs, and lace repeats, it is helpful to identify the repeating structure rather than treating every row as an isolated instruction.
- Keep track of the current chart and row number.
- Pay particular attention to right-side rows because these are where the main lace shaping occurs.
- Remember that the increase section adds one stitch on every right-side row.
- When changing from increases to decreases, identify the last right-side lace combination before selecting Chart 3 or Chart 4.
- Once the correct decrease chart has been selected, do not switch between the two charts.
- For Option B, use the recommended 26, 32, or 38 stitches after a row 12 repeat if you want the stated symmetrical setup.
- Use the stitch counts as checkpoints while working through the triangle.
Common Points to Watch During the Project
The most important transition is the point where the increases stop. A knitter who stops on a different repeat must use the corresponding transition information supplied in the pattern. The decrease chart is selected according to the final right-side lace combination, so this decision should be made before beginning the first decrease row.
Another important point is the difference between m1l and m1lp. The pattern uses both versions during the setup and increase section. Since the project is built symmetrically around its lace structure, keeping the increase direction consistent is important.
The edge stitches also have a specific purpose. The abbreviation sl2p wyif means slipping two stitches purlwise with the yarn in front. These edge instructions appear repeatedly on wrong-side rows and contribute to the clean border seen around the triangle.
Blocking and Finished Appearance
The pattern measurements are based on the sample knitted with the recommended yarn. Because lace fabric can respond to yarn choice, needle size, and finishing, the final dimensions may vary. The original sample measurements are therefore best used as a reference point.
The open areas created by the yarn overs are particularly noticeable in the finished fabric. A careful finishing process can help the lace structure become easier to see, while the repeated rib sections maintain definition between the openwork rows.
When preparing the finished piece, handle the pointed ends and narrow sections carefully. The triangle is designed around a sequence of increases and decreases, so the final shape depends on maintaining the stitch structure throughout the project.
Why This Is a Useful One-Skein Project
The Garden Vines Bandana is compact enough to make a practical use of a single skein. Option A uses 150 meters / 164 yards, while Option B uses 115 meters / 125 yards of the recommended Sunny Linen yarn.
The design is also flexible in terms of gauge and yarn choice. The designer notes that the pattern works with different yarns and needles even when the stated gauge is not achieved. This makes the project suitable for experimenting with yarn already available in your collection while still providing a clearly defined sample specification.
Garden Vines Bandana Project Checklist
- Choose Option A or Option B.
- Prepare Sunny Linen by Majo Garn or another suitable yarn according to your preference.
- For Option A, prepare 150 meters / 164 yards.
- For Option B, prepare 115 meters / 125 yards.
- Use 3.5 mm / US 4 needles for the recommended gauge.
- Keep the abbreviation list available.
- Begin with CO 5 sts.
- Complete the 21-row setup.
- Continue the lace rib pattern with one increase on every right-side row.
- For Option A, stop increasing at the intended halfway point; the sample stopped at 71 stitches on a row 6 repeat.
- For Option B, consider 26, 32, or 38 stitches after a row 12 repeat for a symmetrical lace rib pattern.
- Identify the correct decrease transition.
- Select Chart 3 or Chart 4 according to the last right-side lace combination.
- Continue with the same decrease chart.
- Use Chart 5 after reaching 13 stitches when following Chart 3.
- Use Chart 6 after reaching 9 stitches when following Chart 4.
- Bind off all stitches at the end of the final chart.
Frequently Asked Questions
Is the Garden Vines Bandana one size?
Yes. The pattern is written as one size. The designer also explains that the size and shape can be modified by adding more pattern repeats for a larger shawl or by working a straight section between the increase and decrease portions for a small scarf.
What yarn is recommended?
The recommended yarn is Sunny Linen by Majo Garn, listed as 50 grams = 150 meters. Option A uses 150 meters / 164 yards, while Option B uses 115 meters / 125 yards.
What needle size should be used?
The recommended needle size is 3.5 mm / US 4.
What is the stated gauge?
The stated gauge is 30 stitches and 28 rows over 10 cm / 4 inches in the lace rib pattern on 3.5 mm / US 4 needles.
Can a different yarn or needle size be used?
Yes. The designer states that the gauge is a reference for the recommended yarn and that the pattern works even if the stated gauge is not met and different yarns or needles are used. The finished measurements can vary depending on those choices.
How does Option A differ from Option B?
Option A is the larger bandana, measuring 90 cm / 36 inches in length and 20 cm / 8 inches in the stated width measurement. Option B is the small scarf, measuring 90 cm / 36 inches in length and 10 cm / 4 inches in width.
When should the increases stop for Option A?
The designer recommends working rows 1–12 until the halfway point of the desired length or until half of the yarn has been used. In the sample, increases stopped after reaching 71 stitches on a row 6 repeat.
How do I choose the correct decrease chart?
Look at the last right-side row worked. If the lace used a k2tog-yo combination, use Chart 3 for rows 1, 5, and 9 and Chart 4 for rows 3, 7, and 11. If the lace used a yo-ssk combination, use Chart 4 for rows 1, 5, and 9 and Chart 3 for rows 3, 7, and 11. After finding the first decrease row, continue with the same chart rather than switching between them.
Has the pattern been tested or tech edited?
The source pattern states that it has not been tested or tech edited. The designer asks knitters to email her if they have questions or believe they have found an error.
Final Thoughts
The Garden Vines Bandana is a compact lace knitting project that combines an approachable triangular construction with enough stitch detail to keep the knitting interesting. Starting with only 5 stitches, the project gradually expands through right-side increases, develops its lace rib structure, and then narrows through a carefully coordinated decrease sequence.
Its two size options make the design flexible without changing the basic construction. Option A creates the stated 90 cm / 36 inch by 20 cm / 8 inch bandana, while Option B creates the 90 cm / 36 inch by 10 cm / 4 inch small scarf. The pattern also leaves room for modification through additional repeats or a straight section.
The most important part of working this design successfully is maintaining the relationship between the lace pattern, the increase rows, and the decrease charts. Once the setup is complete, the repeated lace rib structure provides clear visual checkpoints. During the decrease phase, following the transition instructions carefully ensures that the chosen chart matches the final increase sequence.
With its 3.5 mm / US 4 needle recommendation, 30-stitch by 28-row lace rib gauge, and modest yarn requirement, the Garden Vines Bandana offers a focused project for knitters who enjoy textured accessories and delicate lace details. The finished triangle has a light, decorative character while remaining small enough to be a practical single-skein project.
Pattern credit: Garden Vines Bandana by Gerda Wolf / My Knit Projects. The source document identifies the pattern as Garden Vines Bandana Ver 1.3 © 2026 Gerda Wolf and states that it is for personal, non-commercial use only.