
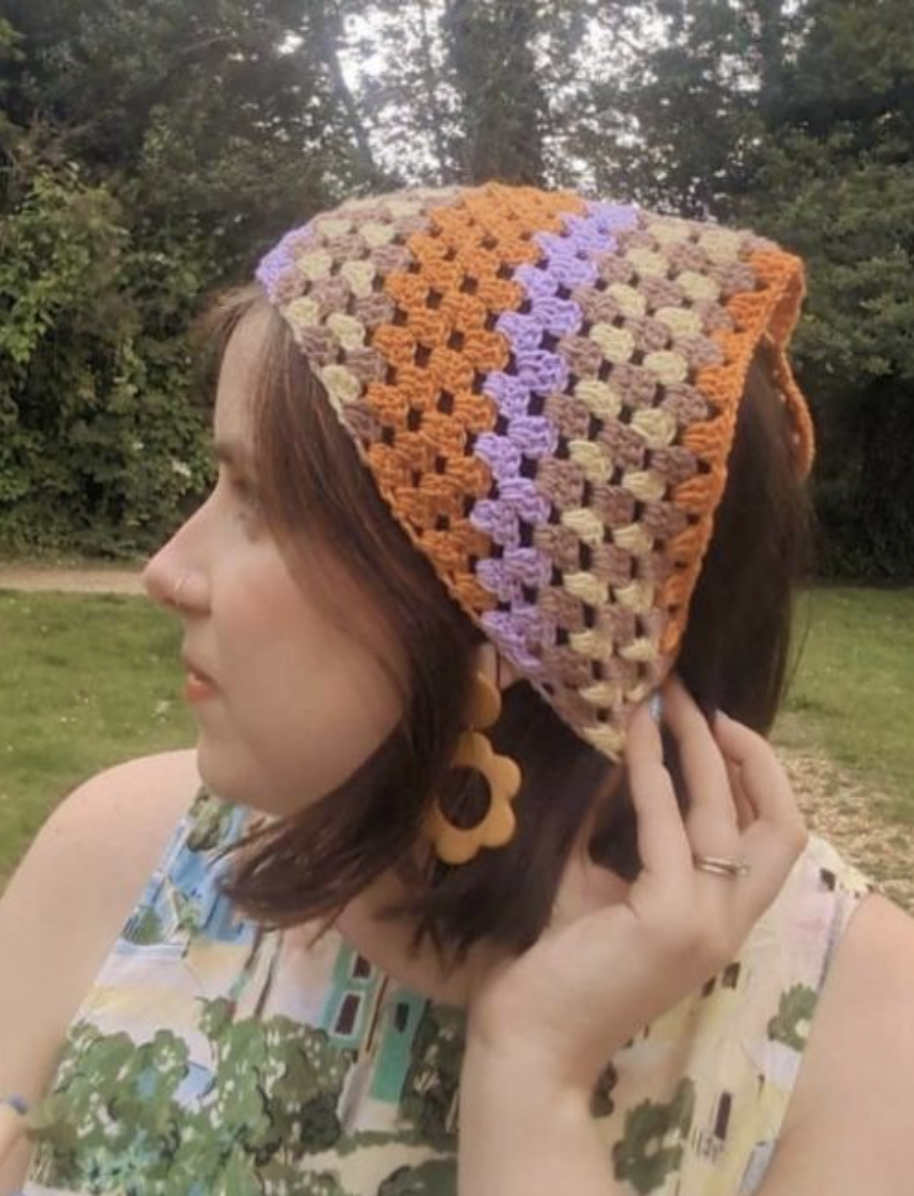

The Cruel Summer Bandana is a compact crochet project with a deceptively simple construction. Everything grows from one small ring, yet the finished piece develops into a wide triangular headscarf with strong color bands, open chain spaces, and two practical ties. The key to making this project successfully is not speed. It is consistency: keeping the central ch-2 space easy to identify, reading each row in sections, checking the stitch count, and following the color joins exactly.
This fourth guide approaches the project as a stitch-checkpoint workshop. Instead of simply moving from “Row 1” to “Row 19,” the tutorial explains what to watch for at each stage and how the written counts can help you catch a mistake before it travels into several later rows. The technical pattern itself is kept intact, including the supplied color assignments, measurements, tension, row counts, and tie instructions.
The source pattern is by Becca Parker of To Be Adorned and is written in UK crochet terms. The recommended hook is 3mm, and the finished main bandana is approximately 59 x 39 x 39cm, not including ties. The stated tension is 9 tr sts x 5 rows in pattern using a 3mm hook = 5 x 5cm.
What You Are Making
The main body is a granny half square. Its shape is created by working groups of three treble crochets into chain spaces and making the central increase with (3tr, ch2, 3tr). As the rows progress, the number of chain-space groups on either side increases, so the triangle becomes wider while the central point remains easy to locate.
The color palette is deliberately soft and playful. Yarn A is Lilac, Yarn B is Raffia, Yarn C is Vanilla, and Yarn D is Nectarine. These labels are important because the pattern calls for specific colors at specific rows rather than a simple repeating sequence.
Project Specifications
- Pattern: Cruel Summer Bandana
- Designer: Becca Parker of To Be Adorned
- Yarn: Four shades of cotton 4ply
- Suggested yarn: Patons 100% Cotton 4ply, 100% cotton, 100g/330m
- Quantity: 1 ball of each color
- Yarn A: Lilac
- Yarn B: Raffia
- Yarn C: Vanilla
- Yarn D: Nectarine
- Hook: 3mm crochet hook (US D/3)
- Other tool: Tapestry needle
- Finished size: Approx 59 x 39 x 39cm, not including ties
- Tension: 9 tr sts x 5 rows in pattern using 3mm hook = 5 x 5cm
Abbreviations to Keep Beside You
The pattern uses UK terminology, so it is especially useful to keep the abbreviation list visible if you normally crochet from US terminology.
- st/sts: stitch/stitches
- sp: space
- beg: beginning
- ch: chain
- ch-sp: chain space
- ss: slip stitch
- dc: double crochet
- tr: treble crochet
- RS: right side
- WS: wrong side
Checkpoint 0: Establish the Center
Before the first row, using the 3mm hook and Yarn A, ch4 and join with a ss to form a ring. This small ring is the entire starting point of the triangular body. Because all later shaping grows outward from it, avoid rushing this foundation.
The central ch-2 space created in Row 1 is particularly important. It becomes the visual and structural center of the triangle. If you can identify it immediately after Row 1, later rows become much easier to navigate.
Row 1 — Yarn A
Row 1 is worked on the RS. Ch4 counts as 1tr and 1ch. Work (3tr, ch2, 3tr) into the ring, ch1, 1tr into the ring, turn.
Checkpoint: [8tr, 4ch-sps]
At this stage, the piece is tiny. Do not use its size as a gauge of whether the final bandana will be correct. The important check is the construction: there should be a clear central ch-2 space and the specified treble count.

Checkpoint 1: Confirm the First Expansion
Row 2 — Yarn A
Row 2 is WS. Ch4 counts as 1tr and 1ch, 3tr into first ch-sp, ch1, (3tr, ch2, 3tr) into ch-2 sp, ch1, 3tr into next ch-sp, ch1, 1tr, turn. Fasten off.
Checkpoint: [14tr, 6ch-sps]
The first major lesson in this pattern is that the center does not move. The outer groups multiply around it. If you lose the central ch-2 space, stop and identify it before continuing. The written row is much easier to understand when you recognize that it is simply left side, center increase, right side.
Checkpoint 2: The First Color Changes
Row 3 — Yarn B
Join Yarn B, ch4 (counts as 1tr and 1ch), 3tr into first ch-sp, ch1, 3tr into next ch-sp, ch1, (3tr, ch2, 3tr) into ch-2 sp, ch1, (3tr into next ch-sp, ch1) twice, ch1, 1tr, turn. Fasten off.
Checkpoint: [20tr, 8ch-sps]
Row 4 — Yarn C
Join Yarn C, ch4 (counts as 1tr and 1ch), 3tr into first ch-sp, ch1, (3tr into next ch-sp, ch1) twice, (3tr, ch2, 3tr) into ch-2 sp, ch1, (3tr into next ch-sp, ch1) three times, ch1, 1tr, turn. Fasten off.
Checkpoint: [26tr, 10ch-sps]
Row 5 — Yarn B
Join Yarn B, ch4 (counts as 1tr and 1ch), 3tr into first ch-sp, ch1, (3tr into next ch-sp, ch1) three times, (3tr, ch2, 3tr) into ch-2 sp, ch1, (3tr into next ch-sp, ch1) four times, ch1, 1tr, turn. Fasten off.
Checkpoint: [32tr, 12ch-sps]
Notice the growth: 8tr, then 14tr, 20tr, 26tr, and 32tr. The checkpoints make the widening pattern visible even before the finished shape is obvious. They are also useful when counting a long row: if your count is wrong at the end, you have a concrete target to investigate.

Checkpoint 3: Keep the Triangle Balanced
From Row 6 onward, the repeated section becomes longer. The easiest way to avoid losing your place is to stop thinking of the row as one long sentence. Read it as three zones: repeated chain-space groups before the center, the central (3tr, ch2, 3tr), and repeated chain-space groups after the center.
Row 6 — Yarn C
Join Yarn C, ch4 (counts as 1tr and 1ch), 3tr into first ch-sp, ch1, (3tr into next ch-sp, ch1) four times, (3tr, ch2, 3tr) into ch-2 sp, ch1, (3tr into next ch-sp, ch1) five times times, ch1, 1tr, turn. Fasten off.
Checkpoint: [38tr, 14ch-sps]
Row 7 — Yarn B
Join Yarn B, ch4 (counts as 1tr and 1ch), 3tr into first ch-sp, ch1, (3tr into next ch-sp, ch1) five times, (3tr, ch2, 3tr) into ch-2 sp, ch1, (3tr into next ch-sp, ch1) six times times, ch1, 1tr, turn. Fasten off.
Checkpoint: [44tr, 16ch-sps]
Row 8 — Yarn D
Join Yarn D, ch4 (counts as 1tr and 1ch), 3tr into first ch-sp, ch1, (3tr into next ch-sp, ch1) six times, (3tr, ch2, 3tr) into ch-2 sp, ch1, (3tr into next ch-sp, ch1) seven times times, ch1, 1tr, turn.
Checkpoint: [50tr, 18ch-sps]
Row 9
Ch4 (counts as 1tr and 1ch), 3tr into first ch-sp, ch1, (3tr into next ch-sp, ch1) seven times, (3tr, ch2, 3tr) into ch-2 sp, ch1, (3tr into next ch-sp, ch1) eight times times, ch1, 1tr, turn.
Checkpoint: [56tr, 20ch-sps]
Row 10
Ch4 (counts as 1tr and 1ch), 3tr into first ch-sp, ch1, (3tr into next ch-sp, ch1) eight times, (3tr, ch2, 3tr) into ch-2 sp, ch1, (3tr into next ch-sp, ch1) nine times times, ch1, 1tr, turn.
Checkpoint: [62tr, 22ch-sps]
By Row 10 the triangle should be visually obvious. This is a useful place to lay the piece flat. You are not changing the pattern based on appearance; you are simply checking that the growing fabric looks balanced and that the central point remains clear.
Checkpoint 4: The Long Middle Rows
Row 11
Ch4 (counts as 1tr and 1ch), 3tr into first ch-sp, ch1, (3tr into next ch-sp, ch1) nine times, (3tr, ch2, 3tr) into ch-2 sp, ch1, (3tr into next ch-sp, ch1) 10 times times, ch1, 1tr, turn. Fasten off.
Checkpoint: [68tr, 24ch-sps]
Row 12 — Yarn A
Join Yarn A, ch4 (counts as 1tr and 1ch), 3tr into first ch-sp, ch1, (3tr into next ch-sp, ch1) nine times, (3tr, ch2, 3tr) into ch-2 sp, ch1, (3tr into next ch-sp, ch1) 10 times times, ch1, 1tr, turn.
Checkpoint: [74tr, 26ch-sps]
Row 13
Ch4 (counts as 1tr and 1ch), 3tr into first ch-sp, ch1, (3tr into next ch-sp, ch1) 10 times, (3tr, ch2, 3tr) into ch-2 sp, ch1, (3tr into next ch-sp, ch1) 11 times times, ch1, 1tr, turn. Fasten off.
Checkpoint: [80tr, 28ch-sps]
Row 14 — Yarn B
Join Yarn B, ch4 (counts as 1tr and 1ch), 3tr into first ch-sp, ch1, (3tr into next ch-sp, ch1) 11 times, (3tr, ch2, 3tr) into ch-2 sp, ch1, (3tr into next ch-sp, ch1) 12 times times, ch1, 1tr, turn. Fasten off.
Checkpoint: [86tr, 30ch-sps]
Row 15 — Yarn C
Join Yarn C, ch4 (counts as 1tr and 1ch), 3tr into first ch-sp, ch1, (3tr into next ch-sp, ch1) 12 times, (3tr, ch2, 3tr) into ch-2 sp, ch1, (3tr into next ch-sp, ch1) 13 times times, ch1, 1tr, turn. Fasten off.
Checkpoint: [92tr, 32ch-sps]

Checkpoint 5: Approach the Final Triangle
Row 16 — Yarn B
Join Yarn B, ch4 (counts as 1tr and 1ch), 3tr into first ch-sp, ch1, (3tr into next ch-sp, ch1) 13 times, (3tr, ch2, 3tr) into ch-2 sp, ch1, (3tr into next ch-sp, ch1) 14 times times, ch1, 1tr, turn. Fasten off.
Checkpoint: [98tr, 34ch-sps]
Row 17 — Yarn C
Join Yarn C, ch4 (counts as 1tr and 1ch), 3tr into first ch-sp, ch1, (3tr into next ch-sp, ch1) 14 times, (3tr, ch2, 3tr) into ch-2 sp, ch1, (3tr into next ch-sp, ch1) 15 times times, ch1, 1tr, turn. Fasten off.
Checkpoint: [104tr, 36ch-sps]
Row 18 — Yarn B
Join Yarn B, ch4 (counts as 1tr and 1ch), 3tr into first ch-sp, ch1, (3tr into next ch-sp, ch1) 15 times, (3tr, ch2, 3tr) into ch-2 sp, ch1, (3tr into next ch-sp, ch1) 16 times times, ch1, 1tr, turn. Fasten off.
Checkpoint: [110tr, 38ch-sps]
Row 19 — Yarn D
Row 19 is RS. Join Yarn D, ch4 (counts as 1tr and 1ch), 3tr into first ch-sp, ch1, (3tr into next ch-sp, ch1) 16 times, (3tr, ch2, 3tr) into ch-2 sp, ch1, (3tr into next ch-sp, ch1) 17 times times, ch1, 1tr, turn. Fasten off.
Final body checkpoint: [116tr, 40ch-sps]

Reading the Final Checkpoint
The final count of Row 19 is not just a number to record. It confirms that the body has reached the specified endpoint. If your Row 19 does not finish at [116tr, 40ch-sps], review the preceding row before moving to the ties. This avoids carrying an unnoticed discrepancy into the finishing stage.
At this point, the main body is complete. The pattern does not ask for a separate decorative border. Instead, the two Yarn D ties are attached directly to the specified ch-1 spaces at the start and end of Row 19.
Constructing the Two Ties
First Tie
With the RS facing, join Yarn D into the ch-1 sp at the start of Row 19, ch62.
Row 1 (RS): Starting in the second ch from the hook, 60dc. Fasten off. [62dc].
Second Tie
With the RS facing, rejoin Yarn D into the ch-1 sp at the end of Row 19, ch62. Work as Row 1.
When both ties are complete, weave in all ends. The tie construction is deliberately straightforward, so the attention should remain on the attachment points and the specified 62-chain foundation.

Assembly and Symmetry Checklist
- Check that the central ch-2 space remained the turning point throughout the body.
- Confirm that the row-end stitch counts match the supplied checkpoints.
- Check the color label before joining each specified new yarn.
- Do not add an extra border when finishing; the supplied pattern ends the body at Row 19 and then adds the ties.
- Attach the first tie to the ch-1 sp at the start of Row 19.
- Attach the second tie to the ch-1 sp at the end of Row 19.
- Use ch62 for each tie foundation.
- For each tie’s Row 1, work 60dc starting in the second chain from the hook.
- Weave in all ends after the ties are complete.
Troubleshooting by Checkpoint
The center looks off-center.
Before changing your tension or undoing multiple rows, identify the central ch-2 space. The pattern’s shaping depends on the (3tr, ch2, 3tr) increase being worked there. Compare the groups on both sides of that center.
My row is short by several stitches.
Use the row checkpoint. Because the pattern grows in regular increments, a mismatch often indicates that one of the chain-space groups was skipped or that the center was not worked in the correct space. Return to the beginning of that row and compare each section.
I cannot remember whether I should fasten off.
Follow the supplied row instructions rather than applying a general color-change rule. Some rows specifically say “Fasten off,” while other rows continue without that instruction.
The colors are not appearing as expected.
Refer to the named yarns. Yarn B is used repeatedly, Yarn C appears at specified rows, Yarn D begins at Row 8 and returns for Row 19 and the ties, while Yarn A is used again at Row 12.
The triangle is getting larger but my tension feels different.
Compare your work with the supplied tension: 9 tr sts x 5 rows in pattern using a 3mm hook = 5 x 5cm. The pattern also specifies the yarn type and hook size, so these are useful variables to keep consistent when checking the finished measurement.
The ties seem too short.
Check that each tie begins with ch62 and that the first dc row starts in the second chain from the hook and contains 60dc, giving the stated [62dc] count.
Quick Row Reference
| Row | Color instruction | Checkpoint |
|---|---|---|
| Row 1 (RS) | Yarn A | [8tr, 4ch-sps] |
| Row 2 (WS) | Continue current yarn | [14tr, 6ch-sps] |
| Row 3 | Yarn B | [20tr, 8ch-sps] |
| Row 4 | Yarn C | [26tr, 10ch-sps] |
| Row 5 | Yarn B | [32tr, 12ch-sps] |
| Row 6 | Yarn C | [38tr, 14ch-sps] |
| Row 7 | Yarn B | [44tr, 16ch-sps] |
| Row 8 | Yarn D | [50tr, 18ch-sps] |
| Row 9 | Continue current yarn | [56tr, 20ch-sps] |
| Row 10 | Continue current yarn | [62tr, 22ch-sps] |
| Row 11 | Continue current yarn | [68tr, 24ch-sps] |
| Row 12 | Continue current yarn | [74tr, 26ch-sps] |
| Row 13 | Continue current yarn | [80tr, 28ch-sps] |
| Row 14 | Yarn B | [86tr, 30ch-sps] |
| Row 15 | Yarn C | [92tr, 32ch-sps] |
| Row 16 | Yarn B | [98tr, 34ch-sps] |
| Row 17 | Yarn C | [104tr, 36ch-sps] |
| Row 18 | Yarn B | [110tr, 38ch-sps] |
| Row 19 (RS) | Yarn D | [116tr, 40ch-sps] |
Why the Stitch Counts Matter
In a pattern built from repeated groups, counting is a practical navigation tool. The visual texture can make individual stitches difficult to distinguish, especially after many rows. The bracketed counts provide a fixed point at the end of each row. They help you decide whether it is safe to continue or whether it is worth checking the current row again.
The chain-space count is equally useful. The project grows from [8tr, 4ch-sps] in Row 1 to [116tr, 40ch-sps] in Row 19. This progression gives you a second way to check the work. When both counts agree, you have much stronger evidence that the row has been completed as written.
Color Management Without Guesswork
Because the bandana is made from four shades, the color changes are part of its recognizable appearance. Keep the four yarn balls or skeins labeled A, B, C, and D rather than relying on color names alone. This is especially helpful if the lighting makes Lilac and other pale shades appear different while you work.
It is also worth keeping the source row list nearby. The sequence includes repeated uses of Yarn B and strategically placed Yarn C and Yarn D rows. Treat every explicit “Join Yarn” instruction as a checkpoint in its own right.
Final Measurements and Tension Check
The stated finished measurement is approximately 59 x 39 x 39cm, not including ties. The stated tension is 9 tr sts x 5 rows in pattern using a 3mm hook = 5 x 5cm.
These specifications describe the supplied design. If your tension differs, the resulting dimensions may differ as well. The safest approach is to compare your tension before assuming that the pattern’s row sequence should be altered. The technical instructions themselves should remain unchanged.

Frequently Asked Questions
Is this pattern written in UK or US crochet terms?
The supplied pattern is written in UK crochet terms. Its abbreviation list defines dc as double crochet and tr as treble crochet.
What hook size is specified?
The pattern specifies a 3mm crochet hook, also listed as US D/3.
How much yarn is required?
The materials list specifies four shades of cotton 4ply yarn, with 1 ball of each color. The suggested yarn is Patons 100% Cotton 4ply, 100% cotton, 100g/330m.
What colors are used?
Yarn A is Lilac, Yarn B is Raffia, Yarn C is Vanilla, and Yarn D is Nectarine.
How many rows are in the main bandana body?
The main body is worked through Row 19.
What is the final body stitch count?
Row 19 ends with [116tr, 40ch-sps].
How are the ties attached?
With the RS facing, the first tie is joined into the ch-1 sp at the start of Row 19. The second is joined into the ch-1 sp at the end of Row 19.
How is each tie made?
Each tie begins with ch62. Row 1 is worked from the second chain from the hook with 60dc, fastened off, and has the stated count [62dc].
What should I do when the body is complete?
Complete both ties and weave in all ends. The supplied pattern does not specify an additional border.
Finished Project Review
Once the ties are attached, lay the bandana flat and inspect the complete triangle. The central point should remain visually coherent, the color rows should follow the specified sequence, and the ties should extend from the two designated Row 19 spaces. This final inspection is a visual confirmation rather than a new pattern step.
The photographs show the finished piece worn as a headscarf and also laid flat. The triangular body is what gives the accessory its flexible styling options: it can cover the crown of the head while the two ties secure it behind the head. The granny-style spaces also allow the changing colors to remain visible across the entire surface.
Final Finishing Notes
Weave in all ends after completing the second tie. Keep the finishing secure but unobtrusive, particularly around the tie attachment areas where the accessory will experience movement during wear. No extra stitch pattern is required after Row 19.
The most reliable way to reproduce this bandana is to treat the project as a sequence of small verified stages. Establish the ring, confirm Row 1, check the early increases, verify the color joins, use the stitch counts as the triangle grows, and only begin the ties once Row 19 reaches [116tr, 40ch-sps]. This method makes the long rows less intimidating and gives you several opportunities to catch errors early.
Maker’s Final Checklist
- Four cotton 4ply shades prepared.
- Yarn A: Lilac.
- Yarn B: Raffia.
- Yarn C: Vanilla.
- Yarn D: Nectarine.
- 3mm hook used.
- Foundation ring formed with ch4 and ss.
- Rows 1–19 completed in the supplied order.
- Central ch-2 space preserved throughout.
- Row 19 checked at [116tr, 40ch-sps].
- First Yarn D tie attached at the start-of-Row-19 ch-1 sp.
- Second Yarn D tie attached at the end-of-Row-19 ch-1 sp.
- Each tie begins with ch62.
- Each tie Row 1 contains 60dc from the second chain.
- All ends woven in.
The Cruel Summer Bandana is a good example of how a small number of repeated crochet ideas can create a highly recognizable finished accessory. The project depends on the relationship between treble clusters, chain spaces, and one central increase. Once that structure is understood, the growing row lengths become much easier to manage.
For a clean result, keep the original technical specifications unchanged: use the specified 3mm hook, the listed cotton 4ply yarn, the four named colors, the supplied UK abbreviations, the exact row sequence, and the stated stitch checkpoints. Use the photographs as visual guidance for shape and color placement, while relying on the written instructions for the exact construction.
The source credits Becca Parker of To Be Adorned and states that the pattern is for personal and non-commercial use only. It also asks makers to credit To Be Adorned when using the pattern and encourages makers to follow and tag @tobeadorned when sharing their finished work online.
With the final ends woven in, the project is ready to wear: a colorful crochet triangle transformed into a practical summer headscarf through two simple ties and a carefully maintained central shape.