
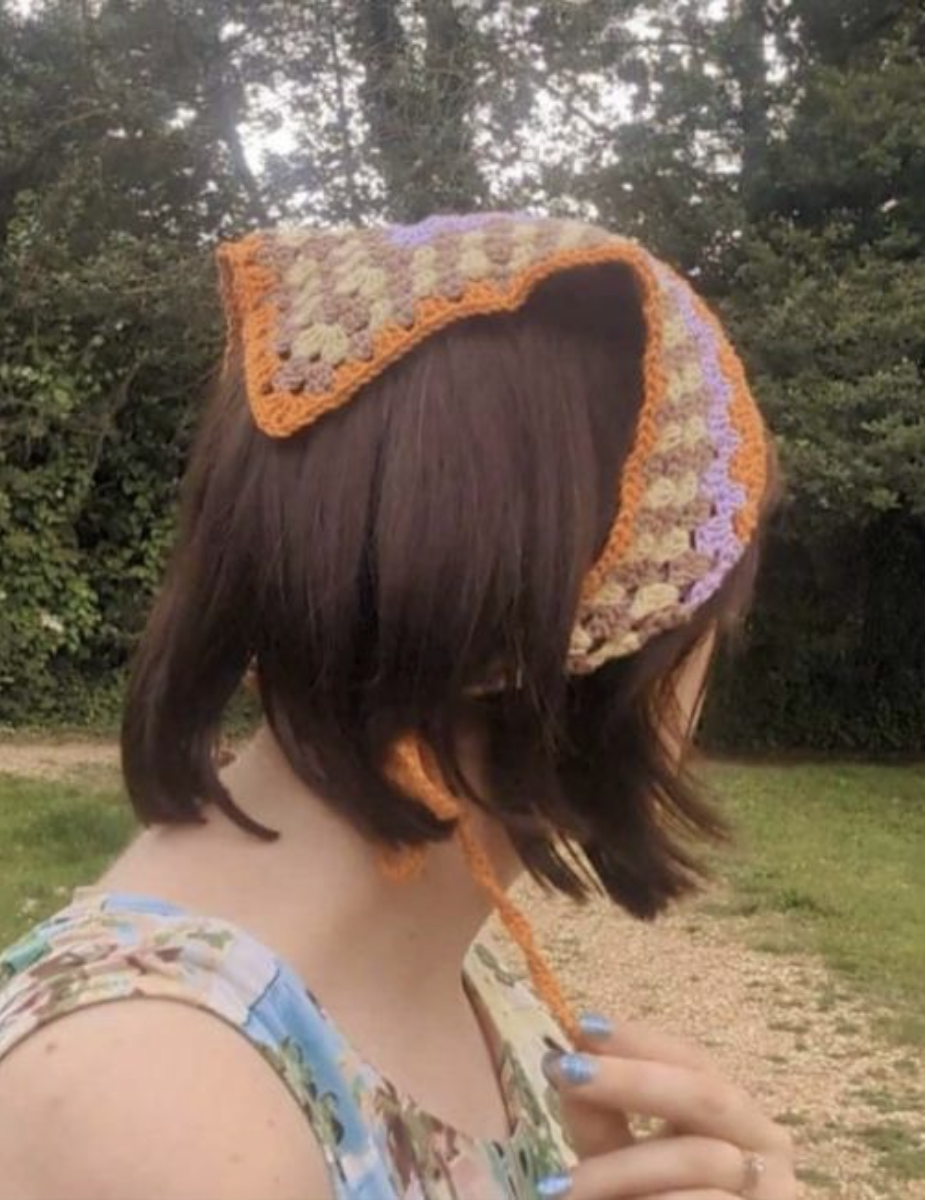

Some crochet projects are small enough to finish in a weekend but still teach several valuable skills at once. The Cruel Summer Bandana is one of those projects. Its fabric is built from a granny-style half square, its triangle expands through repeated chain-space groups, and its final shape is completed with two simple ties. The result is practical, colorful, and easy to recognize once the construction starts to take shape.
This fifth guide is written as a beginner-friendly crochet masterclass. The goal is to make the construction easier to understand without changing the technical pattern. The original row instructions, color assignments, stitch counts, measurements, tension, hook size, and tie construction are retained. The extra explanations are there to help a maker understand what to look for, where to pause, and how to finish the project neatly.
The supplied pattern is by Becca Parker of To Be Adorned and is written in UK crochet terms. It specifies four shades of cotton 4ply yarn, a 3mm crochet hook, and a finished main bandana size of approximately 59 x 39 x 39cm, not including ties. The stated tension is 9 tr sts x 5 rows in pattern using a 3mm hook = 5 x 5cm.
At a Glance: Your Crochet Road Map
- Shape: Granny half square triangle
- Main body: Rows 1–19
- Hook: 3mm crochet hook (US D/3)
- Yarn: Four shades of cotton 4ply
- Suggested yarn: Patons 100% Cotton 4ply, 100% cotton, 100g/330m
- Amount: 1 ball of each color
- Yarn A: Lilac
- Yarn B: Raffia
- Yarn C: Vanilla
- Yarn D: Nectarine
- Needle: Tapestry needle
- Finished size: Approx 59 x 39 x 39cm, not including ties
- Tension: 9 tr sts x 5 rows in pattern using 3mm hook = 5 x 5cm
Before Your First Stitch
The most useful preparation is to make the written pattern easy to read. Put the four yarn colors within reach and label them A, B, C, and D. This prevents a common source of confusion: remembering a color by appearance rather than by the pattern’s letter.
Keep the 3mm hook nearby and have a tapestry needle ready for the final ends. It is also useful to keep a row counter or simple written checklist beside your work. The project grows predictably, so marking each completed row can make the longer middle section much less intimidating.
Understanding the central increase
The defining feature of the triangle is the central (3tr, ch2, 3tr). It is worked into the central ch-2 space on every expanding row. Around that center, groups of 3tr are worked into chain spaces separated by ch1. The left and right sides therefore expand while the center continues to define the point of the triangle.
Once this relationship is clear, the written pattern becomes easier to read. Instead of seeing a long sequence of stitches, think of every row as an approach to the center, the central increase, and a return away from the center.

The Foundation: Creating the Ring
Using the 3mm hook and Yarn A, ch4 and join with a ss to form a ring. This is the starting point for the entire bandana. There is no separate large foundation chain for the body; the triangle develops from this compact center.
Take a moment here to make the ring secure and easy to work into. The first row places all of its initial groups inside this ring, so a loose or difficult-to-see center can make the beginning unnecessarily frustrating.
Rows 1–5: Build the First Triangle
The first five rows establish the logic that continues throughout the project. The number of treble stitches and chain spaces increases, while the central ch-2 space remains the key turning point.
Row 1 (RS)
Using 3mm hook and Yarn A, ch4, join with a ss to form a ring. Ch4 (counts a 1tr and 1ch), (3tr, ch2, 3tr) into the ring, ch1, 1tr into the ring, turn.
Checkpoint: [8tr, 4ch-sps]
Row 2 (WS)
Ch4 (counts as 1tr and 1ch), 3tr into first ch-sp, ch1, (3tr, ch2, 3tr) into ch-2 sp, ch1, 3tr into next ch-sp, ch1, 1tr, turn. Fasten off.
Checkpoint: [14tr, 6ch-sps]
Row 3
Join Yarn B, ch4 (counts as 1tr and 1ch), 3tr into first ch-sp, ch1, 3tr into next ch-sp, ch1, (3tr, ch2, 3tr) into ch-2 sp, ch1, (3tr into next ch-sp, ch1) twice, ch1, 1tr, turn. Fasten off.
Checkpoint: [20tr, 8ch-sps]
Row 4
Join Yarn C, ch4 (counts as 1tr and 1ch), 3tr into first ch-sp, ch1, (3tr into next ch-sp, ch1) twice, (3tr, ch2, 3tr) into ch-2 sp, ch1, (3tr into next ch-sp, ch1) three times, ch1, 1tr, turn. Fasten off.
Checkpoint: [26tr, 10ch-sps]
Row 5
Join Yarn B, ch4 (counts as 1tr and 1ch), 3tr into first ch-sp, ch1, (3tr into next ch-sp, ch1) three times, (3tr, ch2, 3tr) into ch-2 sp, ch1, (3tr into next ch-sp, ch1) four times, ch1, 1tr, turn. Fasten off.
Checkpoint: [32tr, 12ch-sps]
After Row 5, the checkpoint is [32tr, 12ch-sps]. This is a useful first progress marker. If your count is correct and the triangle is beginning to look balanced, you have already established the main rhythm of the pattern.

Rows 6–10: Let the Triangle Grow
Rows 6 through 10 are where the project starts to feel like a real accessory rather than a small sample. The repeated sections become longer, but the method does not change. Each row still travels through the chain spaces toward the center and then back out again.
Row 6
Join Yarn C, ch4 (counts as 1tr and 1ch), 3tr into first ch-sp, ch1, (3tr into next ch-sp, ch1) four times, (3tr, ch2, 3tr) into ch-2 sp, ch1, (3tr into next ch-sp, ch1) five times times, ch1, 1tr, turn. Fasten off.
Checkpoint: [38tr, 14ch-sps]
Row 7
Join Yarn B, ch4 (counts as 1tr and 1ch), 3tr into first ch-sp, ch1, (3tr into next ch-sp, ch1) five times, (3tr, ch2, 3tr) into ch-2 sp, ch1, (3tr into next ch-sp, ch1) six times times, ch1, 1tr, turn. Fasten off.
Checkpoint: [44tr, 16ch-sps]
Row 8
Join Yarn D, ch4 (counts as 1tr and 1ch), 3tr into first ch-sp, ch1, (3tr into next ch-sp, ch1) six times, (3tr, ch2, 3tr) into ch-2 sp, ch1, (3tr into next ch-sp, ch1) seven times times, ch1, 1tr, turn.
Checkpoint: [50tr, 18ch-sps]
Row 9
Ch4 (counts as 1tr and 1ch), 3tr into first ch-sp, ch1, (3tr into next ch-sp, ch1) seven times, (3tr, ch2, 3tr) into ch-2 sp, ch1, (3tr into next ch-sp, ch1) eight times times, ch1, 1tr, turn.
Checkpoint: [56tr, 20ch-sps]
Row 10
Ch4 (counts as 1tr and 1ch), 3tr into first ch-sp, ch1, (3tr into next ch-sp, ch1) eight times, (3tr, ch2, 3tr) into ch-2 sp, ch1, (3tr into next ch-sp, ch1) nine times times, ch1, 1tr, turn.
Checkpoint: [62tr, 22ch-sps]
At the end of Row 10, the stated checkpoint is [62tr, 22ch-sps]. If you are teaching yourself to count crochet pattern repeats, this is an excellent point to compare the written instruction with the fabric. The number of repeated groups has increased, but the center should still be immediately identifiable.
Rows 11–15: The Long-Row Practice Zone
The middle of the bandana is where a beginner benefits most from a calm counting system. Rather than trying to memorize the entire sentence of a row, locate the central ch-2 space first. Then count the repeated 3tr groups on one side, work the center, and continue across the other side according to the written instruction.
Row 11
Ch4 (counts as 1tr and 1ch), 3tr into first ch-sp, ch1, (3tr into next ch-sp, ch1) nine times, (3tr, ch2, 3tr) into ch-2 sp, ch1, (3tr into next ch-sp, ch1) 10 times times, ch1, 1tr, turn. Fasten off.
Checkpoint: [68tr, 24ch-sps]
Row 12
Join Yarn A, ch4 (counts as 1tr and 1ch), 3tr into first ch-sp, ch1, (3tr into next ch-sp, ch1) nine times, (3tr, ch2, 3tr) into ch-2 sp, ch1, (3tr into next ch-sp, ch1) 10 times times, ch1, 1tr, turn.
Checkpoint: [74tr, 26ch-sps]
Row 13
Ch4 (counts as 1tr and 1ch), 3tr into first ch-sp, ch1, (3tr into next ch-sp, ch1) 10 times, (3tr, ch2, 3tr) into ch-2 sp, ch1, (3tr into next ch-sp, ch1) 11 times times, ch1, 1tr, turn. Fasten off.
Checkpoint: [80tr, 28ch-sps]
Row 14
Join Yarn B, ch4 (counts as 1tr and 1ch), 3tr into first ch-sp, ch1, (3tr into next ch-sp, ch1) 11 times, (3tr, ch2, 3tr) into ch-2 sp, ch1, (3tr into next ch-sp, ch1) 12 times times, ch1, 1tr, turn. Fasten off.
Checkpoint: [86tr, 30ch-sps]
Row 15
Join Yarn C, ch4 (counts as 1tr and 1ch), 3tr into first ch-sp, ch1, (3tr into next ch-sp, ch1) 12 times, (3tr, ch2, 3tr) into ch-2 sp, ch1, (3tr into next ch-sp, ch1) 13 times times, ch1, 1tr, turn. Fasten off.
Checkpoint: [92tr, 32ch-sps]
Row 15 ends at [92tr, 32ch-sps]. The project should now have a broad triangular silhouette. This is also a good point to lay the piece flat and check that the two sides are developing evenly. You are not changing the pattern based on appearance; you are simply using the shape as a visual check alongside the written stitch count.

Rows 16–19: Complete the Main Body
The final four body rows continue exactly the same construction principle. The stitch counts keep increasing, and the final color change to Yarn D creates the outer section used for the finished edge and ties.
Row 16
Join Yarn B, ch4 (counts as 1tr and 1ch), 3tr into first ch-sp, ch1, (3tr into next ch-sp, ch1) 13 times, (3tr, ch2, 3tr) into ch-2 sp, ch1, (3tr into next ch-sp, ch1) 14 times times, ch1, 1tr, turn. Fasten off.
Checkpoint: [98tr, 34ch-sps]
Row 17
Join Yarn C, ch4 (counts as 1tr and 1ch), 3tr into first ch-sp, ch1, (3tr into next ch-sp, ch1) 14 times, (3tr, ch2, 3tr) into ch-2 sp, ch1, (3tr into next ch-sp, ch1) 15 times times, ch1, 1tr, turn. Fasten off.
Checkpoint: [104tr, 36ch-sps]
Row 18
Join Yarn B, ch4 (counts as 1tr and 1ch), 3tr into first ch-sp, ch1, (3tr into next ch-sp, ch1) 15 times, (3tr, ch2, 3tr) into ch-2 sp, ch1, (3tr into next ch-sp, ch1) 16 times times, ch1, 1tr, turn. Fasten off.
Checkpoint: [110tr, 38ch-sps]
Row 19 (RS)
Join Yarn D, ch4 (counts as 1tr and 1ch), 3tr into first ch-sp, ch1, (3tr into next ch-sp, ch1) 16 times, (3tr, ch2, 3tr) into ch-2 sp, ch1, (3tr into next ch-sp, ch1) 17 times times, ch1, 1tr, turn. Fasten off.
Checkpoint: [116tr, 40ch-sps]
Row 19 is the final body row and has the checkpoint [116tr, 40ch-sps]. It is also specifically marked RS in the supplied pattern. Once Row 19 is complete, fasten off as instructed and move to the tie construction.
A Simple Way to Check Your Work
For a project like this, checking does not need to mean counting every stitch from the beginning after every row. Instead, use three levels of checking.
- Visual check: Can you identify the central ch-2 space?
- Pattern check: Did you work the specified repeated groups on each side of the center?
- Numerical check: Does the final stitch and chain-space count match the supplied checkpoint?
Using all three gives you a much better chance of catching an error while it is still easy to correct.
Color Changes: Follow the Letters, Not Memory
The pattern uses four named yarns. Yarn A is Lilac, Yarn B is Raffia, Yarn C is Vanilla, and Yarn D is Nectarine. The color sequence is not simply a four-row repeat. Some rows join a new yarn, while others continue the current yarn.
For example, Yarn D is introduced at Row 8, Yarn A returns at Row 12, Yarn B is used at Rows 14, 16, and 18, Yarn C is used at Rows 15 and 17, and Yarn D returns for Row 19. This is why keeping the pattern’s row labels visible is more reliable than trying to recreate the color order from memory.
When a row says “Join Yarn,” treat that wording as part of the technical instruction. When it does not say to join a new yarn, continue exactly as the supplied row directs.
How to Keep the Triangle Symmetrical
Symmetry in this design comes from the construction, not from manually adjusting the left and right sides. The central ch-2 space is the reference point. If it stays in the correct location and the repeated chain-space groups are worked as written, the two sides develop naturally.
- Find the center before beginning the repeated section.
- Do not substitute a nearby space for the central ch-2 space.
- Use the row’s bracketed checkpoint before moving forward.
- Lay the work flat occasionally to inspect the overall triangular shape.
- Do not add or remove stitches to make the shape “look right.”
The purpose of these checks is to protect the original construction. The supplied numbers should remain the authority for the project.

Making the Ties
Once the main triangle reaches Row 19, the bandana becomes wearable through two Yarn D ties. The tie instructions are short, but their attachment points matter.
First tie
With the RS facing, join Yarn D into the ch-1 sp at the start of Row 19, ch62.
Row 1 (RS): Starting in the second ch from the hook, 60dc. Fasten off. [62dc].
Second tie
With the RS facing, rejoin Yarn D into the ch-1 sp at the end of Row 19, ch62. Work as Row 1.
Finally, weave in all ends. The source pattern does not specify an additional decorative border, so the finishing stage is the completion of the two ties and the ends.

Finishing Like a Careful Maker
Weaving in ends is easy to treat as an afterthought, especially when the main triangle already looks finished. For a wearable accessory, however, finishing is part of the construction. Work the ends in securely and keep the finishing neat around the tie attachment areas.
Before considering the project complete, check the two corners where the ties begin. One should be attached at the start-of-Row-19 ch-1 space and the other at the end-of-Row-19 ch-1 space. The two tie foundations should each begin with ch62, and each Row 1 should contain 60dc when started in the second chain from the hook.
Troubleshooting Without Changing the Pattern
My triangle is not expanding evenly.
Locate the central ch-2 space and compare the repeated groups on both sides. Then check the stitch count for the row. Do not compensate by adding or removing stitches unless the original pattern specifically instructs it.
I lost my place in a long row.
Return to the central ch-2 space. It is the strongest landmark in the design. From there, use the written repeat counts to work toward one edge and then the other.
I am unsure which side is the RS.
The supplied pattern explicitly labels Row 1 as RS, Row 2 as WS, and Row 19 as RS. The tie instructions also specify that the RS should be facing. Use those labels rather than relying only on the appearance of the fabric.
My color sequence looks different from the sample.
Check the Yarn A–D labels in the pattern. The source specifies Lilac, Raffia, Vanilla, and Nectarine respectively. Then compare the row where the yarn was joined with the written instructions.
My final size is different.
The supplied finished size is approximately 59 x 39 x 39cm, not including ties, and the stated tension is 9 tr sts x 5 rows in pattern using a 3mm hook = 5 x 5cm. Differences in tension can affect the finished dimensions. The pattern itself should not be altered simply to force a measurement.
The ties do not seem to match.
Verify both attachment points and confirm that both tie foundations use ch62. For Row 1 of each tie, start in the second chain from the hook and work 60dc. The stated count is [62dc].
Beginner Skill Lessons Hidden in This Project
This bandana is more than a small accessory. It gives a beginner practice with several transferable crochet skills.
- Working into a ring: The project starts from a small ring rather than a long foundation.
- Reading chain spaces: The repeated groups are placed into ch-sps, so recognizing spaces becomes important.
- Understanding a central increase: The repeated (3tr, ch2, 3tr) creates the triangle.
- Following color instructions: Multiple yarn shades are introduced at specific rows.
- Counting repeats: The number of groups grows as the triangle becomes larger.
- Working with RS and WS: The pattern identifies the relevant sides explicitly.
- Finishing a wearable: Two ties convert the triangular fabric into a practical headscarf.
Quick Reference for the Four Yarn Colors
| Pattern Label | Color | Pattern Role |
|---|---|---|
| Yarn A | Lilac | Foundation and specified later row |
| Yarn B | Raffia | Repeated contrast color |
| Yarn C | Vanilla | Specified contrast rows |
| Yarn D | Nectarine | Specified body rows and ties |
Final Technical Checklist
- Four shades of cotton 4ply yarn prepared.
- Suggested yarn: Patons 100% Cotton 4ply, 100% cotton, 100g/330m.
- 1 ball of each color.
- Yarn A: Lilac.
- Yarn B: Raffia.
- Yarn C: Vanilla.
- Yarn D: Nectarine.
- 3mm crochet hook (US D/3).
- Tapestry needle.
- Finished main body approximately 59 x 39 x 39cm, not including ties.
- Tension 9 tr sts x 5 rows in pattern using 3mm hook = 5 x 5cm.
- UK crochet terminology used.
- Main body completed through Row 19.
- Row 19 checkpoint: [116tr, 40ch-sps].
- First tie joined at the ch-1 sp at the start of Row 19.
- First tie foundation: ch62.
- First tie Row 1: 60dc from the second chain from the hook, [62dc].
- Second tie joined at the ch-1 sp at the end of Row 19.
- Second tie worked as Row 1.
- All ends woven in.
Frequently Asked Questions
What kind of crochet project is this?
It is a triangular crochet bandana built as a granny half square, finished with two ties.
Is it written in UK crochet terminology?
Yes. The supplied pattern explicitly states that it is written in UK crochet terms.
What size hook do I need?
The pattern specifies a 3mm crochet hook, listed as US D/3.
How much yarn is listed?
The materials list four shades of cotton 4ply yarn and specifies 1 ball of each color.
What is the finished size?
Approximately 59 x 39 x 39cm for the main bandana, not including ties.
How many rows make the main triangle?
The main body runs through Row 19.
What is the final stitch count?
Row 19 finishes at [116tr, 40ch-sps].
How long are the tie foundations?
Each tie begins with ch62.
How many double crochets are worked on each tie?
Row 1 of each tie is worked with 60dc, starting in the second chain from the hook, with the stated count [62dc].
Does the pattern call for a separate border?
No additional border is specified. After Row 19, the pattern moves to the two Yarn D ties and then says to weave in all ends.
Styling the Finished Bandana
The finished photographs show the triangular accessory worn over the head with the ties secured behind it. The triangle provides the main coverage while the ties make the piece adjustable. Because the design is made from colorful granny-style groups, the fabric remains visually interesting even when worn from different angles.

What Makes the Construction Work
The design succeeds because every new row expands the same basic architecture. The central ch-2 space receives the increase, while the number of 3tr groups around it grows. This is why the finished piece can become wide without requiring a complicated shaping formula.
For a beginner, the most useful takeaway is that a complicated-looking row can often be understood as a repeated unit plus a central landmark. Once you recognize that structure, the longer rows become a matter of careful counting rather than memorization.
Final Finishing Advice
When the last tie has been completed, take a final look at the whole project before trimming or hiding any remaining ends. Confirm the two tie attachment points, inspect the triangle for obvious missed spaces, and compare the final body with the stated [116tr, 40ch-sps] checkpoint. Then weave in all ends securely.
Keep the completed bandana flat for a moment before wearing it. This makes the triangular shape easy to inspect and lets you see the relationship between the final Yarn D section and the two ties. The supplied finished-size information does not include the ties, so use the 59 x 39 x 39cm measurement as a reference for the main body only.
The Cruel Summer Bandana is a rewarding project because the technical foundation is simple enough to learn, while the color arrangement gives the finished accessory plenty of personality. If you approach the project one checkpoint at a time, the increasing rows become much easier to manage. The key is consistency: keep the central ch-2 space clear, follow each Join Yarn instruction, respect the supplied stitch counts, and finish the ties exactly where the pattern specifies.
The source credits Becca Parker of To Be Adorned and states that the pattern is for personal and non-commercial use only. The pattern asks makers to credit To Be Adorned when using it and encourages makers to follow and tag @tobeadorned when sharing finished makes online.
With the final ends woven in, the project is ready to become a colorful handmade summer accessory. The finished triangle, contrasting yarn bands, and two simple ties make it a compact project with a clear construction and a satisfying final transformation from a small center ring into a wearable bandana.