
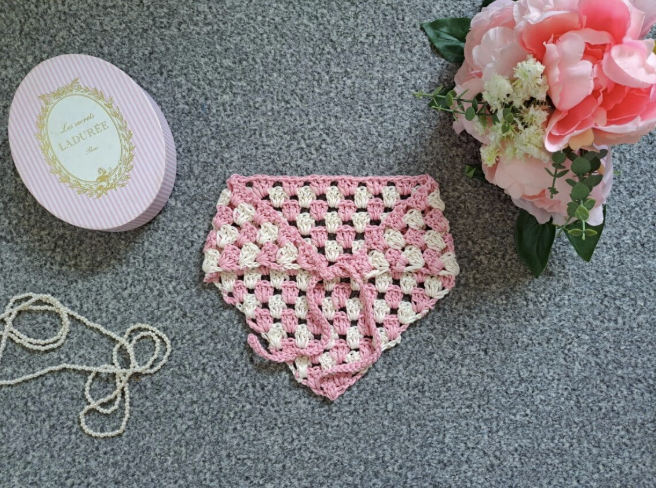
There is something wonderfully nostalgic about a handmade crochet bandana. This cottagecore-inspired design combines a simple granny triangle structure with two soft shades of yarn, creating an accessory that feels both timeless and easy to wear. The project is especially approachable for crocheters who are comfortable with basic stitches and want to practice working into chain spaces, changing colors, fastening off, and building a triangular shape row by row.
This free crochet cottagecore bandana pattern is worked in two shades of Drops Muskat yarn and uses a 4 mm crochet hook. The construction begins at the center with a small chain ring and gradually expands through repeated granny-style clusters. The final rows create the wide triangular shape, while the last remaining Desert Rose yarn is used to make the two ties.
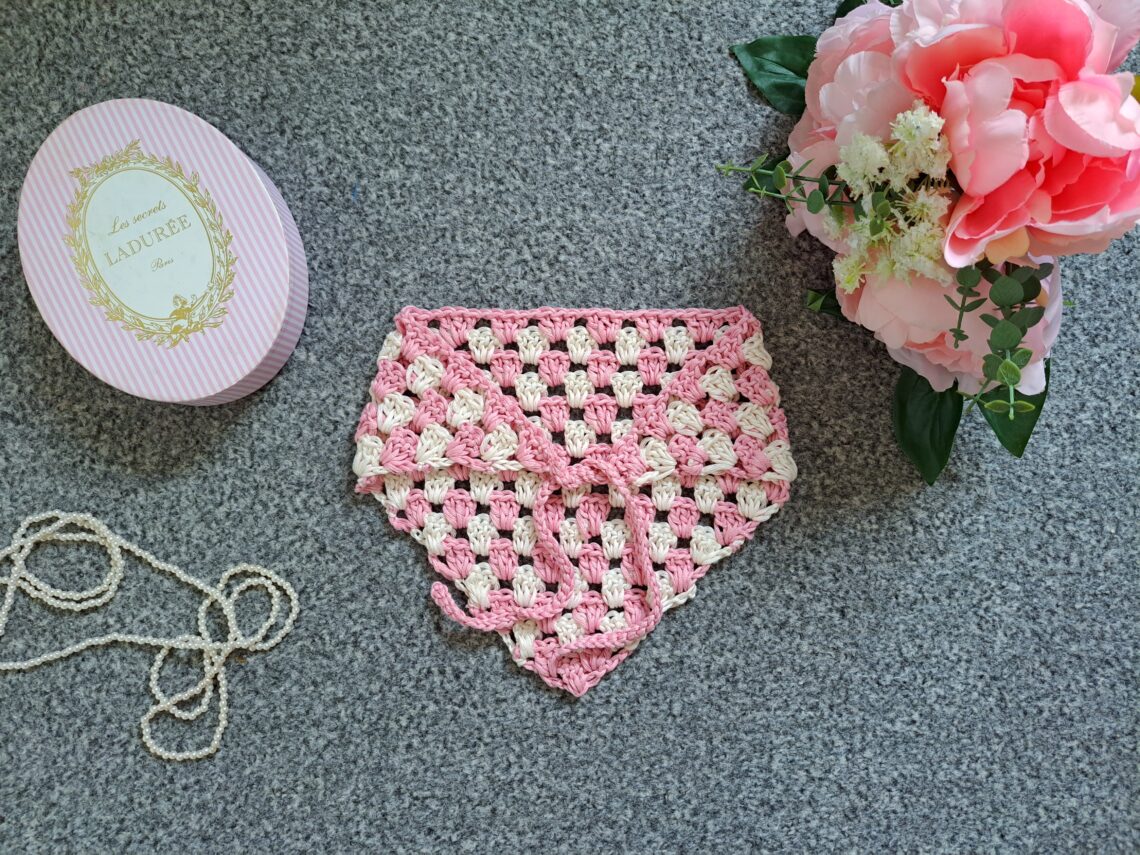
The original pattern is written using US crochet terms, with British terminology provided in brackets for the Double Crochet. To make the project easier to follow, this guide focuses on stitch checkpoints and construction stages. Rather than treating the pattern as a long sequence of numbers, you can think of every row as another step in the growth of the triangle. This approach can make it easier to notice where you are in the pattern and catch mistakes before continuing.
Project Overview
The finished bandana measures approximately 8.5 inches by 17 inches (21.5 cm by 43 cm), excluding the ties. The pattern is rated Easy and is suitable for a beginner who understands basic crochet terminology and is ready to work with Double Crochet stitches and chain spaces.
The color combination specified in the source uses Drops Muskat shade 06 Desert Rose and Drops Muskat shade 08 Off White. The two shades alternate throughout the main triangle. The color changes are an important visual part of the finished design, so keeping the yarn changes consistent from row to row helps preserve the intended appearance.
The gauge is 4 inches (10 cm): 8 rows of Granny Triangle pattern. Because the finished measurements are given in the source, checking your gauge before beginning is useful if you want your finished bandana to stay close to the stated size.
Materials and Pattern Information
- 1 skein Drops Muskat shade 06 Desert Rose
- 1 skein Drops Muskat shade 08 Off White
- 4 mm crochet hook
- Scissors
- Tapestry needle
The source pattern uses the following abbreviations:
- Ch: Chain
- St: Stitch
- Sl st: Slip stitch
- DC: Double Crochet (UK Treble Crochet)
- EOR: End of row
Keeping these abbreviations nearby can make the written instructions much easier to scan while crocheting. In particular, remember that the pattern uses US terminology. The abbreviation DC refers to Double Crochet in the source, while the British equivalent is UK Treble Crochet.
Before You Begin: Understanding the Triangle
The most useful way to understand this project is to see how the triangle expands. The first row creates the center foundation. The following rows add another group of three Double Crochet stitches into the appropriate chain spaces. As the rows increase, the number of repeated middle sections increases as well.
This means the pattern has a predictable visual rhythm. Instead of trying to memorize every line, pay attention to the spaces and clusters that you can see developing in your work. The chain spaces separate groups of Double Crochet stitches, and those spaces become useful visual landmarks as the triangle grows.
Another important feature is the alternating color sequence. After the early rows, the pattern instructs you to fasten off the current yarn and attach the other shade at the same corner. This creates the striped appearance across the triangular fabric.
Creating the Starting Ring
Begin with Desert Rose. Make a slip knot, then chain 4. Slip stitch through the first chain to form a ring.
This small ring becomes the foundation for Row 1. Take a moment to make sure the ring is secure before beginning the Double Crochet stitches. Since the first row is worked into the circle, keeping the center ring easy to identify will help you follow the opening instructions.

Row 1: Establishing the Center
For Row 1, chain 4. In the source pattern, this chain counts as a Double Crochet plus a chain space. Then work 3 Double Crochet into the circle. Chain 1, followed by 1 Double Crochet into the circle.
At the end of this first row, you have established the basic structure that will be expanded in subsequent rows. The center may look very small at this point, which is completely natural. The project is designed to grow gradually as additional rows are added.
A helpful checkpoint after Row 1 is to identify the chain spaces. These spaces are important because later clusters will be worked into them. Avoid pulling the stitches so tightly that the spaces become difficult to see.
Row 2: The First Expansion
Turn your work. Chain 4, which counts as 1 Double Crochet plus a chain space. Work 3 Double Crochet inside the next space. Chain 1, then work 3 Double Crochet, chain 1, and 1 Double Crochet inside the next and last space.
Fasten off at the end of the row. Attach Off White to the same corner where you fastened off.
This is the first important color-change checkpoint. The attachment point matters because the next row begins from this corner. Keeping the new yarn attached in the specified location helps maintain the structure and appearance of the triangle.

Row 3: Building the Granny Triangle Rhythm
Turn your work and begin Row 3 with Off White. Chain 4, counting as 1 Double Crochet plus a chain space. Work 3 Double Crochet in the next space. Chain 1, then work 3 Double Crochet in the next space. Chain 1, followed by 3 Double Crochet, chain 1, and 1 Double Crochet in the next and last space.
Fasten off and attach Desert Rose to the same corner.
At this stage, the alternating color effect begins to become easier to recognize. It is useful to pause after the row and compare the overall shape rather than focusing only on individual stitches. The triangle should continue to expand outward while the center remains the starting point of the design.
Row 4: Establishing the Repeating Structure
For Row 4, chain 4, which equals 1 Double Crochet plus 1 chain space. Work 3 Double Crochet in the next space. Then work the following sequence twice: chain 1, 3 Double Crochet in the next space.
After those repeats, finish with chain 1, 3 Double Crochet, chain 1, and 1 Double Crochet in the next and last space.
Fasten off the current yarn and attach the other shade to the same corner. From this point onward, the color changes continue by alternating the two shades after each row.

Rows 5–16: Let the Triangle Grow
The main body of the bandana continues through Row 16. The basic construction remains consistent, but the number of repeated middle sections increases by one with each new row.
For Row 5, after the initial 3 Double Crochet section, repeat chain 1 and 3 Double Crochet in the next space 3 times.
For Row 6, repeat that sequence 4 times.
For Row 7, repeat it 5 times.
For Row 8, repeat it 6 times.
For Row 9, repeat it 7 times.
For Row 10, repeat it 8 times.
For Row 11, repeat it 9 times.
For Row 12, repeat it 10 times.
For Row 13, repeat it 11 times.
For Row 14, repeat it 12 times.
For Row 15, repeat it 13 times.
For Row 16, repeat it 14 times.
Every row finishes with chain 1, 3 Double Crochet, chain 1, and 1 Double Crochet in the next and last space.
This is the central checkpoint of the entire project: the repeated middle section grows progressively from Row 5 through Row 16. If you lose your place, use the row number and the specified repeat count together. They provide two independent ways to check where you are.

A Simple Row-by-Row Checkpoint System
When working a project with many similar rows, it is easy to accidentally repeat a row or skip one. A simple checkpoint system can help.
- Rows 1–3: Focus on establishing the center and the first color changes.
- Row 4: Confirm the repeating granny-triangle structure.
- Rows 5–8: Check that the repeat count increases one step at a time.
- Rows 9–12: Continue using the row number and repeat count together.
- Rows 13–15: Pay particular attention to the growing number of middle repeats.
- Row 16: Confirm the final repeat count and the finishing color.
This method does not change the pattern. It simply gives you a practical way to organize the information already provided by the source.
Color-Change Tips for a Clean Appearance
The pattern alternates Desert Rose and Off White throughout the main body. After each row, fasten off the current shade and attach the other shade to the same corner.
Because the color change happens at the same corner, it is useful to make that corner your visual starting point for every new row. This can reduce the chance of accidentally attaching the new yarn in a different location.
When checking your work, look at the color sequence as well as the stitch structure. If the colors suddenly appear in an unexpected order, stop before continuing. It is much easier to inspect the previous row immediately than to discover the problem after several additional rows.

Keeping Your Stitch Tension Consistent
Consistent tension can make the finished triangle look more even. The source specifies a gauge of 4 inches (10 cm): 8 rows of Granny Triangle pattern. If your rows are noticeably tighter or looser than the stated gauge, the final dimensions may differ from the finished size given in the pattern.
While working, try to keep your Double Crochet stitches reasonably consistent. Avoid deliberately changing your tension from one color to another. The two shades should become part of the same fabric rather than creating visibly different row heights.
Remember that the finished size excluding ties is 8.5 inches by 17 inches (21.5 cm by 43 cm). These measurements are useful as a reference point when assessing the overall progress of your project.
Visual Checkpoints as the Bandana Gets Larger
As the triangle grows, the fabric becomes easier to inspect. Look for the repeated relationship between the Double Crochet clusters and the chain spaces. Each new row introduces another repeated section, so the triangle should gradually become broader.
Avoid judging the project solely by its appearance after one individual row. Instead, compare several completed rows together. The overall triangular shape is a better indicator of progress than any single cluster.

Reaching Row 16
Row 16 is the final main-body row. The row follows the established structure and contains 14 repeats of the chain 1 and 3 Double Crochet sequence in the middle.
The finishing sequence remains the same: chain 1, 3 Double Crochet, chain 1, and 1 Double Crochet in the next and last space.
Row 16 finishes in Desert Rose. One particularly important instruction is that you do not fasten off the Desert Rose yarn at this point. Instead, the remaining attached Desert Rose yarn is used to create Strap 1.
This is an important transition from the triangular fabric to the ties. Before starting the strap, check that you have completed Row 16 and that Desert Rose is still attached as instructed.
Creating Strap 1
With Desert Rose still attached, chain 35.
Once you have chained 35, slip stitch through the second chain and every chain across. At the end, slip stitch through the Double Crochet on the side of the bandana to secure the strap. Fasten off.
The strap is therefore made from a chain of 35 stitches followed by slip stitches back across the chain. The final slip stitch secures it to the side of the bandana.

Creating Strap 2
For Strap 2, attach the yarn to the other side corner. Chain 35, then slip stitch through the second chain and every chain across.
At the end, slip stitch through the Double Crochet on the side of the bandana to secure Strap 2.
The two straps are therefore constructed using the same basic sequence. The important difference is their starting locations: Strap 1 begins with the Desert Rose yarn already attached after Row 16, while Strap 2 begins by attaching yarn to the opposite side corner.

Symmetry and Side-to-Side Inspection
Once both straps are attached, place the bandana flat and look at the two sides. This is a useful visual inspection rather than an additional pattern instruction. The goal is simply to confirm that the two ties are attached at the intended opposite corners and that the triangular body has maintained its overall shape.
Because the pattern builds from a central starting point, the finished triangle naturally provides a useful reference for comparing the two sides. If one side appears dramatically different, review your previous row checkpoints before assuming the finished piece needs adjustment.
Common Beginner Mistakes to Watch For
Losing Track of the Repeat Count
The repeat count increases as the rows progress. From Row 5 through Row 16, each new row has one more repetition than the previous row. Writing down your current row number can make it easier to stay organized.
Attaching the New Color in the Wrong Place
The pattern specifically instructs you to attach the new shade to the same corner where the previous yarn was fastened off. Keeping this location consistent is important to the construction.
Fastening Off Row 16 Too Early
Do not fasten off the Desert Rose yarn after Row 16. The attached yarn is needed for Strap 1.
Changing the Strap Chain Count
Both straps are based on a chain of 35. Keep this number separate from the row repeat counts so it does not become confused with the main-body instructions.
Mixing Crochet Terminology
The source uses US crochet terms. The Double Crochet in this pattern is equivalent to a UK Treble Crochet. Keeping that distinction clear is particularly important when following tutorials or other patterns written using different terminology.

Quick Pattern Check Before Finishing
- Confirm that the project began with Desert Rose.
- Confirm that the foundation started with Ch 4 and a slip stitch forming a ring.
- Check that Rows 1–3 follow their individual instructions.
- Confirm that Row 4 begins the increasing repeat structure.
- Check the repeat count for each row from Row 5 through Row 16.
- Confirm that every row ends with the specified chain and Double Crochet sequence.
- Confirm that the colors alternate after each row as instructed.
- Confirm that Row 16 finishes in Desert Rose.
- Do not fasten off Desert Rose after Row 16.
- Make Strap 1 with a chain of 35.
- Attach Strap 2 to the opposite side corner and also chain 35.
Frequently Asked Questions
What skill level is this crochet bandana?
The source rates the pattern as Easy. The project uses basic stitches and a repeating granny-triangle construction, making it a suitable choice for beginners who are ready to work with Double Crochet, chain spaces, slip stitches, color changes, and simple strap construction.
What crochet hook size is required?
The pattern uses a 4 mm crochet hook.
Which yarn colors are used?
The specified yarn is Drops Muskat in shade 06 Desert Rose and shade 08 Off White, with 1 skein of each shade listed in the materials.
What is the finished size?
The finished bandana measures 8.5 inches by 17 inches (21.5 cm by 43 cm), excluding the ties.
What gauge does the pattern specify?
The specified gauge is 4 inches (10 cm): 8 rows of Granny Triangle pattern.
How many chains are used for each strap?
Each strap begins with a chain of 35.
Should Desert Rose be fastened off after Row 16?
No. Row 16 finishes in Desert Rose, and the pattern specifically instructs you not to fasten off. The attached Desert Rose yarn is used to create Strap 1.
Where is Strap 2 attached?
Strap 2 is started by attaching yarn to the other side corner of the bandana. It then follows the same chain-35 and slip-stitch construction described in the pattern.
Final Construction Checklist
Before considering the project complete, take a final look at the entire piece. The triangle should show the progressive growth created by the Granny Triangle pattern, while the alternating Desert Rose and Off White rows provide the cottagecore-inspired color effect.
Check the two straps individually. Each should begin from its intended corner and be secured through the Double Crochet on the side of the bandana as specified. If you are reviewing the project after a long break, this is also a useful point to compare your work with the written instructions rather than relying only on memory.
The source pattern provides all the necessary construction details, so there is no need to add extra shaping, additional rows, or alternative finishing methods. Keeping the original sequence intact is the simplest way to preserve the intended design.
Why This Pattern Works Well as a Beginner Project
This bandana offers a useful introduction to several crochet skills without requiring a complicated construction. The first rows teach how a small foundation can become a larger fabric. The repeated middle sections provide practice with working into spaces, while the increasing repeat count encourages careful stitch counting. Alternating colors adds another practical skill, and the final straps introduce a simple finishing construction.
At the same time, the pattern remains visually rewarding throughout the process. The triangle becomes recognizable relatively early, so you can see the project developing rather than waiting until the very end to understand its shape.
The project also gives beginners several opportunities to practice checking their work. Row numbers, repeat counts, color changes, chain spaces, and the final strap construction all provide natural checkpoints.
Enjoying the Finished Handmade Accessory
Once the final strap has been secured, the cottagecore bandana is ready to become a charming handmade accessory. Its triangular shape, soft two-color palette, and simple granny-inspired texture give it a nostalgic character while keeping the construction approachable.
The most important part of working this pattern is not rushing through the similar-looking rows. Take each row as its own checkpoint, verify the repeat count, keep the color changes consistent, and pay particular attention to the transition from Row 16 into the straps.
With those checkpoints in place, the project becomes much easier to manage. What initially looks like a long sequence of repeated Double Crochet groups becomes a clear progression: establish the center, expand the triangle, alternate the colors, complete Row 16, and finish with the two 35-chain straps.
The result is a handmade cottagecore-style bandana that showcases the beauty of simple crochet construction. The combination of an easy Granny Triangle pattern, Desert Rose and Off White yarn, and straightforward ties creates a project that is both practical and satisfying to make.