
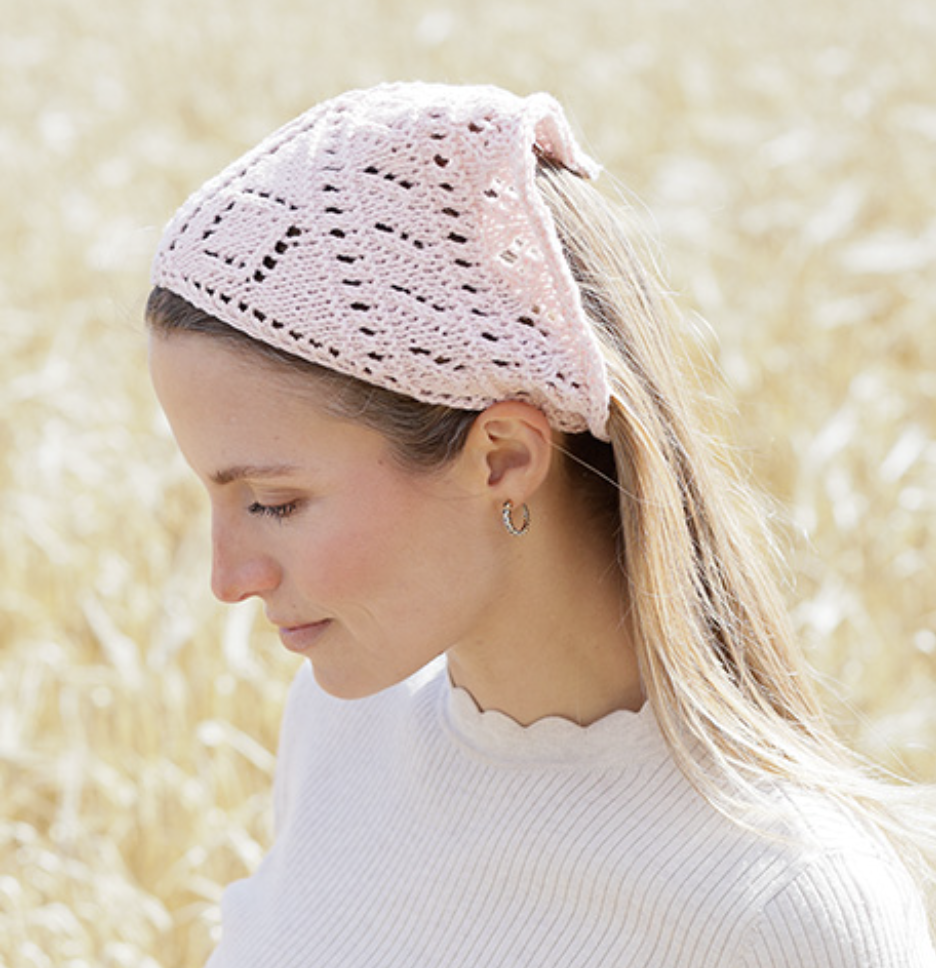
The Rosy Rhythm Bandana is a delicate triangular knitted headscarf worked from the middle outward, with decorative pattern sections, neat three-stitch I-cord edges, and braided cords added at the two ends. The finished piece measures approximately 46 cm along the long side, without the cords, and 23 cm in height measured along the mid-stitch.
This guide presents the pattern as a practical, photo-guided knitting workshop. Instead of treating the project as one long sequence of instructions, the construction is divided into clear checkpoints. This makes it easier to understand where the shaping changes, where the stitch count should be checked, how the pattern diagrams fit together, and how the final cords are attached.
Project Snapshot Before You Cast On
The Rosy Rhythm Bandana is from DROPS 265-5, with the design identified as DROPS Design pattern cm-161. The project uses yarn from yarn group B and is knitted with a DROPS circular needle size 4 mm, length 60 cm.
- Size: Length 46 cm without cords and height 23 cm.
- Yarn: DROPS COTTON MERINO from Garnstudio, belonging to yarn group B.
- Yarn quantity: 50 g.
- Yarn color: Colour 05, Powder Pink.
- Needle: DROPS circular needle size 4 mm, length 60 cm.
- Knitting tension: 21 stitches in width and 28 rows in height with stocking stitch on needle size 4 mm = 10 x 10 cm.
The pattern is worked back and forth rather than as a circular project. This distinction is important because the right side and wrong side instructions are both part of the design, including the special edge treatment.
Gauge Is the First Checkpoint
Before beginning the actual bandana, pay attention to the stated knitting tension. The pattern specifies 21 stitches in width and 28 rows in height with stocking stitch using the 4 mm needle to produce a 10 x 10 cm measurement.
Needle size is only a guide. If you get too many stitches per 10 cm, use a larger needle. If you get too few stitches per 10 cm, use a smaller needle. This check is particularly useful for a project whose finished measurements are given precisely, because the overall dimensions depend on the relationship between the stitch pattern and your knitting tension.
Do not change the stated needle size simply because a different size is personally preferred. The 4 mm needle is the specified starting point, and the gauge check tells you whether your individual knitting matches the intended tension.
Understand the Two Basic Techniques First
Garter Stitch Worked Back and Forth
Garter stitch is worked by knitting all rows, from both the right side and the wrong side. One ridge in height consists of two knitted rows.
This simple definition becomes important around the outside of the bandana because the edge stitches use garter stitch together with the I-cord-style edge construction.
The Three Edge Stitches with I-Cord Treatment
At the beginning of every row, work the three edge stitches as follows: slip 1 stitch purl-wise with the strand in front, knit 1, then work 1 garter stitch.
At the end of every row, work until 3 stitches remain. Then work 1 garter stitch, slip 1 stitch purl-wise with the strand in front, and knit 1.
The same edge treatment is used on both the right side and the wrong side. Keeping these three stitches consistent is one of the easiest ways to maintain a neat outer border while the central fabric expands.
Starting from Seven Stitches
The headscarf begins at the middle and is worked outward. Cast on 7 stitches using the 4 mm circular needle and DROPS Cotton Merino.
The first five rows establish the initial shape before the main chart sequence begins. It is useful to regard these rows as the foundation checkpoint: the three edge stitches are already present at both sides, while the center increases gradually prepare the piece for the decorative pattern.
Row 1 — Wrong Side
Work 3 edge stitches, knit 1, then work 3 edge stitches.
Row 2 — Right Side
Work 3 edge stitches, make 1 yarn over, knit 1, make 1 yarn over, then work 3 edge stitches. There are now 9 stitches.
Row 3 — Wrong Side
Work 3 edge stitches, knit 3, then work 3 edge stitches.
Row 4 — Right Side
Work 3 edge stitches, make 1 yarn over, knit 1, make 1 yarn over, knit 1, make 1 yarn over, knit 1, make 1 yarn over, then work 3 edge stitches. There are now 13 stitches.
Row 5 — Wrong Side
Work 3 edge stitches, knit 7, then work 3 edge stitches.
These opening rows are short, but they are important. The stitch count increases from 7 to 9 and then to 13, creating the initial expansion that will continue through the charted sections.
First Main Pattern Checkpoint: A.1, A.2 and A.3
After the opening rows, continue with the pattern. The first row of this section is worked from the right side.
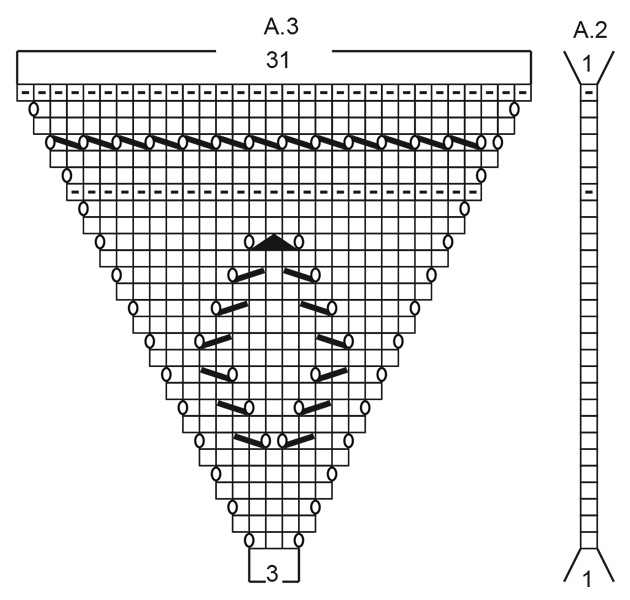
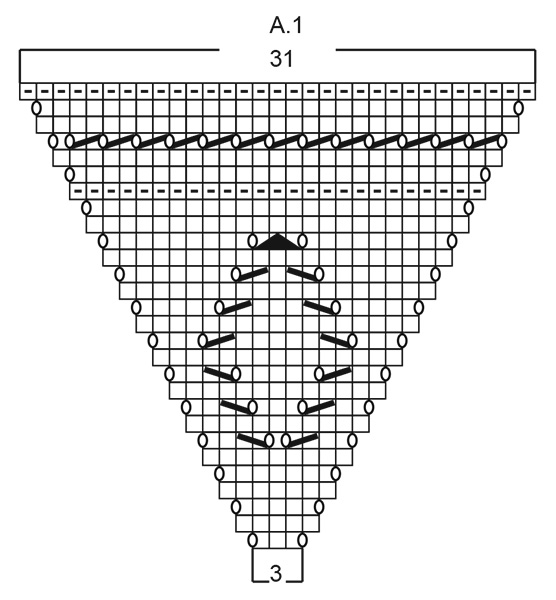
Work 3 edge stitches, A.1, A.2 across 1 stitch, which is the mid-stitch, A.3, and then 3 edge stitches.
At this point, insert 1 marker in the mid-stitch and let the marker follow onwards. The marker is a practical aid for keeping track of the center of the triangular piece as the stitch count increases.
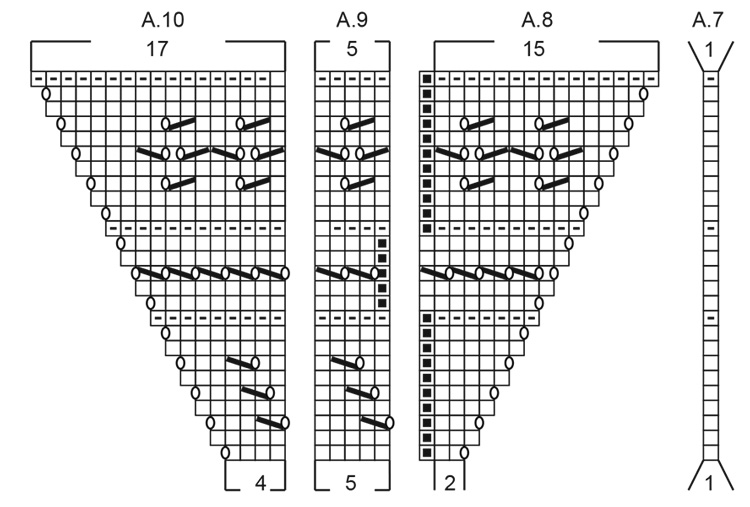
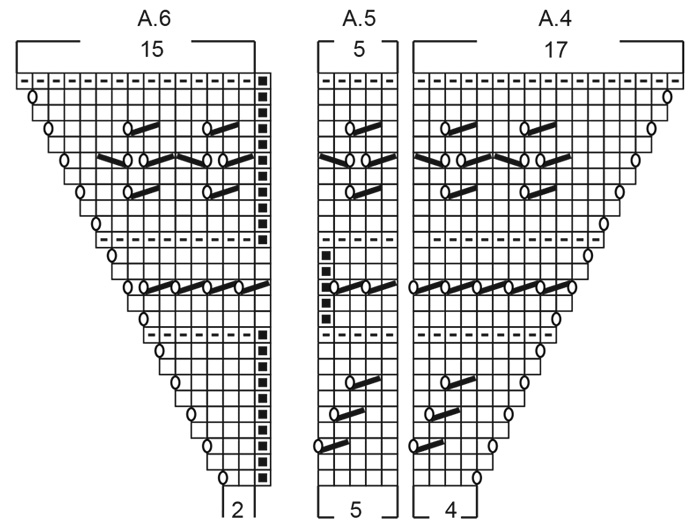
The pattern diagrams show all rows as seen from the right side. When reading the charts, use the symbol explanations supplied with the pattern rather than changing the chart terminology or interpreting a symbol differently.
How to Use the Center Marker
The center marker is especially helpful because the bandana is constructed around a defined mid-stitch. Rather than trying to visually estimate the center after every increase, allow the marker to travel with that stitch.
This does not replace the written instructions or the chart. It simply gives you a physical reference point while working back and forth. If the two sides of the knitted triangle appear uneven, the center marker provides a useful place to begin checking the pattern sequence.
Another useful habit is to verify stitch counts at the stated checkpoints rather than repeatedly stopping without a reason. The most important numerical checkpoint in the first major section comes when the diagrams are finished.
The 69-Stitch Checkpoint
Continue through diagrams A.1, A.2 and A.3 according to the pattern. When this section is finished, there should be 69 stitches.
This number is an important confirmation point. If your stitch count is not 69 at the specified point, stop before moving into the next pattern section. Check the previous rows and chart symbols rather than trying to compensate by adding or removing stitches arbitrarily.
The project depends on the relationship between the center, the repeated chart elements, and the three edge stitches. An unexplained adjustment could affect the later 121-stitch checkpoint and the final shape.
Second Pattern Phase: Expanding to 121 Stitches
Once the first chart section is complete and you have 69 stitches, continue with the next pattern sequence. Again, the first row of this section is worked from the right side.
Work 3 edge stitches, A.4 across 4 stitches, A.5 five times in width, A.6 across 2 stitches, A.7 across 1 stitch which is the mid-stitch, A.8 across 2 stitches, A.9 five times in width, A.10 across 4 stitches, and finish with 3 edge stitches.
The placement of the repeated chart elements is part of the technical structure of the pattern. A.5 is worked 5 times in width on one side, while A.9 is worked 5 times in width on the other side. The central A.7 section remains associated with the marked mid-stitch.
Why the Repeats Matter
The repeated chart units are not interchangeable decorations. Their specified placement controls how the pattern expands across the growing triangular shape.
For the A.4 through A.10 section, keep the sequence exactly as written: A.4 across 4 stitches, A.5 five times, A.6 across 2 stitches, A.7 across the single mid-stitch, A.8 across 2 stitches, A.9 five times, A.10 across 4 stitches, with the three edge stitches at each outer side.
When working a charted project, it can be tempting to focus only on the visual motif. Here, the stitch counts and chart placement are equally important. The written construction tells you exactly how many times each repeated section appears, so those repetitions should be checked rather than estimated visually.
Final Pattern Checkpoint: 121 Stitches
Continue the second pattern section until the diagrams are finished. At the end of this chart sequence there should be 121 stitches, and this occurs on the last row from the wrong side.
This is the second major numerical checkpoint of the project. Before beginning the I-cord cast-off, confirm that the piece has reached 121 stitches and that you have completed the chart sequence at the specified point.
Reading the Pattern Symbols
The pattern provides specific meanings for the chart symbols. Knit from the right side means knit on the right side, while knit from the wrong side means knit on the wrong side. Other symbols represent decreases, yarn overs, and stitches that are passed over.
- Knit from right side, purl from wrong side: Work the stitch according to the side of the fabric being worked.
- Knit from wrong side: Knit the indicated stitch when working the wrong side.
- Knit 2 together: Work the indicated two stitches together as one decrease.
- Slip 1 stitch, knit 1, pass slipped stitch over knitted stitch: Follow the complete decrease sequence shown by the symbol.
- Between 2 stitches make 1 yarn over: Create the indicated yarn over between the stitches.
- Slip 2 stitches as if to knit together, knit 1, pass slipped stitches over knitted stitch: Follow the full centered decrease represented by the symbol.
- No stitch: Go straight to the next symbol.
Because the diagrams show all rows in the pattern from the right side, the chart should be interpreted together with the supplied symbol explanations. Avoid rewriting chart symbols into different terminology, especially when keeping the technical instructions faithful to the original design.
The I-Cord Cast-Off
After completing the final pattern section and reaching 121 stitches on the last row from the wrong side, finish the piece using the specified I-cord cast-off.
Start on the wrong side. When working the last row from the wrong side, cast on 2 stitches at the end and turn.
Row 1 — Right Side
Knit 1, knit 2 twisted together. Then slip the 2 stitches from the right needle onto the left needle without turning. The strand tightens the piece into a small tube.
Repeat Row 1 until 2 stitches remain. Slip those final 2 stitches to the left needle and cast off.
This finishing technique is different from a basic cast-off. The instructions specifically create the small tubular edge characteristic of the I-cord treatment. Follow the sequence as written rather than replacing it with a conventional bind-off.
Expected Finished Measurements
After the I-cord cast-off, the knitted piece should measure approximately 46 cm along the long side and 23 cm measured along the mid-stitch. The scarf is triangular.
These measurements are taken before adding the cords. The cords are separate finishing elements worked at the two ends of the long side.

Creating the Two Cords
The final stage uses the same DROPS Cotton Merino yarn. Cut 6 strands, each 80 cm long.
Thread the strands halfway through the piece at one end of the long side. Once threaded through the fabric, there will be 12 strands of equal length.
Divide these 12 strands into 3 bunches of 4 strands each. Plait the three bunches until 3 cm remain. Tie a strand around the plait and fasten it well.
Repeat the same cord construction at the other end of the long side.
The cord instructions are precise, so the starting quantity of 6 strands, the 80 cm length, the resulting 12 strands, the three groups of four, and the final 3 cm should all remain unchanged.
Assembly and Symmetry Check
Once both cords have been completed, examine the two ends of the long side. The goal at this stage is not to change the knitted pattern but to check that the cords have been attached in the intended positions and that their construction is comparable.
Because each cord begins from 6 strands threaded halfway through the fabric, take care when arranging the strands before dividing them into three bunches. Keeping the three groups distinct makes the plaiting process easier to control.
Do not add extra yarn or alter the stated strand length as a way of correcting an uneven appearance. If one cord looks different from the other, review how the strands were divided and plaited.
Common Troubleshooting Checkpoints
The Edge Looks Uneven
Return to the three edge stitches. At the beginning of the row, remember the sequence of slipping 1 stitch purl-wise with the strand in front, knitting 1, and working 1 garter stitch. At the end, work 1 garter stitch, slip 1 stitch purl-wise with the strand in front, and knit 1.
The Stitch Count Is Wrong
Use the official checkpoints. The project begins with 7 stitches, reaches 9 after Row 2, reaches 13 after Row 4, reaches 69 stitches after the first chart section, and reaches 121 stitches after the second chart section.
These numbers are more useful than trying to judge the shape by eye. If a count is wrong, revisit the previous chart section before continuing.
The Center Looks Difficult to Follow
Use the marker placed in the mid-stitch after beginning the A.1, A.2 and A.3 section. Let the marker follow the center stitch throughout the subsequent work. This gives you a consistent reference point for the two sides of the triangular piece.
The Gauge Does Not Match
Check your number of stitches and rows over 10 cm in stocking stitch. The specified tension is 21 stitches by 28 rows using the 4 mm needle. If you have too many stitches per 10 cm, use a larger needle. If you have too few stitches per 10 cm, use a smaller needle.
The Chart Feels Confusing
Remember that the diagrams show all rows from the right side. Use the symbol explanations supplied with the pattern and pay attention to the distinction between right-side and wrong-side knitting instructions.
A Practical Work Session Checklist
- Before starting: Confirm DROPS Cotton Merino, 50 g, colour 05 Powder Pink.
- Needle: Use the DROPS circular needle size 4 mm, length 60 cm.
- Gauge: Check for 21 stitches and 28 rows over 10 x 10 cm in stocking stitch.
- Opening: Cast on 7 stitches.
- Row 2 checkpoint: Confirm 9 stitches.
- Row 4 checkpoint: Confirm 13 stitches.
- First chart: Follow A.1, A.2 and A.3 exactly.
- Center: Place 1 marker in the mid-stitch.
- First major checkpoint: Confirm 69 stitches when the first diagrams are finished.
- Second chart: Work A.4 through A.10 with the specified repeats.
- Second major checkpoint: Confirm 121 stitches on the last row from the wrong side.
- Finish: Work the specified I-cord cast-off.
- Shape: Check for approximately 46 cm along the long side and 23 cm along the mid-stitch.
- Cords: Cut 6 strands of 80 cm for each cord construction.
- Plait: Divide the resulting 12 strands into 3 bunches of 4 and plait until 3 cm remain.
- Repeat: Work the second cord at the opposite end of the long side.
Final Finishing Perspective
The Rosy Rhythm Bandana is a compact project, but its clean result depends on several small details working together. The three edge stitches establish the neat outer finish, the marked mid-stitch keeps the expanding triangle organized, and the chart sections create the decorative rhythm across the growing fabric.
The most useful approach is to treat the project as a sequence of checkpoints rather than rushing through the entire pattern. First establish the correct gauge. Then complete the seven-stitch beginning and verify the early stitch counts. Move into A.1, A.2 and A.3 while keeping the center marker in place. Confirm 69 stitches before advancing to A.4 through A.10. Finally, verify 121 stitches before beginning the I-cord cast-off.
Once the knitted triangle is finished, the cords provide the final practical detail. Following the specified strand lengths and plait structure keeps both sides consistent without changing the original construction.
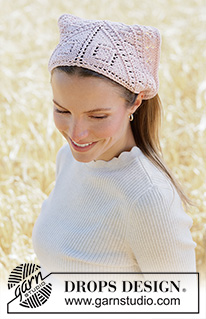
With the technical sequence preserved from beginning to end, the result is a Powder Pink triangular headscarf measuring approximately 46 cm along the long side and 23 cm in height, finished with cords at each end of the long side.
Final Project Check
Before considering the Rosy Rhythm Bandana complete, make one final visual and technical review. Confirm that the three-stitch edges are consistent, the central marker was used correctly during the charted sections, the 69-stitch and 121-stitch checkpoints were reached as specified, and the I-cord cast-off was completed using the stated sequence.
Then check the two cords. Each begins with 6 strands of DROPS Cotton Merino, each 80 cm long, threaded halfway through the fabric to create 12 equal-length strands. Each cord is divided into three bunches of four strands and plaited until 3 cm remain before being tied and fastened.
These final checks preserve the original construction without introducing extra shaping, additional stitches, substitute materials, or altered measurements. The result remains faithful to the specified Rosy Rhythm Bandana pattern from its seven-stitch beginning through its patterned 121-stitch stage and final braided cords.