
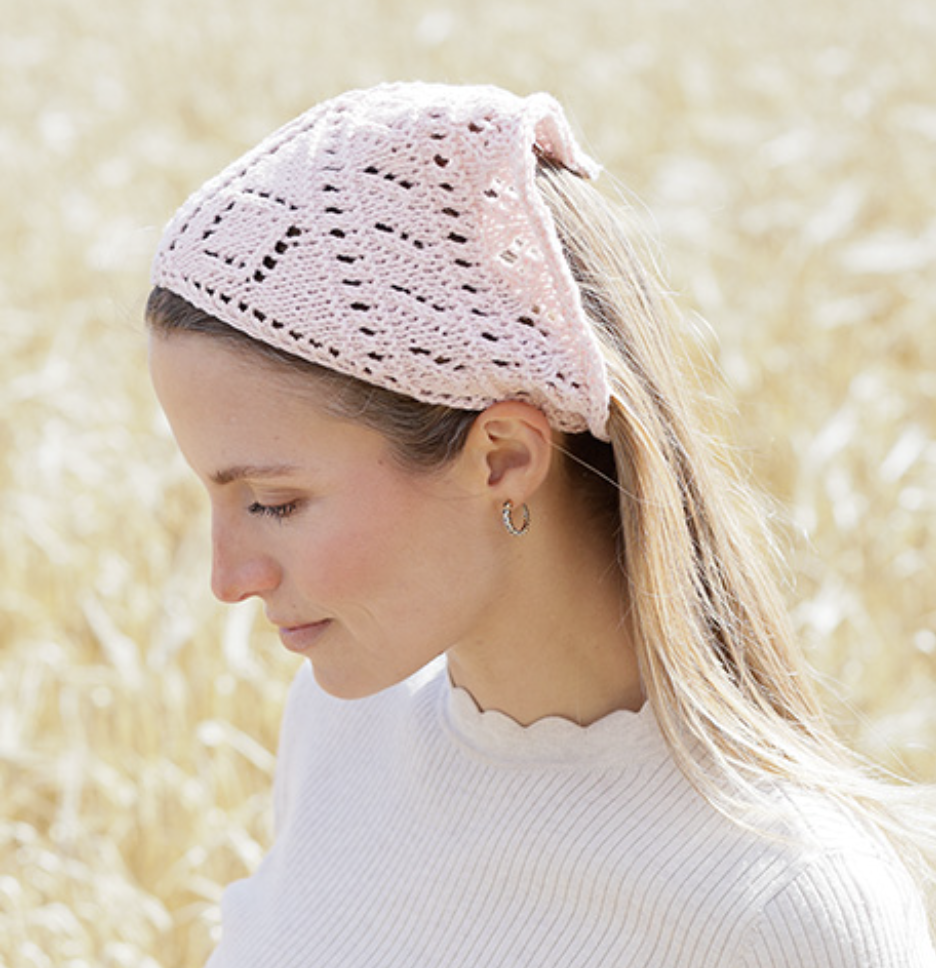
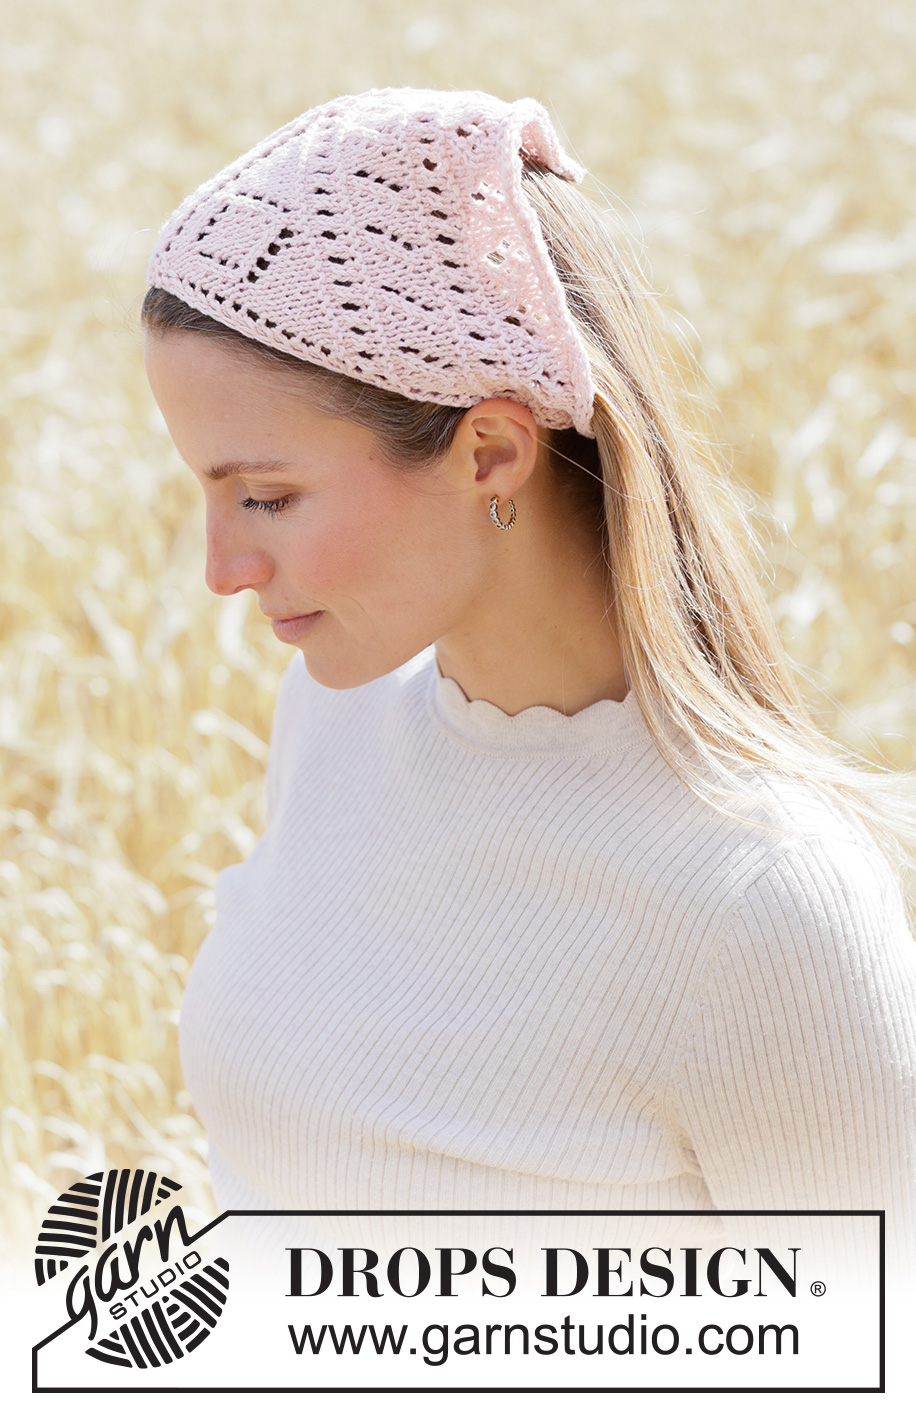
The Rosy Rhythm Bandana is a compact knitting project with a surprisingly rich combination of techniques. Designed as DROPS 265-5, Pattern cm-161, this knitted headscarf combines an open lace pattern with a neat I-cord border and practical braided ties. The fabric begins in the centre with only a few stitches and gradually expands into a triangle, making the construction especially satisfying to watch as the pattern develops.
This second guide approaches the project as a construction-focused workshop. Instead of looking only at the finished accessory, we will follow the major checkpoints that make the project easier to manage: preparing the correct yarn and needle, establishing the first five rows, understanding the centre stitch, navigating charts A.1 through A.10, checking the 69-stitch and 121-stitch milestones, completing the I-cord cast-off, and finally creating the two braided cords.
The pattern is worked back and forth from the middle outwards. That construction is important because it explains why the work starts so small and why the stitch count increases as the triangular scarf grows. The cords are added only after the main triangular fabric has been completed.
Rosy Rhythm Bandana Specifications
There is one size in the supplied pattern. The finished bandana measures approximately 46 cm along the long side without the cords, with a height of 23 cm measured along the mid-stitch.
- Pattern: DROPS 265-5
- DROPS Design: Pattern cm-161
- Yarn group: B
- Yarn: DROPS Cotton Merino from Garnstudio
- Yarn amount: 50 g
- Colour: 05, Powder Pink
- Needle: DROPS circular needle, size 4 mm
- Circular needle length: 60 cm
- Finished length: 46 cm without cords
- Finished height: 23 cm
- Gauge: 21 stitches in width and 28 rows in height with stocking stitch on 4 mm needles = 10 x 10 cm
The needle size is a guide rather than an isolated rule. The specified tension is 21 stitches and 28 rows over 10 x 10 cm in stocking stitch. If you obtain too many stitches over 10 cm, the pattern instructs you to change to a larger needle. If you obtain too few stitches over 10 cm, change to a smaller needle.
Why the Shape Starts in the Middle
The most useful thing to understand before beginning is the direction in which the fabric grows. The bandana is not started along the long outer edge. Instead, it begins at the middle with 7 stitches. The first few rows establish a narrow centre, and the yarn overs in the early right-side rows create the increases that begin opening the triangle.
As the lace charts are worked, the central stitch remains an important reference. A marker is placed in this mid-stitch once the first chart section begins. From that point forward, the work can be viewed as a left section, a central section, and a right section, making the chart easier to organise.
This centre-based construction also helps explain the symmetry of the finished accessory. The decorative lace develops on both sides of the centre rather than being worked as a single one-directional strip.
Understanding the Three-Stitch I-Cord Border
The three edge stitches are maintained throughout the main fabric. They form a narrow I-cord-style edge that gives the sides of the bandana a defined finish.
At the beginning of every row, slip 1 stitch purl-wise with the strand in front, knit 1, and work 1 garter stitch. At the end of the row, work until there are 3 stitches remaining, work 1 garter stitch, slip 1 stitch purl-wise with the strand in front, and knit 1.
The edge instructions are worked in the same way from both the right side and the wrong side. Because these stitches sit outside the lace chart, they should be treated as a separate routine. A useful habit is to complete the edge sequence first, then concentrate on the charted portion in the middle.
Garter Stitch Reference
In this design, garter stitch is worked back and forth by knitting every row, from both the right and wrong side. One ridge in height consists of two rows.
Keeping this definition in mind is useful when checking the side borders. The edge treatment is not the same as simply following every symbol in the lace chart. The pattern specifically gives the three edge stitches their own instructions.
Set Up the First Five Rows
Cast on 7 stitches with the 4 mm circular needle using DROPS Cotton Merino in colour 05, Powder Pink. The work is knitted back and forth, beginning with the wrong side.
Row 1: Establish the Centre
Work the 3 stitches according to the edge-stitch I-cord instructions, knit 1, and work the remaining 3 stitches according to the same edge-stitch instructions.
The result is a compact opening with the central stitch positioned between the two decorative edges.
Row 2: First Pair of Yarn Overs
From the right side, work the 3 edge stitches, make 1 yarn over, knit 1, make 1 yarn over, and finish with the 3 edge stitches. The total becomes 9 stitches.
The two yarn overs are the first clear indication of the outward expansion that will eventually create the triangular silhouette.
Row 3: Wrong-Side Return
Work the 3 edge stitches, knit 3, and then complete the final 3 edge stitches.
Row 4: Four Yarn Overs
Work the 3 edge stitches, make 1 yarn over, knit 1, make 1 yarn over, knit 1, make 1 yarn over, knit 1, make 1 yarn over, and complete the row with the 3 edge stitches. There are now 13 stitches.
Row 5: Prepare for the Charts
Work the 3 edge stitches, knit 7, and work the final 3 edge stitches.
These five rows are the foundation for everything that follows. Before starting the charted section, confirm that the opening sequence has been completed correctly and that the work is still centred between the two I-cord edges.
Reading the First Lace Chart
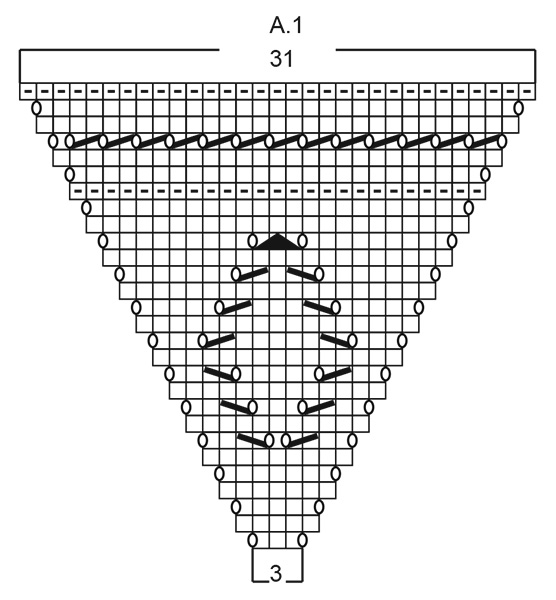
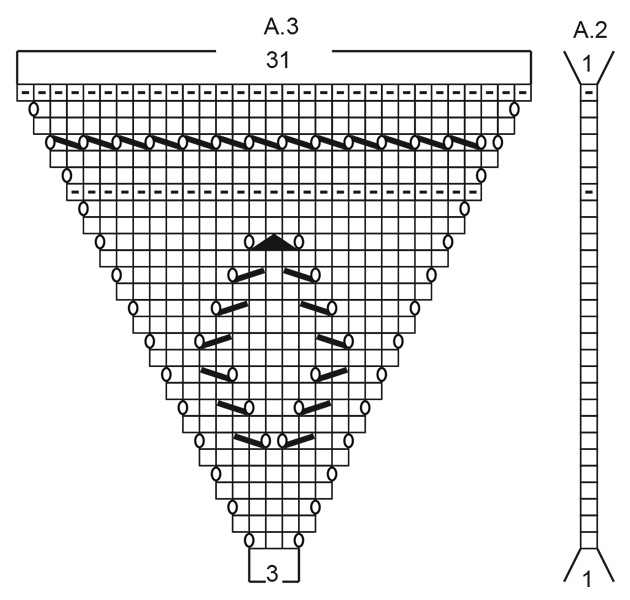
After Row 5, begin the main pattern with the first chart row worked from the right side. Keep the 3 edge stitches as already established. Then work A.1, followed by A.2 across 1 stitch, which represents the mid-stitch, then work A.3 and finish with the 3 edge stitches.
The pattern recommends inserting 1 marker in the mid-stitch and allowing it to follow the work. This is one of the most useful organisational details in the entire project. The marker does not replace careful chart reading, but it gives you a fixed centre reference as the number of stitches grows.
Chart Symbols You Need to Recognize
The diagrams use a series of standard knitting symbols. Understanding what each symbol means makes the visual chart considerably easier to follow.
- Knit from right side, purl from wrong side: The same chart symbol is interpreted according to the side of the work.
- Knit from wrong side: This symbol indicates knitting when working from the wrong side.
- Knit 2 together: A decrease that combines two stitches into one.
- Slip 1, knit 1, pass slipped stitch over: Another decrease formed by slipping one stitch, knitting the next, and passing the slipped stitch over.
- Yarn over: Worked between two stitches to create an increase and an open lace space.
- Slip 2 as if to knit together, knit 1, pass slipped stitches over: A central decrease using two slipped stitches and one knitted stitch.
- No stitch: Move directly to the next symbol in the diagram.
The important point is that the lace pattern balances yarn overs with decreases. A yarn over creates an additional stitch, while the decreases bring the count back into the structure required by the chart. Follow the symbols rather than attempting to recreate the lace from appearance alone.
First Chart Checkpoint: 69 Stitches
Continue through the first group of diagrams. When the diagrams are finished, the work should contain 69 stitches.
This is the first major checkpoint in the project. If you have a different stitch count, it is worth reviewing the completed chart before moving to the next section. Pay special attention to yarn overs and decreases, because missing either one can alter the count and disturb the symmetry.
The 69-stitch checkpoint is also a good moment to look at the shape of the fabric. The triangle should be visibly developing, while the centre marker remains easy to identify.
Moving Into the Wider Lace Section
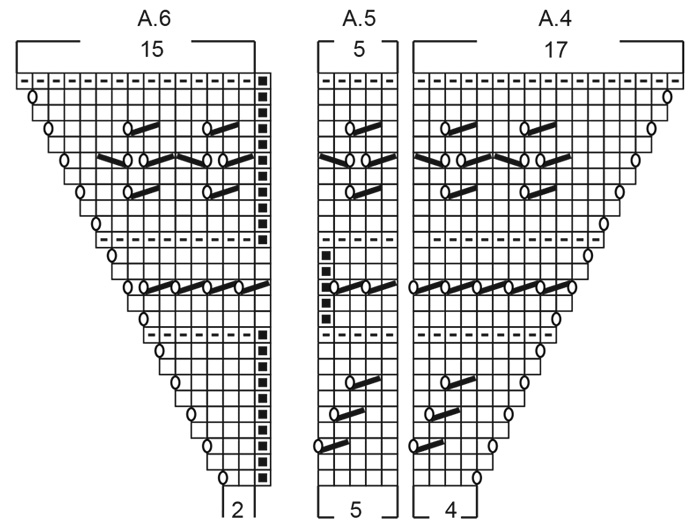
Once the first chart group is complete and there are 69 stitches, begin the next sequence from the right side. The new section uses charts A.4 through A.10 and introduces repeated chart blocks across the wider fabric.
Start with the 3 edge stitches. Work A.4 across 4 stitches. Then work A.5 five times in width. At this point, there are 2 stitches left before the mid-stitch. Work A.6 across 2 stitches, A.7 across the 1-stitch mid-stitch, A.8 across 2 stitches, and then A.9 five times in width. Finish with A.10 across 4 stitches and the 3 edge stitches.
This sequence can look more complicated on paper than it feels once the centre is identified. The repeated sections on the left and right create a useful rhythm, while A.6, A.7, and A.8 form the central transition.
A Practical Method for Managing Repeats
Repeated chart sections are easiest to handle when you avoid looking at the whole row at once. First identify the 3 edge stitches. Then locate A.4. From there, count the five A.5 repeats before reaching the central area.
The same idea applies on the opposite side. After the centre, work A.8, then the five A.9 repeats, followed by A.10 and the final 3 edge stitches.
This creates a useful left-to-right map:
- 3 edge stitches
- A.4 across 4 stitches
- A.5 five times
- A.6 across 2 stitches
- A.7 across 1 mid-stitch
- A.8 across 2 stitches
- A.9 five times
- A.10 across 4 stitches
- 3 edge stitches
Keeping this structure in mind makes the wider chart section easier to navigate without changing any of the original pattern instructions.
The Role of the Centre Stitch
The single mid-stitch represented by A.7 is the anchor of the second chart section. Because the bandana grows from the middle outward, this stitch provides a natural dividing line between the two halves of the triangular fabric.
The centre marker should continue to follow this stitch. If you ever become uncertain about where you are in the chart, return to the marker and rebuild your position from there rather than guessing.
This is particularly helpful when the lace pattern contains no-stitch symbols. A no-stitch symbol is not an additional stitch and does not mean that you should alter the work. It simply tells you to move directly to the next symbol in the chart.
Second Chart Checkpoint: 121 Stitches
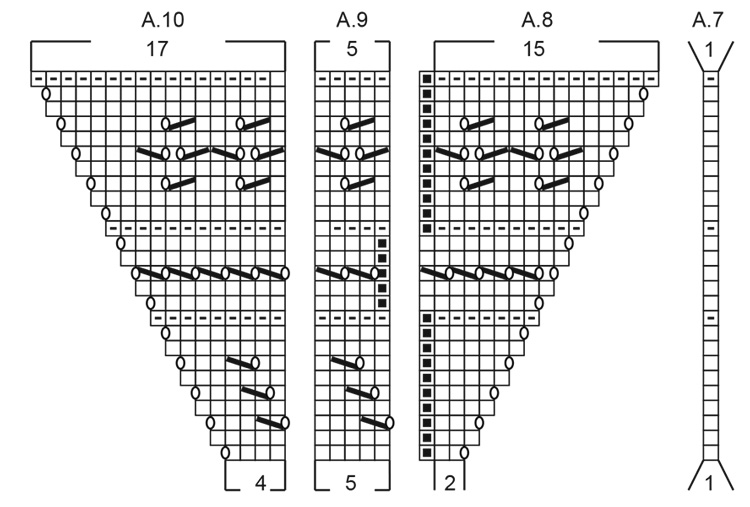
Continue through the diagrams until they are finished. The completed chart sequence should leave you with 121 stitches. The last row of this sequence is worked from the wrong side.
This is the final stitch-count checkpoint before the I-cord cast-off. It is worth taking a moment here rather than rushing into the finishing stage. Check the total stitch count, examine the centre, and make sure the triangular fabric looks balanced from left to right.
The finished main piece should measure approximately 46 cm along the long side and 23 cm measured along the mid-stitch. The pattern describes the scarf as a triangle.
Finishing the Edge with the I-Cord Cast-Off
The I-cord cast-off continues the clean tubular character already established along the edges. When working the last row from the wrong side, cast on 2 stitches at the end of the row and turn.
For Row 1 from the right side, knit 1, knit 2 twisted together, then slip the 2 stitches from the right needle onto the left needle without turning. The pattern notes that when the strand tightens, the fabric forms a small tube.
Repeat Row 1 until only 2 stitches remain. Slip those final 2 stitches onto the left needle and cast off. Cut the strand and fasten it.
Because the cast-off becomes a visible finishing edge, consistent tension is useful. The goal is not to pull the I-cord excessively tight, but to allow the stitches to form the intended small tube as the process advances.
What the Main Fabric Should Look Like
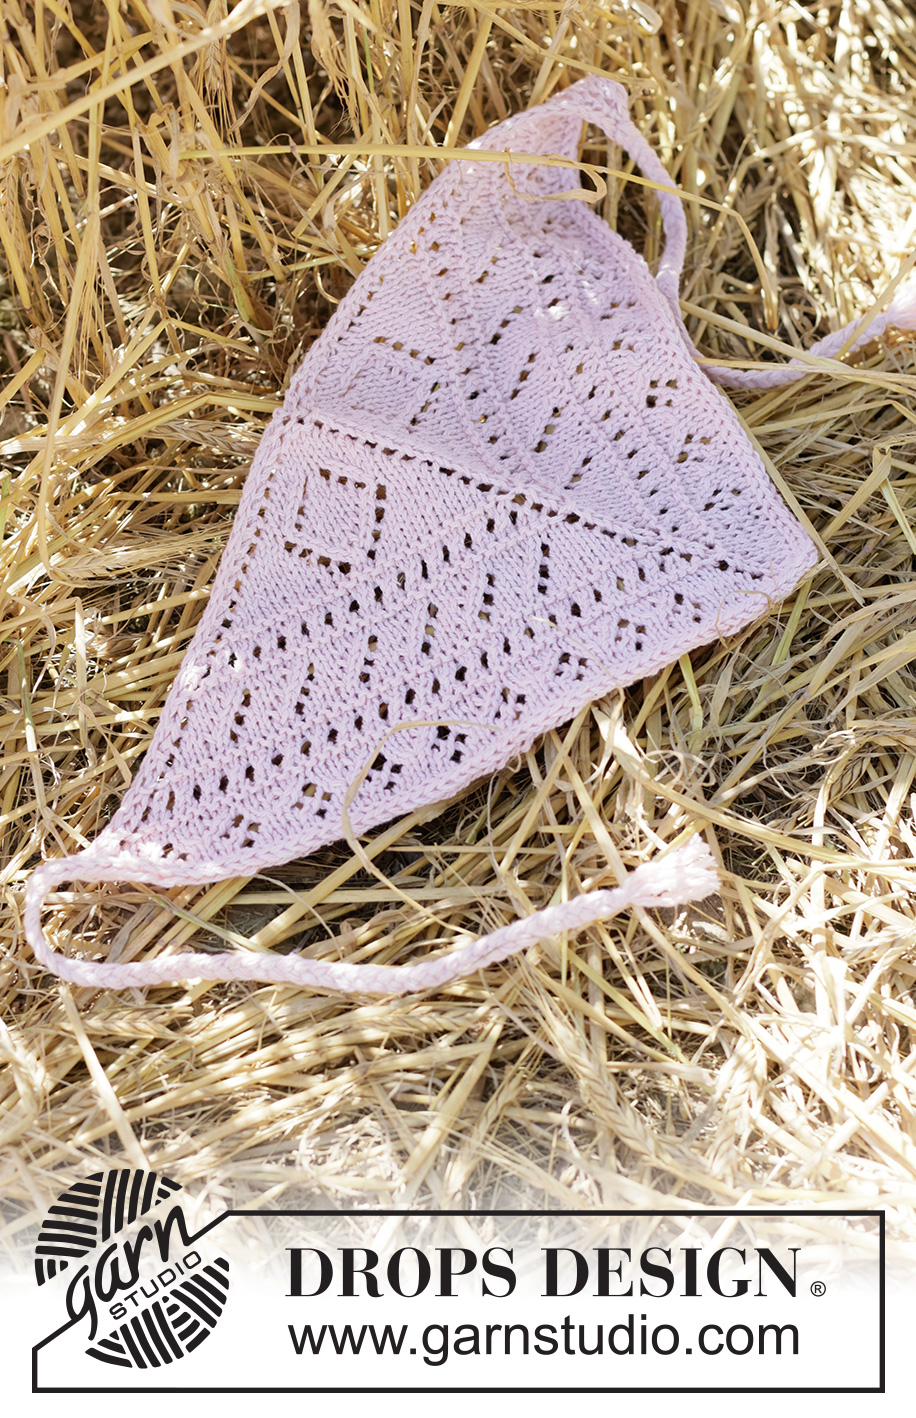
When viewed flat, the bandana’s triangular construction becomes especially clear. The long side forms the upper edge, while the centre extends toward the opposite point. The lace pattern is distributed across the growing triangle, with the I-cord treatment framing the outer edges.
The braided cords are attached at the two ends of the long side. Their position is functional: they provide the means for fastening the bandana when it is worn.
Making the Two Braided Cords
The cords are made separately after the triangular scarf has been completed.
Cut 6 strands of DROPS Cotton Merino, with each strand measuring 80 cm in length. Thread the strands halfway through the piece at the outermost point at one end of the long side.
Once threaded halfway through, the arrangement produces 12 strands of equal length. Divide those 12 strands into 3 bunches, with 4 strands in each bunch.
Plait the three bunches until approximately 3 cm remains. Tie a strand around the plait and fasten it securely.
Repeat the same cord-making process at the opposite end of the long side. The result is a pair of braided ties that can be used to fasten the triangular headscarf.
How the Bandana Sits From the Back

The back view makes the relationship between the centre shaping and the outer edges easy to see. The open lace structure allows the hair to remain visible through portions of the design, while the fabric still provides the visual coverage expected from a headscarf.
The I-cord edges also help the bandana maintain a defined outline. Because the piece is triangular, the long side and centre point naturally create the overall shape rather than requiring separate panels or sewn sections.
Keeping the Finished Measurements on Track
The specified finished measurements are approximately 46 cm along the long side without cords and 23 cm along the mid-stitch. These measurements are useful after completing the chart sequence and before considering the main fabric finished.
If the fabric is noticeably different, first revisit the knitting tension. The specified gauge is 21 stitches in width and 28 rows in height using stocking stitch on a 4 mm needle over 10 x 10 cm. The pattern specifically notes that needle size is only a guide and should be adjusted if the stitch count over 10 cm does not match the stated tension.
For this reason, gauge is best considered at the beginning of the project rather than after the lace section has already been completed.
Beginner-Friendly Checkpoints
Even though this is a relatively small project, the lace charts make it useful to divide the work into checkpoints.
Checkpoint 1: The Foundation
Start with 7 stitches and complete Rows 1 through 5. Confirm the counts of 9 stitches after Row 2 and 13 stitches after Row 4.
Checkpoint 2: The First Lace Group
Begin A.1, A.2, and A.3 from the right side, place the centre marker, and continue until the diagrams are complete. Confirm 69 stitches.
Checkpoint 3: The Wider Lace Group
Begin A.4 through A.10 according to the specified arrangement. Keep the centre marker visible and count the repeated A.5 and A.9 sections carefully.
Checkpoint 4: Final Stitch Count
When the diagrams are finished, confirm 121 stitches. Remember that the last row is from the wrong side.
Checkpoint 5: Finishing
Complete the I-cord cast-off, cut and fasten the strand, then make the two braided cords from 80 cm strands.
Three Things to Watch During Lace Knitting
First, watch the yarn overs. They create open spaces and contribute to the shaping. Missing one changes both the appearance and the stitch count.
Second, watch the decreases. The lace is built from a balance of increases and decreases. If a decrease is skipped, the following chart rows may no longer align correctly.
Third, watch the centre. The marker in the mid-stitch gives you a reliable point from which to check the symmetry of the design.
A Closer Look at the Finished Front
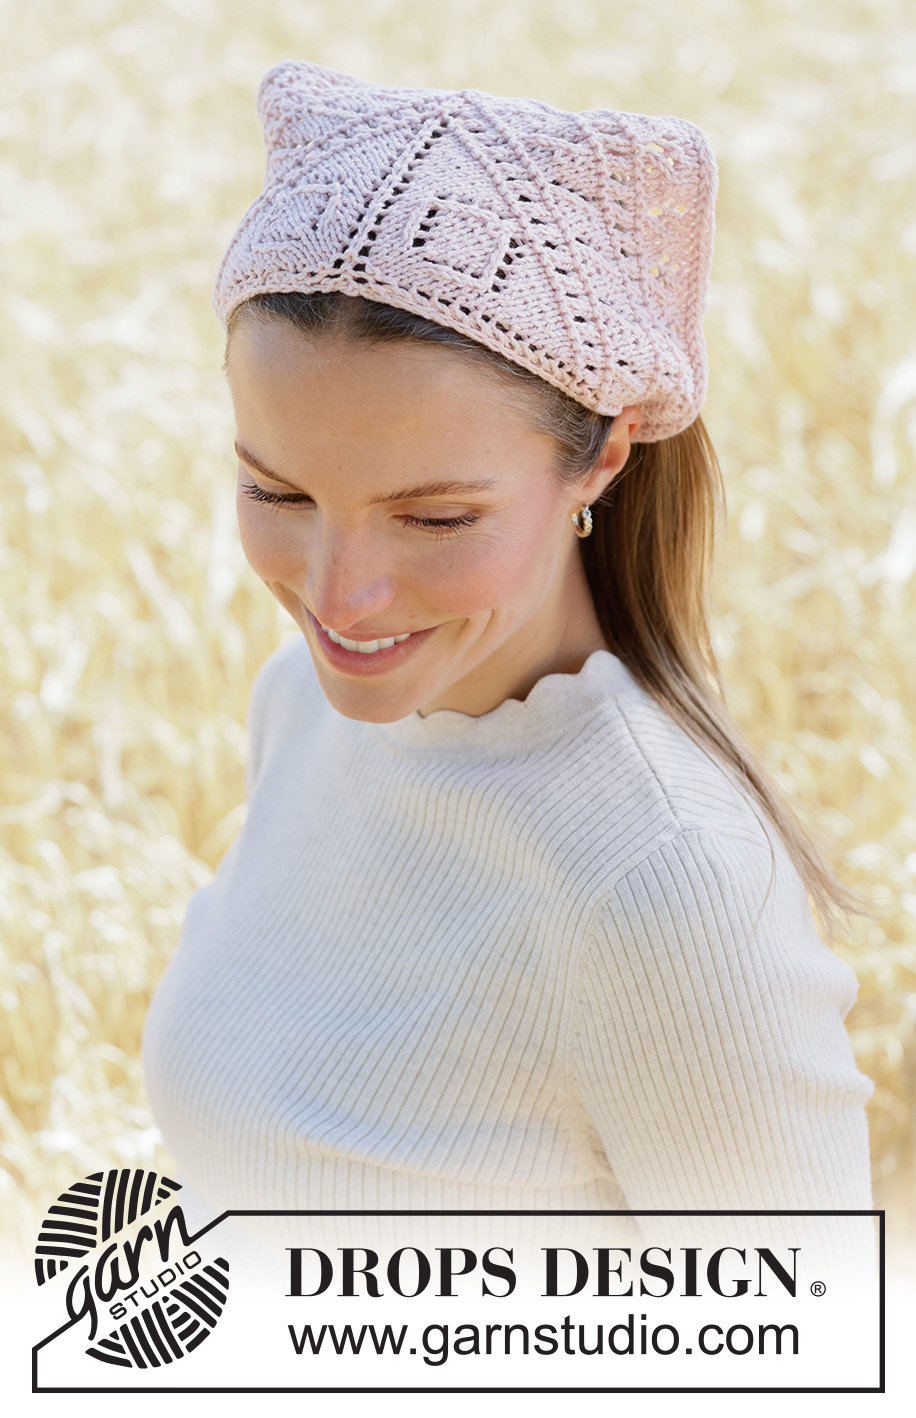
From the front, the lace motifs become the main visual feature. The repeated openings and decreases create geometric areas within the triangular shape, while the soft Powder Pink yarn keeps the overall appearance delicate.
The finished accessory is compact enough to make a focused project, yet the chart sequence gives it more visual detail than a simple garter-stitch headband. The I-cord edges and braided ties also make the construction feel complete rather than leaving the triangle as an unfinished piece of fabric.
Quick Materials and Preparation Checklist
- 50 g DROPS Cotton Merino.
- Colour 05, Powder Pink.
- DROPS circular needle size 4 mm, length 60 cm.
- Check the 21-stitch and 28-row gauge over 10 x 10 cm in stocking stitch.
- Have enough space to keep the lace charts visible while knitting.
- Prepare a stitch marker for the mid-stitch.
- Keep the edge-stitch I-cord instructions available for reference.
- For the cords, prepare 6 strands measuring 80 cm each for each cord.
Final Construction Review
The complete sequence can now be viewed as a simple progression. Begin with the 7-stitch centre, establish the first five rows, and then enter the lace charts. The first chart group uses A.1, A.2, and A.3 and finishes at 69 stitches. The second group uses A.4 through A.10 and finishes at 121 stitches.
Once the chart work is complete, use the I-cord cast-off. The last row before this finishing technique is worked from the wrong side. After the cast-off, the main triangle measures approximately 46 cm along the long side and 23 cm along the mid-stitch.
The final cords are made from 80 cm strands of DROPS Cotton Merino. Six strands are used for each cord. Threaded halfway through the outermost point at each end of the long side, the strands become 12 equal-length strands. These are divided into three groups of four and plaited, leaving approximately 3 cm at the end for securing.
Final Thoughts on the Rosy Rhythm Bandana
The Rosy Rhythm Bandana is a lovely example of how a small knitting project can combine shaping, lace, edge finishing, and practical construction in one piece. Its triangular form is created from the centre outward, so every stage contributes directly to the final silhouette.
The most important habits for a smooth project are simple: maintain the three edge stitches consistently, keep the centre marker in place, read the charts carefully, and use the 69-stitch and 121-stitch counts as checkpoints. These details make the more complicated-looking sections much easier to organise.
Once the main triangle is finished, the I-cord cast-off provides a clean final edge, and the two braided cords transform the knitted triangle into a wearable headscarf. With the specified 50 g of DROPS Cotton Merino in Powder Pink, a 4 mm circular needle, and the stated gauge, the finished accessory follows the original dimensions of approximately 46 cm by 23 cm without the cords.
The combination of geometric lace and the soft pink colour gives the finished bandana a light, decorative character, while the practical tie cords make it easy to fasten. For knitters interested in learning or practising lace charts and I-cord techniques, this project offers a compact way to work through several useful skills while creating a distinctive handmade accessory.