
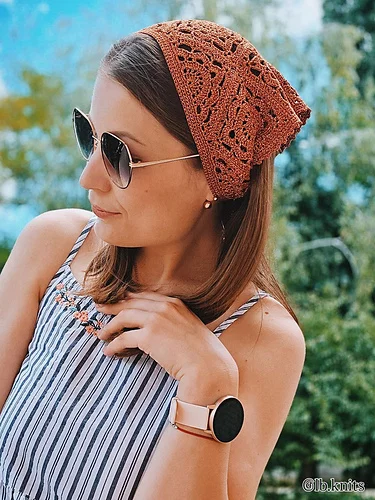
If you love delicate crochet accessories with an intricate handmade look, the LB.KNITS crochet bandana is a beautiful project to add to your collection. This triangular headscarf is built from individual lace motifs, joined into one fabric, finished with a decorative border, and completed with two ties. The finished accessory has a lightweight appearance and a detailed openwork texture that makes it especially attractive for styling with summer outfits.
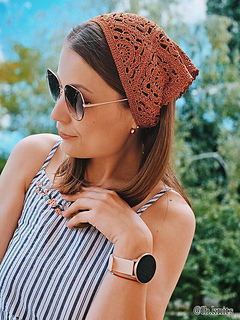
The original pattern was created by Liliya Bardievska of LB.KNITS and is dated July 2025. It is a one-size design, with the designer noting a 56 cm head circumference for the sample. The finished bandana measures 25 cm in height and 49 cm in width, plus ties measuring 30 cm.
What makes this project particularly interesting is the construction. Instead of crocheting the entire triangular shape as one continuous piece, you first create six whole motifs and four half motifs. These pieces are then joined with a joining stitch following the construction diagram. After that, the outer edging is worked, picots are introduced in the third row, and the ties are formed.
This version of the tutorial focuses on understanding that construction from start to finish. It keeps the original technical details unchanged while organizing the project into practical checkpoints that can make the lace construction easier to follow.
LB.KNITS Bandana Project Overview
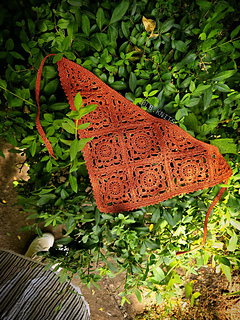
The finished accessory is designed as a triangular lace bandana that can be worn over the hair. The motif arrangement creates a decorative geometric surface, while the open spaces between the stitches keep the fabric visually light.
The original construction instructions explain that the bandana begins with six complete motifs and four half motifs. Once these separate components are finished, they are joined into one fabric using a joining stitch. The bandana is then edged and the ties are added.
The project is therefore easiest to understand as a sequence of separate stages:
- Prepare six whole motifs.
- Prepare four half motifs.
- Arrange the motifs according to the construction diagram.
- Join the motifs in the specified directions.
- Work the turning-row edging.
- Add the picots in the third row.
- Continue around the 4 ½ motif section.
- Create the two ties.
- Hide the ends.
- Complete the wet-finishing process.
Keeping these stages separate makes the project much less intimidating, especially if this is your first motif-based lace crochet accessory.
Materials and Tools
The materials list in the original LB.KNITS source is short and precise. The recommended yarn is Cofil S.R.L art. Minerva, specified at 380 m per 100 g, worked with one strand. The required crochet hook is 2.25 mm.
- Recommended yarn: Cofil S.R.L art. Minerva, 380 m/100 g
- Yarn construction: One strand
- Yarn quantity: 42 g
- Crochet hook: 2.25 mm
- Additional tools: Needle and scissors
- Size: ONE SIZE
- Sample head circumference: 56 cm
The source does not provide a separate gauge measurement in the PDF, so no additional gauge figure is included here. Likewise, the original pattern does not specify a multi-color sequence. The sample is shown as a single-color lace accessory.
Finished Measurements
Before beginning, it is useful to know the dimensions the original pattern gives for the finished item.
- Finished height: 25 cm
- Finished width: 49 cm
- Ties: 30 cm
- Pattern size: ONE SIZE
- Designer sample head circumference: 56 cm
These measurements should be treated as the reference dimensions for the original design. The pattern does not provide a separate grading system with multiple sizes.
Why the Motif Construction Matters
The visual appeal of this bandana comes largely from its motif-based construction. Each individual motif contains lace details, and the motifs are positioned so that their shapes combine into the final triangular form.
Because the finished fabric is assembled from separate pieces, consistency is important. The six whole motifs should be worked consistently with one another, and the four half motifs should likewise match each other in shape.
This does not mean you need to rush through the motifs. In fact, taking a little extra time with the first example of each type can make the rest of the project easier. Once you understand how the whole motif looks and how the half motif is shaped, you have a visual reference for the remaining pieces.
Step 1: Crochet the Six Whole Motifs
The first major stage is to crochet 6 whole motifs according to Scheme 1.
Scheme 1 is the technical reference for the complete motif. Follow the symbols shown in the original chart and keep the hook and yarn consistent throughout all six pieces.
After finishing the first whole motif, inspect its shape before continuing. The outer edges will eventually need to connect to other motifs, so it is helpful to become familiar with the motif’s overall geometry.
Then continue until all six whole motifs have been completed.
A useful organizational method is to place the completed motifs together in one small group while you work on the remaining pieces. This helps prevent accidentally mixing the whole motifs with the half motifs when you reach the assembly stage.
Step 2: Crochet the Four Half Motifs
Next, crochet 4 half motifs following Scheme 2.
The half motifs are an essential part of the triangular construction. They are not simply decorative additions. Their shape allows the motif arrangement to form the intended outer edges of the bandana.
As with the whole motifs, work all four half motifs consistently. Once they are complete, you should have a total of ten separate motif components:
- 6 whole motifs
- 4 half motifs
At this point, resist the temptation to begin joining immediately. First, place the pieces flat and compare their shapes. Having all the components visible makes it easier to understand how the triangular structure will come together.
Step 3: Understand the Joining Diagram
Once all ten pieces are ready, the next stage is joining them into one fabric. The original source provides Scheme 3 for this process.
The diagram shows a triangular outline with directional arrows. The instructions specifically say to begin following the direction of the red arrows and then continue in the direction of the green arrows.
This sequence should be followed carefully because the joining process determines the final arrangement of the motifs. Rather than connecting pieces in whichever order seems convenient, use the diagram as your guide.
Before making the first joining stitch, place the motifs in the arrangement shown by the scheme. This gives you a clear visual map and makes it easier to identify which edges should meet.
Step 4: Join the Motifs
The original pattern instructs you to join the motifs using a joining stitch. Follow Scheme 3 and work first in the direction represented by the red arrows, followed by the green arrows.
As you join the pieces, keep the lace fabric flat whenever possible. This makes it easier to see whether the edges are aligned and whether the triangular outline is developing as expected.
Because the individual motifs are decorative, the joins become part of the visual structure of the finished bandana. For that reason, it is worth taking your time during this stage instead of trying to complete the assembly as quickly as possible.
When the joining stage is complete, the separate motifs should have become one triangular piece ready for the outer edging.
Step 5: Begin the Outer Edging
After the motif assembly is finished, continue with the edging using turning rows as shown in Scheme 4.
The edging follows the triangular outline of the bandana. The original source then specifies that picots are worked in the third row according to Scheme 5.
Because the picots are an important decorative detail, use the original Scheme 5 to identify their placement. Avoid adding extra decorative stitches outside the areas shown by the source.
The border is not only decorative. It also prepares the edges for the final tie construction, so following the turning-row sequence accurately is important.
Step 6: Work the Picot Detail
The third edging row is the point where the picot detail is introduced. Scheme 5 illustrates the stitch arrangement used for this decorative element.
When working lace edging, it can be tempting to tighten stitches in an effort to make the border look neat. However, maintaining a consistent approach is useful because the finished fabric will later be wet-finished and laid flat.
Follow the chart rather than changing the number or location of the picots. The original source identifies the third row specifically for this detail.
Step 7: Continue Around the 4 ½ Motif Section
The instructions then transition to edging the 4 ½ motif section during the third row.
At the end of the third row, the source instructs you to cut the yarn. The next stage begins the tie construction with a new chain or stitch sequence of 80 p.s.b..
This transition is an important checkpoint. Before cutting the yarn, make sure the third row and its picot detail have been completed according to the diagrams and that you have reached the correct end of the edging.
Step 8: Create the First 80-Stitch Tie Section
After the third row is complete, cut the yarn as instructed. Then make 80 p.s.b. for the first tie.
For Row 1, the original instructions specify 80 ст.б.н. for the first tie. Attach it to the bandana at the location indicated by the yellow arrow in Scheme 4.
The same row then continues with N quantity of ст.б.н. on the bandana from the side of the 4 ½ motif.
The source does not give a numerical value for N. Therefore, N should remain exactly as stated in the original instructions rather than being replaced with a guessed number.
Do not cut the yarn after this section. The construction continues directly into the second tie.
Step 9: Begin the Second Tie
After working the specified bandana section, make another 80 p.s.b. for the second tie.
Then turn the work to the wrong side, as specified by the original instructions.
Maintaining the correct orientation at this point is important because Row 2 is worked from the wrong side and connects the second tie with the first tie.
Step 10: Complete Row 2 and Repeat It
For Row 2, work 80 ст.б.н. for the second tie, then work сб.б.н. to the end of the first tie.
Once Row 2 is completed, repeat it 2 more times.
This gives the tie section its final construction according to the original pattern. Avoid adding additional rows simply to change the length, because the original instructions specify the exact repeat sequence.
After the two additional repeats are finished, cut the working yarn and hide all ends.
Assembly Checkpoint
Before moving to wet finishing, take a moment to review the complete construction. A simple checklist can help you confirm that each major section is present.
- 6 whole motifs have been crocheted from Scheme 1.
- 4 half motifs have been crocheted from Scheme 2.
- All ten motif pieces have been arranged according to the construction diagram.
- The motifs have been joined with the specified joining stitch.
- The red-arrow joining direction was followed first.
- The green-arrow joining direction was followed second.
- The turning-row edging has been completed according to Scheme 4.
- Picots have been worked in the third row according to Scheme 5.
- The edging has transitioned around the 4 ½ motif section.
- The first tie begins with 80 p.s.b.
- Row 1 contains 80 ст.б.н. for the first tie.
- The first tie is attached at the position shown by the yellow arrow in Scheme 4.
- The N quantity of ст.б.н. has been worked on the bandana from the 4 ½ motif side.
- The second tie begins with 80 p.s.b.
- Row 2 contains 80 ст.б.н. for the second tie.
- Row 2 continues with сб.б.н. to the end of the first tie.
- Row 2 has been repeated two more times.
- The working yarn has been cut.
- All ends have been hidden.
Wet Finishing: The First Wash
The original pattern includes detailed instructions for wet finishing. The first wash is preferably done by hand, and drying on blockers is optional.
Before beginning the wet-finishing process, hide the ends on the wrong side. The instructions specifically say not to cut the yarn at this stage.
Prepare a basin with water at approximately 30–35°C. Add a washing product intended for wool/silk and leave the bandana in the water for 15 minutes.
After 15 minutes, remove the bandana from the soapy water. Carefully remove excess water without treating the lace fabric roughly.
Rinsing the Crochet Bandana
After the washing stage, rinse the bandana in clean water at approximately 30–35°C. Again, carefully remove excess water.
The source does not recommend twisting or aggressively squeezing the finished lace. Instead, the excess water is removed gently before moving to the towel stage.
Using a Towel to Remove Excess Moisture
Place the washed bandana on a towel and roll the towel and bandana together into a roll. Apply a little pressure to the resulting roll.
The purpose of this step is to allow the towel to absorb excess moisture from the crochet fabric. According to the source, the bandana should become semi-wet after this process.
Once the excess moisture has been removed, unroll the towel and carefully lay the bandana on a horizontal surface.
Drying the Finished Piece
Lay the bandana carefully on a horizontal surface and allow it to dry. The source notes that drying on blockers is optional.
Because this is a lace motif project, laying it flat gives you a useful opportunity to observe the final triangular shape while it dries. Handle the piece gently while arranging it.
After the bandana is completely dry, cut the ends on the wrong side, leaving approximately 3 mm of end as specified by the original pattern.
Optional Steaming
Once the bandana is dry, the source says that you may optionally steam the finished piece with an iron or steamer.
This is an optional finishing step. The original instructions do not require steaming, so it should only be used if desired after the washing and drying process is complete.
How to Keep the Motifs Consistent
One of the most useful habits for a motif-based crochet project is to establish a visual reference early. The first whole motif can serve as a comparison for the other five whole motifs, while the first half motif can serve as a comparison for the remaining three.
Look at the overall shape rather than attempting to invent additional measurements that are not provided in the pattern. The goal is simply to keep the components visually consistent with one another.
It is also helpful to place the motifs flat when checking them. A motif that looks slightly different when held in the hand can become easier to compare when laid flat.
Making the Joining Stage Easier
The joining stage is arguably the most important organizational part of the project. Once the ten individual pieces are complete, place them according to Scheme 3 before making the joining stitches.
Pay particular attention to the two arrow colors. The original instructions say to work first in the direction of the red arrows and then in the direction of the green arrows.
Following this sequence gives you a clear roadmap through the assembly. If you become unsure about which edge should be joined next, return to the diagram rather than improvising.
Keeping the unfinished bandana flat during assembly can also make the triangular shape easier to recognize.
Reading the Edging Diagrams
After the motifs are joined, Schemes 4 and 5 become the main visual references. Scheme 4 shows the edging route and later identifies the position of the tie attachment. Scheme 5 focuses on the picot detail used in the third row.
Because these diagrams have different purposes, it is useful to look at them separately. First understand the direction of the edging from Scheme 4. Then use Scheme 5 specifically when you reach the picot portion.
This keeps the decorative stitch information from becoming mixed with the larger construction route.
Important Stitch and Construction Numbers
The original source contains several numbers that should remain unchanged when working the design. Keeping them visible during the project can make the construction easier to check.
- 6 whole motifs
- 4 half motifs
- 2.25 mm crochet hook
- 42 g yarn consumption
- 25 cm finished height
- 49 cm finished width
- 30 cm ties
- 80 p.s.b. for the first tie section
- 80 ст.б.н. for the first tie in Row 1
- N quantity of ст.б.н. on the bandana from the 4 ½ motif side
- 80 p.s.b. for the second tie
- 80 ст.б.н. for the second tie in Row 2
- 2 more repeats of Row 2
- 30–35°C washing and rinsing temperature
- 15 minutes soaking time
- 3 mm approximate remaining end after drying
Finished Bandana Styling
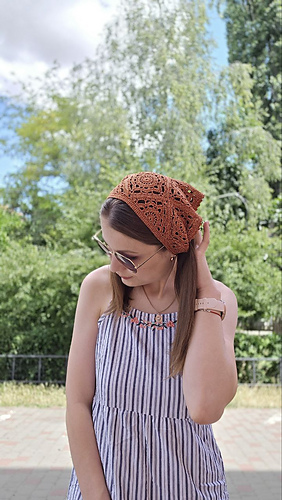
The finished photographs demonstrate the accessory worn over the hair in several different views. The lace fabric creates a decorative layer while the triangular shape sits naturally around the back and sides of the head.
The design works particularly well with simple clothing because the crochet itself becomes the focal point. The intricate motifs stand out against the plain striped dress shown in the sample photographs.
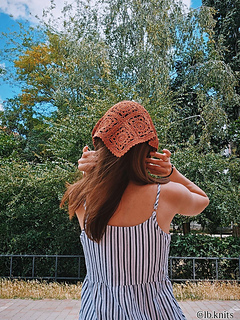
The back view clearly shows the triangular silhouette and the lace border. The ties extend from the lower edges and can be used to secure the bandana around the head.
Common Troubleshooting Questions
What if the whole motifs do not look identical?
Compare each motif with the first completed whole motif and return to Scheme 1 if something appears different. Since the original source does not provide an alternative measurement system, avoid changing the pattern to compensate for a suspected difference.
What if I am unsure how the motifs should be joined?
Use Scheme 3. The source specifically identifies the red-arrow direction as the first joining direction and the green-arrow direction as the second.
What if the edging looks confusing?
Separate the information from the two diagrams. Use Scheme 4 for the overall edging route and Scheme 5 for the picot detail in the third row.
What number should replace N in Row 1?
The source itself writes N and does not provide a numerical value in the supplied instructions. Do not invent a number that is not present in the original source.
Can I change the tie length?
The original finished dimensions specify 30 cm ties, and the construction provides the corresponding 80-stitch tie sections and specified repeats. If reproducing the original design, keep these instructions unchanged.
Beginner-Friendly Project Organization
If you are new to motif crochet, consider dividing the project over several crafting sessions. The first session can focus entirely on the six whole motifs. A second session can be used for the four half motifs.
Once all ten components are ready, take a separate session for arrangement and joining. This is a good point to slow down because the final shape begins to become visible here.
The next session can focus on the border and picots. Finally, complete the ties and wet finishing.
This approach does not change the pattern. It simply makes the project easier to manage by giving each construction stage your full attention.
Quick Reference for the Complete Construction
- Use Cofil S.R.L art. Minerva, 380 m/100 g, one strand.
- Use a 2.25 mm crochet hook.
- Prepare 6 whole motifs from Scheme 1.
- Prepare 4 half motifs from Scheme 2.
- Arrange the ten pieces according to Scheme 3.
- Join them using the specified joining stitch.
- Follow the red arrows first.
- Follow the green arrows second.
- Work the turning-row edging according to Scheme 4.
- Make picots in the third row according to Scheme 5.
- Continue around the 4 ½ motif section.
- Cut the yarn at the end of the third row.
- Make 80 p.s.b. for the first tie.
- Work Row 1 with 80 ст.б.н. for the first tie.
- Attach the tie according to the yellow arrow in Scheme 4.
- Work the N quantity of ст.б.н. on the bandana from the 4 ½ motif side.
- Do not cut the yarn.
- Make 80 p.s.b. for the second tie.
- Turn to the wrong side.
- Work Row 2 with 80 ст.б.н. for the second tie.
- Work сб.б.н. to the end of the first tie.
- Repeat Row 2 two more times.
- Cut the working yarn.
- Hide all ends.
- Wash by hand at approximately 30–35°C.
- Leave in wool/silk washing solution for 15 minutes.
- Rinse at approximately 30–35°C.
- Remove excess moisture using a towel roll.
- Dry flat on a horizontal surface.
- Optionally dry on blockers.
- After drying, leave approximately 3 mm of end when trimming the wrong-side ends.
- Optionally steam with an iron or steamer.
Frequently Asked Questions
Is this a one-size crochet bandana?
Yes. The original pattern is listed as ONE SIZE. The designer notes a 56 cm head circumference for the sample.
What are the finished measurements?
The finished bandana is 25 cm high and 49 cm wide, plus 30 cm ties.
How much yarn is required?
The source specifies 42 g of yarn.
What yarn is recommended?
The recommended yarn is Cofil S.R.L art. Minerva, 380 m per 100 g, worked in one strand.
What hook size is used?
The specified hook is 2.25 mm.
How many motifs are needed?
The construction uses 6 whole motifs and 4 half motifs.
How are the motifs joined?
They are joined with a joining stitch according to Scheme 3. The red-arrow direction is worked first, followed by the green-arrow direction.
When are the picots added?
The picots are worked in the third edging row according to Scheme 5.
How long are the ties?
The finished design specifies 30 cm ties.
How many stitches begin each tie?
The instructions specify 80 p.s.b. for the first tie and another 80 p.s.b. for the second tie.
How many times is Row 2 repeated?
Row 2 is completed once and then repeated two more times.
What temperature should be used for washing?
The source specifies approximately 30–35°C for both washing and rinsing.
How long does the bandana soak?
The source instructs you to leave it in the washing solution for 15 minutes.
Is blocking necessary?
Drying on blockers is optional according to the original instructions. The bandana can be laid carefully on a horizontal surface to dry.
Can the finished bandana be steamed?
Yes. After it is dry, the source says that you may optionally steam it with an iron or steamer.
Final Thoughts on the LB.KNITS Crochet Bandana
The LB.KNITS crochet bandana is a rewarding project for anyone who enjoys lace motifs, geometric construction, and handmade accessories. Its construction is especially interesting because the finished triangular shape is created from six whole motifs and four half motifs rather than being worked as one uninterrupted triangle.
The most important part of the project is to respect the sequence: make the motifs, arrange them, join them using the two directions shown in Scheme 3, complete the turning-row border, add the third-row picots, and then construct the ties exactly as instructed.
The finishing process is equally important. A careful hand wash, gentle moisture removal, flat drying, and optional steaming complete the project without changing its original construction.
With its 25 cm height, 49 cm width, and 30 cm ties, the finished accessory has a compact triangular shape that can be worn comfortably over the hair. The open lace motifs give it a distinctive handmade character, while the simple tie construction keeps the finished accessory practical.
The original pattern credits LB.KNITS and Liliya Bardievska and identifies the design as a July 2025 pattern. The source also provides the Instagram reference @lb.knits and the hashtag #косинка_з_lbknits for finished projects.
Always respect the original designer’s stated usage terms when working with or publishing the pattern.
Once the final ends have been hidden, the bandana has been washed and dried, and the optional finishing has been completed, your delicate LB.KNITS lace crochet bandana is ready to wear.
Congratulations on completing this beautiful motif-based crochet accessory!