
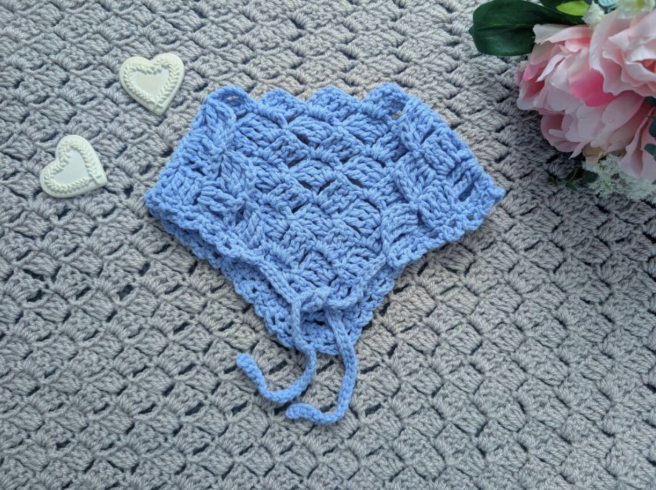

The Crochet Bluebell Bandana is a beautiful small crochet accessory that combines an approachable construction with a delicate, feminine finish. Designed as an easy/beginner project, this bandana introduces crocheters to a treble crochet corner-to-corner technique while keeping the overall project compact and manageable.
The main body is built from C2C squares, allowing the bandana to develop its distinctive shape row by row. After the main section is completed, a chain arch edging is added across the two straight sides. Two chain ties then finish the accessory and allow it to be secured when worn.
This guide follows the original Bluebell Bandana pattern and preserves its technical instructions, measurements, stitch counts, terminology, and construction sequence. It is written as a detailed workshop-style guide so that beginners can understand what each stage is doing while still following the original pattern accurately.
What You Will Make
This project creates a delicate crocheted bandana measuring 8” (20 cm) x 15” (38 cm), including the border but excluding the ties. The finished accessory has a simple central C2C design and a decorative chain arch border that gives the straight sides a softer appearance.
The project is especially suitable if you enjoy crochet accessories that can be completed without committing to a large amount of fabric. The pattern uses one skein of yarn and a 5 mm crochet hook, and the construction is divided into clearly recognizable stages.
First, the C2C main section is created. Next, the first tie is made and attached. The edging is then worked across the two straight sides, followed by the second tie. Finally, the yarn is fastened off and the loose ends are tidied.
Project Details Before You Begin
- Level: Easy/beginner
- Terminology: US terms, with British terms in brackets
- Finished size: 8” (20 cm) x 15” (38 cm), including border but excluding ties
- Gauge: 4” (10 cm) x 4” (10 cm): 4 “clusters” of C2C pattern
- Yarn: 1 skein of Lion Brand Feels Like Butta yarn in shade Bluebell
- Crochet hook: 5 mm
- Scissors: 1 pair
- Tapestry needle: 1
Having these materials ready before beginning makes the project easier to manage. The original pattern does not provide an alternative yarn quantity or hook size, so the specifications above should be treated as the required materials for following the pattern as written.
Understanding the Stitch Language
The pattern uses US crochet terms and provides the corresponding British terminology in brackets. This distinction is important because stitch names can differ between crochet terminology systems.
- Ch: chain
- St: stitch
- Sl st: slip stitch
- Sk: skip
- SC: Single Crochet (UK Double Crochet)
- TC: Treble Crochet (UK Double Treble Crochet)
- EOR: End of Row
One particularly important detail is that the chain 4 used in the C2C construction counts as a treble crochet throughout the relevant instructions. Keeping this in mind will make the square construction much easier to understand.
Why the C2C Construction Matters
Corner-to-corner crochet is a useful construction method because it allows a fabric to grow through individual blocks or squares. In this bandana, the technique is worked with treble crochet rather than a smaller stitch, giving the project a more open and elegant character.
The first row establishes the starting structure. The following rows add squares and connect them to the previous square using slip stitches. As the rows progress from Row 1 through Row 10, the main body develops into the shape required for the bandana.
For beginners, it is helpful to think of each square as a small unit. Instead of trying to understand the entire bandana at once, concentrate on identifying the previous square, finding the space between the 3rd and 4th treble crochet, and completing the next square in that space.
Start With the First Square
Begin by making a slip knot. This is the starting point for the entire project.
Row 1: Establishing the Foundation
Chain 7.
Work a treble crochet into the 5th chain from the hook and then work a treble crochet in each stitch along. At the end of this row, you will have 4 treble crochet stitches.
This first row creates the starting square structure for the C2C section. Take a moment to check your stitch count before moving on. The original pattern specifies 4 TC for this row.
Row 2: Creating the Next Square
Chain 7 and turn your work.
Work a treble crochet into the 5th chain from the hook and then work a treble crochet in each stitch along, again creating 4 treble crochet stitches.
Next, turn the work to slip stitch in between the 3rd and 4th treble crochet from the previous row.
Chain 4. This chain 4 counts as a treble crochet throughout the pattern. Add 3 treble crochet stitches in between the 3rd and 4th treble crochet from the previous row to form a square.
The joining location is an important part of the construction. The pattern specifically places the slip stitch between the 3rd and 4th treble crochet, so this placement should be followed rather than substituted with another space.
Developing the Main Bandana Shape

Once Row 2 is complete, the basic idea behind the construction has been established. Row 3 repeats this approach while adding additional squares. Rows 4–10 continue the same principle.
Row 3
Chain 7 and turn your work.
Work a treble crochet into the 5th chain from the hook, followed by a treble crochet in each stitch along. This gives you 4 treble crochet stitches.
Slip stitch to the previous square in between the 3rd and 4th treble crochet.
Next, chain 4, counting this as a treble crochet, and add 3 treble crochet stitches in that space. Slip stitch to the previous square in between the 3rd and 4th treble crochet.
Then chain 4 again, counting it as a treble crochet, add 3 treble crochet stitches in that space, and slip stitch to the previous square in between the 3rd and 4th treble crochet.
This row demonstrates the repeating square-building rhythm that will continue as the project becomes larger.
Rows 4–10
Rows 4 through 10 are worked by repeating Row 3 and adding the required number of squares as you go along.
Because the number of squares increases as the construction progresses, it is useful to keep your attention on the joining spaces and the square you are currently creating. The original pattern does not introduce a different construction method for these rows; instead, it instructs you to repeat Row 3 while adding the required number of squares.
Do not fasten off after Row 10.
Visual Checkpoints While Working the C2C Section
A good way to approach the main section is to use visual checkpoints without changing the written instructions. After each row, look at the direction of the squares and confirm that your joins are being made in the intended spaces.
If the fabric begins to look unusually distorted, check your most recent slip stitches before continuing. The pattern repeatedly uses the space between the 3rd and 4th treble crochet for joining. Since these joins determine how the squares connect, careful placement is more useful than trying to compensate later.
Another useful habit is to maintain an even working tension. The pattern does not call for an adjustment to the hook size or yarn quantity, so the safest approach is to work consistently with the specified 5 mm hook and Lion Brand Feels Like Butta yarn.
The Yarn Choice for This Delicate Accessory

The original pattern uses Lion Brand Feels Like Butta yarn in the shade Bluebell. The yarn is described as soft and beautiful and is particularly suited to accessories and feminine crochet projects.
The Bluebell color contributes to the delicate character of the finished bandana, while the yarn itself creates a soft feel. Since the pattern specifies one skein, make sure your yarn supply is ready before beginning the project.
When crocheting the main C2C section, keeping the yarn tension consistent will help the square units maintain a similar appearance. Consistency becomes particularly useful once the edging is added because the border is designed to follow the two straight sides of the finished fabric.
Moving From the Main Body to the First Tie
After Row 10 has been completed, do not fasten off. The next stage is the first tie.
Chain 40.
Slip stitch through the second chain and continue slip stitching through each chain across. This creates the first tie.
Once you reach the bandana, slip stitch the tie onto the project to secure it.
The ties are not included in the stated finished measurements of 8” (20 cm) x 15” (38 cm), so this is an important distinction when comparing the completed accessory with the dimensions given in the pattern.
Adding the Chain Arch Edging
The chain arch edging is worked across the two “straight” sides of the bandana. This decorative border is one of the details that gives the project its delicate appearance.
The first edging round creates a foundation of single crochet stitches. The second round transforms that foundation into a repeating series of chain arches.
Edging Row 1: Even Single Crochet
Chain 1. This chain does not count as a stitch.
Place a single crochet evenly across the two straight sides of the bandana. The original instructions emphasize that you should make sure you do not tighten the project with these single crochet stitches.
There is no specific amount of single crochet stitches that you need to crochet across the project. Instead, place the stitches evenly along the two straight sides.
This instruction is particularly useful because it means you should focus on distributing the stitches evenly rather than forcing the edge to match an invented stitch count.
Edging Row 2: Creating the Arches
Chain 1. Again, this chain does not count as a stitch.
Place a single crochet into the first stitch.
Then begin the repeating sequence: chain 3, skip 1 stitch, and work a single crochet into the next stitch. Continue this sequence until the end of the row.
Finish on a single crochet.
The chain-3 sections create the arch-like spaces along the edge. Keep your tension relaxed enough to allow the arches to sit naturally without pulling the bandana inward.
Why Border Tension Is Important
The border is relatively simple, but tension has a significant visual effect. The first edging row is worked with single crochet, and the pattern specifically warns against tightening the project with these stitches.
If those stitches are worked too tightly, the straight sides can be pulled inward. Instead, work the single crochet stitches evenly across the sides while allowing the fabric to maintain its shape.
During the second edging row, the chain 3 spaces should form a repeated decorative rhythm. Following the stated chain 3, skip 1 stitch, single crochet sequence consistently is the key to maintaining that rhythm.
Adding the Second Tie

Once the chain arch edging is complete, do not fasten off yet.
Chain 40 once again.
Slip stitch through the second chain and each chain across until you reach the bandana. Then slip stitch the tie to the project to secure it.
After the second tie has been attached, fasten off and tidy up all loose ends.
The two ties use the same chain-40 construction, providing matching ends on the finished accessory. The ties are attached directly to the bandana using slip stitches as specified in the pattern.
Finishing With the Tapestry Needle
The tapestry needle is used at the final stage to tidy the loose ends. Once the second tie has been secured and the yarn has been fastened off, take time to deal with all remaining loose ends.
A neat finishing process helps the accessory look polished and ready to wear. This stage does not alter the crochet construction; it simply completes the project after all the required crochet work has been finished.
Beginner Construction Checklist
- Make a slip knot.
- Complete Row 1 with 4 TC.
- Complete Row 2 and form the next square.
- Complete Row 3 using the specified square joins.
- Repeat Row 3 for Rows 4–10, adding the required number of squares.
- Do not fasten off after Row 10.
- Chain 40 for the first tie.
- Slip stitch through the second chain and each chain across.
- Secure the first tie to the project.
- Work the first edging row across the two straight sides.
- Keep the edging single crochet stitches even and do not tighten the project.
- Work the second edging row using chain 3, skip 1 stitch, and SC into the next stitch.
- Finish the edging on a SC.
- Chain 40 for the second tie.
- Slip stitch through the second chain and each chain across.
- Secure the second tie to the project.
- Fasten off.
- Tidy all loose ends.
Common Points to Check Before Continuing
Check the Chain-7 Starts
The main rows begin with chain 7. The first treble crochet is worked into the 5th chain from the hook, followed by treble crochets in the remaining stitches along. This produces 4 TC. If the count is different, it is worth checking the foundation before proceeding.
Check the Joining Space
The C2C construction repeatedly refers to the space between the 3rd and 4th treble crochet. This is the joining point for the squares. Maintaining this placement throughout the repeated rows helps preserve the intended construction.
Check the Chain-4 Counts
The chain 4 counts as a TC throughout the pattern. When creating each square, this chain is followed by 3 TC in the specified space.
Check the Edging Tension
The first edging row should not tighten the project. The single crochet stitches are placed evenly across the two straight sides, with no specific stitch count given.
Check the Chain-3 Border Repeat
The second edging row uses a clear repeat: chain 3, skip 1 stitch, and SC into the next stitch. Continue until EOR and finish on a SC.
Finished Size and Gauge Reference
The original gauge is 4” (10 cm) x 4” (10 cm), measured as 4 “clusters” of C2C pattern. This provides a useful reference for the main C2C fabric.
The finished bandana is 8” (20 cm) x 15” (38 cm), including the border but excluding the ties. Because the ties are specifically excluded from these measurements, do not expect the total end-to-end length of the wearable accessory to equal the stated 15” measurement.
For anyone checking their finished project, these measurements are useful reference points rather than a reason to change the pattern instructions. The original construction, yarn, hook, and stitch sequence should remain unchanged when following the pattern.
How to Approach This Project as a Beginner
If you are new to C2C crochet, the most useful approach is to break the pattern into small sections. First, focus on Row 1. Once the first square is clear, move to Row 2 and identify exactly where the new square is attached. Row 3 then demonstrates how additional squares are added.
Rows 4–10 are repetitions of the Row 3 construction, so once you understand that row, the remaining main-body work becomes a matter of repeating the established process and adding the required number of squares.
The edging is a separate skill checkpoint. The first edging row focuses on even placement, while the second creates the chain arches. Treating these as two separate border stages makes the finishing process easier to follow.
Pattern Sequence at a Glance
- Begin with a slip knot.
- Work Row 1: Ch 7, TC in 5th ch from hook and in each stitch along, creating 4 TC.
- Work Row 2: Ch 7, turn, create 4 TC, join between the 3rd and 4th TC, then create the square using Ch 4 and 3 TC.
- Work Row 3 according to the original C2C joining sequence.
- Repeat Row 3 for Rows 4–10, adding the required number of squares.
- Keep the work joined and do not fasten off.
- Create the first chain-40 tie and attach it.
- Work evenly placed SC across the two straight sides.
- Work the chain-3, skip-1, SC edging repeat.
- Create the second chain-40 tie and attach it.
- Fasten off and tidy all loose ends.
What Gives the Bluebell Bandana Its Character?
The design works because several relatively simple elements are combined. The C2C construction provides the main shape, while the treble crochet creates an elegant texture. The chain arch edging adds a decorative border without requiring a complicated stitch pattern.
The two chain ties also contribute to the lightweight character of the accessory. Instead of adding a separate closure, the pattern extends the crochet work into ties that are directly secured to the bandana.
The result is an accessory that is both practical and decorative. It can help tidy the hair while adding a handmade touch to an outfit, making it suitable for different seasons.
Final Finishing Review
Before considering the project complete, check that both ties are securely attached, the chain arches run along the two straight sides, and the loose ends have been tidied.
Also compare the finished main bandana with the stated size of 8” (20 cm) x 15” (38 cm), remembering that this measurement includes the border but excludes the ties.
If the project has the expected shape and the border sits naturally without pulling the fabric inward, the finishing stage is complete.
Frequently Asked Questions
Is this a beginner crochet pattern?
Yes. The original pattern is rated easy/beginner. It introduces a treble crochet C2C technique and a simple chain arch edging while using familiar basic stitches such as chain, slip stitch, and single crochet.
What yarn color is used?
The pattern uses Lion Brand Feels Like Butta yarn in the shade Bluebell.
How much yarn is needed?
The original pattern specifies 1 skein of Lion Brand Feels Like Butta yarn in shade Bluebell.
What hook size should I use?
The specified crochet hook is 5 mm.
What size is the finished bandana?
The finished size is 8” (20 cm) x 15” (38 cm), including the border but excluding the ties.
What is the gauge?
The gauge is 4” (10 cm) x 4” (10 cm): 4 “clusters” of C2C pattern.
How many rows are in the main C2C section?
The main section consists of Rows 1–10. Rows 4–10 repeat the Row 3 construction while adding the required number of squares.
How long is each tie?
Each tie begins with a chain of 40. The chain is slip stitched through the second chain and each chain across before being secured to the project.
Does the border have an exact SC stitch count?
No. The pattern specifically states that there is not a specific amount of SC stitches required across the project. The stitches should be placed evenly across the two straight sides.
Should the first border row be tight?
No. The instructions specifically say to make sure you do not tighten the project with the SC stitches used across the two straight sides.
What happens after the chain arch edging?
After completing the edging and finishing on a SC, do not fasten off. Chain 40 again, slip stitch through the second chain and each chain across, secure the tie to the project, then fasten off and tidy the loose ends.
Final Thoughts on the Bluebell Bandana
The Crochet Bluebell Bandana is a compact project with a graceful result. Its main body introduces the logic of treble crochet C2C construction, while the border provides an opportunity to practice evenly placed single crochet and a repeating chain-arch sequence.
For beginners, the most important part is to follow the joining instructions carefully. The spaces between the 3rd and 4th treble crochet stitches are repeatedly used to connect the squares, and the chain 4 counts as a treble crochet throughout the relevant construction.
The finishing stage is equally straightforward when divided into individual steps: create the first chain-40 tie, work the two edging rows, create the second chain-40 tie, secure it, fasten off, and tidy the loose ends.
With its soft Lion Brand Feels Like Butta yarn, Bluebell shade, delicate C2C structure, and chain arch edging, this bandana makes a lovely handmade accessory while also providing a manageable way to practice several useful crochet techniques.
Follow the original stitch sequence and measurements carefully, keep your tension consistent, and use the visual checkpoints along the way to help you recognize the developing shape. The finished result is a delicate crochet accessory with a distinctly feminine character and a satisfying handmade finish.