
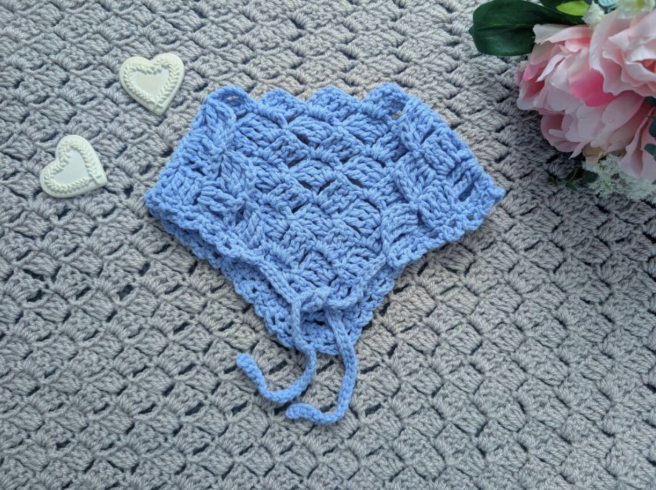

There is something especially charming about a handmade crochet bandana. It is a small project, yet it can make a noticeable difference to an outfit, and it offers an enjoyable way to practice several useful crochet techniques without committing to a large project. The Crochet Bluebell Bandana is a lovely example of this type of accessory, combining a simple corner-to-corner construction with a delicate decorative border and two crochet ties.
This beginner-friendly design is worked using treble crochet corner-to-corner construction, commonly referred to as C2C. The main section is built from squares that are progressively added as the rows advance. Once the main body is complete, the design is finished with a chain arch edging worked across the two straight sides.
The original pattern is rated easy/beginner and uses US crochet terminology, with British equivalents provided in brackets. It calls for Lion Brand Feels Like Butta yarn in the Bluebell shade and a 5 mm crochet hook. The finished bandana measures 8” (20 cm) x 15” (38 cm), including the border but excluding the ties.
This workshop-style guide walks through the project from the first slip knot to the final loose ends. The technical instructions, stitch counts, measurements, yarn requirements, hook size, row numbers, and construction details remain faithful to the original pattern.
Meet the Bluebell Bandana
The Bluebell Bandana is designed as a feminine and practical crochet accessory. Bandanas can be useful for tidying the hair and completing an overall look, while the handmade texture adds a personal touch that is difficult to achieve with a mass-produced accessory.
The design is intentionally uncomplicated. Instead of relying on a highly elaborate stitch pattern, it uses the structure of treble crochet C2C squares to create the main shape. The decorative character comes from the combination of the C2C construction, the soft yarn, the Bluebell color, and the chain arch edging.
One of the most useful aspects of this project for beginners is that the construction can be divided into clear checkpoints. You can focus first on the opening row, then learn how the next square is attached, then repeat the established method through Row 10. After that, the project changes into an edging and finishing exercise.
Project Specifications
- Difficulty: Easy/beginner
- Terminology: US terms, with British terms in brackets
- Finished size: 8” (20 cm) x 15” (38 cm), including border and excluding ties
- Gauge: 4” (10 cm) x 4” (10 cm): 4 “clusters” of C2C pattern
- Yarn: 1 skein of Lion Brand Feels Like Butta yarn in shade Bluebell
- Hook: 5 mm crochet hook
- Scissors: A pair of scissors
- Needle: A tapestry needle
These specifications are useful to review before starting because they establish the exact materials and measurements supplied by the pattern. If you are following the design as written, use the stated 5 mm hook and the specified Lion Brand Feels Like Butta yarn in Bluebell.
What Makes This Pattern Beginner Friendly?
The project is classified as easy/beginner, but it still introduces an important crochet construction technique. The main body is based on C2C squares, so you get the opportunity to learn how separate-looking square units are connected to one another as the fabric grows.
The stitch vocabulary is also relatively focused. You will use chain stitches, slip stitches, treble crochet, single crochet, and skipped stitches. Once these stitches are familiar, the main challenge is not learning a large collection of new techniques but following the placement instructions accurately.
The border is similarly accessible. The first edging row uses single crochet placed evenly along the two straight sides. The second edging row introduces a repeating chain-3 and skip-1 sequence. This creates the decorative arches without requiring an elaborate lace stitch.
Materials and Yarn Preparation

The yarn specified for this project is Lion Brand Feels Like Butta in the shade Bluebell. The pattern calls for 1 skein. The yarn is described as soft and beautiful and has been used for other accessories and crochet designs as well.
Along with the yarn, prepare a 5 mm crochet hook, scissors, and a tapestry needle. Keeping your materials together before beginning can make the project much more comfortable, particularly when you reach the final finishing stage and need the tapestry needle to tidy the loose ends.
Since the pattern does not specify a different hook for the edging or ties, the stated hook size remains the 5 mm crochet hook throughout the project.
Pattern Abbreviations
The original instructions use US crochet terms and give British terms in brackets. Here is the complete abbreviation reference used in the pattern:
- Ch: chain
- St: stitch
- Sl st: slip stitch
- Sk: skip
- SC: Single Crochet (UK Double Crochet)
- TC: Treble Crochet (UK Double Treble Crochet)
- EOR: End of Row
There is one especially important construction note to remember: chain 4 counts as a treble crochet throughout the relevant C2C instructions. This makes the chain-4 beginning of each square part of the square’s treble crochet count.
Gauge and Measurements
The gauge for this design is 4” (10 cm) x 4” (10 cm), measured as 4 “clusters” of C2C pattern.
The finished bandana measures 8” (20 cm) x 15” (38 cm). These dimensions include the border but specifically exclude the ties. This distinction is important because the completed accessory extends beyond the stated bandana measurements once both chain ties have been added.
For a beginner, the measurements are also useful as a general checkpoint. If your finished main section looks dramatically different in scale, review your tension and construction before changing anything about the original pattern. The pattern itself specifies the 5 mm hook and the stated yarn, so those are the materials to use when following the original design.
Stage One: Creating the Foundation
Begin by making a slip knot.
The first row creates the starting structure from which the C2C section will grow. Because the later rows depend on this foundation, it is worth taking a moment to count the chains and treble crochet stitches carefully.
Row 1
Chain 7.
Work a treble crochet into the 5th chain from the hook and then work a treble crochet in each stitch along. At the end of the row, you will have 4 TC.
This is the first important stitch-count checkpoint. The original pattern clearly specifies 4 treble crochet stitches for Row 1.
For beginners, it can help to identify the fifth chain from the hook before inserting the hook. This prevents accidentally working the first treble crochet into the wrong chain and changing the foundation structure.
Stage Two: Building the Second Square
Row 2 begins to demonstrate the characteristic C2C construction. The row starts with another chain-7 sequence and then connects the new square to the previous row.
Row 2
Chain 7 and turn the work.
Work a treble crochet into the 5th chain from the hook and in each stitch along, creating 4 TC.
Turn the work to slip stitch in between the 3rd and 4th TC from the previous row.
Next, chain 4. This chain 4 counts as a TC throughout the pattern. Add 3 TC in between the 3rd and 4th TC from the previous row to form a square.
This is the point where the basic C2C joining concept becomes visible. The new square is formed in the space indicated by the pattern, and the slip stitch connects the new section to the previous square.
Learning the Joining Point
The space between the 3rd and 4th treble crochet stitches is an important reference throughout the main body. The pattern uses this location repeatedly when connecting squares.
If you are new to this construction, do not rush through the joining instructions. After completing the chain-7 section, identify the 3rd and 4th treble crochet stitches from the previous row, locate the space between them, and place the slip stitch as instructed.
Once this movement becomes familiar, the repeated C2C construction is much easier to follow.
Stage Three: Row 3 and the Expanding C2C Section

Row 3
Chain 7 and turn your work.
Work a treble crochet in the 5th chain from the hook and a treble crochet in each stitch along, giving 4 TC.
Slip stitch to the previous square in between the 3rd and 4th TC.
Chain 4, which counts as a TC, and add 3 TC in that space. Slip stitch to the previous square in between the 3rd and 4th TC.
Then chain 4 again, counting it as a TC, and add 3 TC in that space. Slip stitch to the previous square in between the 3rd and 4th TC.
Row 3 is particularly useful as a learning row because it demonstrates the repeating square-building sequence that will be used in the following rows.
Rows 4–10: Continue the Established Construction
Rows 4 through 10 repeat Row 3, adding the required number of squares as you go along.
The original instructions do not introduce a different stitch construction for these rows. Instead, the same basic C2C process continues, with the number of squares increasing as the bandana develops.
This repetition is helpful for beginners because once Row 3 is understood, you can concentrate on repeating the established process. Keep checking the joining spaces between the 3rd and 4th treble crochet stitches and work the squares in the indicated spaces.
Do not fasten off after completing Row 10.
A useful checkpoint at the end of this stage is the overall shape of the main section. The C2C fabric should have developed into the intended bandana form. If something appears noticeably unusual, review the most recent joins before continuing to the edging rather than trying to correct the shape by adding unrequested stitches.
Working With Consistent Tension
Consistent tension is particularly useful in a project based on repeated square units. When each group of stitches is worked with a similar tension, the squares have a more uniform appearance and the joining points are easier to identify.
There is no need to deliberately tighten the stitches to make the fabric look smaller. In fact, the pattern gives a specific warning later in the edging section not to tighten the project with the single crochet stitches.
For the C2C portion, focus on comfortable, repeatable tension while maintaining the exact stitch placements described in the pattern.
Stage Four: Creating the First Tie
Once Row 10 is complete, keep the yarn attached. The first tie is created directly from the working yarn.
Chain 40.
Slip stitch through the second chain and each chain across. This forms the first tie.
Once you reach the bandana, slip stitch this tie onto the project to secure it.
This construction creates a flexible chain tie without requiring a separate sewn-on component. Remember that the finished-size measurement of 8” (20 cm) x 15” (38 cm) excludes the ties.
Stage Five: Preparing the Two Straight Sides
The chain arch edging is now worked across the two straight sides of the bandana.
The first edging row creates a foundation of single crochet stitches. Unlike a conventional pattern where the designer might specify an exact number of border stitches, this pattern deliberately does not provide a specific number of SC stitches for these sides.
Edging Row 1
Chain 1. This chain does not count as a stitch.
Place a SC evenly across the two “straight” sides of the bandana. The pattern specifically instructs you to make sure you do not tighten the project with these SC stitches.
There is no specific amount of SC that you need to crochet across the project.
The goal is therefore even placement rather than achieving an invented stitch count. Work the stitches so that the edging follows the sides naturally and the fabric remains relaxed.
Why You Should Not Tighten the First Border
This is one of the most useful practical notes in the original pattern. When single crochet is worked around an edge, tight stitches can draw the fabric inward. Since this bandana needs to maintain its shape, the edging should not be used to pull the project smaller.
As you work along the straight sides, allow the single crochet stitches to sit naturally. If you notice the edge beginning to gather or pull inward, check your tension before continuing.
There is no need to add extra stitches based on a guessed number. The pattern specifically says there is no specific amount of SC required for this section.
Stage Six: Creating the Chain Arch Edging

Edging Row 2
Chain 1. This chain does not count as a stitch.
Place a SC into the first stitch.
Now begin the repeating edging sequence: chain 3, skip 1 stitch, and SC into the next stitch.
Continue this sequence until EOR.
Finish on a SC.
The repeated chain-3 spaces create the small arches along the border. This is a simple but effective finishing technique because it introduces decorative openings without changing the basic structure of the bandana.
Maintaining Even Chain Arches
When working the decorative border, try to maintain a consistent rhythm. The written sequence is chain 3, skip 1 stitch, SC into the next stitch. Following that sequence carefully is more important than trying to make the arches conform to a different stitch count.
Because the first edging row does not have a specific SC count, the second row is based on the stitches that were actually placed along the sides. This is another reason why even placement in the first edging row is useful.
Keep your chain stitches relaxed enough that the arches can form naturally. Excessive tension can make the decorative border appear smaller and less open than intended.
Stage Seven: The Second Tie
After completing the chain arch edging, do not fasten off.
Chain 40 once again.
Slip stitch through the second chain and each chain across until you reach the bandana.
Slip stitch this tie to the project to secure it.
Now the bandana has both ties attached. The final step is to fasten off and tidy all loose ends.
Finishing the Bandana Neatly
Fasten off after securing the second tie.
Use the tapestry needle to tidy all loose ends. Taking time with this final stage helps give the accessory a clean handmade finish.
Because the bandana is a relatively small accessory, the finishing stage should not require extensive assembly. The two ties are attached during the crochet process, and the border is already worked around the two straight sides.
A Beginner’s Checkpoint List
- Confirm that the project is being worked using US terms.
- Use the specified 5 mm crochet hook.
- Use 1 skein of Lion Brand Feels Like Butta in Bluebell.
- Start with a slip knot.
- Complete Row 1 with 4 TC.
- Complete Row 2 and form the square as instructed.
- Follow the joining spaces carefully in Row 3.
- Repeat Row 3 through Rows 4–10.
- Do not fasten off after Row 10.
- Create the first chain-40 tie.
- Secure the first tie to the project.
- Work SC evenly across the two straight sides.
- Do not tighten the project with the first edging row.
- Work the chain-3, skip-1, SC repeat for the second edging row.
- Finish the edging on a SC.
- Create the second chain-40 tie.
- Secure the second tie to the project.
- Fasten off.
- Tidy all loose ends.
Common Beginner Mistakes to Avoid
Changing the Terminology Mid-Pattern
The pattern uses US crochet terms and provides British equivalents. Choose the terminology system specified by the instructions and pay attention to the abbreviation definitions, particularly SC and TC.
Forgetting That Chain 4 Counts as a TC
The chain 4 used in the C2C construction counts as a treble crochet throughout the pattern. Remembering this makes the square structure easier to understand.
Joining in the Wrong Space
The pattern repeatedly identifies the space between the 3rd and 4th treble crochet stitches as the joining location. Carefully identify this space before making each slip stitch.
Fastening Off Too Early
Do not fasten off after Row 10. The first tie and the edging are worked from the continuing yarn.
Tightening the First Border
The pattern specifically says not to tighten the project with the SC stitches worked across the two straight sides. Keep these stitches even and relaxed.
Inventing a Border Stitch Count
The first edging row does not have a specified number of SC stitches. The instructions call for the stitches to be placed evenly across the two straight sides instead.
Construction Summary
The entire project can be understood as four major construction stages: the C2C body, the first tie, the chain arch edging, and the second tie and finishing.
The C2C body begins with a chain-7 foundation and grows through Rows 1–10. Rows 4–10 repeat the Row 3 construction, adding the required number of squares as the work progresses.
The first tie is made immediately after the main section using chain 40 and slip stitches. The edging then begins with evenly placed SC across the two straight sides, followed by the chain-3 decorative arch sequence.
Finally, the second chain-40 tie is made and secured. The yarn is fastened off, and all loose ends are tidied with a tapestry needle.
Quick Pattern Reference
- Start: Make a slip knot.
- Row 1: Ch 7, TC in 5th ch from hook and in each stitch along = 4 TC.
- Row 2: Ch 7, turn, TC in 5th ch from hook and in each stitch along = 4 TC; turn and sl st between the 3rd and 4th TC from previous row; ch 4, counting as TC, and add 3 TC in the same space to form a square.
- Row 3: Ch 7, turn, create 4 TC; join to previous square between the 3rd and 4th TC; build the additional squares using ch 4, 3 TC, and the specified slip-stitch joins.
- Rows 4–10: Repeat Row 3, adding the required number of squares.
- First tie: Ch 40, sl st through second chain and each chain across, then secure to project.
- Edging Row 1: Ch 1, SC evenly across the two straight sides without tightening the project.
- Edging Row 2: Ch 1, SC into first stitch, then repeat ch 3, sk 1 stitch, SC into next stitch until EOR. Finish on SC.
- Second tie: Ch 40, sl st through second chain and each chain across until reaching the bandana, then secure it.
- Finish: Fasten off and tidy all loose ends.
How the Design Comes Together
The appeal of this bandana comes from the contrast between its structured center and delicate finishing. The treble crochet C2C construction gives the main body a clear geometric appearance, while the chain arch edging introduces a lighter decorative element.
The Bluebell shade further emphasizes the feminine character of the project. Combined with the soft Lion Brand Feels Like Butta yarn, the design becomes an accessory that feels both handmade and polished.
Even though the project is beginner level, the finished result has several details that make it look more intricate than the basic stitch vocabulary might suggest. The square construction creates the shape, the border frames the edges, and the chain ties make the finished accessory wearable.
Final Measurement Check
When the bandana is finished, the stated dimensions are 8” (20 cm) x 15” (38 cm), including the border but excluding the ties.
The gauge reference is 4” (10 cm) x 4” (10 cm): 4 “clusters” of C2C pattern.
These measurements and gauge details are part of the original pattern information and should remain unchanged when documenting or reproducing the design.
Frequently Asked Questions
What skill level is the Crochet Bluebell Bandana?
The pattern is rated easy/beginner. It uses a manageable selection of stitches and introduces a treble crochet C2C construction.
What yarn is used?
The pattern uses 1 skein of Lion Brand Feels Like Butta yarn in shade Bluebell.
What hook size is required?
The specified crochet hook is 5 mm.
What size is the completed bandana?
The finished bandana measures 8” (20 cm) x 15” (38 cm), including the border but excluding the ties.
What is the C2C gauge?
The gauge is 4” (10 cm) x 4” (10 cm): 4 “clusters” of C2C pattern.
How many rows form the main body?
The main body is worked through Row 10. Rows 4–10 repeat the Row 3 construction while adding the required number of squares.
How are the ties made?
Each tie begins with chain 40. The chain is slip stitched through the second chain and each chain across, then attached to the bandana with a slip stitch.
How many SC stitches are required for the first edging row?
The pattern does not specify an exact number. The SC stitches are placed evenly across the two straight sides, and the instructions emphasize not tightening the project with these stitches.
What creates the decorative arches?
The second edging row uses a repeating sequence of chain 3, skip 1 stitch, and SC into the next stitch. This creates the chain arch effect along the straight sides.
Should I fasten off after Row 10?
No. The pattern specifically instructs you not to fasten off after Row 10 because the first tie and edging continue from the working yarn.
Final Thoughts
The Crochet Bluebell Bandana is a satisfying project for anyone who wants to make a small, feminine crochet accessory while practicing a structured C2C technique. The project begins simply with a slip knot and a chain-7 foundation, then grows through repeated square construction until the main body is complete.
The most important skills to focus on are accurate stitch placement, consistent joining, and relaxed edging tension. The space between the 3rd and 4th treble crochet stitches plays an important role in the C2C construction, while the first border row requires an even touch rather than a specific stitch count.
Once the chain arch edging is complete, the second chain-40 tie provides the final structural detail. After fastening off and tidying the loose ends, the result is a delicate handmade bandana measuring 8” (20 cm) x 15” (38 cm), excluding the ties.
With its soft Bluebell yarn, treble crochet C2C body, decorative chain arches, and simple chain ties, this pattern offers a practical introduction to accessory crochet while producing a finished piece that feels elegant and distinctly handmade.