
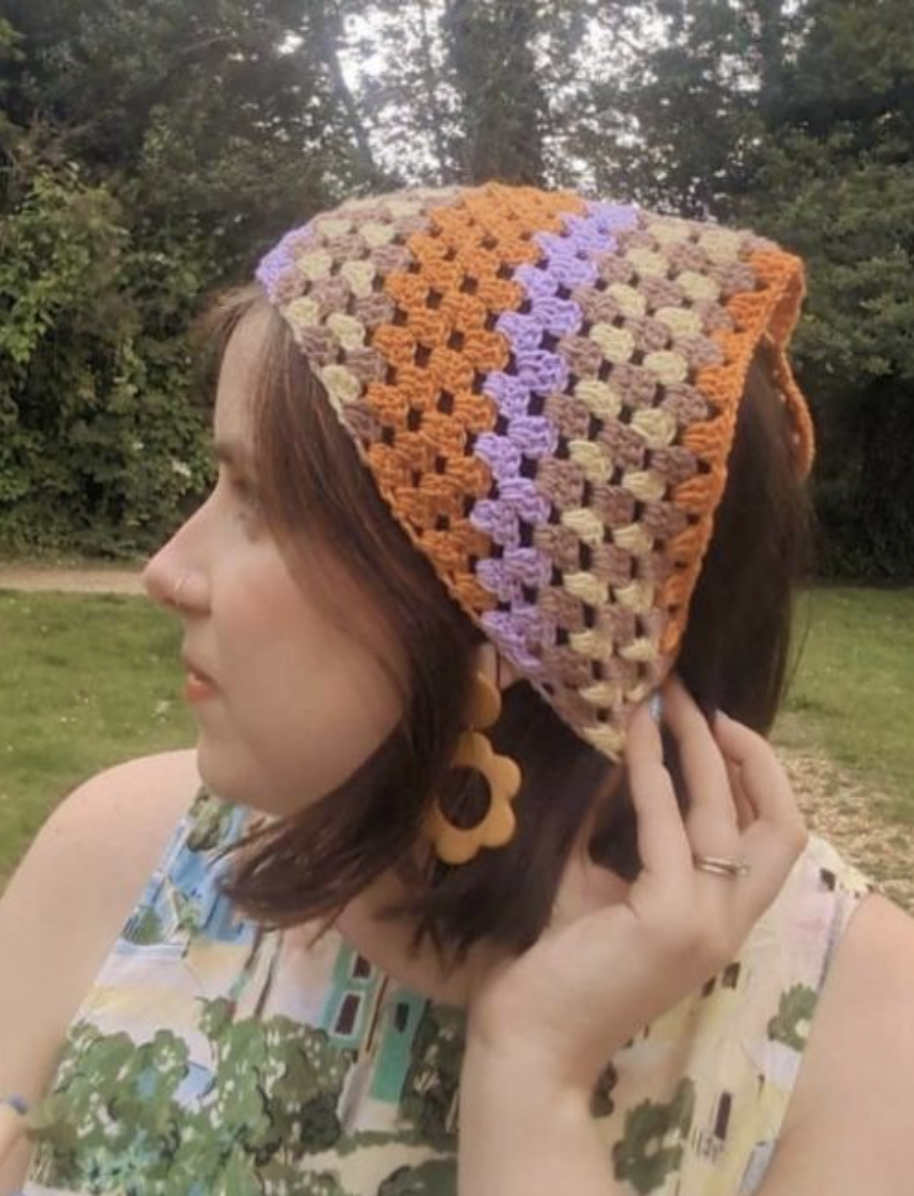

The Cruel Summer Bandana is a compact crochet accessory built around a deceptively simple idea: one expanding granny half square, four shades of cotton 4ply yarn, and two straightforward ties. The original design by Becca Parker of To Be Adorned describes it as a quick and easy stash-busting accessory inspired by THAT Taylor Swift crochet dress. The finished result turns the familiar granny construction into a practical triangular headscarf.
This version of the guide approaches the project as a construction workshop rather than simply a row-by-row introduction. The emphasis is on understanding how the triangle expands, where the central turning point sits, how the color sequence develops, and how the stitch-count checkpoints can be used to keep the work accurate. All technical specifications and written instructions below follow the supplied pattern rather than substituting new measurements or alternative shaping.
The project uses a 3mm crochet hook and four shades of 4ply cotton yarn. The source gives a finished measurement of approximately 59 x 39 x 39cm, not including ties, and a tension of 9 tr sts x 5 rows in pattern using a 3mm hook = 5 x 5cm. The pattern is written in UK crochet terms, so the terminology should be kept consistent from the foundation ring through the final ties.
What You Are Building
It helps to picture the finished piece before making the first chain. The main bandana is a triangular fabric created from a granny half square. The narrow beginning grows outward row after row. At the center of each new row is a ch-2 space. On either side of that center, repeated groups of three trebles are worked into chain spaces. This repeated architecture is what allows the triangle to expand while retaining the characteristic granny texture.
The color changes add a second layer of structure. Instead of one uninterrupted color, the design moves through Yarn A, Yarn B, Yarn C, and Yarn D at specified points. Some colors return later, so the color labels in the pattern are more useful than trying to remember the sequence by appearance alone.
Technical Specification
- Suggested yarn: Patons 100% Cotton 4ply (100% cotton, 100g/330m)
- Yarn A: Lilac
- Yarn B: Raffia
- Yarn C: Vanilla
- Yarn D: Nectarine
- Quantity: 1 ball of each color
- Hook: 3mm crochet hook (US D/3)
- Other material: Tapestry needle
- Finished measurements: Approx 59 x 39 x 39cm, not including ties
- Tension: 9 tr sts x 5 rows in pattern using 3mm hook = 5 x 5cm
- Terms: UK crochet terms
The source also identifies the design as suitable for beginners. That does not mean every row should be rushed. The main challenge is keeping the repeated spaces and groups organized as the number of stitches increases. A calm counting routine is more useful here than trying to memorize the whole pattern.
Pattern Language: Read the Abbreviations First
Before beginning, make sure the pattern vocabulary is familiar. The supplied pattern uses the following abbreviations:
- st/sts: stitch/stitches
- sp: space
- beg: beginning
- ch: chain
- ch-sp: chain space
- ss: slip stitch
- dc: double crochet
- tr: treble crochet
- RS: right side
- WS: wrong side
Because this is a UK-term pattern, do not automatically reinterpret the stitch names using US terminology. In particular, the written instructions use tr for treble crochet and dc for double crochet. The ties use dc, while the triangular body uses tr.
Foundation: Establishing the Triangle
Start with Yarn A and the 3mm hook. Chain 4, then join with a slip stitch to form a ring. This is the compact foundation from which the entire half square develops.
Row 1 — The First Central Point
Row 1 is worked on the RS. Chain 4, counting as 1tr and 1ch. Work (3tr, ch2, 3tr) into the ring, then ch1, 1tr into the ring, and turn. The row ends with [8tr, 4ch-sps].
The most useful visual feature to identify at this stage is the ch-2 space. It becomes the center of the triangle and remains the reference point for the expansion. The other chain spaces provide the locations for the granny groups as the following rows are built.
Row 2 — Turning the Foundation into a Repeat
Row 2 is WS. Chain 4, counting as 1tr and 1ch. Work 3tr into the first ch-sp, ch1, then (3tr, ch2, 3tr) into the ch-2 sp. Continue with ch1, 3tr into the next ch-sp, ch1, 1tr, and turn. Fasten off. The count is [14tr, 6ch-sps].
At the end of Row 2, the basic formula is already visible: a group at the side, the central increase, another group at the opposite side, and the finishing treble. That formula continues through the remainder of the main triangle, with more repeated groups inserted as each row becomes wider.

Rows 3–5: Introducing the Main Stripe Rhythm
Row 3 — Yarn B
Join Yarn B and work ch4, counting as 1tr and 1ch. Work 3tr into the first ch-sp, ch1, 3tr into the next ch-sp, ch1, then (3tr, ch2, 3tr) into the ch-2 sp. Continue with ch1, (3tr into next ch-sp, ch1) twice, ch1, 1tr, and turn. Fasten off. The count is [20tr, 8ch-sps].
Row 4 — Yarn C
Join Yarn C. Work ch4, counting as 1tr and 1ch, then 3tr into the first ch-sp, ch1, (3tr into next ch-sp, ch1) twice, and (3tr, ch2, 3tr) into the ch-2 sp. Continue with ch1, (3tr into next ch-sp, ch1) three times, ch1, 1tr, and turn. Fasten off. The count is [26tr, 10ch-sps].
Row 5 — Yarn B
Join Yarn B. Work ch4, counting as 1tr and 1ch, 3tr into the first ch-sp, ch1, then (3tr into next ch-sp, ch1) three times. Work (3tr, ch2, 3tr) into the ch-2 sp, ch1, then (3tr into next ch-sp, ch1) four times, ch1, 1tr, and turn. Fasten off. The count is [32tr, 12ch-sps].
Rows 3–5 are a good place to establish a consistent rhythm. Instead of trying to count every stitch in isolation, identify the next chain space, work the prescribed three-treble group, make the chain, and continue until you reach the central ch-2 space. Then repeat the same logic on the other side. The bracketed total provides the final verification.
Reading the Expansion Rather Than Memorizing It
As the project grows, the written rows become longer. Fortunately, the pattern’s structure is repetitive. The central section remains (3tr, ch2, 3tr). What changes is the number of repeated (3tr into next ch-sp, ch1) groups before and after the center.
This is useful when working from a printed copy or a screen because it gives you visual landmarks. The beginning is marked by the ch4, the first working ch-sp comes next, the central ch-2 space marks the midpoint, and the final 1tr closes the row. The stitch count then tells you whether the complete row agrees with the original instructions.

Rows 6–10: The Middle of the Construction
Row 6 — Yarn C
Join Yarn C, ch4 (counts as 1tr and 1ch), 3tr into first ch-sp, ch1, (3tr into next ch-sp, ch1) four times, (3tr, ch2, 3tr) into ch-2 sp, ch1, (3tr into next ch-sp, ch1) five times times, ch1, 1tr, turn. Fasten off. [38tr, 14ch-sps].
Row 7 — Yarn B
Join Yarn B, ch4 (counts as 1tr and 1ch), 3tr into first ch-sp, ch1, (3tr into next ch-sp, ch1) five times, (3tr, ch2, 3tr) into ch-2 sp, ch1, (3tr into next ch-sp, ch1) six times times, ch1, 1tr, turn. Fasten off. [44tr, 16ch-sps].
Row 8 — Yarn D
Join Yarn D, ch4 (counts as 1tr and 1ch), 3tr into first ch-sp, ch1, (3tr into next ch-sp, ch1) six times, (3tr, ch2, 3tr) into ch-2 sp, ch1, (3tr into next ch-sp, ch1) seven times times, ch1, 1tr, turn. [50tr, 18ch-sps].
Row 9
Ch4 (counts as 1tr and 1ch), 3tr into first ch-sp, ch1, (3tr into next ch-sp, ch1) seven times, (3tr, ch2, 3tr) into ch-2 sp, ch1, (3tr into next ch-sp, ch1) eight times times, ch1, 1tr, turn. [56tr, 20ch-sps].
Row 10
Ch4 (counts as 1tr and 1ch), 3tr into first ch-sp, ch1, (3tr into next ch-sp, ch1) eight times, (3tr, ch2, 3tr) into ch-2 sp, ch1, (3tr into next ch-sp, ch1) nine times times, ch1, 1tr, turn. [62tr, 22ch-sps].
Notice the checkpoint sequence through this section: 38tr, 44tr, 50tr, 56tr, and 62tr. The ch-space counts rise in the same orderly way: 14, 16, 18, 20, and 22. These figures are not optional estimates; they are the counts stated in the supplied pattern and are useful for confirming that the expansion is progressing correctly.

Rows 11–15: Five More Checkpoints
Row 11
Ch4 (counts as 1tr and 1ch), 3tr into first ch-sp, ch1, (3tr into next ch-sp, ch1) nine times, (3tr, ch2, 3tr) into ch-2 sp, ch1, (3tr into next ch-sp, ch1) 10 times times, ch1, 1tr, turn. Fasten off. [68tr, 24ch-sps].
Row 12 — Yarn A
Join Yarn A, ch4 (counts as 1tr and 1ch), 3tr into first ch-sp, ch1, (3tr into next ch-sp, ch1) nine times, (3tr, ch2, 3tr) into ch-2 sp, ch1, (3tr into next ch-sp, ch1) 10 times times, ch1, 1tr, turn. [74tr, 26ch-sps].
Row 13
Ch4 (counts as 1tr and 1ch), 3tr into first ch-sp, ch1, (3tr into next ch-sp, ch1) 10 times, (3tr, ch2, 3tr) into ch-2 sp, ch1, (3tr into next ch-sp, ch1) 11 times times, ch1, 1tr, turn. Fasten off. [80tr, 28ch-sps].
Row 14 — Yarn B
Join Yarn B, ch4 (counts as 1tr and 1ch), 3tr into first ch-sp, ch1, (3tr into next ch-sp, ch1) 11 times, (3tr, ch2, 3tr) into ch-2 sp, ch1, (3tr into next ch-sp, ch1) 12 times times, ch1, 1tr, turn. Fasten off. [86tr, 30ch-sps].
Row 15 — Yarn C
Join Yarn C, ch4 (counts as 1tr and 1ch), 3tr into first ch-sp, ch1, (3tr into next ch-sp, ch1) 12 times, (3tr, ch2, 3tr) into ch-2 sp, ch1, (3tr into next ch-sp, ch1) 13 times times, ch1, 1tr, turn. Fasten off. [92tr, 32ch-sps].
When the piece reaches this size, it becomes increasingly helpful to pause at the end of every row. If the count is correct, continue. If it is not, the current row is the best place to find the problem. The purpose of this checkpoint approach is not to alter the pattern but to make the original instructions easier to execute accurately.
Rows 16–19: Completing the Main Triangle
Row 16 — Yarn B
Join Yarn B, ch4 (counts as 1tr and 1ch), 3tr into first ch-sp, ch1, (3tr into next ch-sp, ch1) 13 times, (3tr, ch2, 3tr) into ch-2 sp, ch1, (3tr into next ch-sp, ch1) 14 times times, ch1, 1tr, turn. Fasten off. [98tr, 34ch-sps].
Row 17 — Yarn C
Join Yarn C, ch4 (counts as 1tr and 1ch), 3tr into first ch-sp, ch1, (3tr into next ch-sp, ch1) 14 times, (3tr, ch2, 3tr) into ch-2 sp, ch1, (3tr into next ch-sp, ch1) 15 times times, ch1, 1tr, turn. Fasten off. [104tr, 36ch-sps].
Row 18 — Yarn B
Join Yarn B, ch4 (counts as 1tr and 1ch), 3tr into first ch-sp, ch1, (3tr into next ch-sp, ch1) 15 times, (3tr, ch2, 3tr) into ch-2 sp, ch1, (3tr into next ch-sp, ch1) 16 times times, ch1, 1tr, turn. Fasten off. [110tr, 38ch-sps].
Row 19 — RS, Yarn D
Join Yarn D, ch4 (counts as 1tr and 1ch), 3tr into first ch-sp, ch1, (3tr into next ch-sp, ch1) 16 times, (3tr, ch2, 3tr) into ch-2 sp, ch1, (3tr into next ch-sp, ch1) 17 times times, ch1, 1tr, turn. Fasten off. The final count is [116tr, 40ch-sps].

How to Think About the Final Shape
After Row 19, the main triangular section is complete. The final count of 116tr and 40ch-sps confirms the full expansion described by the pattern. At this stage, the piece should read visually as a broad triangle rather than a square or rectangle. The center ch-2 space has guided the growth throughout the entire body.
The source does not call for an additional decorative border around the triangle. Instead, the next construction stage is the pair of ties. This is an important finishing distinction because adding an extra border would change the original pattern rather than simply completing it.
Constructing the Two Ties
The ties are made with Yarn D. Begin with the RS facing.
Tie One
Join Yarn D into the ch-1 sp at the start of Row 19, then ch62.
For Row 1 (RS), start in the second ch from the hook and work 60dc. Fasten off. The stated count is [62dc].
Tie Two
With the RS facing, rejoin Yarn D into the ch-1 sp at the end of Row 19, ch62. Work as Row 1.
Once both ties have been worked, weave in all ends. This final instruction applies to the complete project and is the finishing action specified by the source.

A Workshop-Style Troubleshooting Checklist
If the center does not look like a clear point
Check the central ch-2 space. Every expanding row uses the (3tr, ch2, 3tr) construction in that space. This is the structural center of the triangle.
If one side seems longer than the other
Compare the repeated groups before and after the central ch-2 space. Because the number of groups increases as the rows grow, one skipped chain space or one missing group can affect the symmetry. Use the source’s row-end stitch count to verify the row rather than guessing where to add a stitch.
If the color sequence looks different
Return to the Yarn A–D labels. The pattern specifies each join. Yarn B, for example, appears repeatedly, while Yarn A returns at Row 12 and Yarn D appears at Row 8 and Row 19. The written sequence is the authority for the color changes.
If the triangle is not the stated size
The source specifies approximately 59 x 39 x 39cm, not including ties, with a tension of 9 tr sts x 5 rows in pattern using a 3mm hook = 5 x 5cm. If your dimensions differ, check the tension and the stitch counts rather than changing the number of rows.
Color-Change Management Tips
Because the pattern uses four shades, color management is part of making the project enjoyable. Keep Lilac, Raffia, Vanilla, and Nectarine clearly separated and label them A, B, C, and D. This becomes especially helpful when a color returns after another shade has been worked.
Several rows explicitly say to fasten off after completion. Follow those instructions as written. The color breaks contribute to the stripe pattern, and the finished photos show how the alternating colors form visible bands across the triangle.

Full Stitch-Count Reference
For quick checking while crocheting, the original row counts are listed below exactly as provided:
- Row 1: [8tr, 4ch-sps]
- Row 2: [14tr, 6ch-sps]
- Row 3: [20tr, 8ch-sps]
- Row 4: [26tr, 10ch-sps]
- Row 5: [32tr, 12ch-sps]
- Row 6: [38tr, 14ch-sps]
- Row 7: [44tr, 16ch-sps]
- Row 8: [50tr, 18ch-sps]
- Row 9: [56tr, 20ch-sps]
- Row 10: [62tr, 22ch-sps]
- Row 11: [68tr, 24ch-sps]
- Row 12: [74tr, 26ch-sps]
- Row 13: [80tr, 28ch-sps]
- Row 14: [86tr, 30ch-sps]
- Row 15: [92tr, 32ch-sps]
- Row 16: [98tr, 34ch-sps]
- Row 17: [104tr, 36ch-sps]
- Row 18: [110tr, 38ch-sps]
- Row 19: [116tr, 40ch-sps]
The sequence gives you a simple progress map: each completed row adds six trebles and two chain spaces to the previous row’s stated total. This is a useful observation for checking your work, while the actual instructions remain the source of truth for how each row is made.
Frequently Asked Questions
What is the construction of the Cruel Summer Bandana?
The source describes it as one granny half square with color-change stripes and simple ties added at the end.
How many yarn colors are required?
Four shades of cotton 4ply yarn are specified: Lilac as Yarn A, Raffia as Yarn B, Vanilla as Yarn C, and Nectarine as Yarn D. The suggested yarn is Patons 100% Cotton 4ply, with one ball of each.
What hook should I use?
The specified hook is a 3mm crochet hook, listed as US D/3.
What size will the bandana be?
The stated finished measurements are approximately 59 x 39 x 39cm, not including ties.
Does the pattern use US or UK terminology?
It uses UK crochet terms. The source specifically lists tr as treble crochet and dc as double crochet.
How are the ties made?
Both ties use Yarn D. Each begins with ch62, followed by Row 1 worked from the second chain from the hook with 60dc. The stated row count is [62dc].
When is the main triangle finished?
The main triangle ends with Row 19, which is worked on the RS and uses Yarn D. Its stated count is [116tr, 40ch-sps].
Finishing the Accessory
Once the two ties have been completed, weave in all ends. At that point the project has followed the complete construction described by the source: foundation ring, expanding granny half square, specified color changes through Row 19, two Yarn D ties, and final end weaving.
The finished photographs demonstrate several ways the accessory can be worn. The triangular fabric sits over the hair while the ties secure it, creating a playful headscarf with the colorful granny stripes visible across the crown and sides. The outdoor photographs also show how the four shades work together in a finished wearable setting.
Final Construction Summary
The Cruel Summer Bandana is a good example of how a relatively small crochet project can combine repetition, color planning, and practical shaping. Its construction is intentionally focused: one triangular granny-based body, followed by two ties. The visual character comes from the four-color sequence rather than from complicated shaping or a separate decorative border.
If you are approaching this project as a beginner, focus on three habits: identify the chain spaces before working into them, preserve the central ch-2 space, and use the supplied stitch counts at the end of every row. Those habits make the longer rows much easier to manage without changing any part of the original instructions.
The original source credits Becca Parker of To Be Adorned and states that the pattern is for personal and non-commercial use only. It also asks makers to credit To Be Adorned when using the pattern. The supplied pattern further invites makers to follow and tag @tobeadorned when sharing their makes online.
With the final ends woven in, the bandana is ready to wear. The finished piece combines the familiar texture of granny-style clusters with a colorful striped layout, making it a distinctive summer accessory while remaining a focused crochet project from beginning to end.