
Beginner Crochet Masterclass: Make a Granny Square Bandana from Motifs to Final Ties
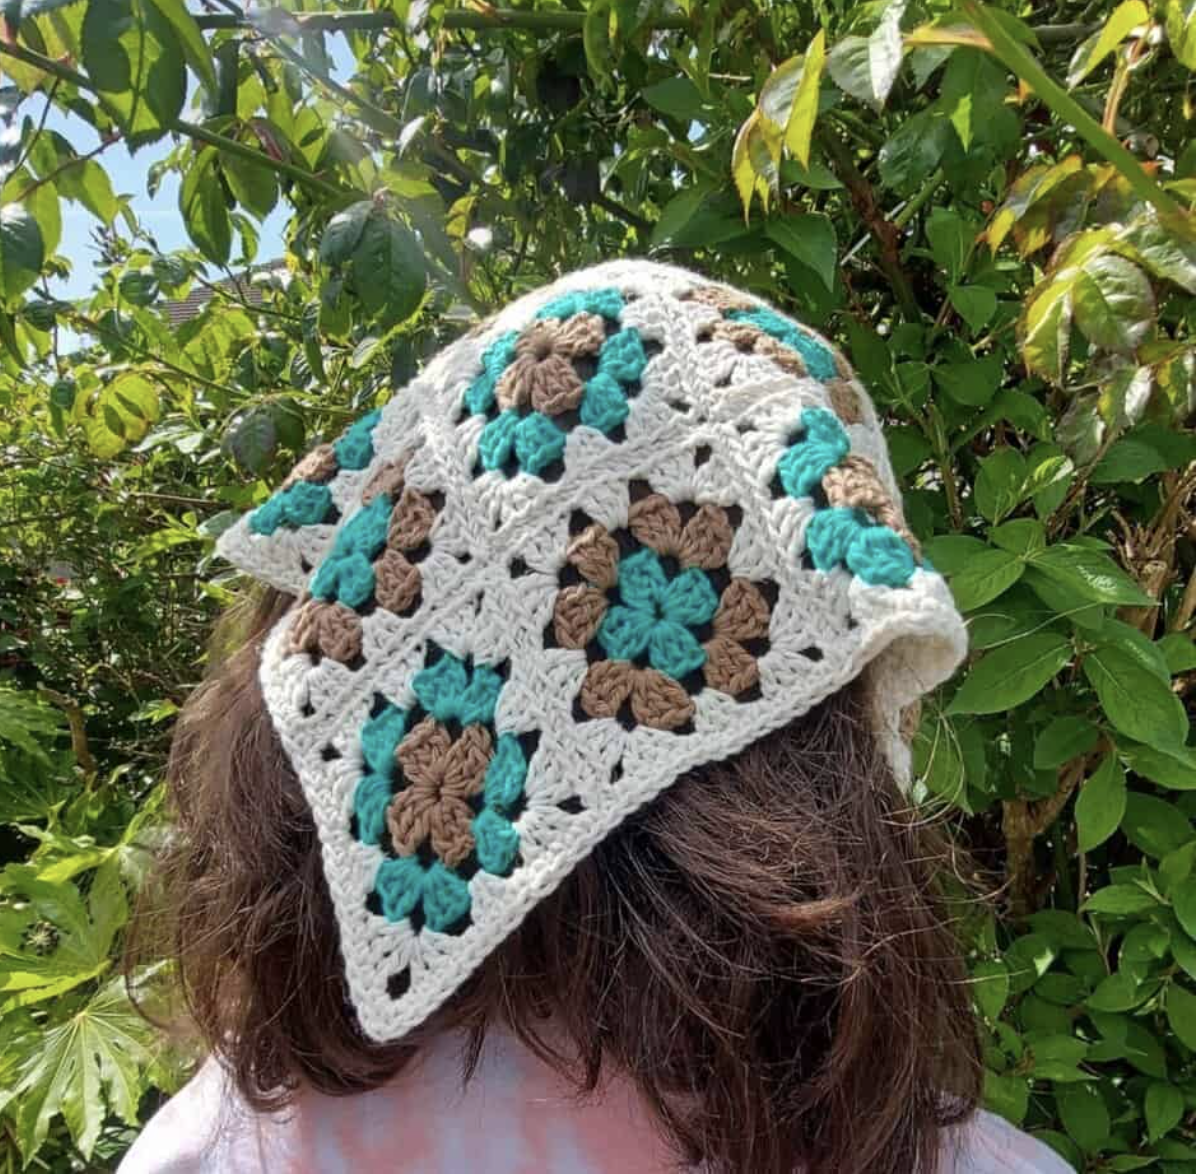
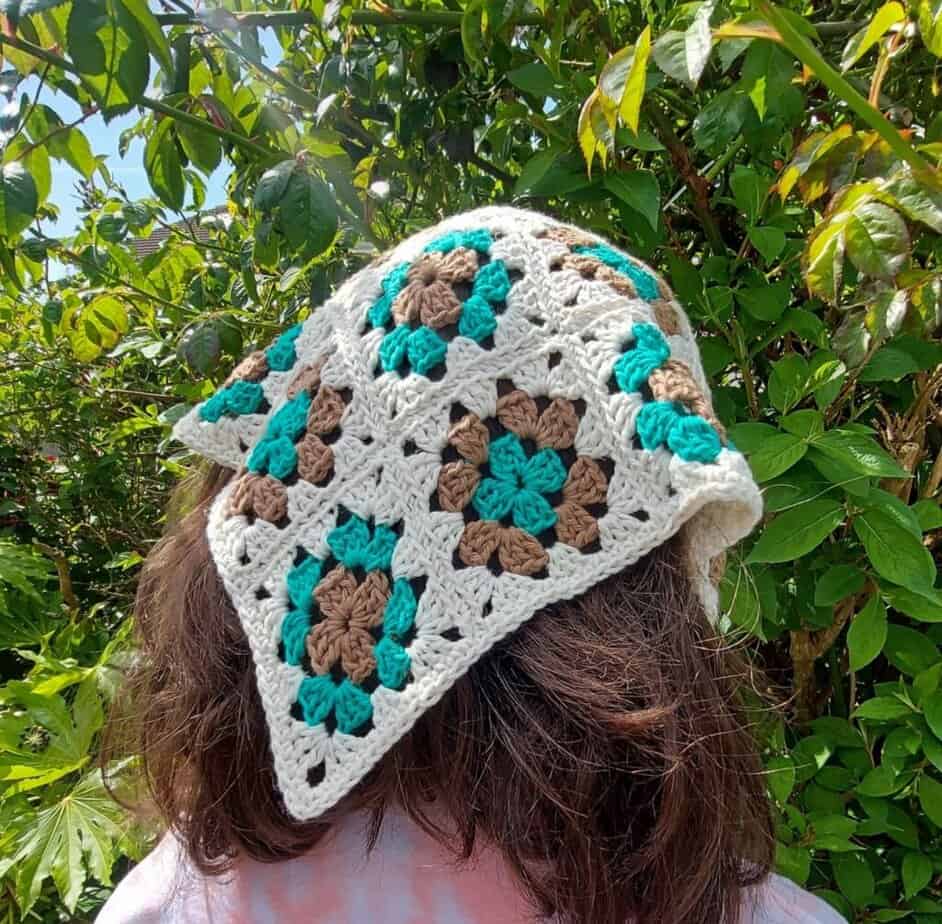
A handmade crochet accessory does not have to involve complicated shaping or advanced stitches to look beautifully finished. This granny square bandana is a great example of how simple crochet elements can be combined into a distinctive wearable piece. The project is built from small granny squares and triangular motifs, then joined and finished with a neat single crochet border and two long ties.
This guide presents the project as a complete crochet workshop, beginning with yarn preparation and motif planning and continuing through the final finishing details. The pattern itself remains exactly as specified, while the surrounding explanations are designed to make the construction easier to understand, especially for a beginner who is comfortable with basic crochet stitches but may be new to assembling multiple motifs into one finished accessory.
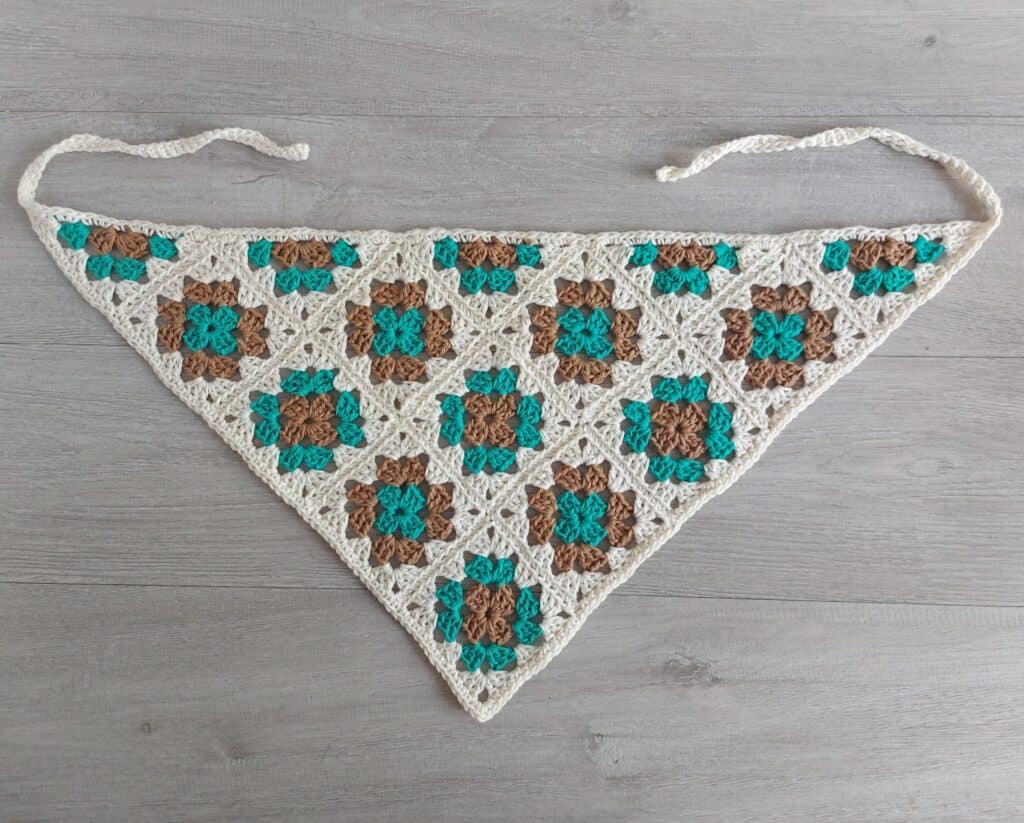
The finished bandana is approximately 24in [61cm] wide and 12in [30cm] deep after light blocking. Each tie is approximately 12in [30cm] long, with the option to make the ties longer by adding more chains. The project is rated easy and uses US crochet terminology.
What Makes This Bandana Different?
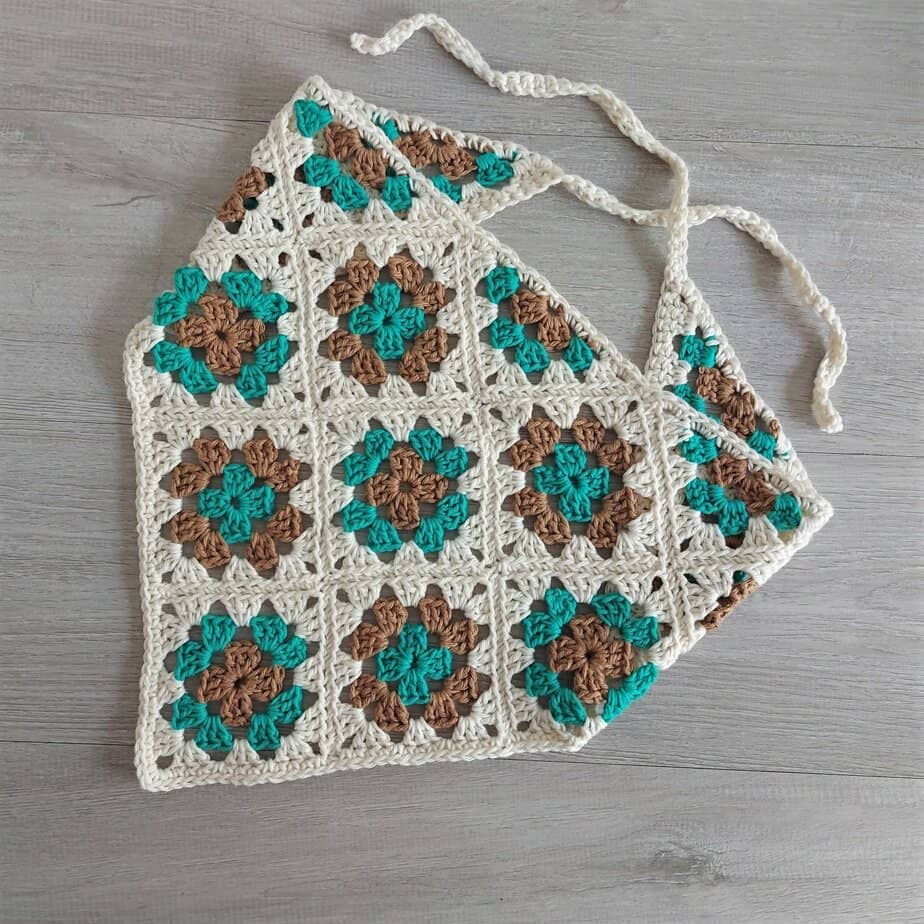
The construction is based on a simple modular idea. Instead of crocheting a large triangle from the beginning, you first make separate motifs. Ten granny squares provide most of the body of the accessory, while five granny triangles help form its characteristic pointed shape.
The motifs are deliberately small. Each square is approximately 3.5in [9cm], while each triangle is approximately 3.5in x 4.8in [9cm x 12cm]. Once the individual pieces are finished and blocked, they are arranged according to the layout and sewn together.
This modular approach has another advantage: you can work on the motifs in short sessions. You can complete several squares one day, make the triangles later, and leave assembly for another session. Because the pieces are independent until the sewing stage, the project is easy to organize without having to keep a large unfinished piece in your hands.
Project Specifications at a Glance
- Skill level: Easy
- Construction: 10 granny squares and 5 granny triangles
- Yarn weight: DK weight/light worsted weight
- Recommended fiber: Cotton
- Hook: 4 mm [G/6]
- Square size: approximately 3.5in [9cm]
- Triangle size: approximately 3.5in x 4.8in [9cm x 12cm]
- Finished width: 24in [61cm]
- Finished depth: 12in [30cm] after light blocking
- Tie length: approximately 12in [30cm] each
- Gauge: Not important
- Terminology: US crochet terms
Choosing the Yarn
The pattern calls for any DK weight or light worsted weight yarn. Cotton is especially well suited to this accessory because it holds its shape, remains breathable, and is easy to wash. Cotton/acrylic yarn can also be used.
The sample uses Cotlin from Knitpicks, described in the source as 70% Cotton and 30% Linen, with 123yds [112m] and 50gr. The sample color plan uses Swan as Yarn A, Marina as Yarn B, and Cashew as Yarn C.
- Yarn A: 1 ball in Swan
- Yarn B: approximately 50m in Marina
- Yarn C: approximately 50m in Cashew
The pattern also gives an alternative of approximately 200m of any DK weight yarn. Because the project uses relatively small quantities of contrast colors, it can be a useful way to use yarn already in your stash.
Prepare Your Crochet Toolkit
Only a few tools are needed for the project:
- 4 mm [G/6] crochet hook
- DK weight/light worsted weight yarn
- Scissors
- Yarn needle
It is also helpful to have a small area available for blocking the motifs and enough flat space to arrange all fifteen pieces before sewing. A pinning surface is useful for shaping the squares and triangles during blocking.
Abbreviations and Pattern Conventions
The written instructions use the following US crochet abbreviations:
- Beg – beginning
- Ch – chain
- St – stitch
- Sl st – slip stitch
- Dc – double crochet
- Yo – yarn over
- Sp – space
- RS – right side
There are two conventions worth remembering throughout the pattern. At the beginning of a round, ch 3 counts as 1 dc. At the beginning of a row, ch 4 counts as 1 dc and ch-1.
These are not optional decorative details. They are part of the stitch structure of the written pattern, so keeping them in mind helps you follow the counts and spaces correctly.
Stage One: Crochet the Ten Granny Squares
The first component of the bandana is the granny square. You will make ten squares in total. Each round uses a different color, and Yarn A is used for Round 3 in all motifs.
The color combinations specified by the pattern are:
- 6 squares in yarn B, C, A
- 4 squares in yarn C, B, A
Following this distribution before you begin can make the later assembly stage much easier. You can create the required number of each color sequence first and keep the completed pieces together.
Creating the Center Ring
With the first color, ch 5 and sl st to the 1st ch to form a ring.
Round 1
Round 1 (RS): Ch 3 (counts as 1 dc here and throughout at beg of round), 2 dc in ring, [ch 3, 3 dc in ring] 3 times, ch 3, join with sl st in 3rd ch of beg ch. Fasten off yarn.
The first round establishes the four corner spaces. When you finish, look for four distinct ch-3 spaces. These spaces are important because the next round is worked into them.
Round 2
Join the second color in any corner ch-3 sp.
Round 2: Ch 3, (2 dc, ch 3, 3 dc) in same ch-sp, [ch 1, (3 dc, ch 3, 3 dc) in next ch-3 sp] 3 times, ch 1, join sl st in 3rd ch of beg ch. Fasten off.
After this round, the motif should have a recognizable square shape. The corners contain the larger groups separated by ch-3 spaces, while the sides include the ch-1 spaces.
Round 3
Join the third color in any corner ch-3 sp.
Round 3: Join 3rd colour in any corner ch-3 sp, ch 3, (2 dc, ch 3, 3 dc) in same ch-sp, [ch 1, 3 dc in next ch-1 sp, ch 1, (3 dc, ch 3, 3 dc) in next ch-3 sp] 3 times, ch 1, 3 dc in next ch-1 sp, ch 1, join sl st in 3rd ch of beg ch. Fasten off, weave in threads.
Yarn A is the third-round color for every square. Once the round is complete, fasten off and weave in the threads before setting the square aside.
Square Consistency Tips
Although gauge is not important for the pattern, consistency between motifs is valuable. The target size for each square is approximately 3.5in [9cm].
If your first square is substantially larger or smaller than this, pause before making all ten. Check your yarn weight, hook size, and tension. The source also notes that another granny square design can be substituted. If you choose another design, make a quick gauge swatch and adjust the hook size so the squares are 3.5in [9cm].
The goal is not to force the yarn into an exact tension. The goal is to make the separate components similar enough that they can be assembled cleanly.
Stage Two: Make Five Granny Triangles
The second motif is the granny triangle. You need five. These motifs differ from the squares because they are worked in rows rather than rounds, and the source specifies that there is no RS; both sides are the same.
As with the squares, each triangle uses three colors, with the sequence specified as C, B, A.
Triangle Foundation
With the first color, ch 5 and sl st to 1st ch to form a ring.
Row 1
Row 1: Ch 4 (counts as 1 dc and ch-1 sp here and throughout at beg of row), 3 dc, ch 3, 3 dc, ch 1, 1 dc in ring, turn. Fasten off.
Row 2
Join the second color in the last dc made in Row 1.
Row 2: Ch 4, 3 dc in 1st ch-1 sp, ch 1, (3 dc, ch 3, 3 dc) in corner ch-3 sp, ch 1, (3 dc, ch 1, 1 dc) in last ch-1 sp, turn. Fasten off.
Row 3
Join the third color in the last dc made in Row 2.
Row 3: Ch 4, 3 dc in 1st ch-1 sp, ch 1, 3 dc in next ch-1 sp, ch 1, (3 dc, ch 3, 3 dc) in corner ch-3 sp, ch 1, 3 dc in next ch-1 sp, ch 1, (3 dc, ch 1, 1 dc) in last ch-1 sp. Fasten off, weave in threads.
Repeat until you have five completed triangles.
Triangle Measurement Check
Each triangle should be approximately 3.5in x 4.8in [9cm x 12cm]. Compare the five pieces with one another before blocking. If one piece is noticeably different, check the stitch groups and spaces before proceeding.
Because the triangles are used around the edges of the finished piece, significant size differences can affect the final shape. A consistent set of motifs will make the layout and border much easier to handle.
Stage Three: Block Every Motif
Blocking is recommended before attaching the motifs. The purpose is to prepare the squares and triangles for assembly by giving them an even shape.
Pin each motif to an even shape and spray with water, or hover a steam iron over each piece. Leave the pieces to dry.
Do not treat blocking as a replacement for correct crochet construction. It is a finishing preparation step. If a motif has an incorrect stitch structure, blocking should not be used to disguise the problem. First make sure the motif follows the written pattern, then use blocking to help even out its shape.
Stage Four: Build the Bandana Layout
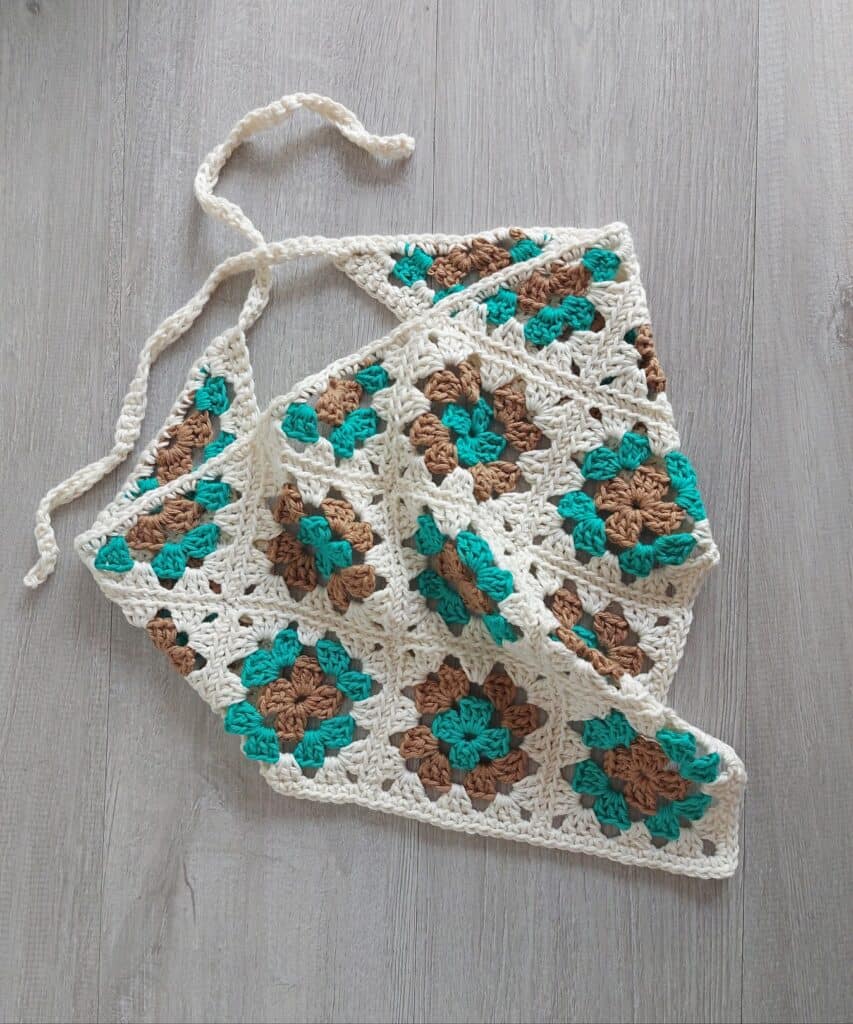
Once all fifteen motifs are ready, place them on a flat surface and follow the supplied layout picture. This is the point where your collection of separate squares and triangles begins to become the finished bandana.
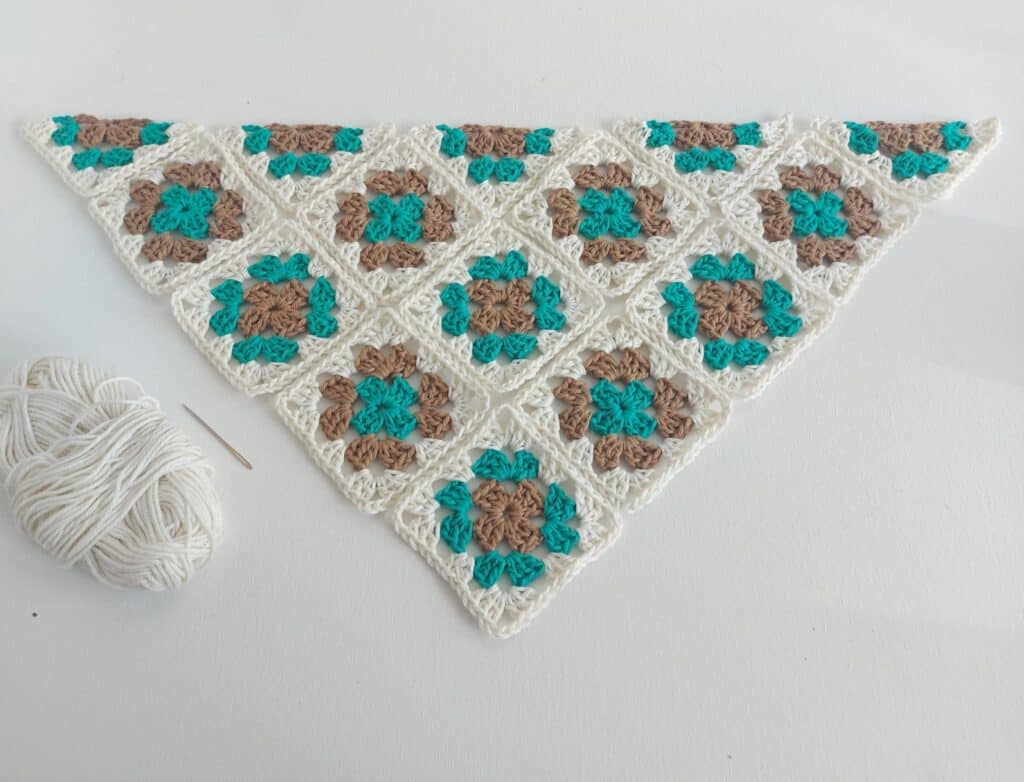
Do not skip this visual planning stage. Color placement is part of the appearance of the finished accessory, and the triangles need to occupy their intended positions to produce the bandana shape.
A simple way to make the process manageable is to arrange everything first, inspect the entire piece, and only then begin sewing. Keep the motifs in place while joining so that you do not accidentally rotate or exchange them.
Stage Five: Sew the Motifs Together
Hold the right sides of the motifs together. Join them in the back loop only by sewing with whip stitching.
One of the most important finishing instructions is to keep the stitches loose. Tight sewing can pull the edges inward and create puckering. The source recommends joining the motifs evenly and keeping the stitches loose enough to avoid this problem.
As you sew, periodically place the joined section flat on your work surface. This gives you an opportunity to notice whether a seam is beginning to draw inward. Correcting tension early is much easier than trying to reshape the complete bandana later.
After the Last Seam
When all motifs have been joined, pin out the finished piece and steam block lightly. This final light block is different from the earlier motif blocking: now the entire assembled piece is being encouraged to settle into its finished shape.
Stage Six: Add the Border and Ties
The border transforms the assembled motif panel into a finished wearable accessory. Use Yarn A for the border and ties.
Join Yarn A in the top left corner of the finished triangle.
First Tie
Ch 40, 1 sc in 2nd ch from hook and in each ch across, giving 39 sc. Sl st back to the main piece.
The tie is deliberately made as a chain followed by single crochet stitches worked back across it. The source gives 40 chains and 39 sc, so retain those numbers when following the original pattern.
First Side Edge
Make a sc in each dc and ch-1 sp down the side, making 1 sc in the space between each motif.
Bottom Point
At the bottom peak of the triangle, make:
(2 sc, ch 1, 2 sc) in the ch-3 sp at the bottom peak of the triangle.
This is the shaping point of the border. Work it carefully so that the central point remains defined.
Second Side Edge
Continue up the other side to the top right corner. Work a sc in each dc and ch-1 sp, again making 1 sc in the space between each motif.
Second Tie
At the right corner, ch 40, 1 sc in 2nd ch from hook and in each ch across, creating 39 sc. Sl st back to the main piece.
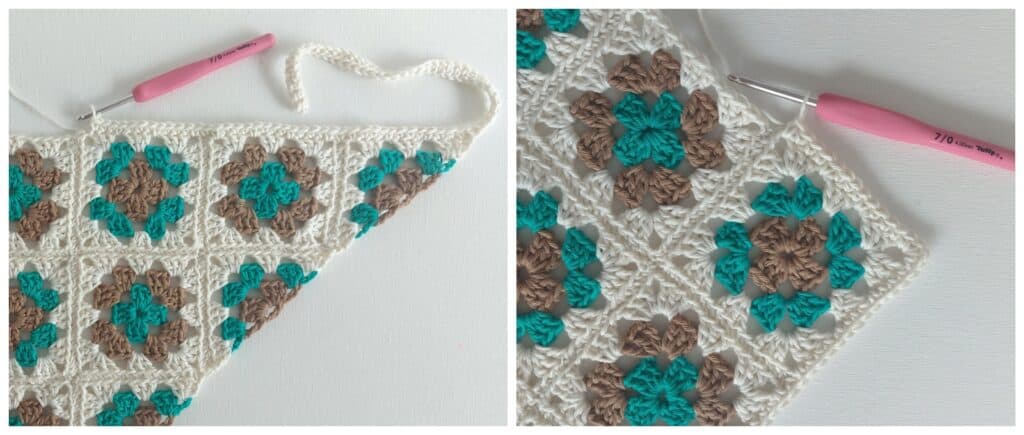
Across the Top
Across the top, work:
- 3 sc in each row end of each triangle
- 1 sc in each beginning ch 5
- 1 sc in the space between each motif
Join with a slip stitch to the beginning chain and weave in all ends.
How to Check the Finished Border
Before weaving in every remaining end, inspect the border from the front and back.
- Both ties should emerge from the correct top corners.
- Each starting tie should contain 40 chains and 39 sc.
- The side border should contain the specified single crochet placement.
- The bottom point should contain (2 sc, ch 1, 2 sc).
- The top edge should follow the specified row-end and beginning-chain instructions.
If you want longer ties, the source allows more chains to be added. The finished version described in the pattern has ties measuring approximately 12in [30cm].
Understanding the Finished Shape
After light blocking, the completed bandana is approximately 24in [61cm] wide and 12in [30cm] deep. The shape comes from the relationship between the square motifs, triangular motifs, their arrangement, and the border around the outside.
This is why the project benefits from checking the motifs before assembly. The final measurements are not created by one complicated shaping sequence. Instead, the dimensions emerge from the combined size and placement of the individual components.
Beginner Tips for a Cleaner Result
Make a Reference Square
Once you finish your first square successfully, keep it nearby while making the remaining nine. Comparing the next pieces with the first one can help you notice differences in size or shape before the entire set is complete.
Finish Ends as You Go
The written pattern instructs you to weave in threads after completing the motifs. Doing this consistently prevents a large pile of loose ends from accumulating before assembly.
Protect the Color Sequence
Keep the B-C-A and C-B-A sequences separate while making the motifs. This is especially useful when several squares are being crocheted in succession.
Do Not Rush Assembly
The layout is important enough to deserve its own preparation stage. Arrange all fifteen pieces before sewing and verify the visual placement first.
Keep Seams Relaxed
Whip stitching should connect the motifs without pulling their edges tightly together. Loose, even sewing is specifically recommended to help prevent puckering.
What If You Want to Experiment?
The original pattern is already flexible in its choice of yarn and notes that another granny square design can be used. If you decide to experiment with the motif design, keep the finished square close to 3.5in [9cm]. A quick gauge swatch can help you determine whether your chosen stitch pattern needs a different hook size.
The same principle applies to yarn. While the sample uses a cotton-linen yarn, the pattern accepts DK weight/light worsted weight yarn, with cotton particularly suited to the finished accessory.
Color changes are another area where the project can have a different personality while retaining its construction. The original color plan uses Yarn B, Yarn C, and Yarn A in the specified combinations, with Yarn A always completing Round 3 of the squares. If you use other colors, maintain the same sequence and motif structure when you want to preserve the construction of the original pattern.
Troubleshooting Before You Finish
My Squares Are Not 3.5 Inches
The target is approximately 3.5in [9cm]. Check your yarn weight, hook, and tension. Gauge is not formally important, but motif consistency is useful for assembly.
My Triangle Is Too Different from the Others
Compare the three rows carefully, especially the ch-1 spaces and central ch-3 space. The target is approximately 3.5in x 4.8in [9cm x 12cm].
The Motifs Look Uneven Before Sewing
Use the recommended blocking process. Pin the pieces to an even shape and spray with water or hover a steam iron over them, then allow them to dry.
The Seams Look Tight
Loosen your whip stitches. The source specifically recommends keeping the joining stitches loose enough to prevent puckering.
The Bandana Point Does Not Look Defined
Check the border at the bottom peak and make sure the specified (2 sc, ch 1, 2 sc) is worked in the ch-3 space at the point.
The Ties Are Not Long Enough for My Preference
The pattern allows more chains to be used if longer ties are wanted. The stated version uses 40 chains at each corner and produces approximately 12in [30cm] ties.
Frequently Asked Questions
How many granny squares do I need?
You need 10 granny squares.
How many triangles are needed?
You need 5 granny triangles.
What size crochet hook is used?
The pattern uses a 4 mm [G/6] crochet hook.
What is the finished size?
After light blocking, the finished bandana is approximately 24in [61cm] wide and 12in [30cm] deep. The ties are approximately 12in [30cm] long.
Is this a one-size project?
The source describes the bandana as one size that fits nearly everyone. Longer ties can be made by adding more chains.
What yarn works best?
Any DK weight/light worsted weight yarn can be used. Cotton works especially well because it holds its shape, is breathable, and is easy to wash. Cotton/acrylic is also an option.
Does the pattern require a specific gauge?
No. Gauge is not important according to the source. The approximate motif measurements are still useful for keeping the finished assembly consistent.
Are the triangles worked with a right side?
No. The source specifies that there is no RS for the triangles; both sides are the same.
Can I make the ties longer?
Yes. The source specifically states that more chains can be used to make the ties longer.
Final Quality-Control List
Before calling the project complete, use this final checklist:
- 10 granny squares are complete.
- 5 granny triangles are complete.
- Squares are approximately 3.5in [9cm].
- Triangles are approximately 3.5in x 4.8in [9cm x 12cm].
- Yarn A was used for Round 3 of every square.
- The specified square color combinations were followed.
- All motif ends are woven in.
- Motifs have been blocked before attachment.
- The fifteen pieces were arranged according to the layout.
- Motifs were joined in the back loop only by whip stitching.
- Joining stitches were kept loose enough to avoid puckering.
- The finished piece was lightly steam blocked.
- Yarn A was used for the border and ties.
- Each tie began with ch 40 and contains 39 sc.
- The bottom peak contains (2 sc, ch 1, 2 sc).
- The top border follows the specified instructions.
- All remaining ends have been woven in.
A Handmade Accessory Built from Simple Skills
The finished bandana demonstrates how far basic crochet techniques can go when they are combined carefully. The individual motifs use familiar double crochet groups, chain spaces, slip stitches, and color changes. The final construction adds blocking, whip stitching, single crochet edging, and simple chain ties.
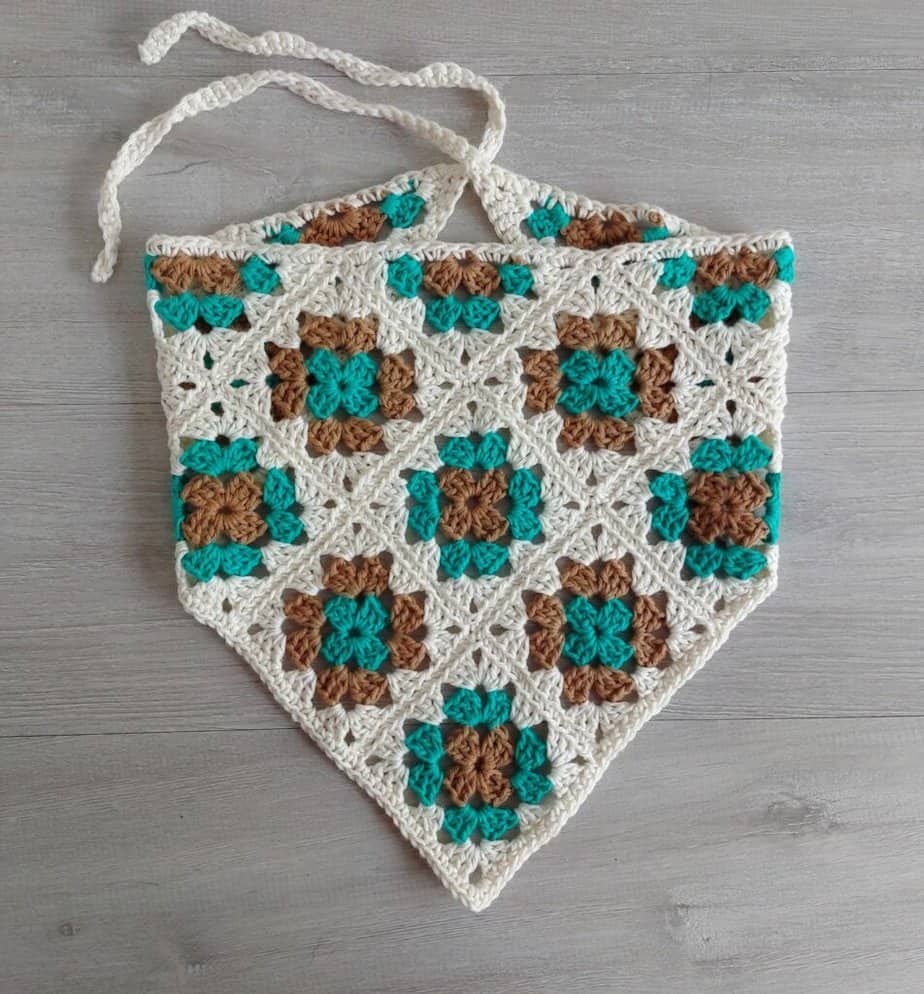
The real lesson in this project is consistency. Ten squares do not need complicated stitches, but they benefit from being similar in size. Five triangles are straightforward to crochet, but they need to match one another well enough to fit the layout. Sewing is simple, but even tension makes the difference between a smooth panel and puckered seams. Finally, the border is uncomplicated, yet accurate placement at the sides, bottom point, corners, and top edge gives the finished bandana its clean shape.
For a beginner, this makes the project an excellent exercise in moving beyond individual crochet motifs and learning how separate components become one finished item. For an experienced crocheter, it offers a quick, colorful accessory with plenty of opportunity to use favorite DK yarns from a stash.
Once the last stitch is secured and the ends are woven in, the result is a practical granny square bandana approximately 24in [61cm] wide and 12in [30cm] deep after light blocking, with approximately 12in [30cm] ties. Whether made in the original Swan, Marina, and Cashew combination or with another coordinated palette, the construction remains centered on the same simple formula: consistent motifs, careful placement, relaxed seams, and a clean finishing border.
This project is a reminder that a polished crochet finish often comes from careful preparation rather than complicated techniques. Work each motif patiently, check the measurements, block before assembly, follow the layout, keep the seams relaxed, and treat the final border as a finishing stage rather than an afterthought. With those checkpoints in place, the fifteen small motifs can be transformed into a cohesive, wearable granny square bandana.