
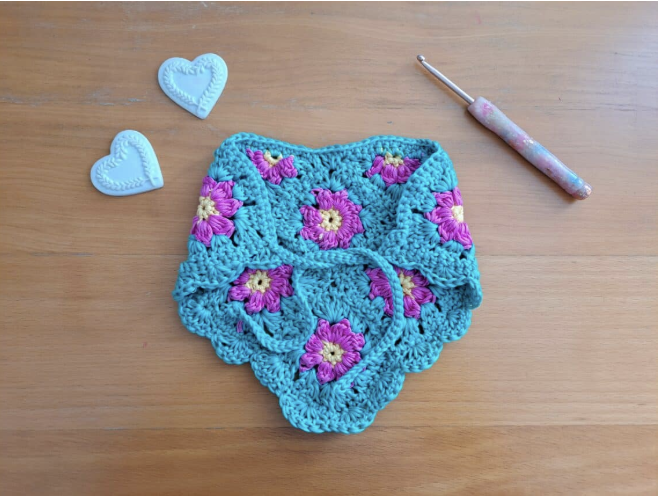
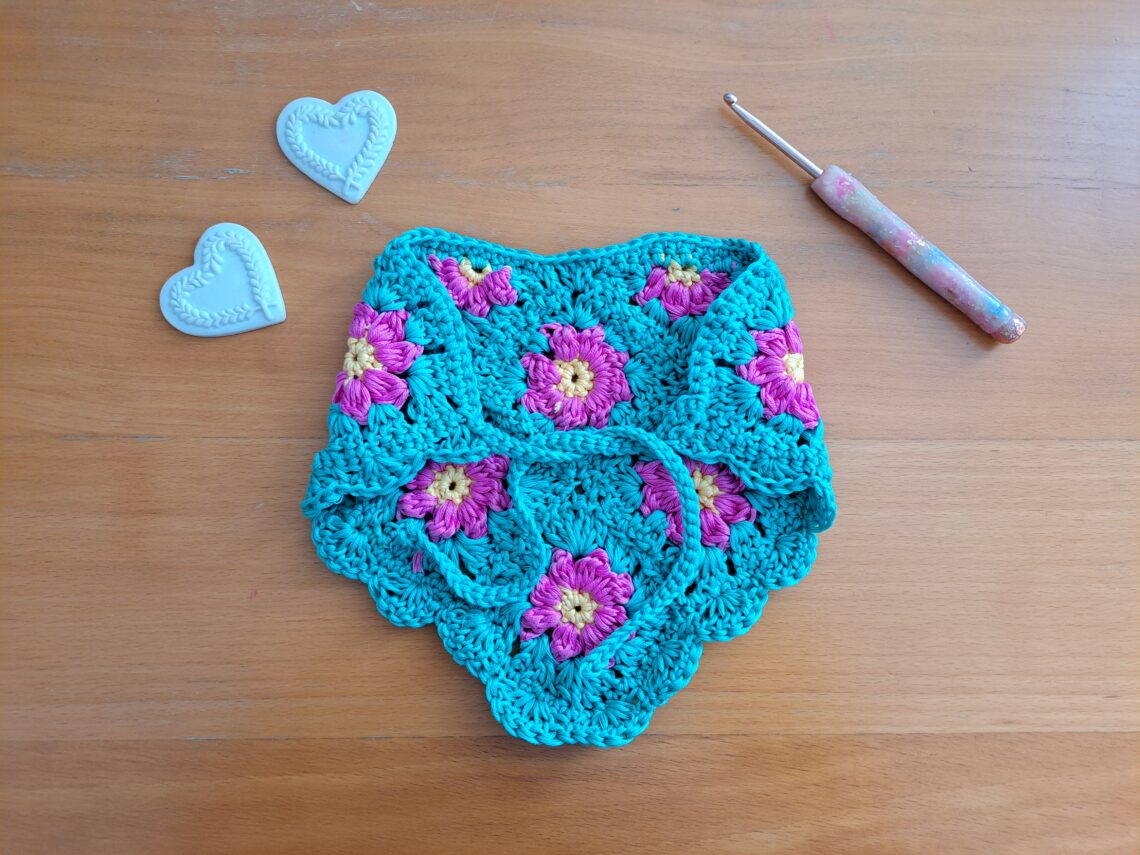
If you love delicate crochet accessories, floral motifs, and the soft romantic look of the Cottagecore aesthetic, the Crochet Lilly Cottagecore Bandana is a beautiful project to add to your handmade wardrobe. This easy crochet bandana combines small flower granny squares and flower granny triangles to create a charming triangular shape, followed by simple ties and a pretty shell stitch edging.
The design was inspired by spring and by the lily of the valley tradition associated with May 1st in France, also known as “1er Mai” or “Fete du Muguet.” That seasonal inspiration is reflected in the floral construction, pastel-style color combination, and lightweight cotton yarn. The finished accessory has a feminine, soft, and dreamy appearance that works especially well for Spring and Summer outfits.
Although the finished piece looks detailed, the construction is quite approachable. You first crochet six individual flower granny squares and two flower granny triangles. These motifs are then sewn together to form the bandana shape. Once the motifs are joined, the ties and edging are crocheted around the project, creating a practical accessory with a decorative finish.
Why This Cottagecore Bandana Is a Lovely Spring Project
Bandanas are wonderfully versatile crochet accessories. They can add a handmade touch to an everyday outfit without requiring a large amount of yarn or a complicated construction. This particular design takes that simple idea and gives it a distinctly floral character.
The six flower granny squares create the central body of the bandana, while the two flower granny triangles help complete the triangular outline. Because the individual motifs are made separately, you can concentrate on one small piece at a time instead of working the entire bandana as one large project.
The floral appearance comes from the construction of the first three rounds. Yellow yarn is used for the center, pink yarn creates the flower petals, and green yarn forms the outer granny-square structure. The resulting motifs have a small flower at the center surrounded by a square or triangular frame.

Yarn Choice: Drops Muskat Cotton
The original pattern uses Drops Muskat yarn, one of the designer’s favorite yarns for this type of project. It is particularly appropriate for a warm-weather accessory because it is made from 100% mercerized cotton and has a DK/Light 3 weight classification.
The pattern calls for three specific shades:
- 1 skein of Drops Muskat in shade 03 Mint Green
- 1 skein of Drops Muskat in shade 30 Vanilla Yellow
- 1 skein of Drops Muskat in shade 29 Pink Panther
The three-color arrangement gives the flowers a clearly defined appearance. Vanilla Yellow forms the flower centers, Pink Panther creates the petals, and Mint Green creates the surrounding granny-square and triangle structures.

Materials You Need
- 1 skein of Drops Muskat in shade 03 Mint Green
- 1 skein of Drops Muskat in shade 30 Vanilla Yellow
- 1 skein of Drops Muskat in shade 29 Pink Panther
- 4 mm crochet hook
- Pair of scissors
- A tapestry needle
- A stitch marker, optional
The project is rated Easy +. The pattern uses US crochet terminology, with British terminology supplied in brackets in the original instructions.
Finished Measurements and Gauge
Gauge is not crucial to complete this project, which makes the bandana particularly convenient for crocheters who do not want to spend time making a gauge swatch for a small accessory.
Each granny square measures approximately 3 x 3 inches (7 cm x 7 cm).
The finished bandana, including the shell stitch edging, measures approximately 8 x 12 inches (20.5 cm x 30.5 cm).
Crochet Abbreviations
- Ch: chain
- Sl st: slip stitch
- St: stitch
- Sk: skip
- DC: Double Crochet (UK Treble)
- SC: Single Crochet (UK Double)
- EOR: End of row/end of round
Keeping the terminology consistent is important throughout the project. The pattern is written using US terms, so remember that DC and SC correspond to different stitch names if you normally crochet using UK terminology.
How the Bandana Is Constructed
The complete bandana consists of eight crocheted motifs: six flower granny squares and two flower granny triangles. Each motif is made in three rounds and uses the same three colors.
After the motifs have been completed, they are sewn together in the arrangement shown in the pattern photographs. This creates the triangular bandana shape. The final stage adds two chain ties and a shell stitch edging around the V-shaped section.
This construction is worth understanding before you begin because the project is completed in separate stages. First come the motifs, then assembly, then the integrated ties and border.
Making the Six Flower Granny Squares
You will need six individual flower granny squares. Each square is worked through three rounds.
Round 1: Yellow Flower Center
With yellow yarn, chain 4. Slip stitch into the first stitch to form a ring.
Place 8 SC directly into the ring. Slip stitch to the first SC to close off the round.
Fasten off the yellow yarn. Attach the pink yarn to any SC.
This first round creates the small center around which the flower petals will be formed. Work carefully into the ring so that the eight SC are clearly defined for the next round.
Round 2: Pink Flower Petals
Chain 3, which counts as a DC. Turn your work. Place 2 DC into the same SC.
Place 3 DC into the next SC and continue placing 3 DC into every stitch until the end of the round. This creates 8 petals.
Slip stitch to the first chain 3 to close off the round.
Fasten off the pink yarn. Attach the green yarn in between any pink petal from the previous round, specifically between the 3 DC groups.

Round 3: Green Granny-Square Structure
Chain 3, which counts as a DC, then place 2 DC into the same space.
Continue with the following sequence: go directly into the next space and place 3 DC, chain 2, and place 3 DC. Then go into the next space and place 3 DC. Repeat this sequence three times. Go directly into the next space and place 3 DC.
Slip stitch to the first chain 3 to close off the round.
Fasten off the green yarn.
At the end of Round 3, you have completed one flower granny square. Repeat the complete three-round process until you have six squares.

Making the Two Flower Granny Triangles
The two triangular motifs use the same yellow, pink, and green color progression, but the construction creates a triangle rather than a square.
Starting the Triangle
Chain 4 and slip stitch through the first chain to form a ring.
Triangle Round 1
With yellow yarn, chain 4 and slip stitch to the first chain space to create a ring.
Place 4 SC directly into the ring. Slip stitch to the first SC to close off the round.
Fasten off the yellow yarn and attach pink yarn to any SC.
Triangle Round 2
Chain 3, which counts as a DC. Turn your work and place 2 DC into the same SC.
Place 3 DC into the next SC and continue placing 3 DC into every stitch until the end of the round. This creates 4 petals.
Slip stitch to the first chain 3 to close off the round.
Fasten off the pink yarn. Attach green yarn in between the first and second DCs on either side of the project.

Triangle Round 3
Chain 3 and place 2 DC into the same space.
Go directly into the next space and place 3 DC. Then go directly into the next space and place 3 DC, chain 2, and 3 DC. Go into the next space and place 3 DC.
To finish off this triangle, go directly between the second-before-last and last DCs and place 3 DCs and place 3 DCs.
Fasten off the green yarn.
Repeat these three rounds to make the second flower granny triangle.
Arrange the Eight Motifs Before Sewing
Once all six granny squares and both flower granny triangles are finished, it is time to create the bandana shape.
Arrange the motifs according to the pattern photograph before beginning to sew. This is an important preparation step because the individual motifs need to form the intended triangular outline.

Once you are satisfied with the placement, sew the six granny squares and two triangles together to create the main bandana. The motifs are individual pieces at this stage, so the tapestry needle becomes an essential tool for joining them securely.
Adding the Ties and First Border Round
After the motifs have been sewn together, you can begin crocheting the border and ties. The ties are integrated into the border process rather than being made separately and attached afterward.
Attach your yarn to the top corner of the project and chain 40.
Once you have chained 40, slip stitch through each chain until you reach the last chain. Then slip stitch through the space where you first began on the project to secure the hair tie.

Next, place a SC into each stitch across the top until you reach the 5 central stitches at the top center part.
In those five stitches, place a DC instead of a SC, creating 5 DCs.
Continue placing a SC into each stitch across until you reach the other side corner.
When you reach the other corner at the top of the bandana, chain 40 again. Slip stitch through every chain across until you reach the stitch where you began. Slip stitch through that stitch to secure the second hair tie.
Completing the Single Crochet Border
Now work across the V-shaped section of the bandana.
Place a SC into each and every stitch across the V part of the bandana until you reach the first SC on the other top corner of the project.
Slip stitch through that stitch to finish off this round.
This first edging round creates a clean foundation for the decorative shell stitch that will be added in the following round.

Round 2: Shell Stitch Edging
The second border round is worked across the V part of the bandana, from one hair tie to the other hair tie.
The shell stitch edging is worked into the SC stitches from the previous row.
Begin with chain 3, which counts as a DC. Place 2 DCs into this first stitch to create a half shell stitch.
Skip 2 stitches and place a SC into the next stitch.
Continue with the repeating sequence: skip 2 stitches, place 5 DC into the next stitch, skip 2 stitches, and place a SC into the next stitch.
Continue this pattern until you reach the last 3 stitches on the other side of the V.
Skip 2 stitches and place 3 DCs into the last stitch to create the final half shell stitch.
Fasten off and tidy up all loose ends.
Optional Finishing Detail
There is one optional finishing step that can give the bandana a neater appearance. You can sew the two half shells on each side to the hair ties.
This step is optional, so it does not alter the main construction of the pattern. If you choose to do it, use your tapestry needle and take care to keep the finished edges neat and secure.

Helpful Tips for a Neat Finished Bandana
Keep Your Motifs Consistent
Because the bandana is assembled from six squares and two triangles, consistency between the motifs is useful. Try to maintain the same stitch tension throughout the project so the motifs remain close to the stated approximate size of 3 x 3 inches (7 cm x 7 cm) for the granny squares.
Pay Attention to Color Changes
The color sequence is an important visual part of the design. Yellow is used for the flower center, pink for the petals, and green for the outer structure. Fasten off and attach each new color exactly where the pattern specifies.
Check Your Petal Counts
For the granny squares, Round 2 creates 8 petals. For the granny triangles, Round 2 creates 4 petals. These counts are useful checkpoints before moving to the green round.
Arrange Before Sewing
Do not rush into joining the motifs immediately after completing the final square or triangle. Lay all eight pieces out first and compare their arrangement with the pattern photograph. This makes it much easier to identify a misplaced motif before it has been sewn into position.
Keep the V Edge Even
When crocheting the SC border across the V-shaped portion, pay attention to the stitches as you progress. This first border round provides the foundation for the shell stitch edging, so a clean and consistent foundation helps the decorative edging sit neatly.
Common Points to Check While Crocheting
- Six flower granny squares should be completed.
- Two flower granny triangles should be completed.
- Each granny square has three rounds.
- Each granny triangle has three rounds.
- Granny-square Round 2 creates 8 petals.
- Granny-triangle Round 2 creates 4 petals.
- The six squares and two triangles are sewn together before the border and ties are added.
- Each tie begins with a chain of 40.
- The top center section contains 5 DCs instead of SCs.
- The shell edging is worked only across the V portion between the ties.
A Simple Way to Approach the Project
If you are newer to crochet, it can help to divide the project into manageable sessions. Start by making the six granny squares. Once those are complete, make the two triangles. You can then stop and arrange all eight motifs before joining them.
The next session can focus entirely on assembly. After the main bandana shape is established, work the first border and both ties. Finally, complete the shell stitch edging and tidy the loose ends.
This approach keeps the project organized and makes it easier to check each stage before moving forward.
Why Cotton Works So Well for This Design
The choice of 100% mercerized cotton is particularly fitting for a Spring and Summer accessory. The Drops Muskat yarn used in the original design is a DK/Light 3 weight yarn and is available in many colors.
The floral granny-square format also makes this a useful design concept for crocheters who enjoy motif-based projects. Instead of constructing a large bandana from a single starting chain, you build a collection of small floral elements and then turn them into one finished accessory.

Frequently Asked Questions
Is this bandana suitable for beginners?
The pattern is rated Easy +. The project uses basic stitches including chain, slip stitch, single crochet, and double crochet. The construction also involves sewing motifs together, so beginners should be comfortable following stitch instructions and using a tapestry needle.
Do I need to make a gauge swatch?
Gauge is not crucial to complete this project. The approximate granny-square size is 3 x 3 inches (7 cm x 7 cm), while the finished bandana including the shell stitch edging is approximately 8 x 12 inches (20.5 cm x 30.5 cm).
How many granny squares are required?
The pattern requires 6 individual flower granny squares.
How many flower triangles are required?
You will make 2 flower granny triangles.
How are the motifs joined?
The six granny squares and two triangles are sewn together using a tapestry needle according to the arrangement shown in the pattern photograph.
How are the ties made?
The ties are integrated into the border. At each top corner, you chain 40 and slip stitch back through the chain before securing the tie to the project.
How many DCs are placed at the top center?
During the first border round, the 5 central stitches at the top center are worked with DC instead of SC, creating 5 DCs.
What type of edging is used?
The second edging round uses a shell stitch. The sequence includes groups of 5 DCs separated by SC stitches, with half shell stitches at both ends.
Quick Project Reference
- Project: Lilly Cottagecore Bandana
- Level: Easy +
- Yarn: Drops Muskat
- Fiber: 100% mercerized cotton
- Weight: DK/Light 3
- Colors: 03 Mint Green, 30 Vanilla Yellow, 29 Pink Panther
- Hook: 4 mm crochet hook
- Granny Squares: 6
- Flower Granny Triangles: 2
- Approximate Square Size: 3 x 3 inches (7 cm x 7 cm)
- Finished Bandana: 8 x 12 inches (20.5 cm x 30.5 cm), including shell stitch edging
- Ties: Chain 40 at each side
- Border: Single crochet foundation followed by shell stitch edging
- Gauge: Not crucial
- Terminology: US terms, with British terms in brackets
Final Finishing Checklist
- Complete all 6 flower granny squares.
- Complete both flower granny triangles.
- Check the arrangement before sewing.
- Sew all 8 motifs together to form the bandana.
- Attach yarn at the top corner.
- Chain 40 for the first tie.
- Slip stitch back through the chain and secure it.
- Work SCs across the top, with 5 DCs at the central 5 stitches.
- Work the second chain-40 tie.
- Continue the SC border across the V.
- Work the shell stitch edging on the second round.
- Fasten off and tidy all loose ends.
- Optionally sew the two half shells to the hair ties for a neater finish.
A Romantic Handmade Accessory for Spring and Summer
The Crochet Lilly Cottagecore Bandana brings together several classic crochet ideas in one small project: colorful flower motifs, granny-square construction, simple assembly, practical ties, and decorative edging. The result is a handmade accessory with a distinctly feminine and Cottagecore-inspired character.
Its construction also makes the project satisfying to work through in stages. The individual flower motifs can be completed separately before they are transformed into the recognizable triangular bandana shape. The final border and shell stitch edging then frame the entire piece and add the delicate finishing detail that makes the design feel complete.
Using Drops Muskat in Mint Green, Vanilla Yellow, and Pink Panther preserves the soft floral character of the original design, while the 4 mm crochet hook keeps the project straightforward to work. Since gauge is not crucial, the focus can remain on following the individual rounds, maintaining the stated stitch instructions, and assembling the motifs correctly.
Whether you are looking for a small warm-weather crochet project, a floral accessory, or a Cottagecore-inspired handmade piece, this bandana offers a charming combination of practicality and decoration. The finished dimensions are approximately 8 x 12 inches (20.5 cm x 30.5 cm), including the shell stitch edging, making it a compact project that showcases the beauty of crochet flowers without requiring a large amount of construction.
Most importantly, take the project one stage at a time: create the flower centers, build the petals, complete the green motif rounds, make the triangles, arrange and sew the pieces, and finally work the integrated ties and shell edging. Following that sequence keeps the construction clear while allowing the floral details to remain the focus of this lovely Lilly Cottagecore Bandana.