
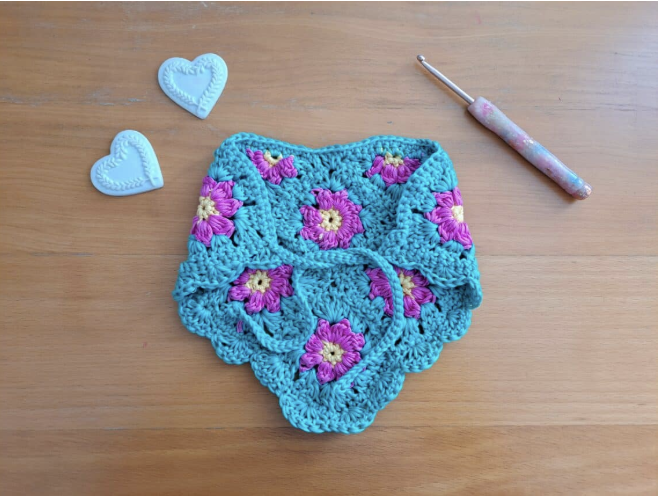
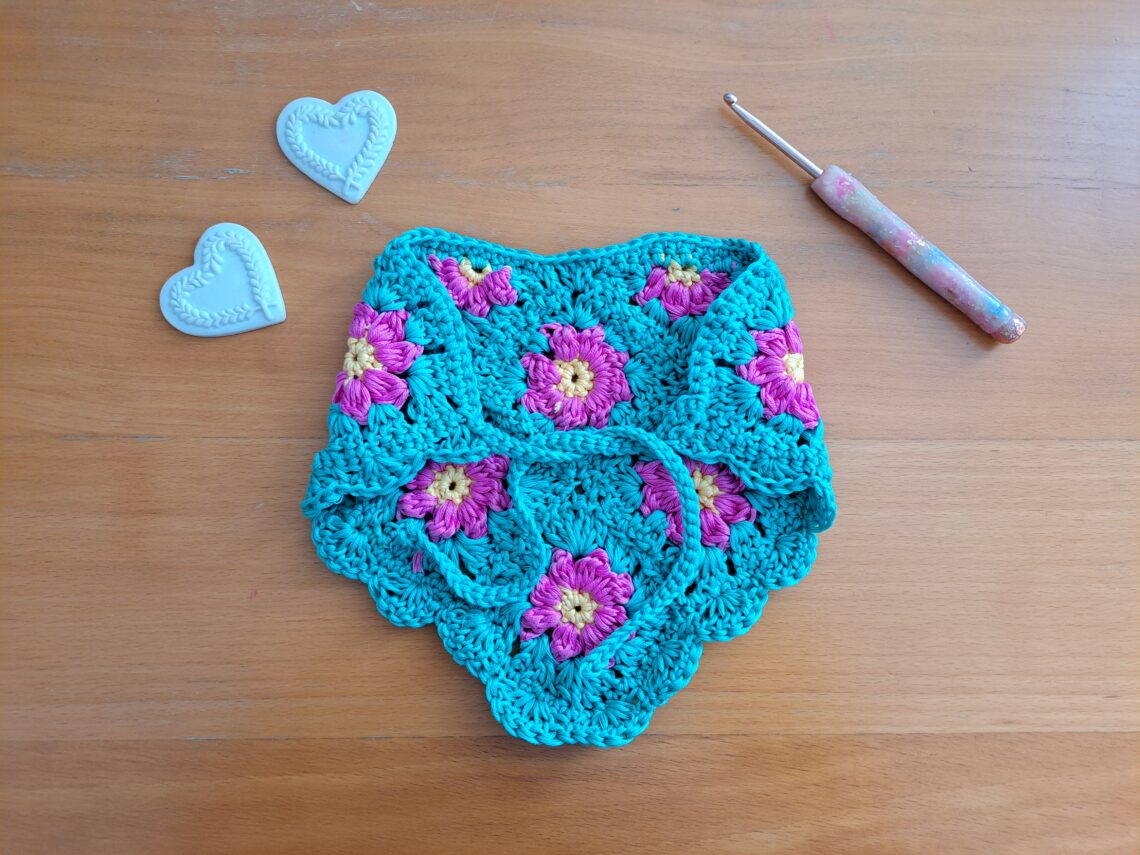
The Lilly Cottagecore Bandana is a charming crochet accessory inspired by spring, flowers, and the soft romantic style of the Cottagecore aesthetic. Made from small flower granny squares and flower granny triangles, this design creates a pretty triangular bandana that can add a handmade feminine touch to a Spring or Summer outfit.
This project is especially appealing if you enjoy crochet motifs. Rather than crocheting the entire accessory continuously from one starting point, you first create individual floral elements and then sew them together. The finished shape is completed with two long ties and a decorative shell stitch edging.
The design was created with Spring in mind and takes its name from the lily of the valley tradition celebrated in France on May 1st. The “1er Mai,” also called the “Fete du Muguet,” provided the seasonal inspiration for this floral crochet project.
The original pattern is rated Easy + and uses US crochet terms, with British terminology provided in brackets. Gauge is not crucial for completing the project, making this a particularly approachable accessory for crocheters who want to concentrate on the motifs and construction rather than a precise gauge swatch.
Understanding the Construction Before You Begin
Before picking up your hook, it is helpful to understand the complete construction. The bandana is made from eight separate crochet motifs:
- 6 individual flower granny squares
- 2 flower granny triangles
All of these motifs are worked in three rounds and use three colors. The yellow yarn creates the flower center, pink forms the petals, and green creates the outer granny-square or granny-triangle structure.
After all eight pieces have been crocheted, they are sewn together to form the triangular bandana shape. The ties and border are then crocheted directly onto the assembled project. This means that the ties are not separate pieces that need to be made and sewn on later; they are integrated into the border process.
The final decorative element is a shell stitch edging worked across the V-shaped part of the bandana.

Materials for the Lilly Bandana
The original design uses Drops Muskat yarn, a 100% mercerized cotton yarn in DK/Light 3 weight. Cotton is especially suitable for a Spring and Summer accessory, and Drops Muskat is available in many different colors.
For the original color combination, gather the following:
- 1 skein of Drops Muskat in shade 03 Mint Green
- 1 skein of Drops Muskat in shade 30 Vanilla Yellow
- 1 skein of Drops Muskat in shade 29 Pink Panther
- 4 mm crochet hook
- Pair of scissors
- Tapestry needle
- Stitch marker, optional
The project does not require a large collection of specialized tools. A 4 mm hook, scissors, and tapestry needle are sufficient for the main work, while the stitch marker is optional.

Size and Gauge Information
Gauge is not crucial to complete this project. This makes the pattern less restrictive than projects where a specific gauge must be achieved before beginning.
One completed granny square measures approximately 3 x 3 inches (7 cm x 7 cm).
The finished bandana, including the shell stitch edging, measures approximately 8 x 12 inches (20.5 cm x 30.5 cm).
These measurements are useful checkpoints while working, especially when you have completed the six square motifs. The individual squares should remain approximately consistent with one another so that they can be assembled smoothly.
Pattern Abbreviations
The pattern uses US crochet terminology, with British terms in brackets.
- Ch: chain
- Sl st: slip stitch
- St: stitch
- Sk: skip
- DC: Double Crochet (UK Treble)
- SC: Single Crochet (UK Double)
- EOR: End of row/end of round
If you normally crochet using British terminology, take particular care with the difference between SC and DC. Following the terminology used by the pattern will help keep the stitch instructions consistent.
Part One: Crochet the Six Flower Granny Squares
The first major stage is creating six identical flower granny squares. Each square has three rounds and uses the three specified colors.
Round 1: Create the Yellow Flower Center
Begin with yellow yarn.
Chain 4. Slip stitch into the 1st stitch to form a ring.
Place 8 SC directly into the ring. Slip stitch to the 1st SC to close off the round.
Fasten off the yellow yarn.
Attach pink yarn to any SC.
This creates the small circular foundation for the flower. The eight SC stitches become the spaces used to create the flower petals in the next round.
Round 2: Form the Eight Pink Petals
Chain 3, which counts as a DC.
Turn your work and place 2 DC into the same SC.
Place 3 DC into the next SC and continue placing 3 DC into every stitch until EOR. This creates 8 petals.
Slip stitch to the first chain 3 to close off the round.
Fasten off the pink yarn.
Attach green yarn in between any pink petal from the previous round, specifically in the space corresponding to the 3 DC group.

Round 3: Turn the Flower Into a Granny Square
With green yarn, chain 3, which counts as a DC.
Place 2 DC into the same space.
Then follow the pattern sequence: go directly into the next space and place 3 DC, chain 2, and 3 DC. Go into the next space and place 3 DC.
Repeat the indicated sequence three times.
Go directly into the next space and place 3 DC.
Slip stitch to the first chain 3 to close off the round.
Fasten off the green yarn.
At this stage, the flower has been transformed into a granny-square motif. Repeat the three-round process until you have six completed flower granny squares.

Part Two: Make the Two Flower Granny Triangles
The two triangle motifs are also made in three rounds. They use the same three colors but have a different stitch arrangement so the finished pieces create triangular sections for the bandana.
Begin the Triangle
Chain 4 and slip stitch through the 1st chain to form a ring.
Triangle Round 1
With yellow yarn, chain 4 and slip stitch to the 1st chain space to create a ring.
Place 4 SC directly into the ring.
Slip stitch to the 1st SC to close off the round.
Fasten off the yellow yarn.
Attach pink yarn to any SC.
Triangle Round 2
Chain 3, which counts as a DC.
Turn your work and place 2 DC into the same SC.
Place 3 DC into the next SC and continue placing 3 DC into every stitch until EOR. This creates 4 petals.
Slip stitch to the first chain 3 to close off the round.
Fasten off the pink yarn.
Attach green yarn in between the 1st and 2nd DCs on either side of the project.

Triangle Round 3
Chain 3 and place 2 DC into the same space.
Go directly into the next space and place 3 DC.
Go directly into the next space and place 3 DC, chain 2, 3 DC.
Go into the next space and place 3 DC.
To finish off this triangle, go directly between the 2nd before last and last DCs and place 3 DCs and place 3 DCs.
Fasten off the green yarn.
Repeat the process to make the second flower granny triangle.
Part Three: Assemble the Main Bandana Shape
Once all six squares and both triangles are complete, the project changes from a collection of individual motifs into a recognizable bandana.
Place your six granny squares and two triangles together according to the arrangement shown in the pattern photograph. Take time to check the placement before sewing.
This is one of the most important preparation stages because the motifs determine the final shape. The triangles and squares need to be positioned as shown so that the assembled piece creates the intended bandana form.

Sew the six granny squares and two triangles together to form the bandana. Use the tapestry needle and take care that the joins are secure.
Because the final border is crocheted after the motifs have been joined, make sure the assembled piece is stable before beginning the edging stage.
Part Four: Create the First 40-Chain Tie
After all the motifs have been sewn together, you can begin crocheting the border and ties. The ties are created as part of the border rather than as separate components.
Attach your yarn to the top corner of the project.
Chain 40.
Once you have chained 40, slip stitch through each chain until you reach the last chain.
Then slip stitch through the space where you first began on the project to secure the hair tie.

Part Five: Crochet Across the Top Edge
Once the first tie has been secured, continue along the top of the bandana.
Place a SC into each stitch across the top until you reach the 5 central stitches at the top center part.
For these five central stitches, place a DC instead of a SC. This creates 5 DCs in the center.
After completing those five DCs, continue placing a SC into each stitch across until you reach the opposite side corner.
This combination of SCs and the five central DCs is an important part of the first border round, so keep the five center stitches clearly identified while working.
Part Six: Add the Second Tie
When you reach the other corner at the top of the bandana, chain 40.
Slip stitch through every chain across until you reach the stitch where you began.
Slip stitch through that stitch to secure the second hair tie.
The two chain-40 ties are now integrated into the upper edge of the bandana.
Continue With the Single Crochet Round
Now work along the V-shaped portion of the bandana.
Place a SC into each and every stitch across the V part of the bandana until you reach the first SC on the other top corner of the project.
Slip stitch through that stitch to finish off this round.
This round establishes the stitch foundation needed for the decorative shell stitch edging.

Part Seven: Add the Shell Stitch Edging
The second round creates the decorative border that gives the Lilly Bandana its finished look. This round is worked across the V part of the bandana, from one hair tie to the other.
The shell stitch edging is worked into the SCs from the previous row.
Beginning the Shell Stitch Round
Chain 3, which counts as a DC.
Place 2 DCs into this first stitch. This creates a half shell stitch.
Skip 2 stitches.
Place a SC into the next stitch.
Repeat the Shell Sequence
Continue with the following sequence:
- Skip 2 stitches.
- Place 5 DC into the next stitch.
- Skip 2 stitches.
- Place a SC into the next stitch.
Repeat this sequence until you reach the last 3 stitches on the other side of the V.
Then skip 2 stitches and place 3 DCs into the last stitch. This creates the second half shell stitch.
Fasten off and tidy up all loose ends.
Optional Neat Finishing Step
The original pattern includes an optional finishing detail. You can sew the two half shells on each side to the hair ties.
This can give the bandana a neater finish. It is optional, so it does not form part of the required construction sequence.

Stitch Checkpoints Before Moving Forward
When working a motif-based project, small checkpoints can make the complete construction much easier to manage. The following points come directly from the pattern and can help you verify your progress.
- Each granny square has 3 rounds.
- Each granny triangle has 3 rounds.
- There are 6 flower granny squares in total.
- There are 2 flower granny triangles in total.
- Granny-square Round 1 contains 8 SC in the ring.
- Granny-square Round 2 creates 8 petals.
- Granny-triangle Round 1 contains 4 SC in the ring.
- Granny-triangle Round 2 creates 4 petals.
- Each top tie begins with chain 40.
- The center of the top edge contains 5 DCs.
- The first V-edge round is worked in SC.
- The second V-edge round uses the shell stitch sequence.
Tips for Keeping the Flower Motifs Consistent
Because six squares are being assembled into one accessory, it is useful to treat the first completed square as a visual reference for the remaining five. Keep the color sequence the same and follow the round instructions carefully.
The three colors have distinct jobs in the motif. Yellow is used for the center, pink is used for the petals, and green is used for the final outer structure. Fastening off each color and attaching the next color at the specified location helps preserve the appearance of the original design.
The approximate square measurement is 3 x 3 inches (7 cm x 7 cm). While gauge is not crucial, substantially different tension between motifs can make assembly more difficult. Consistent tension can therefore make the sewing stage more straightforward.
Tips for Sewing the Bandana Together
Lay all eight motifs out before sewing. The six squares and two triangles need to be placed according to the pattern arrangement so they create the intended bandana shape.
If a motif appears to be in the wrong orientation, correct it before beginning the join. This is much easier than sewing several sections together and then discovering that a triangle or square has been placed incorrectly.
When sewing, keep the joins secure without pulling them so tightly that the motifs become distorted. The finished accessory should retain the shape created by the crochet motifs.
Tips for the Border and Ties
The border is one continuous finishing stage that incorporates both ties. Remember that each tie begins with chain 40. After chaining, the pattern instructs you to slip stitch through each chain and then secure the tie to the project.
When working across the top edge, pay particular attention to the five central stitches. These five stitches receive DC rather than SC.
Once the top edge and second tie have been completed, the V section is worked in SC. This creates the foundation for the shell stitch round.
Tips for the Shell Stitch Edging
The shell stitch edging is decorative, but it also depends on the stitch spacing from the preceding SC round. Work the skip instructions carefully so the shells are distributed according to the pattern.
The first end begins with a half shell made from chain 3 and 2 DCs in the first stitch. The repeating section uses 5 DCs in a stitch, separated by SCs. The final end is finished with 3 DCs in the last stitch to create the second half shell.
After completing the edging, fasten off and tidy all loose ends before deciding whether to add the optional sewing detail at the hair ties.
Frequently Asked Questions
What skill level is the Lilly Cottagecore Bandana?
The pattern is rated Easy +. It uses basic crochet stitches, but the project also involves changing colors, making separate motifs, sewing them together, and completing a decorative border.
Is gauge important?
No. Gauge is not crucial to complete this project.
What yarn does the original pattern use?
The original design uses Drops Muskat, a 100% mercerized cotton yarn in DK/Light 3 weight.
Which colors are used?
The original color combination uses shade 03 Mint Green, shade 30 Vanilla Yellow, and shade 29 Pink Panther.
What crochet hook size is required?
The pattern calls for a 4 mm crochet hook.
How many flower squares are needed?
You need 6 flower granny squares.
How many flower triangles are needed?
You need 2 flower granny triangles.
What is the approximate size of each granny square?
Each granny square is approximately 3 x 3 inches (7 cm x 7 cm).
What is the finished size of the bandana?
The finished bandana measures approximately 8 x 12 inches (20.5 cm x 30.5 cm), including the shell stitch edging.
How long are the crochet ties?
Each tie begins with a chain of 40.
What edging does the pattern use?
The first border round is worked in SC along the V section, followed by a shell stitch edging in the second round.
Complete Project Checklist
- Prepare the three Drops Muskat colors.
- Prepare the 4 mm crochet hook.
- Make 6 flower granny squares.
- Make 2 flower granny triangles.
- Arrange all 8 motifs into the bandana shape.
- Sew the motifs together.
- Attach yarn at the top corner.
- Chain 40 for the first tie.
- Slip stitch through the chain and secure the tie.
- Work SCs across the top.
- Work 5 DCs in the 5 central stitches.
- Continue SCs across the remaining top edge.
- Chain 40 for the second tie.
- Slip stitch back through the chain and secure it.
- Work SCs across the V section.
- Complete the shell stitch edging.
- Fasten off.
- Tidy all loose ends.
- Optionally sew the side half shells to the hair ties.
Why the Lilly Bandana Makes a Great Motif Project
One of the most enjoyable aspects of this design is the way small crochet motifs become a larger finished accessory. The flower granny squares are small enough to work individually, while the two triangles provide the special pieces needed to complete the bandana shape.
The three-color construction also makes every round easy to visually distinguish. The yellow centers become pink petals, and the green outer rounds frame each flower. Once the motifs are joined, the repeated floral design creates the Cottagecore-inspired character of the accessory.
The final shell edging adds another layer of texture without changing the basic structure of the bandana. Combined with the two chain-40 ties, it turns the assembled motifs into a finished wearable piece.
Final Thoughts on the Crochet Lilly Cottagecore Bandana
The Lilly Cottagecore Bandana is a beautiful example of how simple crochet motifs can be combined into a delicate accessory. The project moves through a clear sequence: floral centers, petals, granny-square and triangle structures, assembly, integrated ties, a single crochet border, and finally shell stitch edging.
The use of Drops Muskat 100% mercerized cotton in Mint Green, Vanilla Yellow, and Pink Panther gives the original design its fresh Spring and Summer character. The 4 mm crochet hook and Easy + skill level keep the project approachable, while the motif construction provides plenty of opportunities to practice color changes, stitch placement, joining, and finishing.
For the best result, keep the six granny squares consistent, follow the three-round construction of the two triangles carefully, and arrange all eight motifs before sewing them together. Once the main shape is complete, the 40-chain ties and decorative shell edging provide the final details that turn the individual crochet pieces into the finished Lilly Bandana.
With its flower-centered motifs, soft color palette, and romantic silhouette, this Cottagecore-inspired bandana is a lovely project for anyone who enjoys handmade Spring and Summer accessories and the timeless appeal of crochet granny-square designs.