
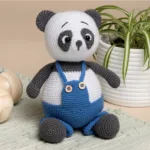
Paf the Panda Dad is a charming intermediate crochet amigurumi project that combines a rounded panda body with expressive eyes, anthracite ears and limbs, and a distinctive French Blue pair of overalls. The finished character measures approximately 22 cm (8.6 inches), making him a substantial little handmade companion while still being practical to crochet with Friends Cotton 8/4 yarn.

This tutorial follows the original Paf – Panda Dad pattern, No. 1020-211-2748, and keeps the technical information, stitch counts, colors, construction order, and finishing instructions intact. The project is rated Intermediate and uses a 2.50 mm crochet hook. The main construction is worked in single crochet with carefully placed increases and decreases, followed by stuffing, sewing, facial embroidery, and the construction of the overalls.
Project Details at a Glance
- Pattern: Paf – Panda Dad, No. 1020-211-2748
- Skill level: Intermediate
- Crochet hook: 2.50 mm
- Finished size: Approx. 22 cm (8.6 inches)
- Yarn: Friends Cotton 8/4
- White: #001, 1 skein
- Anthracite: #122, 1 skein
- French Blue: #084, 1 skein
- Safety eyes: 2, 8 mm
- Wooden buttons: 2, 12 mm
- Black scrap yarn: For the eyebrows
- Fiberfill: For stuffing
The pattern does not state a gauge. For this reason, the listed 2.50 mm hook and the specified yarn should be followed as written rather than changing the hook size based on an assumed gauge.
Abbreviations Used in the Pattern
- ch = chain
- sc = single crochet
- sl st = slip stitch
- mr = magic ring
- inc = increase, 2 stitches in the same stitch
- dec = decrease, 2 stitches together
- rnd(s) = round(s)
- (xx) = number of stitches after the ended round
Helpful Tips Before You Begin
The original pattern gives three important working tips. Always stuff the head and body firmly. Also add stuffing between the head and body as you sew the head onto the body so the finished panda does not have a wobbly head. Finally, work tightly enough to avoid holes between the stitches.
These points are particularly important for amigurumi. The shaping depends on controlled increases and decreases, while the stuffing provides the volume that turns the flat crochet fabric into a rounded character. Keeping the stitch counts exact from one round to the next will also make the assembly stages much easier.
Step 1: Crochet the Two Arms
Make 2 arms in Anthracite (#122).
- Rnd 1: 6 sc in a mr.
- Rnd 2: (inc) 6 times (12).
- Rnd 3: (1 sc, inc) 6 times (18).
- Rnds 4-7: 1 sc in each st (18).
Stuff the hand and the arm as you work.
Continue with Rnd 8: (dec) 5 times, 8 sc (13).
Rnds 9-23: 1 sc in each st (13).
Fasten off. Make the second arm in exactly the same way.
Step 2: Make the Eye Pieces
White Part Around the Eye
In White (#001), make 2.
Rnd 1: 4 sc in a mr.
Do not tighten the loop. Leave a tail long enough for assembling.
Grey Part of the Eye
In Anthracite (#122), make 2. Chain 1 to turn the work after each completed row.
- Row 1: ch 4, turn.
- Row 2: begin in the 2nd chain from the hook, (inc) 3 times, ch 1, turn (6).
- Row 3: (inc) 6 times, ch 1, turn (12).
- Row 4: make an edge around the entire eye, working 1 sc in each st and 2 sc in each corner (19).
Fasten off and leave a tail long enough for sewing. Attach the safety eye at the edge of the grey eye piece, 3 rounds below the top of the eye. Make sure the curved part points outwards.
Step 3: Shape the Panda Head
Use White (#001) for the head. The head begins with a magic ring and expands to 66 stitches before the decreases close the rounded form.
- Rnd 1: 6 sc in a mr.
- Rnd 2: (inc) 6 times (12).
- Rnd 3: (1 sc, inc) 6 times (18).
- Rnd 4: 1 sc in each st (18).
- Rnd 5: (inc) 6 times, 12 sc (24).
- Rnd 6: (1 sc, inc) 6 times, 12 sc (30).
- Rnd 7: (4 sc, inc) 6 times (36).
- Rnd 8: 1 sc in each st (36).
- Rnd 9: (5 sc, inc) 6 times (42).
- Rnd 10: (6 sc, inc) 6 times (48).
- Rnd 11: (7 sc, inc) 6 times (54).
- Rnd 12: (8 sc, inc) 6 times (60).
- Rnd 13: (9 sc, inc) 6 times (66).
Now attach the complete grey eye pieces together with the safety eyes. Insert the safety eyes between Rounds 6 and 7 on the head, with 12 sc between the eyes and approximately 6 sc between the upper part of the grey eye pieces. Be careful to make sure the snout points upwards. Place the white part around each safety eye and tighten the magic ring. Sew the grey eye parts into place.

Stuff the head as you make it.
- Rnds 14-25: 1 sc in each st (66).
- Rnd 26: (9 sc, dec) 6 times (60).
- Rnd 27: (8 sc, dec) 6 times (54).
- Rnd 28: (7 sc, dec) 6 times (48).
- Rnd 29: (6 sc, dec) 6 times (42).
- Rnd 30: (5 sc, dec) 6 times (36).
- Rnd 31: (4 sc, dec) 6 times (30).
- Rnd 32: (3 sc, dec) 6 times (24).
- Rnd 33: (2 sc, dec) 6 times (18).
- Rnd 34: (1 sc, dec) 6 times (12).
- Rnd 35: (2 sc, dec) 3 times (9).
Fasten off and leave a tail long enough for closing the hole. Use a needle to gather the last 9 stitches in the front loop and tighten the yarn to close the hole neatly. Weave in the ends.
Step 4: Finish the Face Details
The face is one of the most recognizable parts of Paf. The eye placement is deliberately specified in the pattern, so use the stated stitch spacing rather than positioning the pieces by eye alone. The curved part of each grey eye piece should point outwards.

For the snout, use Anthracite (#122): Rnd 1: 6 sc in a mr, 1 sl st. Fasten off and leave a tail long enough for sewing. During final assembly, sew the snout to the tip and embroider a stripe downwards.
Step 5: Crochet the Body
Work the body in White (#001).
- Rnd 1: 6 sc in a mr.
- Rnd 2: (inc) 6 times (12).
- Rnd 3: (1 sc, inc) 6 times (18).
- Rnd 4: (2 sc, inc) 6 times (24).
- Rnd 5: (3 sc, inc) 6 times (30).
- Rnd 6: (4 sc, inc) 6 times (36).
- Rnd 7: (5 sc, inc) 6 times (42).
- Rnd 8: (6 sc, inc) 6 times (48).
- Rnd 9: (7 sc, inc) 6 times (54).
- Rnd 10: (8 sc, inc) 6 times (60).
- Rnd 11: (9 sc, inc) 6 times (66).
- Rnds 12-24: 1 sc in each st (66).
Stuff the body as you make it.
- Rnd 25: (9 sc, dec) 6 times (60).
- Rnds 26-27: 1 sc in each st (60).
- Rnd 28: (8 sc, dec) 6 times (54).
- Rnds 29-30: 1 sc in each st (54).
- Rnd 31: (7 sc, dec) 6 times (48).
- Rnds 32-33: 1 sc in each st (48).
- Rnd 34: (6 sc, dec) 6 times (42).
Change to Anthracite (#122).
- Rnds 35-36: 1 sc in each st (42).
- Rnd 37: (5 sc, dec) 6 times (36).
Now attach the arms on this round by crocheting through both layers of the arm, meaning all 4 loops on the arm.
Rnd 38: 8 sc, 6 sc with arm, 15 sc, 6 sc with arm, 1 sc (36).
Rnd 39: 1 sc in each st (36).
Rnd 40: (4 sc, dec) 6 times (30).
Rnd 41: 1 sc in each st (30).
Fasten off and leave a tail long enough for sewing.

Step 6: Crochet the Two Legs
In Anthracite (#122), make 2 legs.
- Rnd 1: 6 sc in a mr.
- Rnd 2: (inc) 6 times (12).
- Rnd 3: (1 sc, inc) 6 times (18).
- Rnd 4: (2 sc, inc) 6 times (24).
- Rnd 5: (3 sc, inc) 6 times (30).
- Rnd 6: (4 sc, inc) 6 times (36).
- Rnds 7-10: 1 sc in each st (36).
- Rnd 11: (dec) 6 times, 24 sc (30).
- Rnd 12: (3 sc, dec) 6 times (24).
- Rnd 13: (2 sc, dec) 6 times (18).
- Rnds 14-24: 1 sc in each st (18).
Stuff the foot firmly and the rest of the leg lightly with fiberfill. Fasten off and leave a tail long enough for sewing.
Step 7: Make the Two Ears
In Anthracite (#122), make 2 ears.
- Rnd 1: 6 sc in a mr.
- Rnd 2: (inc) 6 times (12).
- Rnd 3: (1 sc, inc) 6 times (18).
- Rnd 4: (5 sc, inc) 3 times (21).
- Rnds 5-7: 1 sc in each st (21).
Fasten off and leave a sufficiently long tail for sewing.

Step 8: Crochet the Overalls
The overalls are made in French Blue (#084). They begin with two separate pants legs that are later joined together.
Pants Legs
- Rnd 1: ch 30 and join into a ring with a sc in the first ch.
- Rnds 2-12: 1 sc in each st (30).
Fasten off. Make one more pants leg but do not break off the yarn. Chain 6 and attach the second pants leg to the first pants leg. Now work around both pants legs.
Rnd 13: 30 sc around one leg, 6 sc in the chains between the two legs, 30 sc around the second leg, 6 sc in the chains between the two legs (72).
Rnds 14-18: 1 sc in each st (72).
Rnd 19: 13 sc, dec, 34 sc, dec, 21 sc (70).
Rnds 20-31: 1 sc in each st (70).
Rnd 32: 15 sc to end at the side of the pants and finish nicely.
Fasten off.

Front Panel
In French Blue (#084):
- Rnd 1: 6 sc in a mr.
- Rnd 2: (inc) 6 times (12).
- Rnd 3: (1 sc, inc) 6 times (18).
- Rnd 4: (2 sc, inc) 6 times (24).
- Rnds 5-13: 1 sc in each st (24).
Fasten off. Attach the front panel on the front side of the pants in the middle and crochet the 2 layers together with 12 sc.
Straps
In French Blue (#084), make 2 straps.
- Rnd 1: ch 48, turn.
- Rnd 2: begin in the 2nd chain from the hook, 46 sc.
Fasten off and leave a tail long enough for sewing.
Step 9: Assemble the Panda
Once all of the crocheted pieces are ready, the final assembly brings Paf together. The original pattern gives specific placement instructions for each component, so keep these measurements and positions as your assembly checkpoints.
- Sew the ears on Round 23 with approximately 13 sc in between.
- Embroider the eyebrows between Rounds 11 and 12 with 6 sc in between.
- Sew the snout to the tip and embroider a stripe downwards.
- Sew the legs diagonally from Round 3.
- Attach the overalls to the body.
- Sew the straps onto the middle of the back side of the overalls with approximately 10 sc in between.
- Sew the buttons in front of the straps.
- Fold the pants legs up 2-3 times.
- Sew on the head.
- Sew on the tail in the middle of the back side of the pants.
The head deserves particular attention during sewing. The original instructions specifically recommend stuffing between the head and body while sewing the head onto the body to avoid a wobbly head. Work around the join carefully and keep the head centered.
Final Assembly and Finishing Checklist
- Both arms are attached during Body Round 38.
- The ears are sewn on Round 23 with approximately 13 sc between them.
- The eyebrows are between Rounds 11 and 12 with 6 sc between them.
- The snout is sewn to the tip and receives the downward embroidered stripe.
- The legs are sewn diagonally from Round 3.
- The overalls are attached to the body.
- The two straps are sewn to the middle of the back side with approximately 10 sc between them.
- The two 12 mm wooden buttons are sewn in front of the straps.
- The pants legs are folded up 2-3 times.
- The head is securely sewn onto the body.
- The tail is positioned in the middle of the back side of the pants.
- All loose yarn ends are securely woven in.
How to Keep the Finished Panda Neat
When checking the completed panda, compare both sides rather than judging each component independently. The ears should look balanced, the eyes should remain aligned, and the arms and legs should sit in their intended positions. The overalls should follow the body without pulling excessively at the straps or front panel.
Stuffing should also remain consistent with the original instructions. The head and body are stuffed firmly, the hand and arm are stuffed as you work, the foot is stuffed firmly while the remainder of the leg is stuffed lightly, and the tail is stuffed lightly. These different stuffing levels help each component retain its intended shape.
Troubleshooting Without Changing the Pattern
The Crochet Fabric Has Visible Holes
Work more tightly. The original pattern specifically says to work tightly to avoid holes between the stitches. If the stuffing is visible through the fabric, check your tension before continuing.
The Head Feels Loose After Sewing
Check the stuffing between the head and body while sewing. The original instructions explicitly recommend adding stuffing between the two pieces during the sewing process to avoid a wobbly head.
The Face Looks Uneven
Recheck the eye placement before permanently sewing the grey eye pieces. The safety eyes are inserted between Rounds 6 and 7, with 12 sc between the eyes and approximately 6 sc between the upper parts of the grey pieces. Also check that the curved part of each eye piece points outwards and that the snout points upwards.
The Overalls Do Not Look Symmetrical
Check the center position of the front panel and the strap placement. The straps are sewn onto the middle of the back side of the overalls with approximately 10 sc between them, while the buttons are sewn in front of the straps.
Why the Construction Works So Well
Paf’s shape comes from a straightforward sequence of increases, straight rounds, and decreases. The head reaches 66 stitches before gradually decreasing, while the body follows its own increase sequence before narrowing through the lower rounds. The anthracite color change at Body Rounds 35-36 and the integrated arm construction at Round 38 create the panda’s recognizable lower-body coloring and attached limbs.
The separate overalls add another layer of construction. Instead of being crocheted as one simple flat piece, they begin with two tubular pant legs, are joined with a chain section, and then continue around both legs. The front panel and two straps are added afterward. This creates the characteristic dressed-up appearance without changing the underlying panda body.
Frequently Asked Questions
What skill level is this panda project?
The original pattern lists the project as Intermediate.
What size crochet hook should I use?
Use a 2.50 mm crochet hook, as specified in the pattern.
What yarn is required?
The pattern uses Friends Cotton 8/4 in White (#001), Anthracite (#122), and French Blue (#084), with 1 skein of each color listed.
How big is the finished Panda Dad?
The finished measurement is approximately 22 cm (8.6 inches).
What size safety eyes are required?
The project uses 2 safety eyes measuring 8 mm.
What size buttons are used?
The overalls use 2 wooden buttons measuring 12 mm.
How many ears, arms and legs are made?
The pattern calls for 2 arms, 2 legs, and 2 ears.
What colors are used for the panda?
The head and main body are worked in White (#001), while the anthracite sections use Anthracite (#122). The overalls are made in French Blue (#084).
Final Thoughts
Paf the Panda Dad is a detailed amigurumi project that rewards careful stitch counting and patient assembly. The individual components are relatively manageable, but the finished character depends on accurate placement, consistent stuffing, and attention to the specified construction details.
From the rounded head and carefully positioned eye pieces to the anthracite limbs and French Blue overalls, each stage contributes to Paf’s final personality. Keeping the original stitch counts intact is especially important because the shape of every component is built directly from those increases and decreases.
Take your time with the face and the final sewing stages, particularly the ears, eyes, snout, head, legs, straps, buttons and tail. When those details are positioned according to the pattern, the separate crocheted pieces come together into the finished approximately 22 cm Panda Dad.
With the pieces assembled, the stuffing checked, the facial details finished, and the overalls secured, Paf Panda Dad is ready to become a cheerful handmade addition to your amigurumi collection.