
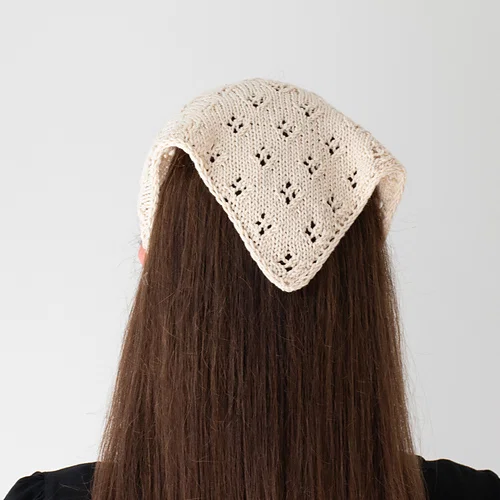
The Summer Veil Bandana is a lightweight knitted accessory built around an elegant Quatrefoil eyelet lace stitch. Worked in sport-weight cotton yarn, this triangular design combines yarnovers, right-leaning decreases, left-leaning decreases, and a practical i-cord edging. The result is a delicate-looking bandana with clean borders and long knitted ties.
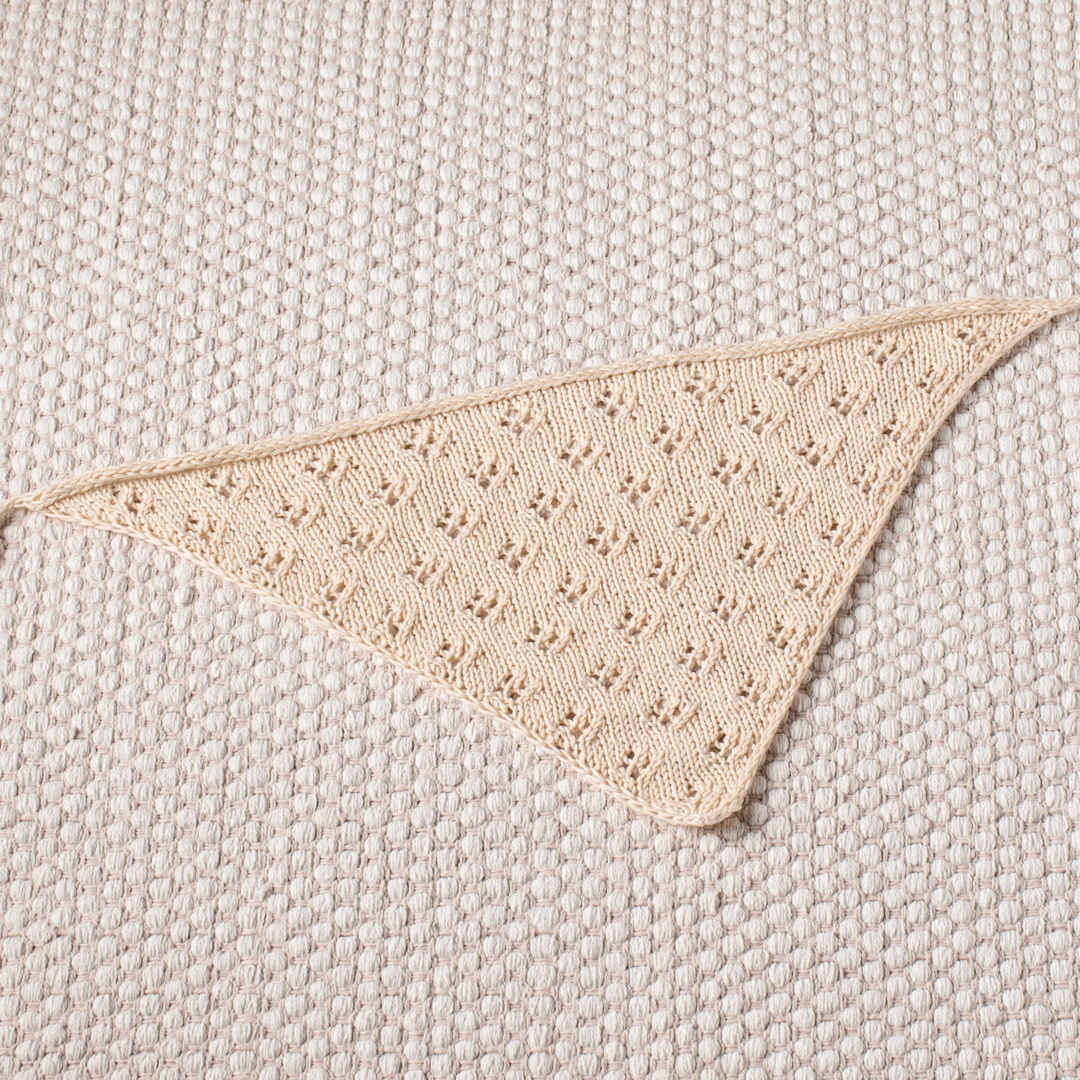
This project is knitted back and forth, beginning at the bottom edge and gradually becoming wider through increases on the right side. Instead of requiring separate shaping pieces, the triangle develops naturally through the setup rows and the repeating lace pattern.
One of the most useful construction details is the treatment of the first and last 2 stitches. These stitches form an i-cord edging, which gives the bandana neat edges and helps prevent them from curling. The same i-cord technique is used for the ties, allowing the finished accessory to have a consistent appearance from one end to the other.
The original pattern is written in one size, but it also allows the length to be modified by adding or subtracting repeats. This flexibility is built directly into the pattern without requiring a completely different stitch design.
Project Overview
The Summer Veil Bandana has a finished length of 49cm/19.25in. without the ties and a height of 24cm/9.5in. The specified gauge is 24 stitches by 32 rows over 10 x 10 cm (4x4in) in stockinette stitch after blocking.
The design uses Drops Safran in the color marzipan, uni color 71, with 1 ball required. The main fabric is knitted with 3mm (US 2.5) knitting needles, while a pair of 3mm (US 2.5) DPNs is used for the i-cord ties.
- Size: One size
- Finished length without ties: 49cm/19.25in.
- Height: 24cm/9.5in.
- Gauge: 10 x 10 cm (4x4in) = 24 sts x 32 rows in stockinette stitch after blocking.
- Yarn: Drops Safran in the color marzipan (uni color 71)
- Quantity: 1 ball
- Main needles: 3mm (US 2.5) knitting needles
- Tie needles: A pair of 3mm (US 2.5) DPNs
- Notions: Tapestry needle, measuring tape, and scissors
Getting Familiar With the Pattern Structure
Before working the first row, it helps to see the project as a sequence of connected sections. The bandana itself is created first. It begins with a small number of stitches and gradually widens until the desired length is reached.
The construction can be viewed in four main stages. The first stage is the setup section, which establishes the beginning of the triangle. The second stage is the main eight-row lace sequence. The third stage creates the first i-cord and joins it to the live bandana stitches. The final stage continues the edging into the second i-cord tie.
This organization is particularly helpful because the project does not require you to sew the ties onto the finished bandana afterward. Instead, the first tie is connected directly to the live stitches, and the edging is worked as part of the construction.
The Quatrefoil Eyelet Lace Stitch
The main visual feature of the Summer Veil Bandana is its Quatrefoil eyelet lace stitch. The pattern describes this stitch as consisting of yarnovers together with right-leaning and left-leaning decreases.
A yarn over creates an additional opening in the fabric, producing the characteristic eyelet effect. The decreases balance the lace structure and shape the decorative motifs. The use of both k2tog and ssk is important because the pattern deliberately combines right-leaning and left-leaning decreases.
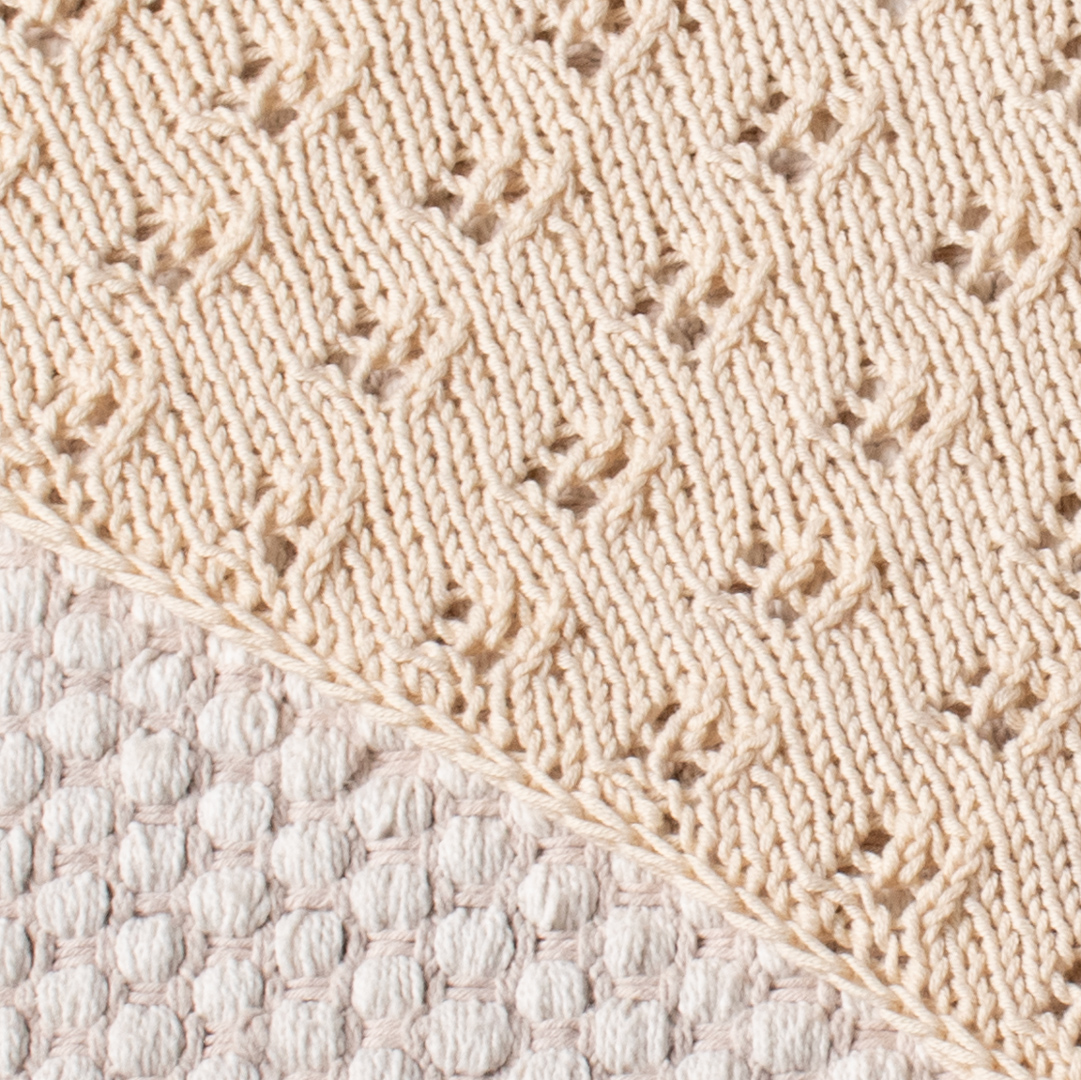
The stitch count does not remain fixed throughout the main section. This is a key point in the original instructions. Since the bandana grows wider, the number of stitches changes with each row.
The instructions therefore specify that the sequence between the asterisks should not be treated as one permanently fixed group. Instead, work as many stitches as you have before the last 2 stitches. Keeping this instruction in mind prevents the growing triangle from being accidentally treated as though it had a constant width.
Knitting Abbreviations
The pattern uses standard abbreviations throughout the setup, lace, and i-cord sections.
- k – knit.
- k2tog – knit 2 stitches together.
- p – purl.
- RS – right side.
- sl – slip stitch as if to purl with yarn in front.
- ssk – slip 1 stitch knitwise, slip the next stitch knitwise, return the 2 stitches back to the left needle, knit those 2 stitches together through the back loops.
- WS – wrong side.
- yo – yarn over.
- *-* – repeat the instructions in between the asterisks the number of times specified.
Beginning the Triangle
The bandana starts from the bottom point. The initial cast-on is intentionally small, with only 4 stitches. From there, the setup rows introduce the increases that begin expanding the fabric.
Cast on 4 stitches.
Set-Up Rows
Row 1 (WS): k2, sl2.
Row 2 (RS): k2, yo, sl2 (5sts).
Row 3: k2, p1, sl2.
Row 4: k2, yo, k1, yo, sl2 (7sts).
Row 5: k2, p to last 2 sts, sl2.
Row 6: k2, yo, k3, yo, sl2 (9sts).
Row 7: k2, p to last 2 sts, sl2.
Row 8: k2, yo, k1, k2tog, yo, k2, yo, sl2 (11sts).
Row 9: k2, p to last 2 sts, sl2.
Row 10: k2, yo, k1, k2tog, yo, k1, yo, ssk, k1, yo, sl2 (13sts).
Row 11: k2, p to last 2 sts, sl2.
Row 12: k2, yo, k3, k2tog, yo, k4, yo, sl2 (15sts).
Row 13: k2, p to last 2 sts, sl2.
Row 14: k2, yo, k to last 2 sts, yo, sl2 (17sts).
Row 15: k2, p to last 2 sts, sl2.
At the end of the setup section, Row 14 has brought the stitch count to 17 stitches, while Row 15 provides the next wrong-side row before the main lace sequence begins.
Moving Into the Main Lace Sequence
Once the setup rows are finished, the project moves into the main pattern rows. These consist of 8 rows that are repeated 8 more times or until the desired length is reached.
The pattern specifically notes that the stitch count changes with each row. Therefore, the central repeated section must be worked according to the number of stitches currently available before the final 2 stitches.
Pattern Rows
Row 1 (RS): k2, yo, k1, *k2tog, yo, k6* to last 2 sts, yo, sl2 (2 sts increased).
Row 2 (WS): k2, p to last 2 sts, sl2.
Row 3: k2, yo, k1, *k2tog, yo, k1, yo, ssk, k3* to last 2 sts, yo, sl2 (2 sts increased).
Row 4: k2, p to last 2 sts, sl2.
Row 5: k2, yo, k3, *k2tog, yo, k6* to last 2 sts, yo, sl2 (2 sts increased).
Row 6: k2, p to last 2 sts, sl2.
Row 7: k2, yo, k to last 2 sts, yo, sl2 (2 sts increased).
Row 8: k2, p to last 2 sts, sl2.
Repeat rows 1-8 8 more times or until you reach your desired length.
Reading the Increase Rows
The main right-side rows are where the triangular shape continues to expand. Rows 1, 3, 5, and 7 each state that 2 stitches are increased. These increases work alongside the lace pattern rather than appearing as a separate shaping section.
The wrong-side rows provide a repeated structure: k2, p to last 2 sts, sl2. This makes the edge treatment consistent while allowing the lace design to develop on the right side.
Because the central stitch count changes, the most important habit is to avoid assuming that every repeat has exactly the same total number of stitches. The pattern itself provides the instruction to work as many stitches as you have before the last 2 stitches.
How to Check Your Lace Progress
There are several visual checkpoints that can help when working the main triangle. The fabric should become progressively wider. The two edge stitches should remain easy to distinguish from the central lace section. The eyelets should develop into the repeating Quatrefoil design as the rows progress.
If you lose your place, first identify whether you are working on the RS or WS. Then look for the two edge stitches. The wrong-side rows are especially recognizable because they repeatedly begin with k2 and finish with sl2.
When working a right-side lace row, pay close attention to the positions of the yarnovers and decreases. The combination of k2tog, yo, and ssk is what creates the directional structure within the lace.
Finishing the Main Bandana Section
Continue the 8-row pattern repeat 8 more times or until the desired length is reached. The original finished measurement is 49cm/19.25in. without ties, with a height of 24cm/9.5in.
When the bandana section is complete, break the yarn while leaving a 10cm (4″) long tail.
Set the bandana aside and leave the stitches on the needle as is. These live stitches are needed for the next construction stage, so they should remain available for joining to the first i-cord.
Creating the First I-Cord Tie
The first tie is worked using the specified pair of 3mm (US 2.5) DPNs. Unlike the bandana, which is worked back and forth, the i-cord uses a repeated movement that creates a narrow knitted tube.
Cast on 3 stitches, do not turn.
Then repeat:
*Slip the 3 stitches to the right side of the needle. Knit 3.*
Continue knitting the i-cord until the tube measures approximately 30 cm.
Do not cut the yarn at this point. The working yarn continues directly into the joining process.
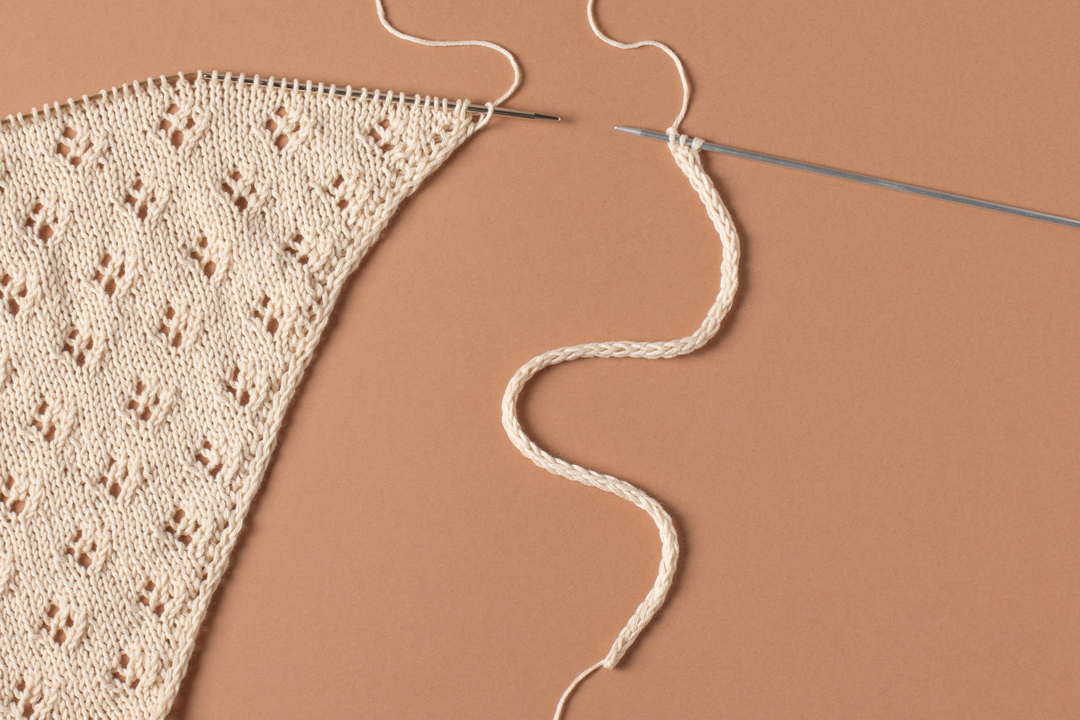
Joining the First Tie to the Live Stitches
After the first i-cord reaches approximately 30 cm, transfer the 3 i-cord stitches to the needle while holding the live bandana stitches.
This is the beginning of the i-cord edging. The tie and bandana are no longer treated as separate pieces; instead, the i-cord is progressively joined to the live edge.
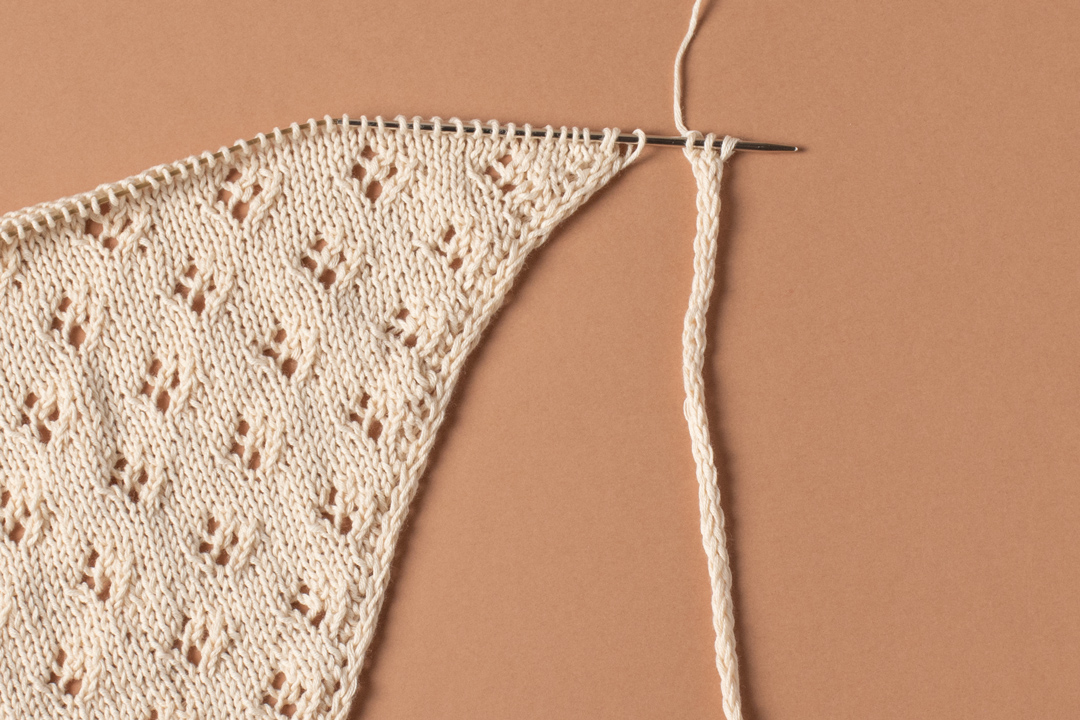
Begin the joining process by knitting the first two i-cord stitches, then work ssk. The ssk knits the last i-cord stitch together with the first bandana stitch.
Next, transfer the first 3 stitches to the needle while holding the live bandana stitches.
This transfer-and-join movement is repeated along the edge. It is useful to work deliberately here because the edging depends on repeating the same sequence consistently.
The I-Cord Edging Sequence
Repeat the following sequence:
*k2, ssk, transfer 3 stitches to the needle, holding the live bandana stitches*
Continue the previous steps until you have 3 stitches left.
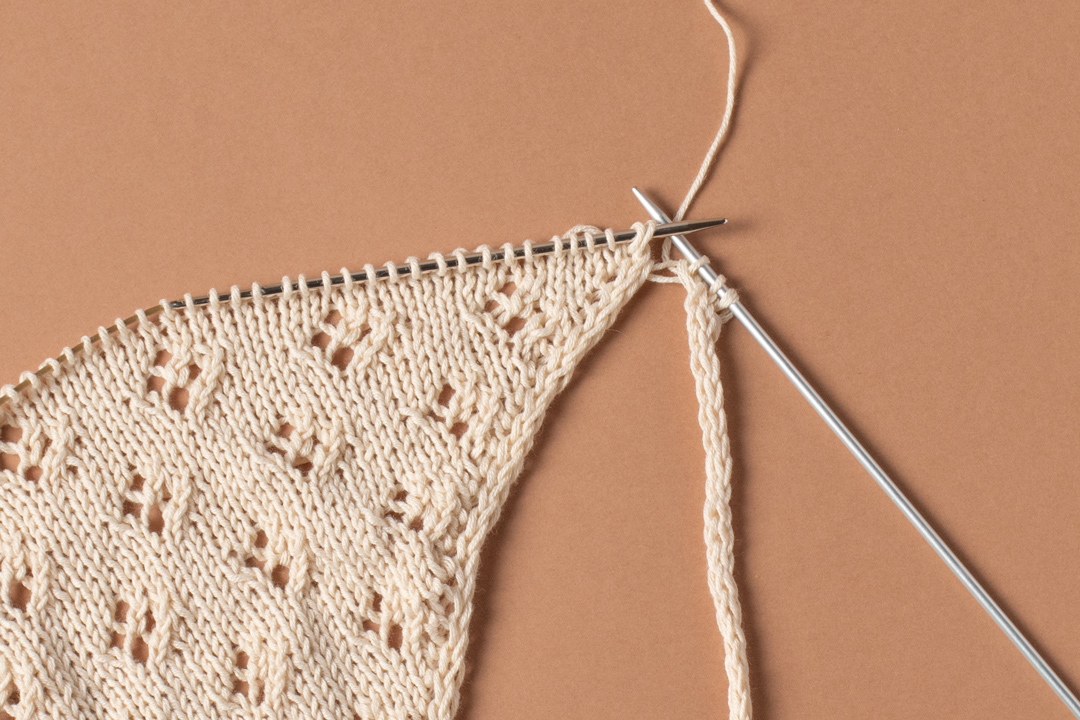
The ssk is the joining action in this section. Each time it is worked as specified, the final i-cord stitch is knitted together with a live bandana stitch. The process therefore moves the edging steadily across the bandana.
As the edging progresses, the original edge stitches and the newly formed i-cord create the clean outer border described in the pattern overview.
What to Watch for During the Edging
The edging section involves several coordinated actions, so it is helpful to keep the three i-cord stitches clearly identified. After working the required k2 and ssk, the first 3 stitches are transferred to the needle while holding the live bandana stitches.
Do not skip the transfer step. It is part of the mechanism that allows the i-cord to continue forming while the live bandana stitches are incorporated one by one.
The pattern does not provide a separate number of edging repeats. Instead, it gives a clear stopping point: continue until you have 3 stitches left. Those remaining stitches then become the foundation for the second i-cord tie.
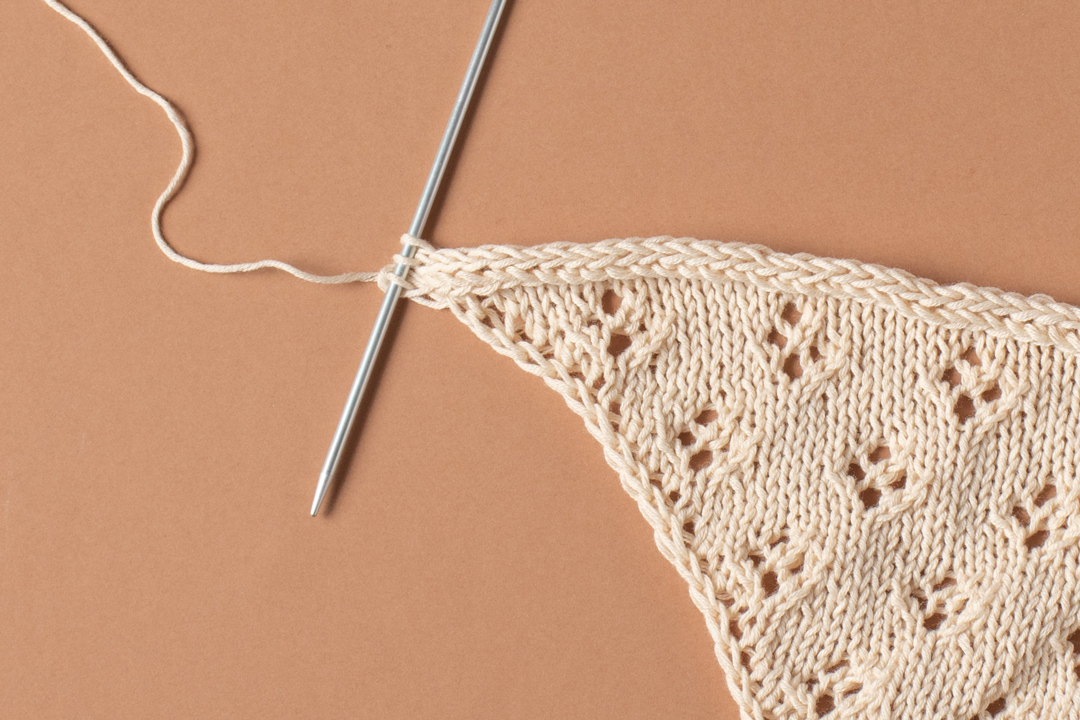
Working the Second I-Cord Tie
Once the edging has been worked until 3 stitches remain, the project moves directly into the second tie.
The second i-cord is worked in exactly the same basic manner as the first:
*Slip the 3 stitches to the right side of the needle. Knit 3.*
Continue until the tube measures approximately 30 cm.
When the second tie reaches approximately 30 cm, bind off, cut the yarn, and weave in the tails.
This completes the main construction of the Summer Veil Bandana. The two ties are integrated into the i-cord edging rather than being attached afterward as separate sewn components.
Keeping the Edges Neat
The i-cord edging is one of the defining structural features of this design. The first and last 2 stitches of the bandana form the edging, and the finished border helps the sides look neat while preventing them from curling.
Maintaining the edge instructions consistently is therefore important. On the setup and pattern rows, the edge stitches are treated separately from the central fabric. On wrong-side rows, the repeated k2 and sl2 instructions make the border easy to identify.
When you reach the assembly stage, the same principle continues through the i-cord joining sequence. This gives the completed accessory a continuous border from the bandana fabric through the ties.
Adjusting the Bandana Length
The pattern is written as one size, but the designer notes that the size can be modified by adding or subtracting repeats. The main pattern consists of rows 1-8, making the repeat structure the natural point for adjusting the length.
The original design measures 49cm/19.25in. in length without ties and 24cm/9.5in. in height. If you are following the original version, these measurements provide the reference for the intended finished size.
When modifying the project, the important point is to preserve the existing 8-row sequence. The pattern does not introduce an alternative stitch sequence for different sizes.
Beginner-Friendly Troubleshooting
The lace pattern seems to change width.
This is expected. The number of stitches changes with each row because the specified right-side rows increase by 2 stitches. The pattern also instructs you to work the central repeat according to the number of stitches you have before the last 2 stitches.
I am unsure which stitches form the edge.
The first and last 2 stitches form the i-cord edging. On wrong-side rows, the repeated structure of k2 at the beginning and sl2 at the end provides a useful visual reference.
Should I cut the yarn after the first tie?
No. After the first i-cord reaches approximately 30 cm, the instructions say not to cut the yarn because the tie is immediately connected to the bandana.
What happens to the live bandana stitches?
They remain on the needle after the bandana section. The first i-cord is then transferred to the needle while holding those live stitches, allowing the i-cord edging to be worked across them.
When do I stop the edging?
Continue the edging sequence until you have 3 stitches left. Those 3 stitches are then used for the second i-cord tie.
Useful Progress Checklist
- Cast on 4 stitches.
- Complete setup Rows 1-15.
- Reach 17 stitches at Row 14.
- Begin the 8-row Quatrefoil eyelet lace sequence.
- Remember that the stitch count changes with each row.
- Repeat rows 1-8 8 more times or until the desired length is reached.
- Break the yarn after the bandana section, leaving a 10cm (4″) tail.
- Keep the live bandana stitches on the needle.
- Cast on 3 stitches for the first i-cord.
- Work the first i-cord to approximately 30 cm.
- Do not cut the yarn after the first tie.
- Transfer the 3 i-cord stitches while holding the live bandana stitches.
- Work the initial k2 and ssk joining sequence.
- Repeat k2, ssk, and the stitch-transfer step.
- Continue until 3 stitches remain.
- Work the second i-cord to approximately 30 cm.
- Bind off, cut the yarn, and weave in the tails.
Gauge and Finished Measurements
The stated gauge for the project is 24 sts x 32 rows in 10 x 10 cm (4x4in) in stockinette stitch after blocking. The original finished measurements are 49cm/19.25in. in length without ties and 24cm/9.5in. in height.
These specifications are useful checkpoints when making the original one-size design. The pattern’s row instructions remain the primary construction instructions, while the gauge and measurements provide reference points for the finished result.
Finishing the Accessory
The final finishing stage is deliberately straightforward. Once the second i-cord reaches approximately 30 cm, bind off and cut the yarn. The remaining tails are then woven in using the tapestry needle.
There is no separate assembly sequence for attaching the ties because both ties are incorporated into the construction. The first tie joins the live stitches and develops into the edging, while the second tie begins from the final 3 stitches after the edging has been completed.
This integrated approach keeps the finished bandana visually consistent and avoids the need to sew separate ties onto the completed triangle.
Why This Pattern Works Well as a Small Knitting Project
The Summer Veil Bandana brings together several useful knitting techniques in a relatively compact accessory. The setup rows introduce increases, the main section provides repeated lace practice, and the final construction introduces an i-cord joining method.
The Quatrefoil eyelet lace gives the project its decorative identity, while the i-cord construction contributes structure. The combination of open lace and a defined edge makes the finished piece both delicate and tidy.
Another useful feature is the ability to modify the size by adding or subtracting repeats. This flexibility is particularly practical when the same lace design is desired at a different length.
Complete Construction Recap
The entire pattern can be summarized as a continuous progression from a four-stitch beginning to a finished accessory with two integrated ties.
- Start with 4 stitches.
- Work the 15 setup rows to establish the triangular beginning.
- Begin the 8-row pattern sequence featuring Quatrefoil eyelet lace.
- Repeat rows 1-8 8 more times or continue until the desired length is reached.
- Break the yarn leaving a 10cm (4″) tail and keep the live stitches on the needle.
- Cast on 3 stitches for the first i-cord.
- Knit approximately 30 cm of i-cord without turning.
- Transfer the i-cord stitches while holding the live bandana stitches.
- Join the i-cord using k2 and ssk.
- Repeat the edging sequence until 3 stitches remain.
- Continue with the second i-cord until it measures approximately 30 cm.
- Bind off, cut the yarn, and weave in the tails.
Final Thoughts
The Summer Veil Bandana is a refined lace knitting project that relies on a clear and efficient construction. Starting from just 4 stitches, the fabric develops into a triangular shape through carefully placed increases and a repeating Quatrefoil eyelet pattern.
The design’s beauty comes from the interaction between the open lace and the simple structural details. Yarnovers create the eyelets, k2tog and ssk shape the lace, and the i-cord edging provides a clean boundary around the delicate fabric.
The finishing method is equally thoughtful. Rather than attaching the ties after the bandana has been completed, the first tie is joined directly to the live stitches and becomes part of the edging. Once the edging reaches the final 3 stitches, those stitches continue into the second approximately 30 cm i-cord tie.
For the original one-size version, the target measurements are 49cm/19.25in. without ties and 24cm/9.5in. in height, with a gauge of 24 stitches by 32 rows per 10 x 10 cm (4x4in) in stockinette stitch after blocking. The specified yarn is 1 ball of Drops Safran in marzipan, uni color 71, worked with 3mm (US 2.5) needles.
Whether you are focusing on the lace motif, practicing directional decreases, or learning how an i-cord can be integrated into an edge, this project provides several techniques within one compact accessory. Following the original row sequence carefully and using the stitch counts as checkpoints will help preserve the intended triangular shape and lace structure from beginning to end.
Quick Reference
- Pattern name: Summer Veil Bandana
- Size: One size
- Length without ties: 49cm/19.25in.
- Height: 24cm/9.5in.
- Gauge: 24 sts x 32 rows in 10 x 10 cm (4x4in) stockinette stitch after blocking
- Yarn: Drops Safran, marzipan, uni color 71
- Quantity: 1 ball
- Main needles: 3mm (US 2.5) knitting needles
- Tie needles: 3mm (US 2.5) DPNs
- Cast-on: 4 stitches
- Setup: Rows 1-15
- Stitch count after Row 14: 17 stitches
- Main pattern: Rows 1-8
- Main repeat: Repeat rows 1-8 8 more times or until desired length
- Bandana yarn tail: 10cm (4″)
- First tie: Approximately 30 cm
- Second tie: Approximately 30 cm