
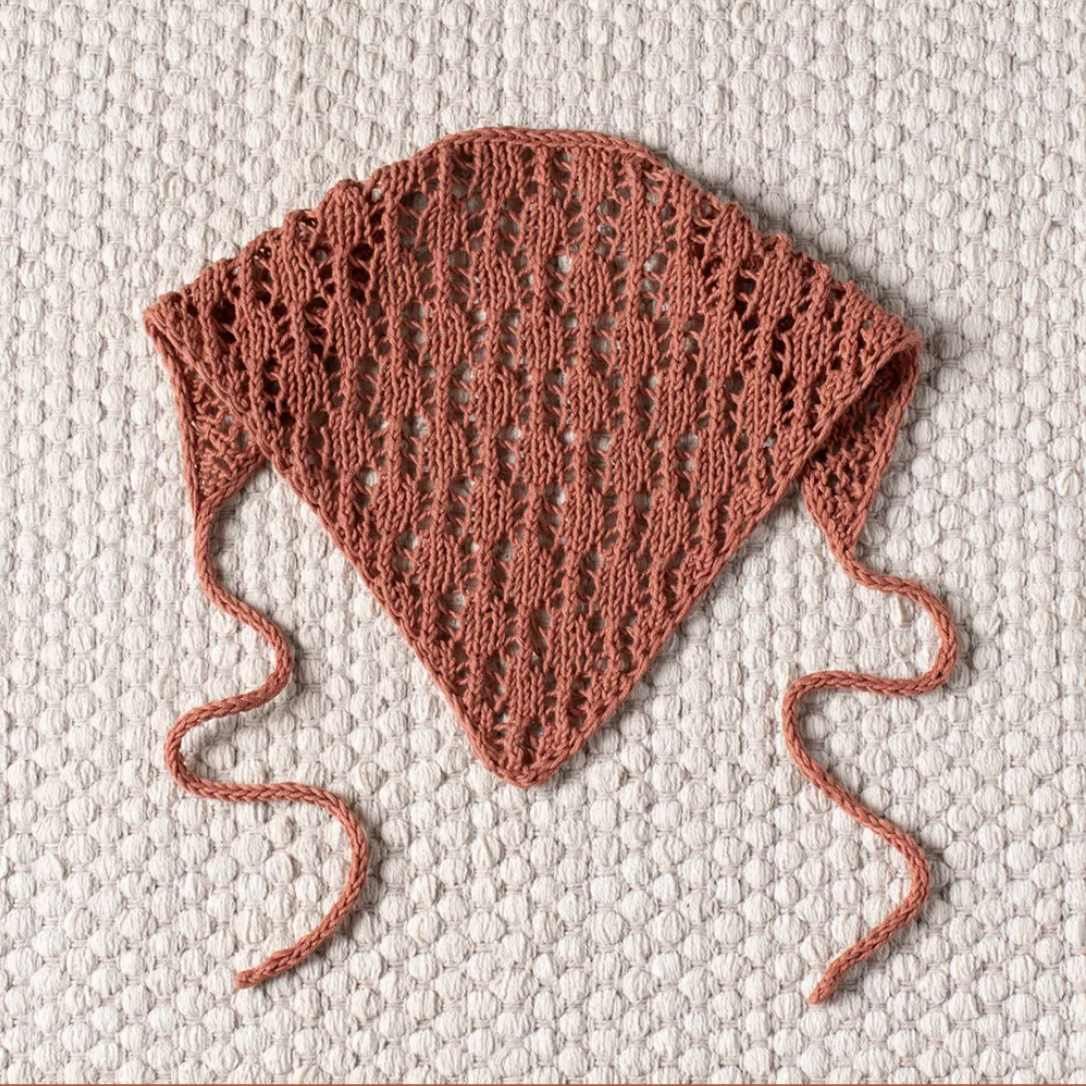
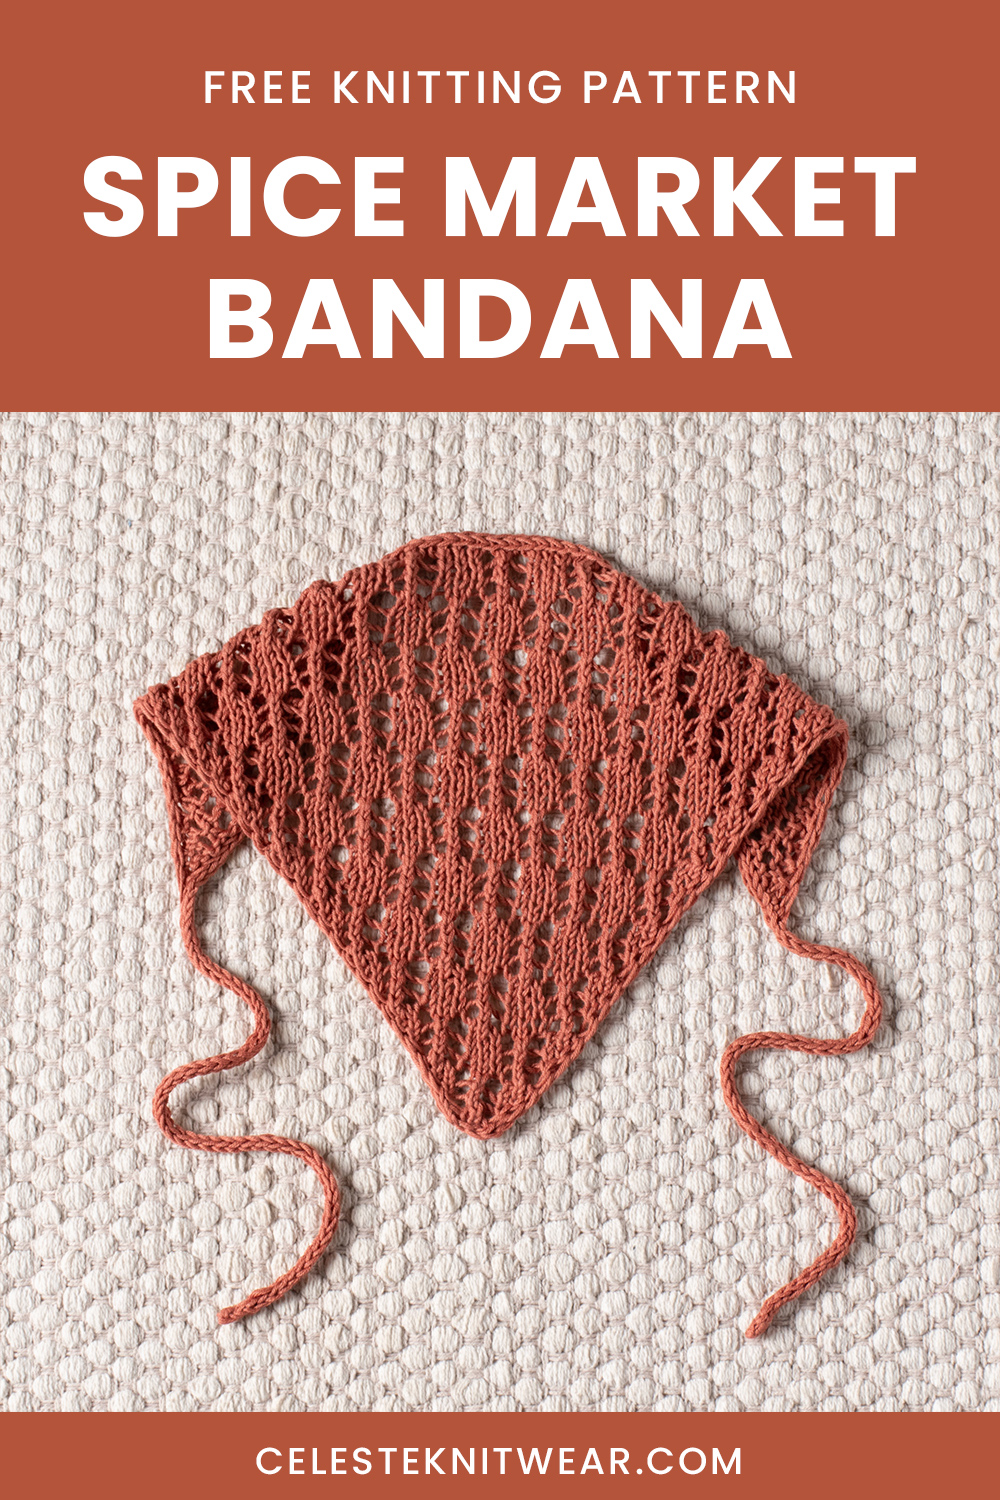
The Spice Market Bandana is a delicate summer knitting project that combines a lightweight sport-weight cotton yarn with an elegant lace stitch, neat i-cord edges, and simple knitted ties. The finished accessory has a triangular shape and is designed to be worn as a practical and decorative head accessory during warmer weather.
This project is worked back and forth rather than in the round. The construction begins at the bottom point of the triangle with just 5 stitches and gradually becomes wider through increases worked on the right-side rows. As the triangle grows, the central lace pattern develops between two clean i-cord-style borders.
One of the most useful features of the design is its flexibility. The pattern can be made longer or shorter by adding or subtracting repeats of the six-row pattern section. The standard instructions call for repeating rows 1-6 nine more times or continuing until the desired length is reached.
Why This Bandana Is an Interesting Knitting Project
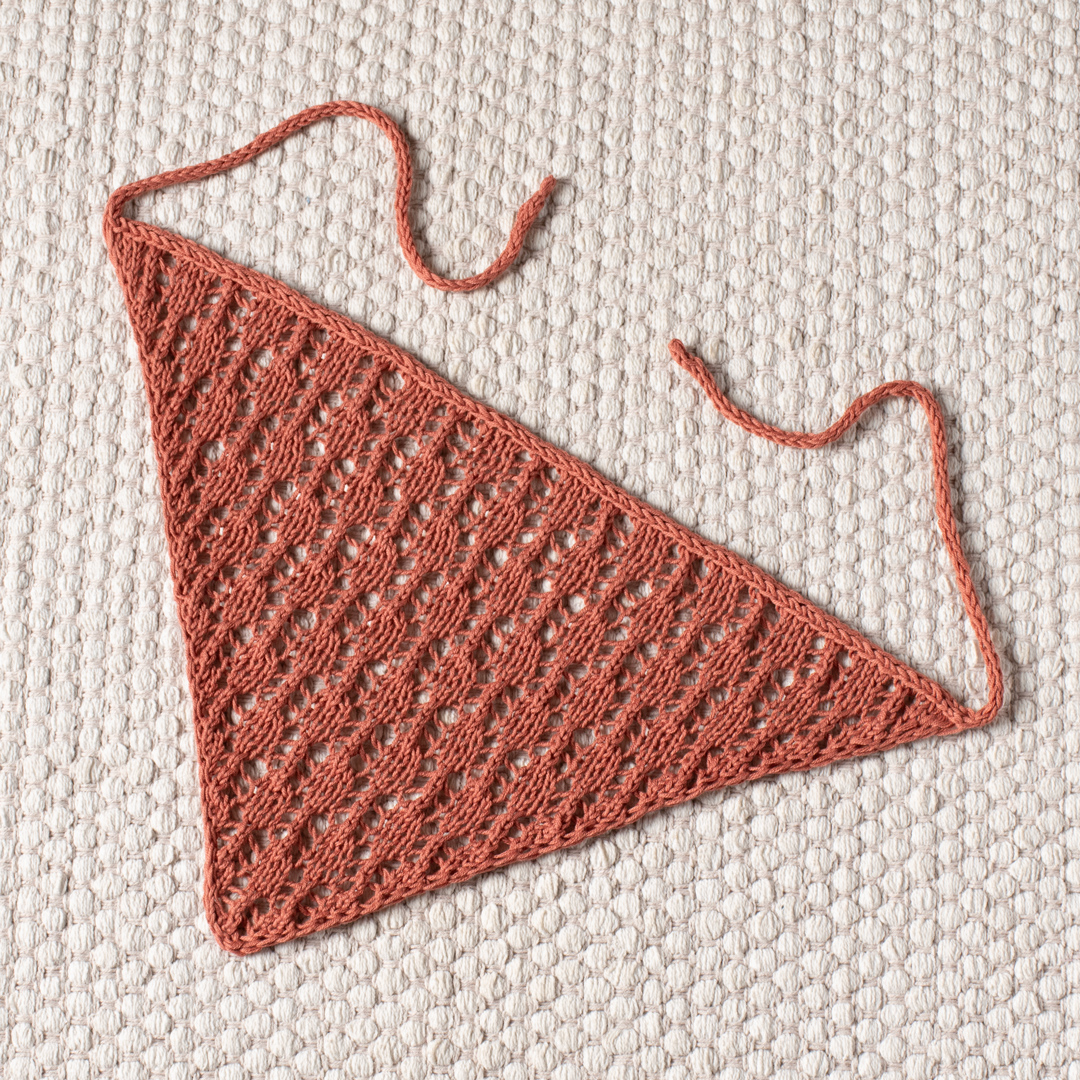
The Spice Market Bandana may be a relatively small accessory, but its construction includes several useful knitting techniques. The main body introduces increases, yarn overs, and a centered three-stitch decrease, while the edges use a simple i-cord treatment to create a clean finish.
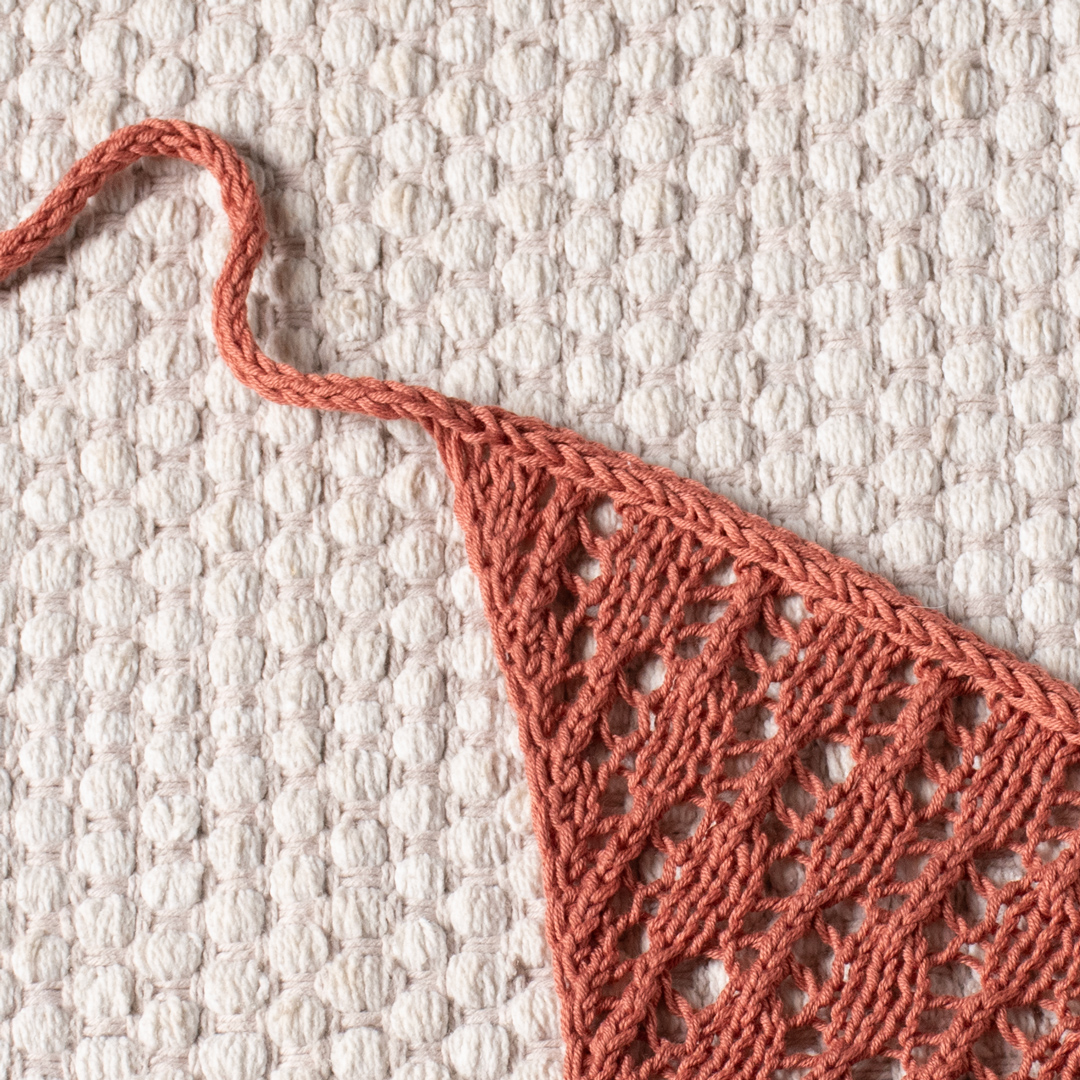
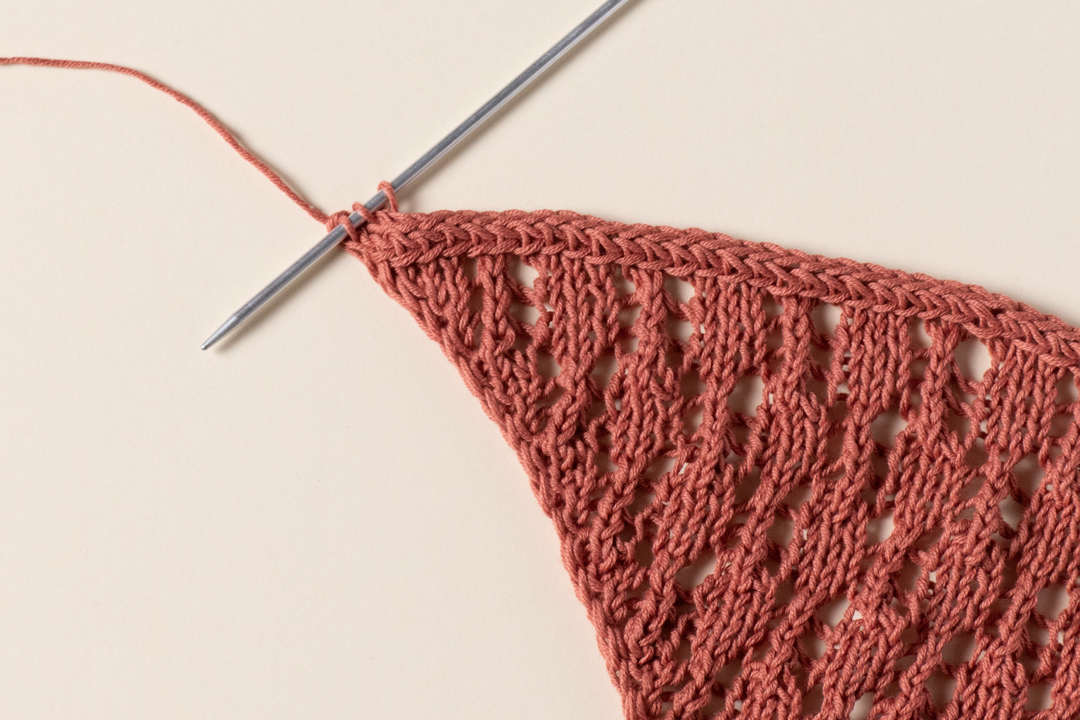
The first and last two stitches of every row form the i-cord edging. The first two stitches are knitted, while the final two stitches are slipped with the yarn in front. These edge stitches should not be tightened. Keeping them relaxed allows the border to remain neat and helps prevent the fabric from curling.
After the triangular body is completed, the pattern moves into a second construction phase. A three-stitch i-cord is worked on DPNs for approximately 30 cm. Instead of finishing that first tie separately, it is connected directly to the live bandana stitches. The i-cord then becomes the edging that travels across the bandana.
When only 3 stitches remain, the second i-cord tie is worked to approximately 30 cm. This creates a continuous and practical finish with matching ties at both ends.
Project Specifications
The original pattern is written in one size, with the following finished measurements:
- Size: One size.
- Length without ties: 40cm / 15.75in.
- Height: 23cm / 9in.
The specified gauge is:
10 x 10 cm (4 x 4in) = 24 sts x 32 rows in stockinette stitch after blocking.
Because the gauge is stated after blocking, it is useful to consider the blocked fabric when checking the dimensions of your finished bandana. The project can also be adjusted in length by changing the number of six-row pattern repeats.
Materials for the Spice Market Bandana
Yarn
The pattern specifies Drops Safran in the color red clay (uni color 59), using 1 ball.
The bandana is designed for sport-weight cotton yarn. The cotton construction makes the project particularly appropriate for a lightweight summer accessory, while the lace pattern gives the finished fabric an airy decorative quality.
Main Needles
Use 3mm (US 2.5) knitting needles for the main triangular bandana.
DPNs for the Ties
A pair of 3mm (US 2.5) DPNs is required for the i-cord ties.
Additional Notions
- Tapestry needle
- Measuring tape
- Scissors
The measuring tape is especially helpful when checking the 40cm / 15.75in finished length, the 23cm / 9in height, and the approximately 30 cm length of each i-cord tie.
Understanding the Pattern Before You Start
The easiest way to approach this project is to divide it into three major sections: the setup triangle, the repeated lace body, and the i-cord finishing.
First, the bandana starts with 5 stitches and grows through the setup rows. The stitch count increases from 5 to 7, then 9, then 11, and finally 13 stitches at the end of the setup increase rows.
Second, the six-row lace pattern is repeated 9 more times or until the desired length is reached. The right-side rows contain the two shaping increases, while the wrong-side rows use the same simple edge and purl structure.
Third, the yarn is broken with a 10cm (4″) tail, but the live stitches remain on the needle. The first i-cord is then worked separately and connected to those live stitches. The i-cord continues along the edge before becoming the second tie.
Important Pattern Notes
I-Cord Edges
The i-cord edging is created by knitting the first 2 stitches of every row and slipping the last 2 stitches of every row with yarn in front.
Do not tighten the edge stitches. A relaxed edge helps the border form neatly and prevents unnecessary tension along the sides of the triangular fabric.
Increases
Two stitches are increased at the beginning and at the end of each right-side row using M1R and M1L. These increases occur before and after the two-stitch i-cord edge sections.
The pattern specifically notes that the increased stitches should not be tightened.
If you want to simplify the increase method, the pattern allows M1L and M1R to be replaced with yarn overs.
Knitting Abbreviations
- k – knit.
- k3tog – knit 3 stitches together: slip the next 2 stitches knitwise (slip both stitches together, not one by one) to the right-hand needle, knit the next stitch, pass the 2 slipped stitches over the knit stitch.
- p – purl.
- RS – right side.
- sl – slip stitch as if to purl with yarn in front.
- ssk – slip 1 stitch knitwise, slip the next stitch knitwise, return the 2 stitches back to the left needle, knit those 2 stitches together through the back loops.
- WS – wrong side.
- yo – yarn over.
- *-* – repeat the instructions in between the asterisks the number of times specified.
Starting the Triangle
The triangular bandana begins with a very small cast-on. This makes it easy to see the fabric gradually expand as the increases are added.
Cast On
Cast on 5 stitches.
Once the five stitches are on the needle, begin the setup section. Take care with the edge stitches from the beginning because the same edge construction continues throughout the entire body.
Setup Section: Building the Foundation
Set-Up Row (WS)
k2, p1, sl2.
This row establishes the basic five-stitch structure with two knitted edge stitches, one central purl stitch, and two slipped edge stitches.
Row 1 (RS)
k2, M1R, k1, M1L, sl2 (7sts).
The two increases bring the stitch count from 5 to 7 stitches.
Row 2
k2, p to last 2 sts, sl2.
The wrong-side rows provide a consistent framework for the lace work. Keep the first two stitches relaxed and continue to slip the final two with yarn in front.
Row 3
k2, M1R, yo, k3tog, yo, M1L, sl2 (9sts).
This is the first setup row where the characteristic lace combination of yarn overs and k3tog appears.
Row 4
k2, p to last 2 sts, sl2.
Row 5
k2, M1R, k1, yo, k3tog, yo, k1, M1L, sl2 (11sts).
Row 6
k2, p to last 2 sts, sl2.
Row 7
k2, M1R, k2, yo, k3tog, yo, k2, M1L, sl2 (13sts).
Row 8
k2, p to last 2 sts, sl2.
The setup section is now complete. The stitch-count checkpoint after Row 7 is 13 stitches.
Checking Your Stitch Count Before the Main Pattern
The setup section gives several useful checkpoints. These are worth remembering because they can help identify a problem before you have knitted many repeats.
- Row 1: 7 stitches.
- Row 3: 9 stitches.
- Row 5: 11 stitches.
- Row 7: 13 stitches.
If one of these counts does not match the pattern, it is worth reviewing the increases before continuing. Since two stitches are added on each specified right-side setup row, the triangle should grow steadily.
The Main Six-Row Lace Repeat
After completing the setup section, move into the six-row pattern. This is the part that creates the main decorative fabric while continuing to widen the triangle.
Pattern Row 1 (RS)
k2, M1R, *yo, k3tog, yo, k3* to last 5sts, yo, k3tog, yo, M1L, sl2 (2sts increased).
The repeated lace section sits between the two edge increases. Follow the asterisked instructions exactly as written until the row reaches the final five stitches.
Pattern Row 2 (WS)
k2, p to last 2 sts, sl2.
This simple wrong-side row provides a useful opportunity to inspect the lace pattern and the side edges.
Pattern Row 3
k2, M1R, k1, *yo, k3tog, yo, k3* to last 6sts, yo, k3tog, yo, k1, M1L, sl2 (2sts increased).
The extra k1 stitches help the lace section transition as the triangular body becomes wider.
Pattern Row 4
k2, p to last 2 sts, sl2.
Pattern Row 5
k2, M1R, k2, *yo, k3tog, yo, k3* to last 7sts, yo, k3tog, yo, k2, M1L, sl2 (2sts increased).
Pattern Row 6
k2, p to last 2 sts, sl2.
These six rows together make one complete pattern repeat.
How to Keep Track of Repeats
The main pattern is much easier to manage if you think of Rows 1-6 as a single unit. The standard instructions say to repeat rows 1-6 9 more times or continue until you reach your desired length.
One practical approach is to keep a written tally of every completed six-row repeat. This does not alter the pattern and simply helps prevent accidentally skipping or adding a repeat.
The right-side rows can also serve as visual checkpoints. Each one increases the stitch count by two. The wrong-side rows do not increase and follow the same basic structure.
Reading the Lace Pattern More Easily
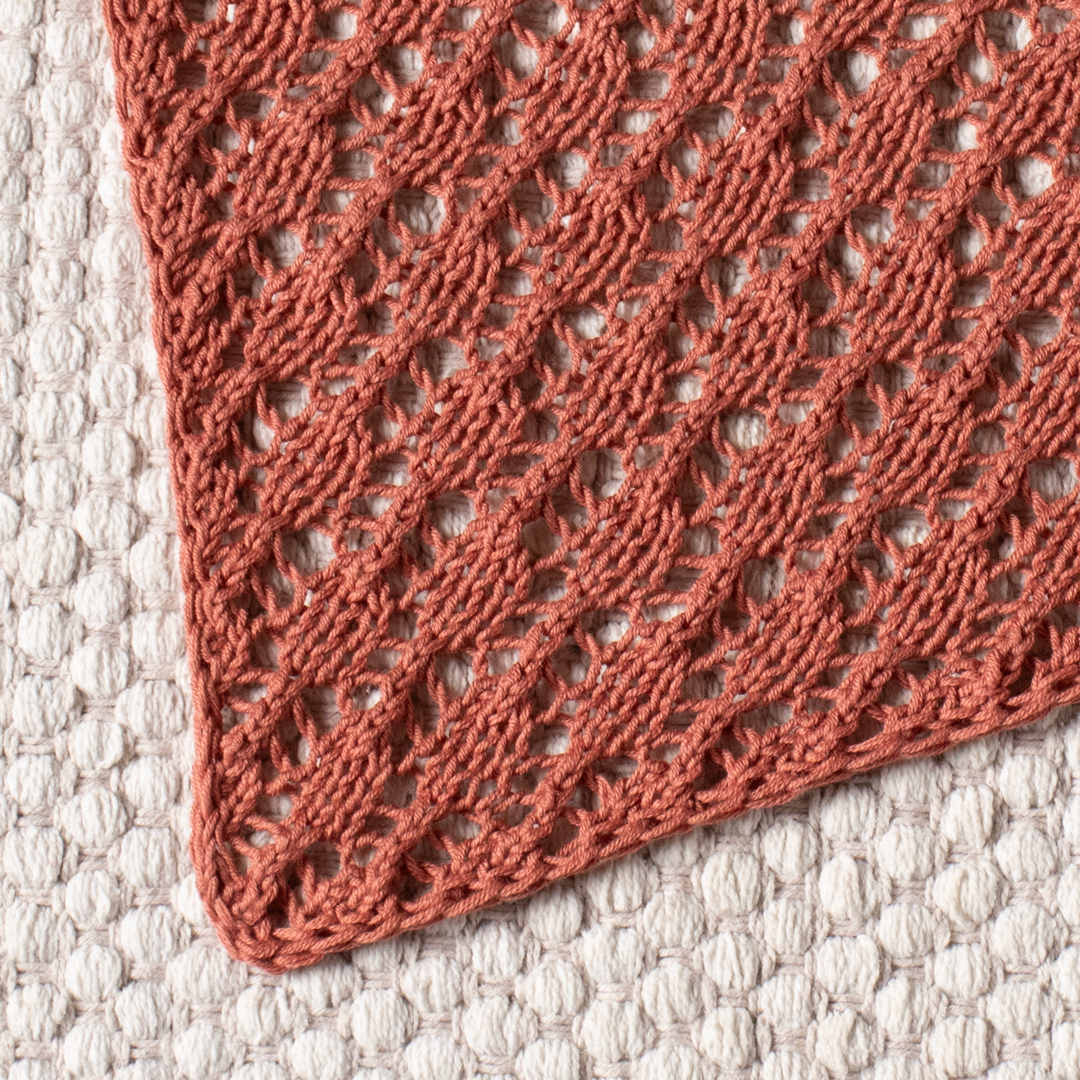
The lace design uses two main actions: yarn overs and k3tog decreases. The yarn overs create the open spaces, while the k3tog decreases balance the stitch count within the lace motif.
It is useful to distinguish these decorative stitches from the M1R and M1L shaping increases. The lace motif is responsible for the decorative holes, while the M1 increases are responsible for expanding the overall triangular shape.
Keeping those two functions separate in your mind can make the pattern easier to read, especially when the number of stitches between the edge and the lace motif increases.
Finishing the Main Body
When you have completed the required pattern repeats or reached your desired length, break the yarn while leaving a 10cm (4″) long tail.
Do not remove the live stitches from the needle. They are needed for the next stage, where the first i-cord is connected to the edge of the bandana.
Creating the First I-Cord Tie
The ties are made separately from the main triangle using the pair of 3mm (US 2.5) DPNs.
Cast on 3 stitches and do not turn.
Then repeat:
*Slip the 3 stitches to the right side of the needle. Knit 3.*
Continue until the i-cord tube measures approximately 30 cm.
At this point, do not cut the yarn. The first i-cord is going to become part of the bandana’s finished edging.
Connecting the First I-Cord
Transfer the 3 i-cord stitches to the needle while holding the live bandana stitches.
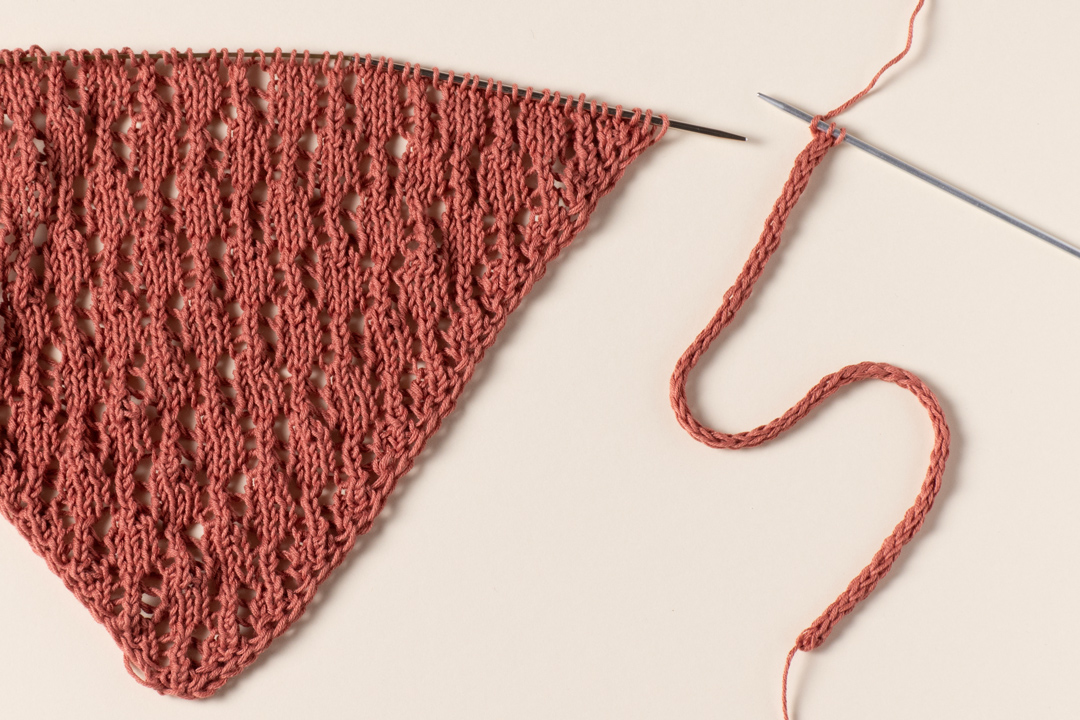
Next, knit the first two i-cord stitches.
Then work ssk, knitting the last i-cord stitch together with the first bandana stitch.
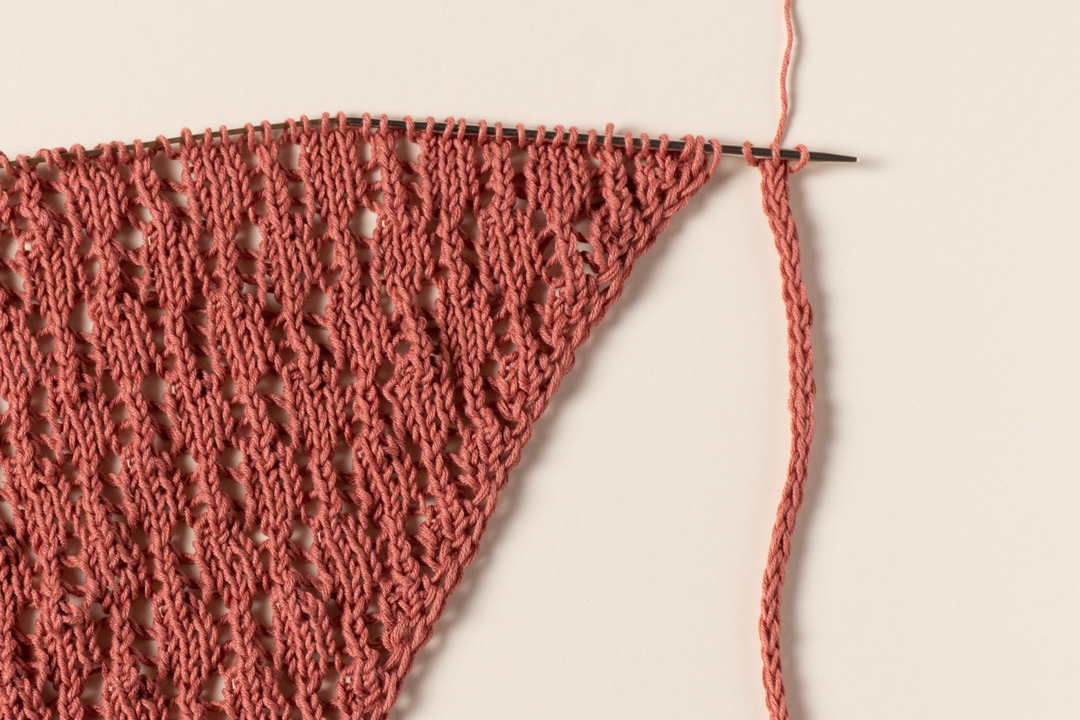
This is the key transition between the separate tie and the edging. From here, the i-cord becomes an integrated part of the finished bandana.
Continuing the I-Cord Edging
Transfer the first 3 stitches to the needle while holding the live bandana stitches.
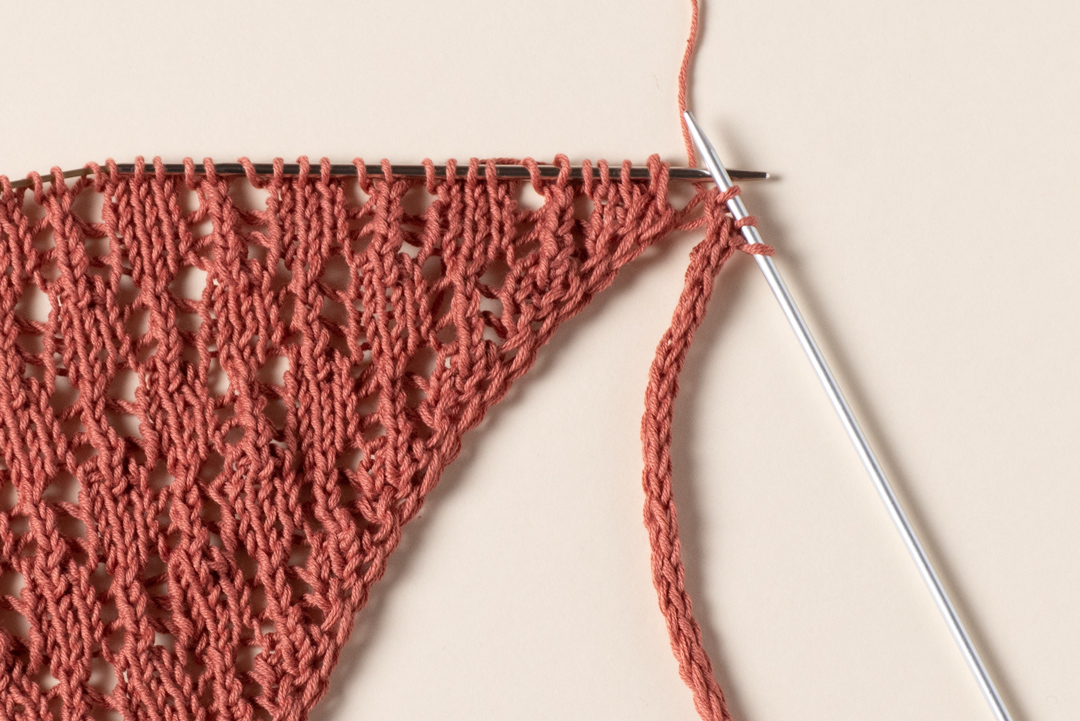
Repeat:
*k2, ssk, transfer 3 stitches to the needle, holding the live bandana stitches*
Continue until you have 3 stitches left.
The repeated sequence gradually connects the i-cord to the remaining bandana stitches. Because the same process is repeated across the edge, it creates a continuous border rather than a separate strip sewn on afterward.
Working the Second Tie
Once the edging has reached the point where only 3 stitches remain, begin the second i-cord tie.
Work the same three-stitch i-cord technique:
*Slip the 3 stitches to the right side of the needle. Knit 3.*
Continue until the tube measures approximately 30 cm.
The second tie is worked in the same way as the first tie, but this time the i-cord is completed rather than connected to another section of live knitting.
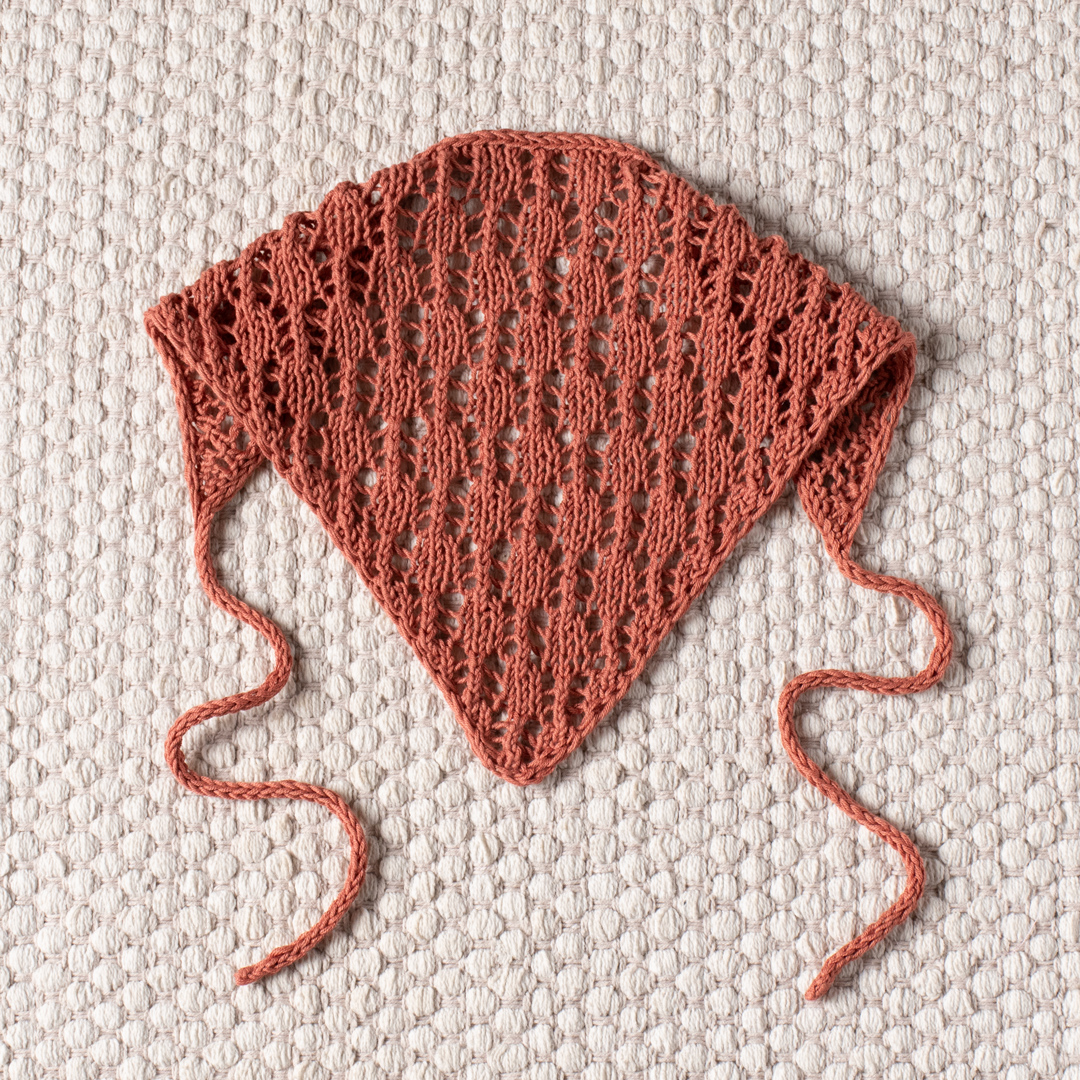
When the second tie reaches approximately 30 cm, bind off, cut the yarn, and weave in the tails.
Understanding the SSK Join
The ssk is particularly important during the i-cord edging because it joins the final i-cord stitch to a live bandana stitch.
The abbreviation means: slip 1 stitch knitwise, slip the next stitch knitwise, return the 2 stitches back to the left needle, and knit those 2 stitches together through the back loops.
In the i-cord edging instructions, the pattern describes the first connection as knitting the first two i-cord stitches and then working an ssk using the last i-cord stitch together with the first bandana stitch.
Once this is understood, the repeated edging sequence becomes easier to follow because the same basic relationship is maintained as the i-cord moves along the edge.
Beginner Checkpoints for the Main Body
There are several simple details that can help keep the project organized.
Check the Edge First
Every row begins with k2 and finishes with sl2. If the edge does not look consistent, check these four stitches before examining the lace section.
Check the Increase Rows
On each right-side shaping row, two stitches are added. One is created with M1R and one with M1L.
Check the Wrong-Side Rows
Rows 2, 4, and 6 of the main pattern all use:
k2, p to last 2 sts, sl2.
This repeated instruction makes the wrong-side rows useful checkpoints between lace rows.
Check the Setup Counts
The setup section gives the following stitch counts: 7 stitches after Row 1, 9 stitches after Row 3, 11 stitches after Row 5, and 13 stitches after Row 7.
How to Adjust the Length
The pattern is written for one size, but the body length can be modified. The main instruction is to repeat rows 1-6 nine more times or until the desired length is reached.
Adding repeats produces a longer triangle, while subtracting repeats produces a shorter one. The pattern does not require the lace motif itself to be redesigned when making this adjustment.
When modifying the length, use the measuring tape and remember the standard finished measurements of 40cm / 15.75in without ties and 23cm / 9in in height.
Practical Tips for Working the Lace
Lace knitting becomes much easier when the instructions are read one section at a time. Rather than trying to memorize an entire row, identify the opening edge stitches, the increase, the repeated lace section, and the closing increase and edge stitches.
The asterisks in the pattern are particularly important. They indicate the portion that should be repeated the specified number of times. Follow the stopping point carefully, because the final stitches of each right-side row have their own instructions.
It can also help to pause after every wrong-side row. Since these rows are consistent, they provide an opportunity to inspect whether the lace holes and decreases are appearing in the expected relationship.
Practical Tips for the I-Cord
The i-cord is only three stitches wide, so keeping track of the three stitches is essential. The pattern says not to turn after knitting. Instead, slip the three stitches to the right side of the needle and knit them again.
For the first tie, continue until it measures approximately 30 cm and keep the yarn attached. For the second tie, work approximately 30 cm, then bind off and finish the yarn tails.
Because the ties are measured in centimeters rather than by a fixed number of rows, a measuring tape is the best way to maintain the specified length.
Finishing and Final Inspection
After the second i-cord is bound off and the yarn tails are woven in, inspect the entire bandana. Look at the two side edges and make sure they remain neat and relaxed. Check that both ties are approximately 30 cm long and that the triangular body has the intended proportions.
The standard finished measurements are 40cm / 15.75in in length without ties and 23cm / 9in in height. The gauge is 24 stitches x 32 rows over 10 x 10 cm (4 x 4in) in stockinette stitch after blocking.
The lace design is formed by the repeated combination of yarn overs and k3tog decreases, while the overall triangle is shaped by the M1R and M1L increases. These elements work together to create the finished silhouette.
Complete Project Checklist
- Prepare Drops Safran in red clay, uni color 59, 1 ball.
- Use 3mm (US 2.5) knitting needles for the main body.
- Prepare 3mm (US 2.5) DPNs for the ties.
- Cast on 5 stitches.
- Work the setup row and Rows 1-8.
- Confirm the setup stitch counts as you progress.
- Begin the six-row pattern repeat.
- Repeat rows 1-6 9 more times or until the desired length is reached.
- Break the yarn and leave a 10cm (4″) tail.
- Leave the live stitches on the needle.
- Cast on 3 stitches for the first i-cord.
- Work the first i-cord to approximately 30 cm.
- Connect the i-cord to the bandana using the stated ssk method.
- Continue the i-cord edging across the live stitches.
- Stop when 3 stitches remain.
- Work the second i-cord to approximately 30 cm.
- Bind off, cut the yarn, and weave in the tails.
Final Pattern Reference
For quick reference, the core specifications of the Spice Market Bandana are:
- Size: One size.
- Finished length without ties: 40cm / 15.75in.
- Height: 23cm / 9in.
- Gauge: 24 stitches x 32 rows in 10 x 10 cm (4 x 4in) stockinette stitch after blocking.
- Yarn: Drops Safran, red clay (uni color 59), 1 ball.
- Needles: 3mm (US 2.5) knitting needles.
- Tie needles: Pair of 3mm (US 2.5) DPNs.
- Starting stitch count: 5 stitches.
- First tie: Approximately 30 cm.
- Second tie: Approximately 30 cm.
Conclusion
The Spice Market Bandana is a compact project that combines several classic knitting techniques into one wearable accessory. Its triangular construction begins with just 5 stitches and expands gradually through carefully positioned increases, while the central lace pattern provides the decorative character of the finished fabric.
The two-stitch i-cord edges are an important part of the design. By knitting the first two stitches and slipping the final two stitches with yarn in front on every row, the sides remain neat and resist curling. The pattern also specifically instructs knitters not to tighten these edge stitches or the increased stitches.
The finishing method gives the project an especially clean appearance. Instead of attaching separate ties after the bandana is complete, the first three-stitch i-cord is connected directly to the live stitches and transformed into the edging. After the edging reaches the opposite side, the remaining three stitches become the foundation for the second approximately 30 cm tie.
For a smooth knitting experience, focus on the structure of the project rather than trying to memorize every row. Check the stitch counts during the setup section, recognize the six-row repeat, keep the edge stitches relaxed, and use the wrong-side rows as regular checkpoints.
Once the final tie has been knitted, bound off, and woven in, the Spice Market Bandana is ready for its finishing treatment. The combination of sport-weight cotton, lace, a growing triangle, and integrated i-cord ties creates a practical handmade accessory with a clean and refined construction.
“`