
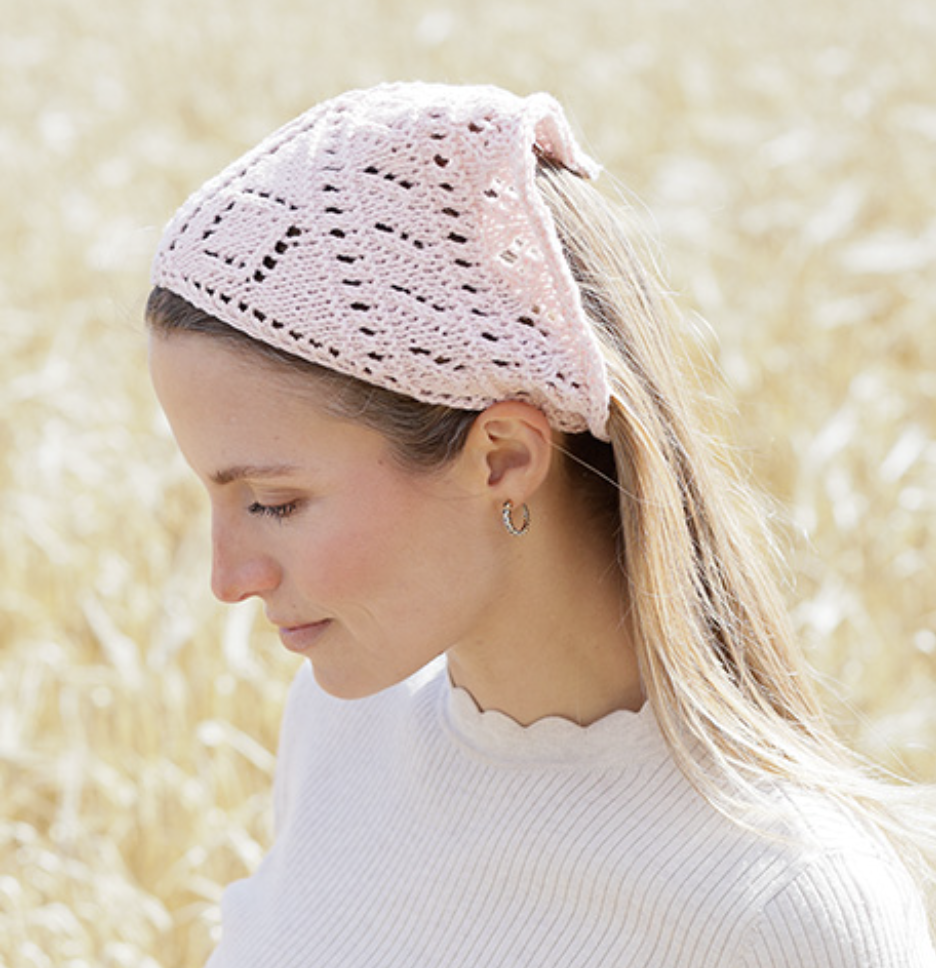
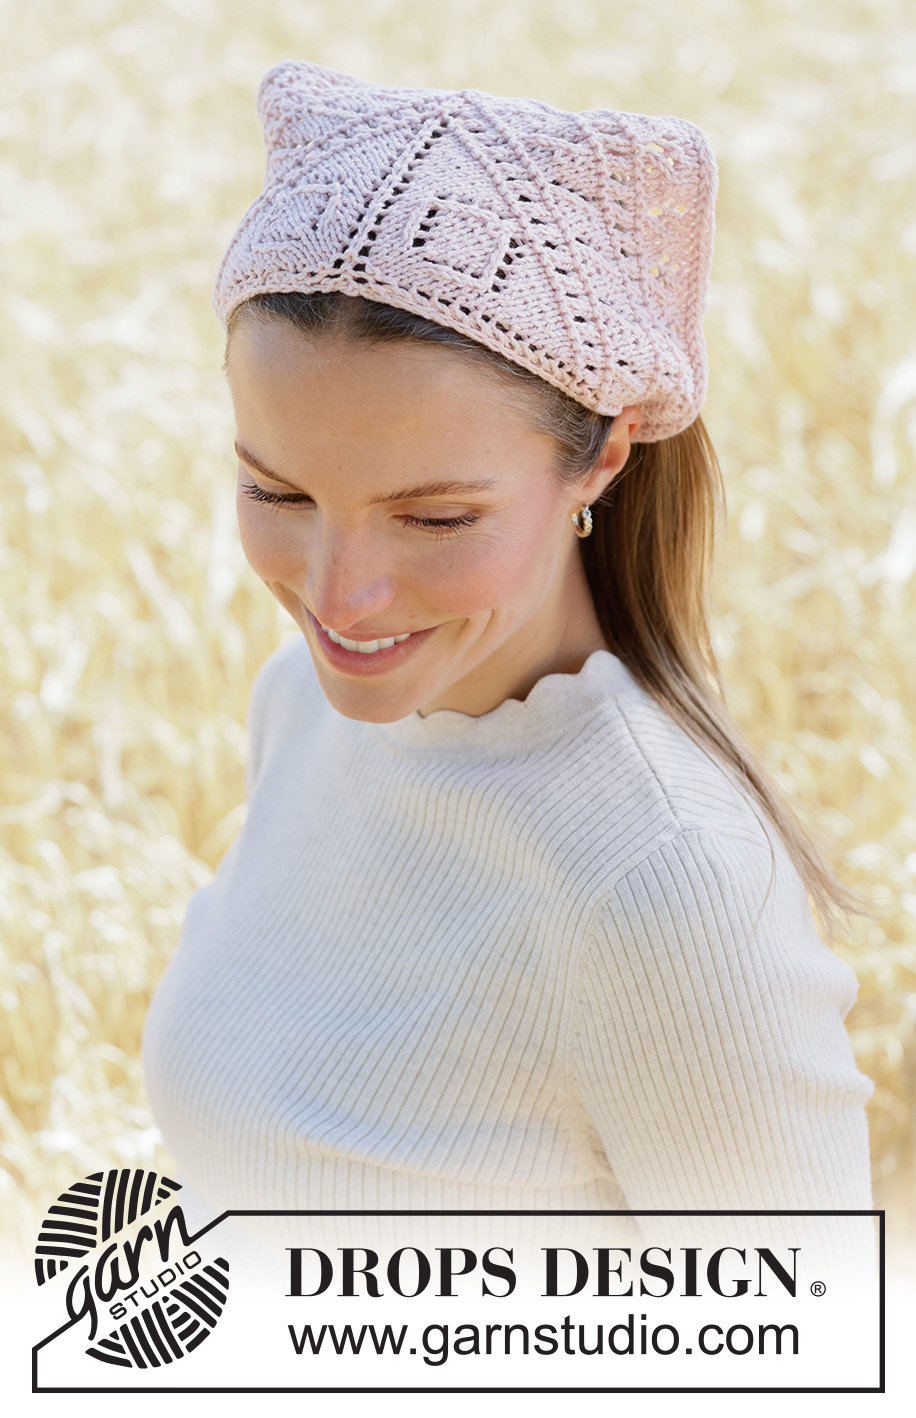
The Rosy Rhythm Bandana is a compact triangular knitted headscarf that combines a simple center-out construction with decorative chart work, carefully maintained edge stitches, and a distinctive I-cord cast-off. The project is worked back and forth from the middle outward, allowing the triangle to expand progressively until the final 121-stitch stage is reached.
This final guide takes a masterclass-style approach to the project. Instead of simply presenting the instructions as one continuous sequence, it explains how the different parts of the construction fit together, where the important checkpoints occur, how to read the charts, and how to finish the bandana with its braided cords. All technical details remain tied to the specified pattern.
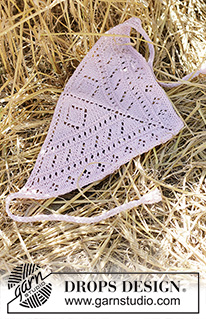
What Makes This Bandana Construction Special?
The Rosy Rhythm Bandana is built around a central mid-stitch. The work begins with only 7 stitches, increases through the first rows, then moves into a series of charted motifs. As the project becomes wider, the chart repeats expand around the marked center while the three edge stitches on each side continue to create the finished border.
Once the final chart section is complete, the piece reaches 121 stitches. The knitted triangle is then finished with an I-cord cast-off before the two braided cords are added to the ends of the long side.
The finished dimensions are approximately 46 cm along the long side and 23 cm in height when measured along the mid-stitch. The 46 cm measurement is stated without the cords.
Complete Materials and Measurements
- Pattern: Rosy Rhythm Bandana.
- Pattern collection: DROPS 265-5.
- Design: DROPS Design, pattern cm-161.
- Yarn group: B.
- Yarn: DROPS COTTON MERINO from Garnstudio.
- Yarn quantity: 50 g.
- Yarn color: Colour 05, Powder Pink.
- Needle: DROPS circular needle size 4 mm, length 60 cm.
- Finished length: 46 cm without cords.
- Finished height: 23 cm.
- Knitting tension: 21 stitches in width and 28 rows in height with stocking stitch on needle size 4 mm = 10 x 10 cm.
The pattern also includes diagrams A.1 through A.10. The diagrams show all rows in the pattern from the right side.
Gauge: The Measurement That Controls the Project
The specified knitting tension is 21 stitches in width and 28 rows in height with stocking stitch using a 4 mm needle, producing a 10 x 10 cm measurement.
Needle size is only a guide. If you have too many stitches per 10 cm, use a larger needle. If you have too few stitches per 10 cm, use a smaller needle.
This is particularly relevant to a triangular accessory because the final measurements depend on the relationship between stitch size, row height, and the number of stitches created during the increases. A different tension can change the dimensions even when every written row is followed correctly.
For that reason, gauge should be treated as the first technical checkpoint rather than an optional detail.
Two Foundation Techniques: Garter Stitch and the Three-Edge Stitch
Garter Stitch
Garter stitch is worked back and forth by knitting all rows from both the right side and the wrong side. One ridge in height consists of two knitted rows.
This technique appears within the edge construction and should be kept separate in your mind from the charted pattern itself.
The Three Edge Stitches with I-Cord Treatment
At the beginning of every row, slip 1 stitch purl-wise with the strand in front, knit 1, and work 1 garter stitch.
At the end of every row, work until 3 stitches remain. Work 1 garter stitch, slip 1 stitch purl-wise with the strand in front, and knit 1.
The same treatment is used on both the right side and wrong side.
These three stitches form the outer boundaries of the growing triangle. They should therefore be treated as a fixed construction element while the central pattern changes and expands.
The Seven-Stitch Starting Point
The headscarf is worked back and forth from the middle outward. Cast on 7 stitches using the 4 mm circular needle and DROPS Cotton Merino.
The first five rows create the initial center section before the main chart sequence begins.
Row 1 — Wrong Side
Work 3 edge stitches, knit 1, and work 3 edge stitches.
Row 2 — Right Side
Work 3 edge stitches, yarn over, knit 1, yarn over, and work 3 edge stitches.
There are now 9 stitches.
Row 3 — Wrong Side
Work 3 edge stitches, knit 3, and work 3 edge stitches.
Row 4 — Right Side
Work 3 edge stitches, yarn over, knit 1, yarn over, knit 1, yarn over, knit 1, yarn over, and work 3 edge stitches.
There are now 13 stitches.
Row 5 — Wrong Side
Work 3 edge stitches, knit 7, and work 3 edge stitches.
The opening section is now complete and the project is ready to move into the main chart pattern.
Chart Reading: Think in Sections Rather Than Individual Symbols
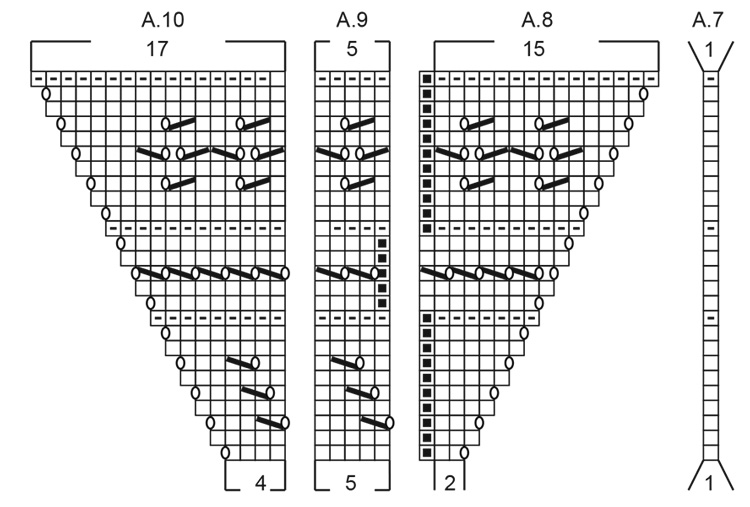
The main pattern consists of diagrams A.1 through A.10. The charts show all rows in the pattern from the right side. This means that chart reading should always be connected to the symbol explanations provided with the design.
The pattern symbols include the following actions:
- Knit from right side, purl from wrong side.
- Knit from wrong side.
- Knit 2 together.
- Slip 1 stitch, knit 1, pass slipped stitch over knitted stitch.
- Between 2 stitches make 1 yarn over.
- Slip 2 stitches as if to knit together, knit 1, pass slipped stitches over knitted stitch.
- No stitch: go straight to the next symbol.
Keeping these definitions unchanged is important because the charts combine increases and decreases to create the decorative pattern while the overall piece continues expanding.
Beginning the Main Pattern: A.1, A.2 and A.3
Continue with the pattern, beginning with a right-side row. Work 3 edge stitches, A.1, A.2 across 1 stitch, which is the mid-stitch, A.3, and 3 edge stitches.
At this point, insert 1 marker in the mid-stitch and let it follow onwards to make the pattern easier.
The center marker is one of the most useful organizational tools in the project. The bandana grows outward from this point, so the marker provides a stable reference while the number of stitches increases on both sides.
When working through the chart, avoid judging the position of the center by appearance alone. Keep the marker attached to the mid-stitch and allow it to move naturally as the knitting progresses.
The First Big Checkpoint: 69 Stitches
Continue through the diagrams according to the pattern. When the first chart section is finished, there are 69 stitches.
The 69-stitch count is a critical checkpoint because it confirms that the first section has been worked through its complete sequence before the construction moves into the larger chart arrangement.
If your count is different, do not compensate by adding or removing stitches without a pattern instruction. Instead, review the preceding rows and chart symbols, particularly the increases, decreases, and the central mid-stitch area.
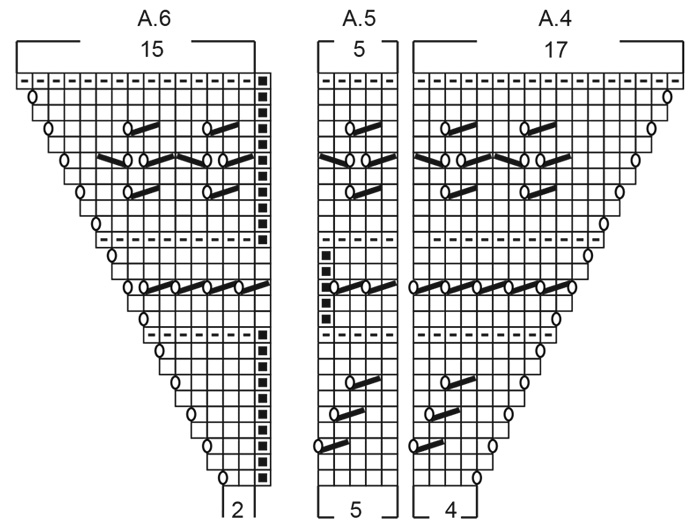
Second Chart Phase: Building the Wider Pattern
After reaching 69 stitches, continue the pattern beginning with a right-side row.
The second section is arranged as follows:
- 3 edge stitches.
- A.4 across 4 stitches.
- A.5 five times in width.
- A.6 across 2 stitches.
- A.7 across 1 stitch, which is the mid-stitch.
- A.8 across 2 stitches.
- A.9 five times in width.
- A.10 across 4 stitches.
- 3 edge stitches.
The exact repetition of A.5 and A.9 is important. A.5 is worked 5 times in width, while A.9 is also worked 5 times in width. The central A.7 section remains associated with the single marked mid-stitch.
Understanding the Symmetry of the Second Section
The second chart phase is easier to understand when viewed from the center outward. The mid-stitch is represented by A.7. Immediately around it are A.6 and A.8. Farther toward the sides are the repeated A.5 and A.9 motifs, while A.4 and A.10 occupy the outer chart positions before the three edge stitches.
This arrangement gives the growing triangle its organized visual rhythm. The center marker helps you distinguish the left and right pattern structures even as the total stitch count becomes much larger than it was at the beginning.
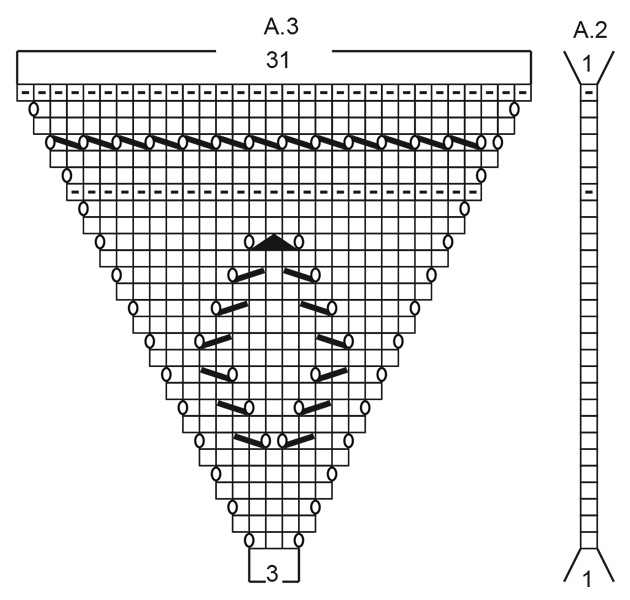
The Final 121-Stitch Checkpoint
Continue the second chart section until the diagrams are finished. At the end of this section there are 121 stitches, and the 121-stitch count occurs on the last row from the wrong side.
This is the final major stitch-count checkpoint before the finishing stage. If the count is correct, the piece is ready for the I-cord cast-off.
At this point, resist the temptation to judge the finished dimensions only by sight. The specified gauge and stitch count are the technical references that define the construction. The final piece should be approximately 46 cm along the long side and 23 cm measured along the mid-stitch.
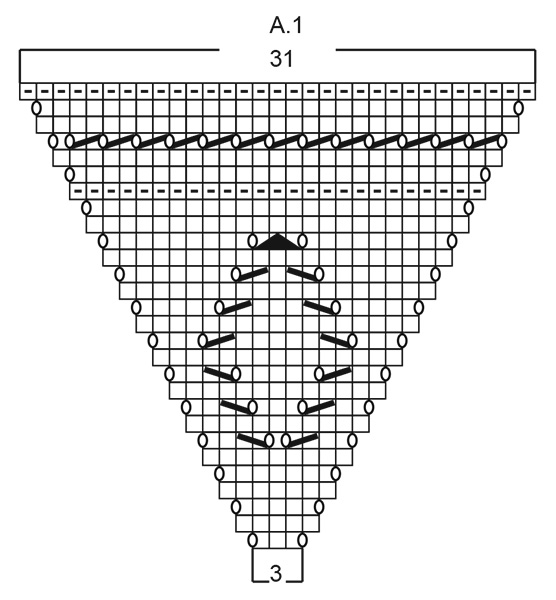
How to Know When the Chart Work Is Truly Finished
There are two important numerical landmarks in the pattern. The first occurs after the A.1, A.2 and A.3 section, when the piece has 69 stitches. The second occurs after the A.4 through A.10 section, when the piece has 121 stitches.
These checkpoints are useful because charted knitting can sometimes look visually complete before the required sequence is actually finished. Rather than stopping because the motif appears familiar, continue until the specified diagrams are complete and the stated stitch count is reached.
The final 121-stitch stage is also explicitly identified as the last row from the wrong side, which gives an additional orientation check before beginning the cast-off.
The I-Cord Cast-Off: A Controlled Tubular Finish
The I-cord cast-off is worked after the 121-stitch chart section is complete.
Start on the wrong side. When working the last row from the wrong side, cast on 2 stitches at the end and turn.
Right-Side Row
On Row 1 from the right side, knit 1, knit 2 twisted together, then slip the 2 stitches from the right needle onto the left needle. Do not turn. The strand tightens the piece into a small tube.
Repeat Row 1 until 2 stitches remain. Slip those 2 stitches to the left needle and cast off.
This technique creates the specified I-cord edge. It is therefore important not to substitute a standard cast-off for convenience, because the finishing method is part of the design.
Finishing the Triangle Before Adding the Cords
After the I-cord cast-off, cut and fasten the strand.
The knitted piece should now be approximately 46 cm along the long side and 23 cm measured along the mid-stitch. The scarf is triangular.
The cords are not included in the stated 46 cm long-side measurement. They are added separately to the two ends of that long side.
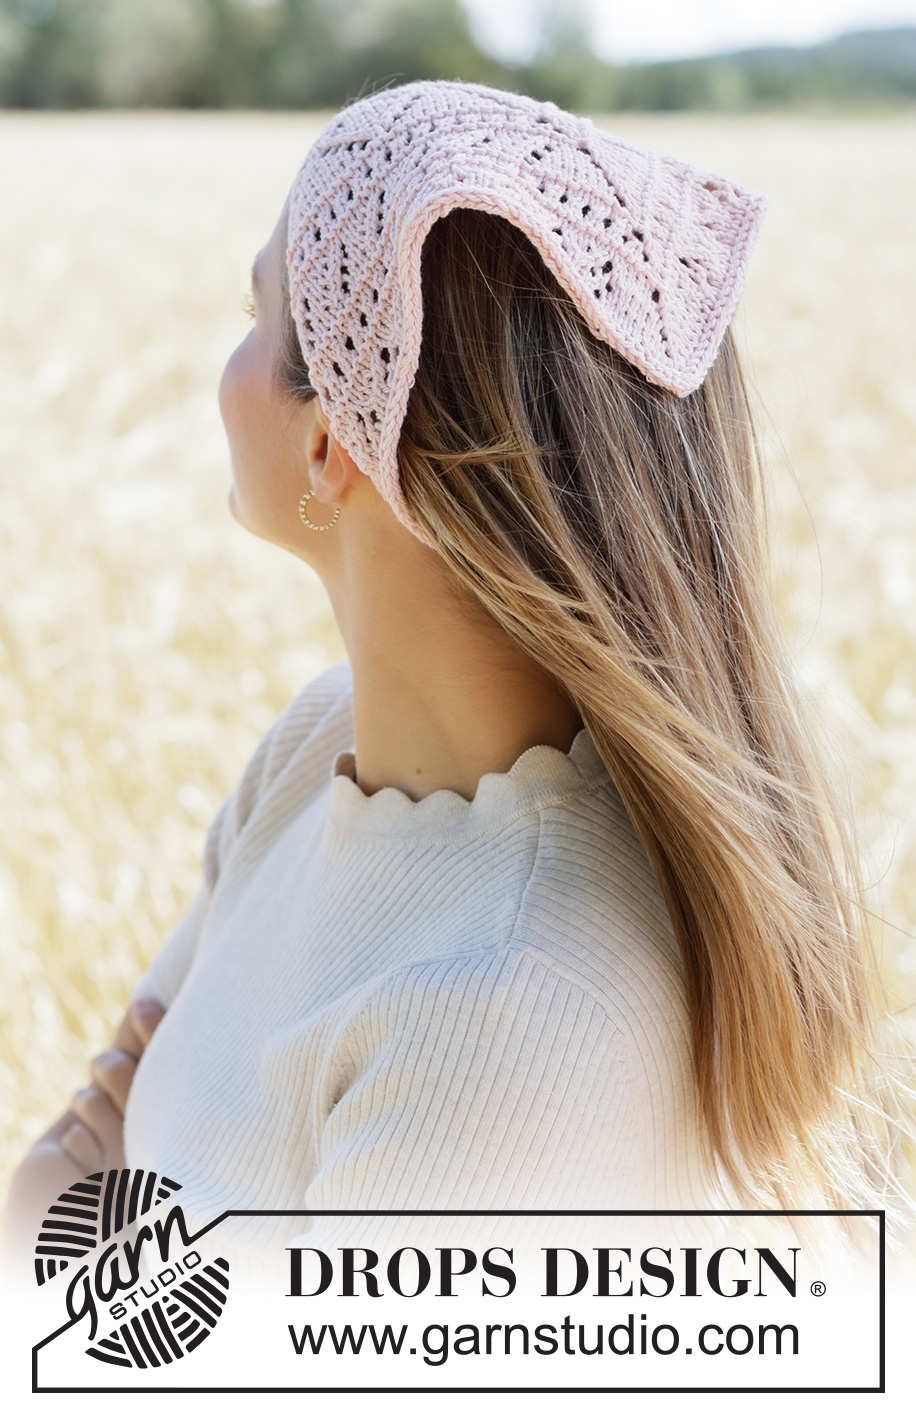
The Cord Construction: Six Strands Become Twelve
The cords are made using DROPS Cotton Merino. For each cord, cut 6 strands, each 80 cm long.
Thread the strands halfway through the piece at the outermost point at one end of the long side. Because each strand is folded through the fabric, the six strands produce 12 strands of equal length.
Next, divide the 12 strands into 3 bunches of 4 strands each.
Plait the three bunches until 3 cm remain. Then tie a strand around the plait and fasten it well.
This sequence is deliberately precise. The 80 cm strand length, the resulting 12 strands, the division into three groups of four, and the point at which only 3 cm remain are all part of the stated construction.
Repeat the Same Process at the Other End
Work the second cord at the other end of the long side.
Use another 6 strands of DROPS Cotton Merino, each 80 cm long. Thread them halfway through the piece, creating 12 equal-length strands. Divide them into 3 bunches of 4, plait until 3 cm remain, and tie a strand around the plait before fastening it well.
Keeping the two cords consistent gives the finished bandana a balanced appearance while retaining the original pattern specifications.
Beginner Masterclass: What to Check During Each Stage
Before Knitting
Confirm the yarn, color, quantity, needle size, and gauge. The specified materials are DROPS COTTON MERINO, 50 g, colour 05 Powder Pink, with a DROPS circular needle size 4 mm and length 60 cm.
During the Opening Rows
Use the stitch counts as checkpoints. Start with 7 stitches, reach 9 stitches after Row 2, and reach 13 stitches after Row 4.
During the First Chart
Keep the three edge stitches at both sides and place the marker in the mid-stitch when beginning the A.1, A.2 and A.3 section.
After the First Chart
Confirm 69 stitches before moving into the second pattern arrangement.
During the Second Chart
Keep the A.5 and A.9 repetitions exact. Each is worked 5 times in width. Maintain the center reference through A.7.
Before the Cast-Off
Confirm 121 stitches on the last row from the wrong side. Only then proceed to the I-cord cast-off.
During Cord Construction
Measure the strands carefully and keep the three groups of four strands separate while plaiting.
Troubleshooting Without Changing the Pattern
If the Gauge Is Off
Compare your knitting with the stated 21 stitches and 28 rows over 10 x 10 cm in stocking stitch. Too many stitches per 10 cm call for a larger needle, while too few stitches per 10 cm call for a smaller needle.
If the Edge Is Uneven
Review the three edge stitches at the beginning and end of each row. The same edge treatment is used from both sides of the fabric.
If the Center Becomes Hard to Find
Use the marker in the mid-stitch. It was specifically added after beginning the A.1, A.2 and A.3 pattern section to make the pattern easier to follow.
If the First Major Count Is Wrong
Check the first chart sequence before proceeding. The expected count after completing the first diagrams is 69 stitches.
If the Final Major Count Is Wrong
Check the second chart sequence, especially the five repetitions of A.5 and five repetitions of A.9, along with the center A.7 section. The expected final pattern count is 121 stitches.
If the Cords Look Different
Review the cord construction from the beginning. Each cord starts with 6 strands of 80 cm, becomes 12 equal-length strands after being threaded halfway through the fabric, and is divided into three groups of four before plaiting.
Final Technical Checklist
- Yarn: DROPS COTTON MERINO.
- Color: 05, Powder Pink.
- Quantity: 50 g.
- Needle: 4 mm circular needle, 60 cm.
- Gauge: 21 stitches and 28 rows = 10 x 10 cm in stocking stitch.
- Starting stitch count: 7 stitches.
- After Row 2: 9 stitches.
- After Row 4: 13 stitches.
- First pattern: A.1, A.2 and A.3.
- Center: 1 marker in the mid-stitch.
- First chart checkpoint: 69 stitches.
- Second pattern: A.4 through A.10.
- A.5: 5 times in width.
- A.9: 5 times in width.
- Final pattern checkpoint: 121 stitches.
- Cast-off: I-cord cast-off.
- Finished knitted size: approximately 46 cm along the long side and 23 cm along the mid-stitch.
- Cords: 6 strands of 80 cm for each cord.
- After threading: 12 equal-length strands.
- Plait: 3 bunches of 4 strands.
- Plait endpoint: 3 cm remaining.
Final Thoughts on the Rosy Rhythm Construction
The Rosy Rhythm Bandana is a good example of how a relatively small knitted accessory can contain several layers of technique. The project begins with a straightforward seven-stitch foundation, but the center-out construction quickly introduces increases, chart reading, a marked mid-stitch, repeated motifs, stitch-count checkpoints, and a specialized I-cord finish.
The most reliable way to approach it is to work systematically. First establish the gauge and understand the three-stitch edge. Then complete the five foundation rows and verify the early stitch counts. Move into A.1, A.2 and A.3 while keeping the mid-stitch marked, and stop at the 69-stitch checkpoint before starting the wider A.4 through A.10 section.
The second chart phase is where the growing triangle becomes more substantial. The five repeats of A.5 and the five repeats of A.9 should remain exactly as specified, while A.7 continues to occupy the single mid-stitch. When the diagrams are complete and the piece has reached 121 stitches on the last row from the wrong side, the knitted body is ready for its I-cord cast-off.
The final cords complete the practical construction. Six 80 cm strands become 12 equal-length strands at each end, those strands are divided into three groups of four, and the groups are plaited until 3 cm remain. A strand is then tied around the plait and fastened well, and the same process is repeated at the opposite end.
With those stages completed, the result is the specified triangular Powder Pink Rosy Rhythm Bandana, approximately 46 cm along the long side without cords and 23 cm measured along the mid-stitch. The finished appearance comes from maintaining the relationship between the edge stitches, center marker, chart sequence, stitch counts, gauge, I-cord cast-off, and braided cords from beginning to end.