

No Bake Berry Cheesecake
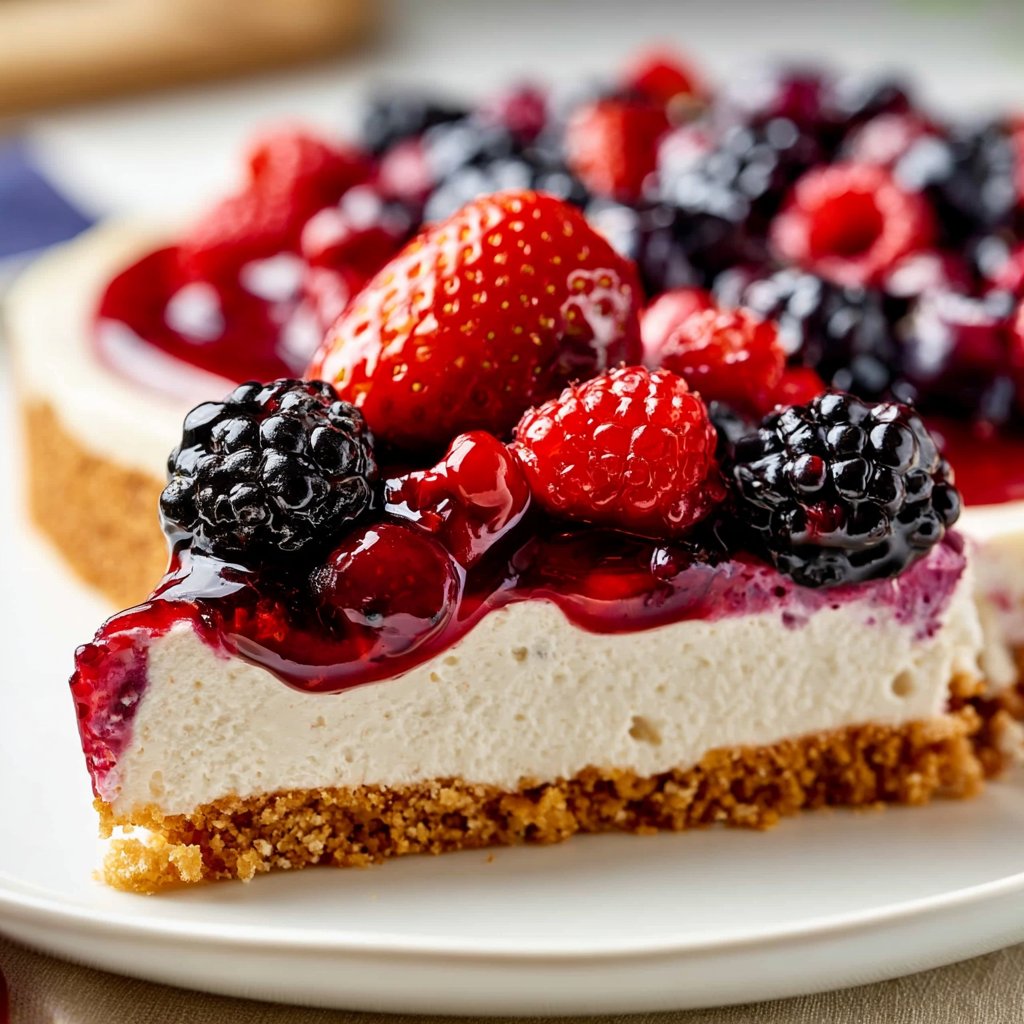
There’s something magical about a no-bake cheesecake, especially one loaded with fresh berries. This No Bake Berry Cheesecake is creamy, light, and bursting with flavor. The smooth cream cheese filling pairs beautifully with the bright notes of mixed berries, creating a delightful dessert that feels indulgent yet refreshing. It’s perfect for those warm summer days or any festive gathering where you want something sweet but not too heavy.
This cheesecake’s texture is creamy and velvety, thanks to the luscious cream cheese and sour cream mixture. The crust adds a satisfying crunch that balances the creaminess. Since it’s a no-bake recipe, it’s incredibly easy to prepare and is a great option when you’re pressed for time but still want to impress your family and guests. Serve it as a light dessert after dinner or even at brunch paired with coffee or tea.
Nutrition & Recipe Details
| Item | Value |
|---|---|
| Prep time | 20 minutes |
| Cook time | 0 minutes |
| Store time | 4 hours |
| Calories | 250 per slice |
| Protein | 4g |
| Carbohydrates | 30g |
| Fat | 12g |
How to make No Bake Berry Cheesecake
Ingredients
| Ingredient | Quantity |
|---|---|
| Graham Crackers | 1 ½ cups |
| Butter | ½ cup (melted) |
| Cream Cheese | 16 ounces (softened) |
| Sour Cream | ½ cup |
| Sugar | ¾ cup |
| Vanilla Extract | 1 teaspoon |
| Mixed Berries | 2 cups (fresh) |
Step-by-Step Instructions
- Crush the Graham Crackers and mix with melted butter to form the crust. Press it into the bottom of a springform pan.
- In a bowl, beat the cream cheese until smooth. Add sugar, sour cream, and vanilla extract, mixing until well combined.
- Spread the cream cheese mixture over the crust.
- Top with mixed berries.
- Refrigerate for several hours or until set.
- Serve chilled.
Pro Tips
| Tip | Description |
|---|---|
| Use room temperature cream cheese | This helps in achieving a smoother filling without lumps. |
| Choose fresh berries | Fresh berries provide the best flavor and texture. Look for vibrant, firm, and unblemished options. |
| Chill overnight | For the best results, let the cheesecake set overnight in the fridge. |
Why You’ll Love This Recipe
The flavor profile of this No Bake Berry Cheesecake is simply irresistible. The creamy and tangy filling contrasts perfectly with the sweet and tart berries on top. This dessert can be versatile, fitting into various diets. Whether you’re trying to impress guests or treat your family, it’s a crowd-pleaser that won’t break the bank or require extensive cooking skills.
Moreover, it’s a dream come true for anyone looking for a lighter dessert. Since it’s no-bake, you can whip this up quickly, making it a fantastic choice for impromptu gatherings or summer parties. Plus, it’s also a great way to incorporate more fresh fruit into your diet, making it feel a bit healthier while still satisfying your sweet tooth.
How to serve No Bake Berry Cheesecake
Present your cheesecake with a sprinkle of fresh mint leaves on top for a pop of color. Consider adding a dusting of powdered sugar around the edge for an elegant touch. Slice it into even pieces using a warm knife for clean cuts.
Serve it alongside a cup of coffee or tea, or pair it with a light sparkling water. For those who enjoy a dessert spread, consider adding some whipped cream or a side of fruit compote for guests to enhance their personal slice.
How to store No Bake Berry Cheesecake
You can store your cheesecake in the refrigerator for up to 3–5 days. Cover it tightly with plastic wrap or aluminum foil to prevent it from absorbing other odors. If you want to save it for longer, you can freeze it for up to 2–3 months. Just be sure to wrap it well to avoid freezer burn.
When you’re ready to enjoy, let it thaw in the refrigerator for several hours before serving for the best texture.
Tips to make No Bake Berry Cheesecake
Make sure to double-check that your ingredients are at room temperature before starting. This ensures a smoother filling that won’t have any lumps. If you like a sweeter cheesecake, feel free to adjust the sugar level slightly up or down based on your personal preference.
Be careful not to over-mix the cream cheese mixture after adding the sugar, as this can lead to a denser texture. A gentle mix until combined is all you need.
Variation
You can easily adapt this recipe to fit different dietary needs. For a gluten-free version, use gluten-free graham crackers as the base. You can also substitute the cream cheese with a dairy-free alternative, like cashew or almond cream cheese, making it vegan-friendly.
If you want a lighter version, consider using Greek yogurt instead of sour cream; it will still maintain a creamy richness without as many calories.
Storage and Reheating
If you have leftovers, store them in the refrigerator as directed. This cheesecake does not need to be reheated, as it’s best served chilled. If you’ve frozen a portion, simply move it to the fridge to thaw overnight.
Customization Ideas
Adjust the flavor by adding a bit of lemon zest or almond extract to the cream cheese mixture for a twist. You can also experiment with different fruit toppings like peaches or mango for a bit of variety.
If you want a crunchy topping, consider crushing some nuts or using granola on top for added texture.
Common Mistakes to Avoid
- Using cold cream cheese: This can lead to a lumpy filling; ensure it’s softened before mixing.
- Overmixing the filling: This can create an overly dense texture. Mix just until smooth.
- Not chilling long enough: If you don’t let it set properly, it can be runny when served.
- Not using a springform pan: This makes it difficult to remove the cheesecake cleanly. The springform pan helps hold everything together.
- Skipping the crust prep: Properly pressing the crust into the pan ensures it holds its shape and texture once set.
Serving Occasions
This cheesecake is perfect for any occasion. It’s a fantastic dessert for family dinners, holidays, or summer barbecues. Whether you’re celebrating a birthday or enjoying a quiet moment at home, having a slice of this cheesecake can make any moment feel special.
Why make this recipe
Making a No Bake Berry Cheesecake stands out because it’s both easy and impressive. The combination of flavors and textures creates a dessert that feels more luxurious than its short prep time might suggest. Plus, playing with fresh berries makes it seasonal and vibrant. It’s an excellent way to showcase fresh produce while keeping the process simple and fun.
FAQs
Q1: How long can I keep the no bake cheesecake?
A: You can store it in the refrigerator for up to 5 days. If frozen, it can last for 2-3 months, but always thaw in the fridge.
Q2: Can I use frozen berries?
A: Yes, frozen berries can be used, though fresh berries provide a firmer texture and better flavor. If using frozen, thaw them and pat them dry to avoid excess moisture.
Q3: Is it necessary to use a springform pan?
A: While a springform pan is ideal for easier removal, you can also use a regular pie dish; just slice carefully.
Q4: How can I make it sweeter?
A: To increase sweetness, simply add a bit more sugar to the cream cheese mixture, or top it with a sweetened fruit compote.
Q5: Can I make this cheesecake vegan?
A: Absolutely! Substitute non-dairy cream cheese and sour cream, and ensure you use vegan graham crackers.
Disclaimer
Nutrition information is approximate and will vary based on the specific ingredients used. Always check labels for more accurate data.
Print
No Bake Berry Cheesecake
- Total Time: 240 minutes
- Yield: 8 servings
- Diet: Vegetarian
Description
A creamy, light no-bake cheesecake topped with fresh mixed berries, perfect for any gathering.
Ingredients
- 1 ½ cups Graham Crackers
- ½ cup Butter (melted)
- 16 ounces Cream Cheese (softened)
- ½ cup Sour Cream
- ¾ cup Sugar
- 1 teaspoon Vanilla Extract
- 2 cups Mixed Berries (fresh)
Instructions
- Crush the Graham Crackers and mix with melted butter to form the crust. Press it into the bottom of a springform pan.
- Beat the cream cheese until smooth. Add sugar, sour cream, and vanilla extract, mixing until well combined.
- Spread the cream cheese mixture over the crust.
- Top with mixed berries.
- Refrigerate for several hours or until set.
- Serve chilled.
Notes
Use room temperature ingredients for a smoother filling, and chill overnight for the best results.
- Prep Time: 20 minutes
- Cook Time: 0 minutes
- Category: Dessert
- Method: Refrigerating
- Cuisine: American