
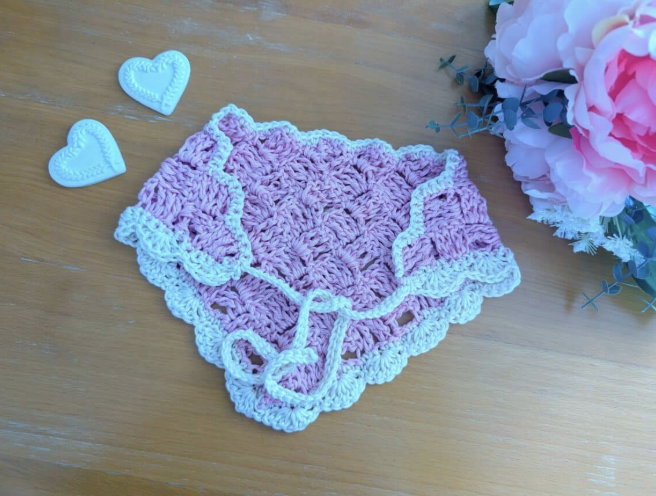

A small handmade accessory can completely change the feeling of an outfit, and this Crochet Delicate Bandana is designed with exactly that kind of understated charm in mind. The finished piece combines a soft Desert Rose body with an Off White decorative border, creating a romantic accessory that can be worn in several different ways.
The construction is based on Treble C2C, or corner-to-corner crochet. This technique creates connected square units and gives the fabric an attractive diagonal texture. The treble stitches also contribute to the light, airy quality of the finished bandana.
Once the C2C body is complete, the design changes character with a Shell Stitch Edging. The border introduces rounded scallops along the V-shaped sides, while two long crocheted ties are incorporated into the first border round. Together, these details give the project its distinctive feminine finish.
What Makes This Bandana Special?
This is more than a simple triangular crochet accessory. Its visual appeal comes from the combination of several small design details working together. The C2C construction creates the textured central fabric, the two-color palette creates gentle contrast, and the shell edging frames the lower portion with decorative curves.
The color combination is particularly soft. Desert Rose provides the main color, while Off White is reserved for the border and ties. The result has a romantic, timeless quality that works especially well with spring and cottage-inspired styling.

The bandana can be tied under the chin for a vintage-inspired look, worn over the hair as a headscarf, styled around a bun or ponytail, or even worn as a lightweight neck accessory. This versatility makes the finished piece useful as well as decorative.
Pattern Specifications at a Glance
Before starting, it is useful to have the main specifications together in one place. This project is classified as easy/beginner and uses US crochet terms, with British terminology supplied in brackets.
- Skill level: Easy/beginner
- Yarn for body: Drops Muskat in Desert Rose
- Yarn for border: Drops Muskat in Off White
- Alternative yarn: 100% mercerized cotton in a light 3/DK weight
- Hook size: 4.5 mm crochet hook
- Gauge: 4 inches (10 cm) x 4 inches (10 cm): 4 “clusters” of C2C pattern
- Finished size: 7.7 inches (19 cm) x 16 inches (40.5 cm)
For the project, you will also need a pair of scissors and a tapestry needle. The pattern calls for 1 skein of Drops Muskat in Desert Rose and 1 skein of Drops Muskat in Off White, or the stated alternative of 100% mercerized cotton yarn in a light 3/DK weight.
Understanding the Yarn and Color Plan
The first part of the project is worked entirely in Desert Rose. This color forms the main body and remains the dominant shade of the finished bandana.
After the C2C body is completed, the Desert Rose yarn is fastened off. Off White is then attached at the stitch where the yarn was fastened off. This second shade is used for the border and the two ties.
Keeping the two stages clearly separated is useful when organizing your work. The first phase is about building the textured C2C fabric, while the second phase concentrates on shaping the outside edge and adding the decorative shell pattern.
Tools and Materials Checklist
- 1 skein Drops Muskat in Desert Rose
- 1 skein Drops Muskat in Off White
- 4.5 mm crochet hook
- Scissors
- Tapestry needle
If you choose a substitute yarn, the source specifies a 100% mercerized cotton yarn in a light 3/DK weight. Keeping the substitute within the stated yarn description helps retain the intended lightweight character of the accessory.
Crochet Abbreviations Used in the Pattern
The following abbreviations are used throughout the instructions. The original pattern uses US terminology, with British equivalents in brackets.
- Ch: chain
- St: stitch
- Sl st: slip stitch
- SC: Single Crochet (UK Double Crochet)
- TC: Treble crochet (UK Double Treble Crochet)
- DC: Double Crochet (UK Treble Crochet)
- EOR: End of Round/end of row
Starting the C2C Bandana
Begin with shade Desert Rose. Make a slip knot before starting the first chain sequence.
The main body is created from connected C2C squares. The early rows establish the first square units, and the following rows continue building the diagonal fabric.
Row 1
Chain 7. Place a TC in the 5th chain from the hook and in each stitch along. The completed row contains 4 TC.
This first row establishes the foundation for the C2C construction. Take care with the chain count because the following rows build from this starting structure.
Row 2
Chain 7 and turn the work. Place a TC in the 5th chain from the hook and in each stitch along, giving 4 TC.
Turn the work and slip stitch in between the 3rd and 4th TC from the previous row. Chain 4, which counts as a TC throughout the pattern, and add 3 TC in between the 3rd and 4th TC from the previous row to form a square.
At this stage, it can be helpful to pause and identify the first completed C2C square visually. Understanding where each new square is attached makes the later rows much easier to follow.
Row 3
Chain 7 and turn your work. Place a TC in the 5th chain from the hook and a TC in each stitch along, creating 4 TC.
Slip stitch to the previous square in between the 3rd and 4th TC. Chain 4, which counts as a TC, and add 3 TC in that space. Slip stitch to the previous square in between the 3rd and 4th TC.
Then chain 4, which counts as a TC, and add 3 TC in that space. Slip stitch to the previous square in between the 3rd and 4th TC.
Reading the C2C Structure
The most useful way to understand these rows is to think in terms of squares rather than a conventional straight-row crochet fabric. Each square is created with the chain-4-and-3-TC combination, while slip stitches connect the new square to the existing work.
As the piece grows, these squares create the diagonal texture characteristic of corner-to-corner crochet. The fabric is therefore easy to recognize once several rows have been completed.
For a beginner, the repeated movements can initially feel unfamiliar. Instead of trying to memorize the entire sequence, concentrate on the current square and locate the space where the next square must be attached.

Rows 4 Through 11
Rows 4-11 continue the same construction. Repeat row 3, adding the required number of squares as you go along.
The original instructions specifically group rows 4-11 together as a repeat of row 3. Do not introduce additional rows or alter the sequence. The growth of the bandana is created by continuing the stated C2C construction through row 11.
As the body becomes larger, the diagonal texture becomes more obvious. This is a good point to check your tension and make sure the squares remain reasonably consistent in appearance.
Once row 11 is complete, fasten off the Desert Rose yarn.
How to Check Your C2C Work
There are several simple visual checkpoints that can help you stay oriented while working the main body.
- Make sure the initial foundation has the specified chain count.
- Confirm that Row 1 contains 4 TC.
- Check the square created in Row 2 before moving forward.
- In Row 3, make sure each new square is connected to the previous square with the specified slip stitch.
- Continue the Row 3 repeat for Rows 4-11.
- Keep the overall fabric relaxed enough to retain its airy character.
These checkpoints do not change the pattern. They simply make it easier to notice a construction problem early, before many additional squares have been added.
Beginning the Off White Border
After fastening off the Desert Rose yarn, attach the Off White yarn to the project in the stitch where you fastened off.
The border has a carefully defined path. Round 1 covers three sides of the project. It starts along the straight edge, then introduces the first tie at the first corner. After the tie is anchored, the crochet continues along the V side. The second tie is created at the opposite corner before the round is completed.
Understanding this route before picking up the hook can prevent confusion. The border is not simply worked continuously around every edge in the same manner. The ties are deliberately incorporated at the corners, and Round 2 is restricted to the V sides.
Round 1: Working the Straight Edge
Begin Round 1 with Ch 1, which counts as a SC.
Place a SC all across the “straight” edge of the border. The original instructions do not specify a fixed number of SCs for this section.
Instead, the important requirement is that the SCs need to be a multiple of 5. Keep this requirement in mind as you work across the bandana because it prepares the edge for the shell sequence used in Round 2.
Making the First Tie
Once you reach the first corner, create the first tie.
Chain 45. Then slip stitch into the second chain and continue slip stitching until the end of the chain. After reaching the end, slip stitch into the project to anchor the tie to the bandana.
This method creates a flexible crocheted tie directly from the corner. There is no separate tie piece to make or sew onto the project.
When the tie has been anchored, continue with the SC border across the V side of the bandana.
Continuing Around the V Side
After completing the first tie, continue placing SCs across the V side.
Work carefully along this edge, maintaining an even appearance. The exact number of SCs is not predetermined by the original instructions, but remember that the stitch count needs to be a multiple of 5.
As you approach the other corner, prepare to create the second tie.

Making the Second Tie
At the other corner, create the second tie using the same instructions as the first.
Chain 45, slip stitch through the second chain and each chain across, and then slip stitch the tie to anchor it down.
Using the same chain length and construction for both ties keeps the two ends consistent. The symmetry is especially important because these ties are responsible for securing the bandana when it is worn.
Round 2: The Decorative Shell Stitch Border
Round 2 is worked only along the two V sides of the bandana.
Begin with Ch 1. This chain does not count as a stitch.
Place a SC into the first stitch. Skip 2 stitches, then place 5 DC into the next stitch. Skip 2 stitches again, then place a SC into the next stitch.
Continue this sequence until EOR.
The repeated groups of 5 DC create the shell effect. As the round progresses, these groups form the soft scalloped edge that frames the lower portion of the bandana.
Round 2 Stitch Rhythm
- Ch 1; it does not count as a stitch.
- SC into the first stitch.
- Skip 2 stitches.
- Place 5 DC into the next stitch.
- Skip 2 stitches.
- SC into the next stitch.
- Repeat until EOR.
Once Round 2 is complete, fasten off the yarn and tidy all loose ends.
Why the Shell Stitch Is So Effective Here
The shell border gives the bandana a very different visual quality from the C2C body. The main fabric is built from angular square units, while the shells create rounded, fan-like groups of stitches.
This contrast is what makes the finished accessory feel delicate rather than overly geometric. The Off White yarn further emphasizes the border, making the scallops easy to see against the Desert Rose body.

Tips for Keeping the Border Even
The border is one of the most visible parts of the finished project, so consistent tension is helpful.
When working SCs across the edges, try to maintain a steady rhythm rather than creating very tight stitches in some areas and loose stitches in others. An even edge will make the shell sequence easier to maintain.
When you reach each corner, pause before beginning the tie. Make sure the tie is anchored securely after the chain has been worked back with slip stitches.
For Round 2, focus on the repeating stitch rhythm. The shell section depends on the sequence of skipping 2 stitches, placing 5 DC into the next stitch, skipping 2, and then placing a SC into the next stitch.
Gauge and Finished Measurements
The stated gauge for the project is 4 inches (10 cm) x 4 inches (10 cm), with 4 “clusters” of the C2C pattern.
The finished bandana measures 7.7 inches (19 cm) x 16 inches (40.5 cm).
These measurements are useful reference points while working. They help you understand the intended scale of the finished accessory and provide a way to compare your progress with the original pattern specifications.
Ways to Wear the Finished Bandana
The shape of this project makes it especially flexible when it comes to styling. Its ties allow it to function naturally as a head accessory, while the lightweight crochet fabric also makes it suitable for other uses.
Classic Under-the-Chin Style
Tie the bandana underneath the chin for a vintage-inspired appearance. This styling emphasizes the triangular shape and gives the accessory a traditional headscarf feeling.
Headscarf Style
Place the bandana over the hair and use the ties to secure it. The soft Desert Rose and Off White combination works particularly well with romantic or cottage-inspired outfits.
Hair Accessory
Use the bandana around a bun or ponytail for another way to incorporate it into a hairstyle. The crocheted texture adds a handmade detail without requiring a separate decorative accessory.
Neck Accessory
The lightweight texture also allows the piece to be styled as a delicate neck accessory. This offers another way to use the finished crochet piece beyond traditional headwear.

Beginner Troubleshooting Guide
My C2C Squares Do Not Look Even
Check your tension and make sure the chain and treble stitches are being worked consistently. Pay particular attention to the slip-stitch joins between the squares.
I Am Unsure Where to Add the Next Square
Look for the space between the 3rd and 4th TC of the previous square, as specified throughout the C2C instructions. The slip-stitch connection helps identify the correct location for the next square.
My Shell Border Does Not Line Up
Check the stitch-count requirement. The original pattern states that the SCs need to be a multiple of 5. Also review the Round 2 sequence carefully: SC, skip 2, 5 DC, skip 2, SC.
My Two Ties Look Different
Make sure both ties begin with Chain 45 and are worked back with slip stitches starting in the second chain. Using the same construction for both ties will help them match.
The Border Looks Too Tight
Review your tension while placing the SCs around the edges. The goal is to maintain an even border rather than pulling each stitch excessively tight.
Finishing Checklist
- Confirm that Rows 1-11 of the Desert Rose C2C section are complete.
- Fasten off the Desert Rose yarn.
- Attach Off White at the specified stitch.
- Complete the SCs across the straight edge.
- Create the first Chain 45 tie.
- Anchor the first tie to the bandana.
- Continue across the V side.
- Create the second Chain 45 tie.
- Anchor the second tie.
- Check that the SC count is a multiple of 5.
- Work Round 2 only across the two V sides.
- Repeat the shell sequence until EOR.
- Fasten off.
- Tidy all loose ends with the tapestry needle.
Complete Pattern Summary
For a quick reminder, the project begins with Desert Rose yarn and a slip knot. Row 1 starts with Chain 7 and 4 TC. Row 2 introduces the first square, while Row 3 establishes the repeating C2C square construction.
Rows 4-11 repeat Row 3, adding the required number of squares as the bandana grows. The Desert Rose yarn is then fastened off.
Off White yarn is attached at the fastened-off stitch for the border. Round 1 begins with Ch 1, which counts as a SC, and SCs are worked across the straight edge. At the first corner, Chain 45 is used to create the first tie, which is worked back with slip stitches and anchored to the bandana.
The SC border then continues across the V side. At the opposite corner, the second Chain 45 tie is made using the same method.
Round 2 is worked only along the two V sides. It begins with Ch 1, which does not count as a stitch, followed by the repeating sequence of SC, skip 2, 5 DC in the next stitch, skip 2, and SC in the next stitch. After reaching EOR, fasten off and tidy all loose ends.
Final Thoughts
This Crochet Delicate Bandana is a charming project for anyone who enjoys combining texture, soft colors, and decorative crochet details. The pattern demonstrates how Treble C2C can create an airy main fabric while a simple shell stitch can transform the edge into a feminine decorative feature.
The project also offers a satisfying progression for beginners. The C2C section teaches how individual squares connect and grow, while the border introduces single crochet edging, long crocheted ties, and a repeating shell sequence.
Its finished dimensions of 7.7 inches (19 cm) by 16 inches (40.5 cm) make it a compact accessory, while the Chain 45 ties provide a practical way to secure it when worn. The Desert Rose and Off White palette gives the completed piece a gentle romantic character, but the construction itself remains the defining feature.
Whether worn beneath the chin, over the hair, around a bun or ponytail, or as a delicate neck accessory, the finished bandana brings handmade texture into everyday styling. It is a small project with plenty of visual character, and the combination of C2C squares and shell edging makes every part of the construction meaningful.
Follow the specified stitch counts, row numbers, colors, hook size, gauge, measurements, tie length, and border sequence carefully, and allow the texture of the crochet to develop naturally as the piece grows. With its simple construction and elegant finish, this delicate bandana is a beautiful way to create a wearable handmade accessory.