
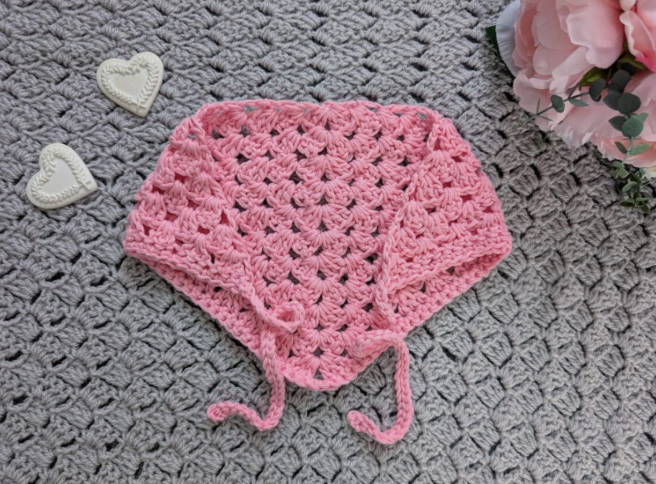

If you are looking for a crochet accessory that is quick to make, easy to style, and suitable for different seasons, this Crochet Rose Button Bandana is a lovely project to add to your handmade collection. The design combines the classic simplicity of a granny triangle with a feminine, slightly boho-inspired look, creating a practical accessory that can be worn in many different ways.
This beginner-friendly crochet bandana uses aran or medium 4 yarn and a 5.5 mm crochet hook. The main fabric is worked as a simple granny triangle, so the construction is particularly approachable if you are comfortable with chain stitches, double crochet stitches, and working into chain spaces. The finished bandana measures approximately 8.5 x 18 inches (22 x 46 cm), excluding the ties on either side.
The original design uses Drops Paris in shade 20 (pink), giving the accessory its romantic rose-inspired appearance. However, the same pattern can be crocheted in different colors, making it easy to adapt the look to your own wardrobe or to create handmade gifts for friends and family.
Why This Crochet Bandana Is a Great Beginner Project
One of the most appealing things about this project is its straightforward construction. Rather than relying on complicated stitch combinations, the triangular body is built row by row using a repeating granny-style pattern. Each new row increases the number of granny clusters while maintaining the recognizable triangular shape.
That simplicity also makes the project relatively fast. Aran or medium 4 yarn combined with a 5.5 mm hook produces a fabric that grows quickly, so you can see the shape developing after only a few rows. This makes the bandana an excellent choice for a short crochet session when you want to complete something useful without committing to a large project.
The finished accessory has an elegant feminine character, while the granny triangle construction gives it a relaxed handmade quality. It can therefore fit naturally into casual, summer, cottagecore, and boho-inspired outfits.
Project Overview
The Rose Button Bandana consists of one triangular crocheted section followed by a simple single crochet edging and two long ties. The central triangle is created first. The pattern begins with a small chain ring and gradually increases across 11 rows.
After Row 11, the yarn remains attached. The first 35-chain tie is then created directly from the side of the bandana. Once that tie has been secured, a single crochet edging is worked around the V-shaped section. The second 35-chain tie is then created in the same way on the opposite side.
This construction means there is no complicated joining process. The ties are made directly from the completed bandana, keeping the finished accessory simple and streamlined.
Materials You Will Need
- 2 skeins of Drops Paris in shade 20 (pink)
- A 5.5 mm crochet hook
- A pair of scissors
- A tapestry needle
The original pattern uses Drops Paris, an aran/medium 4, 100% cotton yarn. Cotton is particularly suitable for an accessory such as this because it produces a comfortable crocheted fabric and works well with the simple granny triangle construction.
The original design uses pink, which complements the feminine character of the bandana. If you decide to make another version, the pattern can be worked in different colors while retaining the same construction and stitch instructions.
Finished Size and Gauge
Before beginning, it is useful to keep the stated gauge and finished measurements in mind. The gauge for this design is:
4 inches (10 cm): 5 rows of Granny Triangle pattern
The finished bandana measures:
8.5 x 18 inches (22 x 46 cm), excluding the ties on each side.
These measurements refer specifically to the finished bandana body and do not include the two 35-chain ties. Keeping the stated gauge in mind can help you understand how your work is progressing without changing the original pattern instructions.
Crochet Terms Used in the Pattern
The pattern uses US crochet terms, with British terms provided in brackets. This is important because stitch terminology differs between US and UK crochet patterns.
- Ch: chain
- St: stitch
- Sl st: slip stitch
- Sp: space
- SC: Single Crochet (UK Double Crochet)
- DC: Double Crochet (UK Treble Crochet)
- EOR: End of row
If you normally crochet using UK terminology, pay particular attention to the distinction between SC and DC. Following the terminology stated in the original pattern will help keep the instructions consistent.
Starting the Granny Triangle
To begin, make a slip knot. Then chain 4 and slip stitch through the first chain to form a ring.
The first row establishes the center of the triangle. Chain 4, which counts as a Double Crochet plus a chain space. Work 3 Double Crochet stitches into the circle, then chain 1 and work 1 Double Crochet into the circle.
At this stage, the project is very small, so it can be useful to make sure the center ring is clearly visible before moving forward. The chain spaces created in the early rows become important because the following granny clusters are worked into these spaces.
Building the Triangle Row by Row
The main body follows a consistent rhythm. Each row begins with chain 4, which represents 1 Double Crochet plus a chain space. The work is turned, and granny-style groups of 3 Double Crochet are placed into the next spaces. Chain-1 spaces separate the groups.
This repeated structure makes the pattern easy to recognize as it grows. Rather than memorizing every row individually, you can use the increasing number of granny clusters as a visual checkpoint while still following the exact row instructions.
Rows 1–4
Row 1: Chain 4 (= DC + chain space), work 3 DC in the circle; chain 1, then work 1 DC in the circle.
Row 2: Chain 4 (= 1 DC + chain space), turn your work; place 3 DC inside the next space; chain 1, 3 DC, chain 1, then 1 DC in the next and last space.
Row 3: Chain 4 (= 1 DC + chain space), turn your work; place 3 DC in the next space; chain 1, 3 DC in the next space; chain 1, 3 DC, chain 1, then 1 DC in the next and last space.
Row 4: Chain 4 (= 1 DC + chain 1 space), turn your work; place 3 DC in the next space; repeat [chain 1, 3 DC in the next space] 2 times; chain 1, 3 DC, chain 1, then 1 DC in the next and last space.
As the triangle expands, the spaces between the granny clusters become increasingly easy to identify. Maintaining the chain-1 spaces is important because they form the structure into which later clusters are placed.
Rows 5–8
Row 5: Chain 4 (= 1 DC + chain 1 space), turn your work; place 3 DC in the next space; repeat [chain 1, 3 DC in the next space] 3 times; chain 1, 3 DC, chain 1, then 1 DC in the next and last space.
Row 6: Chain 4 (= 1 DC + chain 1 space), turn your work; place 3 DC in the next space; repeat [chain 1, 3 DC in the next space] 4 times; chain 1, 3 DC, chain 1, then 1 DC in the next and last space.
Row 7: Chain 4 (= 1 DC + chain 1 space), turn your work; place 3 DC in the next space; repeat [chain 1, 3 DC in the next space] 5 times; chain 1, 3 DC, chain 1, then 1 DC in the next and last space.
Row 8: Chain 4 (= 1 DC + chain 1 space), turn your work; place 3 DC in the next space; repeat [chain 1, 3 DC in the next space] 6 times; chain 1, 3 DC, chain 1, then 1 DC in the next and last space.
At these middle rows, the triangle becomes much more recognizable. If you are new to granny-style crochet, this is a useful point to pause and check that your work is expanding evenly rather than pulling to one side.

Rows 9–11
Row 9: Chain 4 (= 1 DC + chain 1 space), turn your work; place 3 DC in the next space; repeat [chain 1, 3 DC in the next space] 7 times; chain 1, 3 DC, chain 1, then 1 DC in the next and last space.
Row 10: Chain 4 (= 1 DC + chain 1 space), turn your work; place 3 DC in the next space; repeat [chain 1, 3 DC in the next space] 8 times; chain 1, 3 DC, chain 1, then 1 DC in the next and last space.
Row 11: Chain 4 (= 1 DC + chain 1 space), turn your work; place 3 DC in the next space; repeat [chain 1, 3 DC in the next space] 9 times; chain 1, 3 DC, chain 1, then 1 DC in the next and last space.
Do not fasten off after Row 11. The yarn remains attached because it will be used immediately to create the first tie.

Creating the First Tie
With the yarn still attached to the bandana, create the first tie. Chain 35. Skip the first chain and slip stitch through the second chain and every chain across.
Continue working slip stitches until you reach the end of the chain. Once you have reached the end, slip stitch through the Double Crochet on the side of the bandana to secure the strap fully onto the project.
Do not fasten off at this stage.
The 35-chain tie is an important finishing feature because it transforms the triangular crocheted piece into a wearable bandana. When working the chain, try to keep the tension consistent so the tie has a neat and even appearance.

Adding the Single Crochet Edging
After completing the first tie, the next stage is to add a Single Crochet edging across the V-shaped section of the bandana.
Begin Row 1 by working Single Crochet across the first side of the V, placing a Single Crochet into each stitch. When you reach the top of the V, identified in the original instructions as the chain 2 from the previous row, place 2 Single Crochets there. Continue with Single Crochets across the second side of the V.
Do not fasten off.
This edging gives the central V area a more finished appearance and provides a clean transition between the triangular body and the second tie. The additional 2 Single Crochets at the top of the V are an important part of the stated instructions, so they should not be omitted.
Creating the Second Tie
Once the Single Crochet edging is complete, create the second tie.
Chain 35, skip the first chain, and slip stitch through the second chain and every chain across. When you reach the end of the chain, slip stitch through the Double Crochet on the side of the bandana to secure the strap fully onto the project.
Finally, fasten off and tidy up all loose ends with the tapestry needle.
Finishing the Bandana Neatly
Finishing is a small part of the project, but it can make a significant difference to the final appearance. After fastening off, use the tapestry needle to tidy the loose ends securely. Because this accessory has ties and a visible triangular shape, clean finishing helps preserve the simple appearance of the design.
Before wearing the completed bandana, gently arrange the triangle so the sides sit evenly. Avoid pulling aggressively on the fabric. A neat, relaxed finish works particularly well with the casual character of the granny triangle.

Beginner Tips for a Smooth Crochet Experience
If this is your first granny triangle project, concentrate on the spaces rather than trying to count the entire fabric at a glance. The granny clusters are separated by chain spaces, and these spaces provide useful visual landmarks as the triangle becomes larger.
Turning your work consistently at the end of each row is also essential. The instructions repeatedly state to turn your work after the opening chain 4. Keeping this movement consistent will help the triangle develop correctly.
Another useful habit is to pause at the end of each row and visually check the growing shape. The triangle should expand progressively as additional granny clusters are introduced. This is not a replacement for following the written instructions, but it can help you notice a missed space or cluster before continuing too far.
Common Points to Watch While Crocheting
- Remember that the pattern uses US crochet terms, with UK equivalents in brackets.
- Keep the 5.5 mm crochet hook consistent throughout the project.
- Maintain the chain-1 spaces between the granny clusters as instructed.
- Turn your work at the specified point in every row.
- Do not fasten off after Row 11.
- Use exactly 35 chains for each tie.
- When making each tie, skip the first chain before beginning the slip stitches.
- Secure each completed tie to the Double Crochet on the side of the bandana.
- Place 2 Single Crochets at the top of the V during the edging row.
- Fasten off and tidy all loose ends only after the second tie is complete.
A Simple Stitch Checkpoint System
For beginners, one of the easiest ways to stay organized is to treat each row as a checkpoint. The repeated structure increases by one additional [chain 1, 3 DC in next space] repeat as the pattern progresses.
Rows 5 through 11 therefore provide a particularly useful visual progression. Row 5 contains the repeat 3 times, Row 6 contains it 4 times, Row 7 contains it 5 times, Row 8 contains it 6 times, Row 9 contains it 7 times, Row 10 contains it 8 times, and Row 11 contains it 9 times.
These numbers should be treated as checkpoints from the original pattern rather than as a reason to alter the instructions. If your row does not visually correspond to the appropriate stage, it is worth checking the preceding row before continuing.
Why Cotton Yarn Works Well for This Accessory
The original pattern uses Drops Paris, an aran/medium 4 cotton yarn. Cotton is a natural choice for a lightweight accessory because it works well with the structured granny-style stitch pattern and gives the finished project a handmade texture.
The yarn is also available in many colors, which makes the design versatile. The original pink version emphasizes the feminine character of the bandana, but the pattern itself can be approached as a base design for different color choices.
Because the project uses only two skeins of the specified yarn, it is also considerably smaller than many garment-sized crochet projects. This makes it appealing for crocheters who enjoy making accessories between larger projects.
Ideas for Wearing the Finished Bandana
The completed bandana has a distinctly feminine and slightly boho appearance. Its triangular silhouette and long ties make it suitable as a seasonal accessory, particularly when you want to add a handmade detail to a simple outfit.
The design can complement casual summer clothing, cottagecore-inspired outfits, and relaxed everyday looks. The pink version has a romantic appearance, while other color choices can give the same pattern a completely different personality.
Because the finished size is 8.5 x 18 inches (22 x 46 cm), excluding the ties, it remains a relatively compact accessory. The ties provide the flexibility needed to secure the bandana comfortably when styling it.
A Quick Reference for the Complete Project
- Project: Crochet Rose Button Bandana
- Skill level: Easy/beginner
- Yarn: Drops Paris, aran/medium 4, 100% cotton
- Color: Shade 20 (pink)
- Quantity: 2 skeins
- Hook: 5.5 mm crochet hook
- Gauge: 4 inches (10 cm) = 5 rows of Granny Triangle pattern
- Finished size: 8.5 x 18 inches (22 x 46 cm), excluding ties
- Terms: US terms, with British terms in brackets
- Main construction: Granny triangle
- Main body: 11 rows
- First tie: Chain 35
- Second tie: Chain 35
- Edging: Single Crochet across the V
Final Thoughts on the Crochet Rose Button Bandana
The Crochet Rose Button Bandana is a wonderful example of how a simple stitch pattern can become a stylish handmade accessory. The granny triangle creates the main shape without requiring complicated techniques, while the two long ties and Single Crochet edging complete the design with practical finishing details.
For beginners, the project offers useful practice with chain stitches, Double Crochet, slip stitches, granny-style spaces, turning rows, and simple edging. For more experienced crocheters, it is a quick project that can be completed without the commitment required by a larger crochet item.
The original pink Drops Paris version has a particularly feminine character, but the basic design can also be enjoyed in different colors. Whether you are making the bandana for yourself, preparing a handmade accessory for a gift, or simply looking for a quick seasonal crochet project, this pattern provides a charming option.
The most important thing when making the project is to follow the stated stitch sequence, row numbers, measurements, and tie instructions carefully. The triangular body grows through a predictable granny-style progression, and the finishing stages then transform that triangle into the completed wearable accessory.
Once the final loose ends have been tidied, your Crochet Rose Button Bandana is ready to become a practical handmade addition to your accessory collection. Its quick construction, cotton yarn, feminine styling, and beginner-friendly stitch pattern make it a particularly enjoyable project for spring and summer crochet sessions, while its versatile design allows it to remain useful throughout the year.