
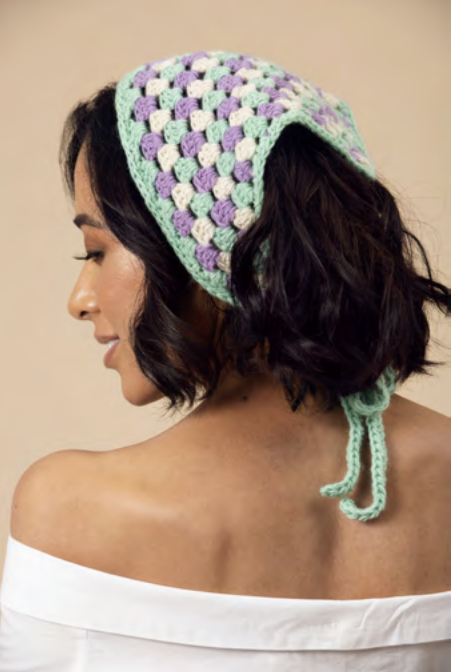
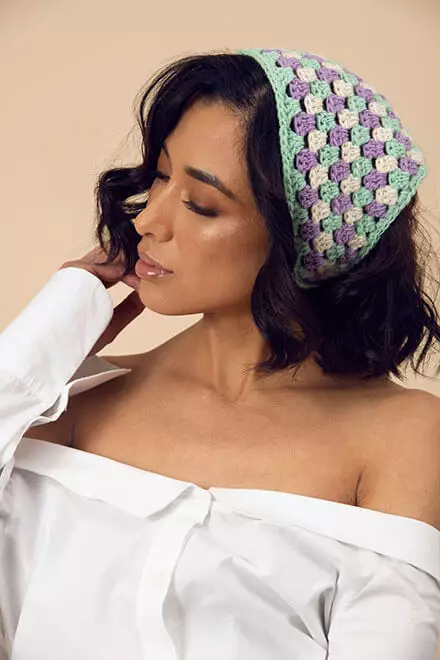
The Sofia Bandana by Toni Lipsey is a small, stylish crochet project with a simple construction and a distinctive three-color appearance. The finished piece forms a triangular bandana that can be tied at the back of the head, making it both a practical accessory and a fun way to showcase coordinated yarn colors.
The original pattern is rated Easy and is worked in one size. The finished measurements are 18 inches wide by 8 inches long. The main fabric is built with double crochet groups separated by chain-1 spaces, while the color changes create the striped effect that gives the finished bandana its recognizable look.
This version of the guide focuses on understanding the construction of the project from the first chain through the final finishing steps. The technical instructions, measurements, yarn information, gauge, row numbers, color changes, and finishing directions remain faithful to the original pattern.
One of the most useful features of this design is that the three colors are not repeatedly cut and rejoined. Instead, the pattern instructs you to carry the yarn up the side of the work. This makes the color-changing process more efficient and keeps the number of loose ends manageable.
Sofia Bandana at a Glance
Before picking up your hook, it helps to understand the basic structure of the project. The Sofia Bandana consists of a triangular main section worked from the narrow starting point outward. The body progresses from Row 1 through Row 18. After the main section is completed, the finishing instructions add two long ties and an edging around the bandana.
- Skill level: Easy
- Size: One
- Finished measurements: 18 inches wide x 8 inches long
- Hook: US I/9 (5.5mm) crochet hook or size needed to obtain gauge
- Yarn: AMANO SKINNY YANA
- Yarn construction: Hold yarn double throughout
- Colors: Three-color technique
- Designer: Toni Lipsey
The simplicity of the finished shape comes from the way the stitch groups expand across the rows. Although the pattern is short, paying attention to the turning chain, chain-1 spaces, and color changes is important for keeping the triangular fabric consistent.
Materials You Need
The source pattern specifies AMANO SKINNY YANA at 100g per 437yd hank. The listed materials are divided into the colors used throughout the project.
- A: 1 hank AMANO SKINNY YANA, 100g per 437yd hank, #1502 Blanca, 55 yards.
- B: 1 hank AMANO SKINNY YANA, 100g per 437yd hank, #1516 [Unknown], 55 yards.
- A: 1 hank AMANO SKINNY YANA, 100g per 437yd hank, #1512 Botanical, 115 yards.
- Hook: US I/9 (5.5mm) crochet hook or size needed to obtain gauge.
- Other supplies: Scissors and tapestry needle.
The materials section in the original source prints the third yarn line with the letter A, while the instructions use A, B, and C for the three-color sequence. This guide keeps that source wording rather than changing the color labels.
The instruction to hold the yarn double throughout is especially important. Make sure the working yarn is consistently held double from the beginning of the project. Changing the number of strands can affect the gauge and the appearance of the stitch groups.
Check Your Gauge Before Starting
Gauge is the best way to make sure your finished bandana stays close to the dimensions specified in the pattern. The source gives two gauge measurements:
- 3.5 inches = 4 3dc groups
- 3.75 inches = 8 rows
The pattern specifically says to adjust your hook to meet gauge. This means the listed US I/9 (5.5mm) hook is the starting recommendation, but your individual tension determines whether another hook size is needed to match the stated gauge.
Gauge becomes particularly useful in this project because the body is made through repeated rows. A small difference in row height can become more noticeable by the time you reach Row 18. Checking gauge before committing to the complete piece gives you the opportunity to make an adjustment early.
Important Pattern Notes
There are several instructions that should be understood before you begin. They affect how the rows are read and how the color changes are handled.
- Starting ch-4 counts as dc + ch 1.
- The pattern uses a 3 stripe technique.
- Do not cut yarn when changing color.
- Carry yarn up the side of the work.
- Change color on the last stitch of each row unless otherwise instructed.
- Hold yarn double throughout.
The starting chain is therefore not simply a turning chain that can be ignored when counting the structure of the row. The pattern explicitly counts the starting ch-4 as a double crochet plus a chain 1.
The carried-color technique is another major part of the design. Instead of fastening off each color after a row, keep the yarn available at the side and carry it upward. This is what allows the three-color stripe technique to work smoothly.
Reading the Crochet Stitch Structure
The main body repeatedly uses groups of three double crochet stitches, referred to in the gauge as 3dc groups. These groups are separated by chain-1 spaces. As the rows progress, additional spaces are created across the growing triangular shape.
For beginners, the easiest way to follow the construction is to think of each chain-1 space as a visible landmark. When the instructions say to work 3dc in a ch-1 space, locate that opening before inserting the hook. This can be easier than trying to identify individual stitches in the textured cluster fabric.
The turning chain also plays an important role. Follow the exact placement instructions in each row rather than assuming every row begins and ends in exactly the same way. Once Row 4 is established, the pattern becomes much more repetitive.
Starting the Sofia Bandana
The bandana begins with Color A and a five-chain foundation. The first row establishes the initial stitch group and creates the foundation for the triangular shape.
Row 1 (WS)
With A, ch 5, (3dc, ch 1, dc) in 5th ch from hook, turn, cc to B.
This first row is short, but it introduces several important elements that will appear throughout the project: double crochet stitches, a chain-1 space, turning, and color changing.
After completing the stitches, turn your work and change color to B. Do not cut the yarn. The unused color should remain available for the later color changes.
Creating the First Expansion
Row 2 (RS)
Ch 4, 3dc in first ch-1 sp, ch 1, 3dc in tch sp, ch 1, dc in 3rd ch of tch, turn, cc to C.
Row 2 begins expanding the triangular shape. There are now specific chain-1 spaces and a turning-chain space that serve as the locations for the next groups of double crochet stitches.
Because the starting ch-4 counts as dc + ch 1, keep that note in mind while reading the row. At the end, turn the work and change color to C.
Row 3
Ch 4, 3dc in first ch-1 sp, ch 1, 3dc in next ch-1 sp, ch 1, 3dc in tch sp, ch 1, dc in 3rd ch of tch, turn, cc to A.
Row 3 introduces another 3dc group into the next chain-1 space. The fabric should begin to look more clearly triangular as the number of stitch groups increases.
Complete the row exactly as written, turn the work, and change color to A. Again, there is no need to cut the yarn.

Establishing the Repeating Pattern
Row 4
Ch 4, 3dc in first ch-1 sp, ch 1, (3dc in next ch 1 sp, ch 1) to tch, 3dc in tch sp, ch 1, dc in 3rd ch of tch, cc to next color.
Row 4 is the key reference row for the remainder of the main body. The instructions establish a repeating sequence that will be used again through Rows 5-18.
Notice the parenthetical repeat: (3dc in next ch 1 sp, ch 1) to tch. This means the same stitch-and-space combination is repeated across the available chain-1 spaces until reaching the turning chain.
At the end of the row, change to the next color. As before, keep the unused colors attached and carry them up the side rather than cutting them.
Rows 5 Through 18: The Main Body
Once Row 4 is complete, the main body becomes a repeating sequence. The original pattern states:
Rows 5-18: Repeat Row 4, maintaining color changes. Cc to A at the end of Row 18. Fasten off A and B.
This section is where consistency matters most. Since the instructions are based on repeating Row 4, use Row 4 as your reference rather than trying to recreate the stitch placement from memory.
At the beginning of each row, identify the first chain-1 space. Then work the 3dc group as instructed, maintain the chain-1 spacing, and continue across the row. The number of available spaces grows with the triangular fabric, so take care not to skip a space.
The color changes also continue during this section. Watch the last stitch of each row and make the color change according to the established sequence. Remember that the pattern specifically tells you to carry the yarn up the side instead of cutting it.
Row-by-Row Consistency Check
After several repeated rows, look at the fabric rather than only at your written instructions. The 3dc groups should create a recognizable repeating texture, and the chain-1 spaces should remain visible between them.
If the fabric begins looking uneven, first check whether a chain-1 space was skipped or whether a 3dc group was placed somewhere other than the specified space. It is better to identify the issue at the current row than to continue through several more rows.
Do not add or remove stitches simply to make the shape look more symmetrical. The original row instructions should remain the authority for the construction.
Completing Row 18
Row 18 is the final row of the main triangular section. Continue repeating Row 4 while maintaining the color changes.
At the end of Row 18, the pattern specifically instructs you to change color to A. Then fasten off A and B.
This point is a useful project checkpoint. Before moving to the finishing instructions, take a moment to compare the main section against the stated finished body measurement of 18 inches wide by 8 inches long.
Adding the First Tie
The finishing section begins by creating the first long tie. The instructions are:
Ch 65, hdc in 3rd ch from hook and each ch across.
This produces a long chain worked back with half double crochet stitches. Take care to work into the third chain from the hook as specified, then continue across each chain.
Once the chain has been worked, rotate to work along the row ends. The border then follows the side of the triangular bandana.
Working Around the Lower Point
Continue with 2sc in the end of each row to the chain at the bottom tip of the bandana. At the bottom tip, work 3sc in the chain.
The three single crochet stitches at the tip help the edging move around the point of the triangular shape. This is one of the places where careful placement is especially useful because the bandana changes direction at the tip.
After working the 3sc in the chain at the bottom tip, continue with 2sc in the end of each row to the next corner.
Work steadily along the row ends and keep your tension consistent. The edging should follow the existing shape rather than pulling the fabric tightly.
Creating the Second Tie
After reaching the next corner, make the second tie using the same starting chain length:
Ch 65, hdc in 3rd ch from hook and each ch across.
This creates the second long tie. Keeping both chains at the specified length is important because they form the two sides used to secure the bandana when worn.
Finishing Along the Top Edge
After completing the second tie, the finishing instructions continue along the top of Row 18.
Working along the top of Row 18, sc in each st and ch-1 sp across to the last st. Then sl st in the last st. Fasten off A.
This final section completes the edging around the upper edge of the bandana. Work the single crochet stitches into each stitch and chain-1 space as instructed, continuing across the row until the last stitch.
Finish with the specified slip stitch in the last stitch, then fasten off A.
Weaving In the Ends
Once all of the crochet construction is complete, weave in all remaining ends. The three-color technique reduces the number of ends compared with cutting the yarn after every color change, but there will still be ends that need to be secured.
Use the tapestry needle to weave the ends neatly into the fabric. Avoid pulling too tightly, especially around the triangular edges and the ties. The goal is to secure the yarn while allowing the fabric to retain its intended shape.
Light Steam Blocking
The original finishing instructions say to steam block lightly as needed. This is an optional finishing step based on the condition and appearance of the completed piece.
Because the instructions specifically call for light steam blocking, keep this step gentle. The purpose is to help the finished bandana settle into its shape, not to change the dimensions or alter the stitch construction.
Beginner Tips for Better Results
The Sofia Bandana is rated Easy, but a few habits can make the project much smoother.
- Hold the yarn double: Keep the yarn doubled throughout, exactly as specified.
- Watch the turning chain: The starting ch-4 counts as dc + ch 1.
- Do not cut colors: Carry the yarn up the side instead.
- Check the last stitch: Color changes are generally made on the last stitch of each row unless otherwise instructed.
- Use the spaces as landmarks: The ch-1 spaces make it easier to locate where the next 3dc group belongs.
- Keep tension steady: Consistent tension helps the triangular shape remain even.
- Use Row 4 as your reference: Rows 5-18 repeat Row 4.
- Measure rather than guess: Use the stated gauge and finished measurements as checkpoints.
Common Trouble Spots to Watch
The Color Sequence Feels Confusing
The opening rows explicitly establish the color changes: Row 1 changes to B, Row 2 changes to C, and Row 3 changes to A. Row 4 then continues the sequence by changing to the next color. Rather than cutting yarn, carry the colors up the side.
The Triangle Does Not Look Even
Check the placement of the 3dc groups and chain-1 spaces. The repeated structure is established in Row 4 and is then used for Rows 5-18.
The Fabric Size Is Different
Check your gauge. The source specifies 3.5 inches for 4 3dc groups and 3.75 inches for 8 rows. Adjust your hook to meet gauge as instructed.
You Have Too Many Loose Ends
Make sure you are following the three-stripe technique correctly. The source specifically says not to cut yarn when changing color and to carry yarn up the side of the work.
Sofia Bandana Construction Checklist
Use this checklist while working through the project:
- Gather the three specified AMANO SKINNY YANA colors.
- Prepare a US I/9 (5.5mm) crochet hook or adjust the hook size to obtain gauge.
- Hold yarn double throughout.
- Check the stated gauge before beginning.
- Read the note about the starting ch-4.
- Begin Row 1 with A.
- Change to B after Row 1.
- Change to C after Row 2.
- Change to A after Row 3.
- Use Row 4 as the repeating reference.
- Repeat Row 4 through Row 18 while maintaining color changes.
- Change to A at the end of Row 18.
- Fasten off A and B.
- Make the first ch-65 tie and work hdc across it.
- Work 2sc along the row ends to the bottom tip.
- Work 3sc in the chain at the bottom tip.
- Continue with 2sc along the row ends to the next corner.
- Make the second ch-65 tie and work hdc across it.
- Work sc across the top of Row 18 in each stitch and ch-1 space.
- Sl st in the last stitch.
- Fasten off A.
- Weave in all remaining ends.
- Steam block lightly as needed.
Understanding the Final Shape
The completed main section forms a triangular fabric with the point developing from the early rows and the width increasing as the rows progress. The 3dc groups create the textured color pattern, while the chain-1 spaces keep the structure visually open.
The finishing stage transforms this triangular piece into a wearable bandana. The two chains of 65 are worked with half double crochet and become the long ties. The single crochet edging follows the outer edges, while the three single crochet stitches at the bottom point help the border turn around the tip.
The final appearance depends on following the stitch placement and color changes consistently. The contrast between Blanca, the listed #1516 color, and Botanical is what gives the sample its distinctive striped look.
Frequently Asked Questions
What skill level is the Sofia Bandana?
The original pattern lists the skill level as Easy.
What size will the finished bandana be?
The pattern gives one size with finished measurements of 18 inches wide by 8 inches long.
Which crochet hook should I use?
The pattern specifies a US I/9 (5.5mm) crochet hook or the size needed to obtain gauge.
What yarn is required?
The source specifies AMANO SKINNY YANA, with each hank listed as 100g per 437yd hank. The materials list #1502 Blanca at 55 yards, #1516 [Unknown] at 55 yards, and #1512 Botanical at 115 yards.
How should the yarn be held?
The pattern explicitly says to hold the yarn double throughout.
Should I cut the yarn after every color change?
No. The pattern uses a three-stripe technique and specifically instructs you not to cut the yarn when changing color. Carry the yarn up the side of the work.
How many rows are worked for the main body?
The main body is worked through Row 18. Rows 5-18 repeat Row 4 while maintaining the color changes.
How long are the ties?
The finishing instructions begin each tie with ch 65, followed by hdc in the third chain from the hook and each chain across.
Does the finished bandana need blocking?
The finishing instructions say to steam block lightly as needed.
Final Tips Before You Finish
The Sofia Bandana is a good example of how a relatively short crochet pattern can create a visually detailed accessory through careful repetition and color management. The most important things to keep under control are gauge, yarn tension, color changes, and stitch placement.
When working through Rows 5-18, resist the temptation to rush simply because the instructions repeat. Repetition is where small placement mistakes can multiply. Using Row 4 as your reference makes the process much easier and gives you a reliable pattern to follow throughout the body.
The finishing stage is equally important. The two ch-65 ties and the edging are part of the original construction, so they should be worked exactly according to the instructions rather than substituted with a different border or tie length.
Conclusion
The Sofia Bandana offers a straightforward crochet construction with a playful three-color finish. Starting from a small foundation, the project expands through a sequence of double crochet groups and chain-1 spaces until the main triangular section reaches Row 18. The carried-color method keeps the three-color sequence continuous and helps create the characteristic striped appearance.
Once the main body is complete, the finishing instructions add two long ties, shape the lower point with 3sc, and create a clean single crochet edging along the top. A final round of weaving in ends and light steam blocking completes the project.
For the best result, keep the yarn double, follow the gauge, use the chain-1 spaces as placement landmarks, maintain the color changes, and use Row 4 as your guide for Rows 5-18. With those details in place, the Sofia Bandana becomes an enjoyable and manageable crochet project that can be completed as a colorful handmade accessory.