
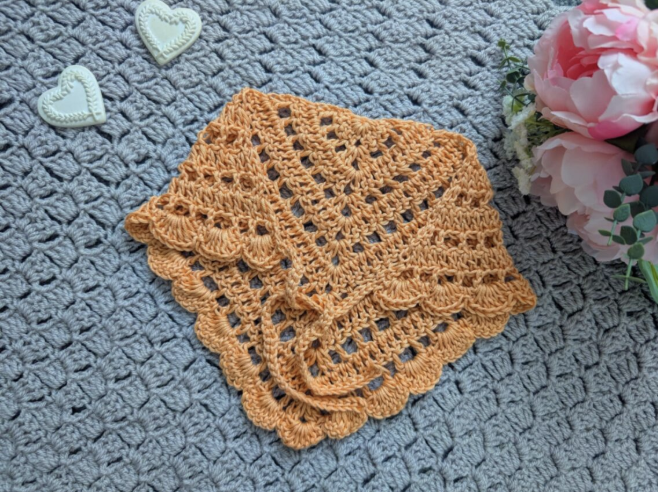

There is something especially charming about a handmade crochet accessory that looks delicate without requiring a complicated construction. The Crochet Lovely Bandana is a beautiful example of that balance. With its airy filet crochet body, scalloped shell stitch edging, and two crocheted ties, this project creates a feminine accessory with a distinctly Cottagecore-inspired character.
This beginner-friendly crochet bandana is worked using basic stitches and a simple repeating sequence. The main body is built by alternating two rows, allowing the triangular shape to develop gradually while creating the openwork effect. Once the body is finished, the first tie is crocheted directly from the project, followed by the decorative shell edging. The second tie is then worked at the opposite end.
One of the most useful features of this construction is that the ties do not need to be made separately and sewn onto the finished piece. They are incorporated into the crochet process itself. That makes this a practical project for crocheters who enjoy clean construction and minimal finishing work.
The original sample is made with Universal Yarn Vireo in Apricot Tart, a beautiful shade that complements the soft and feminine design. Vireo is made from 80% tencel and 20% wool and gives the finished accessory a lovely drape.
Project Overview
The Crochet Lovely Bandana is classified as an easy/beginner project. Although the finished accessory has an intricate-looking appearance, the stitches used throughout the pattern are accessible to crocheters who are comfortable with chains, slip stitches, single crochet, and double crochet.
The main body uses a filet crochet design. This means that open chain spaces are incorporated into the fabric rather than creating a completely solid surface. The alternating rows help establish the pattern and gradually build the shape.
The border uses shell stitches. Each shell is made with 7 double crochet stitches, while single crochet stitches are used between the shells to anchor the edging to the bandana.
The finished bandana measures 9 inches x 17.5 inches (23 cm x 44.5 cm), excluding the ties on each side. The stated gauge is 4 inches (10 cm): 6 rows.
What Makes This Bandana Special?
The beauty of this project comes from the relationship between its simple construction and decorative details. The center section does not rely on complicated stitch combinations. Instead, the visual effect comes from the placement of double crochet stitches, chain spaces, and skipped stitches.
The shell border then changes the character of the piece. Instead of ending with a plain edge, the bandana receives a series of graceful shell shapes that frame the openwork center.
The integrated ties are another thoughtful part of the design. The first tie is created immediately after the main body, and the yarn remains attached as the edging is worked. The second tie is created after the edging reaches the other side.
This means the complete project flows through several stages without requiring separate pieces to be attached later.

The Cottagecore Character of the Design
This crochet bandana fits naturally into the Cottagecore aesthetic. Cottagecore is associated with countryside living, rural inspiration, floral themes, handmade crafts, and soft nostalgic styling. The delicate silhouette of this accessory works beautifully with that visual language.
The original Apricot Tart color adds warmth to the project, while the openwork pattern prevents the finished piece from feeling visually heavy. The shell edging provides a decorative finish without overwhelming the central design.
Because the pattern can be crocheted in different colors, the same design can take on a different personality depending on the yarn shade selected. The original pattern, however, uses Universal Yarn Vireo in Apricot Tart.
For anyone building a handmade accessory collection, this bandana is also an appealing project because it is relatively compact. It offers an opportunity to practice pattern reading and stitch consistency while producing something that has a clear finished purpose.
Materials You Will Need
Prepare the materials before starting so that you can move through the pattern without interruptions.
- 1 skein of Universal Yarn Vireo in shade Apricot Tart
- 5.5 mm crochet hook
- Pair of scissors
- Tapestry needle
The yarn used in the original project is Universal Yarn Vireo. It contains 80% tencel and 20% wool. The original designer has also used this yarn for the Vintage Beauty Shawl.
The 5.5 mm hook is the hook size specified in the pattern. If you want to reproduce the original dimensions as closely as possible, it is important to keep the yarn, hook, and stated gauge in mind rather than changing them casually.
Pattern Information at a Glance
- Skill level: Easy/beginner
- Yarn: Universal Yarn Vireo
- Yarn shade: Apricot Tart
- Yarn quantity: 1 skein
- Fiber content: 80% tencel and 20% wool
- Hook: 5.5 mm
- Gauge: 4 inches (10 cm): 6 rows
- Finished size: 9 inches x 17.5 inches (23 cm x 44.5 cm), excluding ties
- Crochet terminology: US terms, with British terms in brackets
Understanding the Crochet Abbreviations
The pattern uses US crochet terminology. If you usually work from UK patterns, keep the following list available while crocheting.
- Ch: Chain
- St: Stitch
- Sl st: Slip stitch
- Sp: Space
- SC: Single Crochet (UK Double Crochet)
- DC: Double Crochet (UK Treble Crochet)
- EOR: End of row
The difference between US and UK terminology is particularly important for DC and SC. Always interpret the abbreviations according to the US terminology used in this pattern.
Beginning the Bandana
Start with a slip knot. Chain 4 and then slip stitch through the first chain to form a ring.
This small ring becomes the starting point of the bandana. The first row establishes the initial triangular structure, and the center chain-2 space created during this row becomes an important reference point for the shaping that follows.
Row 1: Chain 3, which counts as a DC. Work 5 DC into the ring. Then chain 2 and work 6 DC into the ring.
At the end of this first row, you should have the foundation needed to begin the open filet crochet structure. The chain-2 space is especially important because the following rows will use it to establish the top point of the expanding shape.
Building the Filet Crochet Pattern
The central body is created through two repeating row structures. This is the key section to understand before moving on to the edging.
Row 2
Chain 3, which counts as a DC, and turn your work. Place a DC into the first stitch.
Next, work the sequence of chain 1, skip 1 stitch, DC until you reach the penultimate stitch before the chain-2 space at the top of the project.
Skip the last stitch before the center. Then work 2 DC, chain 2, 2 DC into the chain-2 space.
After the center, skip 1 stitch and continue with DC in the next stitch, chain 1, skip 1 stitch, DC until you reach the last stitch.
Finish the row by placing 2 DC into the last stitch.
This row introduces the open spaces that give the bandana its filet crochet appearance. The chain-1 spaces are not accidental gaps; they are part of the design and should be worked according to the stated sequence.
Row 3
Chain 3, which counts as a DC, and turn your work. Place another DC into the first stitch.
Then place a DC into the next stitch until you reach the chain-2 space at the top of the project, including the chain spaces.
Work 2 DC, chain 2, 2 DC into the chain-2 space from the previous row.
Continue by placing a DC into each stitch across, including the chain spaces, until the end of the row. Finish by placing 2 DC into the last stitch.
The contrast between Rows 2 and 3 is what helps produce the open and structured appearance of the central fabric.

The Main Body: Rows 4 Through 12
Once Rows 2 and 3 are understood, continue the main body by alternating these two rows.
Rows 4-12: Alternate Rows 2 and 3, finishing on a Row 3.
This instruction is an important part of the original pattern. Rather than estimating the size by eye, follow the stated row sequence and complete the required rows. Finishing on Row 3 is also important because the following construction begins directly from the completed body.
For beginners, row counting can make this part easier. After completing each row, mentally identify whether you have just worked the openwork Row 2 structure or the denser Row 3 structure. This gives you two checkpoints: the row number and the stitch pattern.
The central chain-2 space should remain easy to identify throughout this section. It is the point around which the bandana expands, so maintaining its position helps preserve the intended shape.
How to Keep Your Rows Consistent
The most useful habit during the main body is to avoid rushing through the repeated sections. The pattern is simple enough that it can become tempting to crochet automatically, but the skipped stitches and chain spaces in Row 2 still need careful attention.
When working Row 2, look for the repeating rhythm of chain 1, skip 1 stitch, and DC. When working Row 3, remember that the instructions specifically include the chain spaces when placing the DC stitches.
The center of the bandana provides another visual checkpoint. The repeated 2 DC, chain 2, 2 DC construction at the center keeps the triangular shaping organized.
If the center point begins to look uneven, stop and check the placement around the chain-2 space before continuing.
Creating the First Tie
After completing the main body, the first tie is worked without fastening off.

Chain 40. Then slip stitch through the second chain from the hook and continue slip stitching into each chain across until you reach the end of the chain.
Once you reach the end, slip stitch through the first stitch on the project to secure the tie to the project.
Do not fasten off.
This is a key construction detail. The yarn remains attached because the next stage is the shell stitch edging. Keeping the yarn connected allows the tie, border, and second tie to form one continuous crochet construction.
Adding the Shell Stitch Edging
Now it is time to transform the simple filet crochet body into a more decorative finished accessory. The shell stitch edging frames the bandana and creates its characteristic scalloped appearance.
Begin with chain 3, which counts as a DC. Place 6 DC into the first chain space on the project. Together with the starting chain 3, this creates a shell.
Next, place a SC directly into the next space to anchor the edging.
Continue with the following sequence:
Go directly into the next chain space and place 7 DC to create a shell. Then go directly into the next space with a SC.
Repeat this sequence until you reach the last space on the first side.
At the very top of the project, skip 2 DC and place 7 DC into the chain-2 space at the top of the project. Then skip 2 DC.
Continue with SC into the next space, 7 DC into the next space, repeating this sequence until the end of the row.
Do not fasten off at the end of the shell edging.
Shell Stitch Tips for a Clean Border
Every shell contains 7 DC, so maintaining this number consistently is one of the easiest ways to keep the border uniform.
The single crochet stitches between the shells provide the anchor points. They separate the larger groups of double crochet stitches and help the border follow the edge of the bandana.
When you arrive at the top center, slow down and follow the specific instructions for the chain-2 space. This is the central point of the bandana, so the shell placed there becomes an important visual feature.
A steady crochet tension can also help the shells appear more consistent. Avoid pulling the stitches excessively tight, especially when working several double crochet stitches into the same space.
Creating the Second Tie
After the shell edging is complete, the second tie is worked directly from the project.
Chain 40. Slip stitch through the second chain from the hook, then slip stitch into each chain across until you reach the end of the chain.
Slip stitch through the first stitch on the project to secure the tie to the project.
Now you can fasten off and tidy up all loose ends.
The second tie completes the construction and gives the bandana matching ties on both sides. Because both ties are made directly from the project, there is no separate sewing stage for attaching them.
Finishing the Project Neatly
After fastening off, use the tapestry needle to tidy all loose ends. Since this is an openwork accessory, take care when weaving in the ends so that they do not become visible through the chain spaces.
The finished bandana should measure 9 inches x 17.5 inches (23 cm x 44.5 cm), excluding the ties, according to the original pattern.
At this point, gently arrange the shell border so that the individual shells are clearly visible. Avoid pulling aggressively on the open filet crochet fabric because the design depends on its delicate structure and drape.
Beginner Checklist Before You Finish
- Check that the project began with a 4-chain ring.
- Confirm that Row 1 was completed with the specified DC groups and center chain-2 space.
- Make sure Rows 2 and 3 were alternated correctly.
- Confirm that Rows 4-12 were completed, finishing on Row 3.
- Check that the first tie began with chain 40.
- Make sure the first tie was secured with a slip stitch.
- Confirm that the yarn was not fastened off before the shell edging.
- Check that each shell contains 7 DC.
- Pay particular attention to the shell worked into the top chain-2 space.
- Make the second tie with chain 40.
- Fasten off only after the second tie is secured.
- Tidy all loose ends with the tapestry needle.
Common Problems and How to Check Your Work
The center point does not look symmetrical
Check the chain-2 space at the top of the project. The shaping repeatedly uses 2 DC, chain 2, 2 DC in this space. This center location should remain consistent from row to row.
The filet crochet spaces look uneven
Review Row 2 carefully. The openwork relies on the sequence of chain 1, skip 1 stitch, and DC. Missing a skipped stitch or working into the wrong stitch can alter the appearance of the open spaces.
The fabric becomes too dense
Check Row 3. The instructions specifically say to place a DC into each stitch across, including the chain spaces. Also verify that you are using the specified 5.5 mm hook and the original yarn if you are aiming to reproduce the original project.
The shell border does not look consistent
Count the double crochet stitches in each shell. Every shell is made with 7 DC. Also make sure that the single crochet stitches are being used to anchor the edging into the spaces between shells.
I am unsure whether to fasten off
Do not fasten off after the first tie or after the shell edging. The yarn remains attached as the construction continues. Fastening off occurs after the second tie has been secured.
Why This Is a Good Project for Practicing Pattern Reading
This bandana offers several useful lessons for crocheters who are developing confidence with written patterns. The instructions combine stitch abbreviations, row numbers, repeats, skipped stitches, chain spaces, and construction changes in one relatively compact project.
The repeated Rows 2 and 3 make it easier to establish a rhythm. At the same time, the pattern requires enough attention to teach you how to locate specific spaces and understand instructions such as working into chain spaces.
The transition from the main body to the first tie is another useful lesson. Instead of treating the bandana as separate pieces, the pattern demonstrates how one continuous strand of yarn can be used to create the tie, edging, and second tie.
For beginners, this can be a helpful introduction to construction techniques that reduce sewing and create a more integrated finished item.

Choosing Your Yarn Carefully
The original project uses Universal Yarn Vireo in Apricot Tart. The yarn is made from 80% tencel and 20% wool, and the designer highlights its beautiful colors and drape.
The combination is particularly suitable for a design that is intended to feel light and feminine. The filet crochet structure allows the fabric to remain visually open, while the yarn contributes to the graceful appearance of the finished piece.
If you are making the original version, keep the specified yarn and 5.5 mm hook together. Changing materials may result in a different gauge, drape, or finished measurement.
Finished Bandana and Styling Ideas
Once complete, the Crochet Lovely Bandana makes a charming handmade accessory. The triangular shape, delicate openwork, scalloped border, and long ties create a feminine silhouette that fits naturally with casual and Cottagecore-inspired outfits.
The Apricot Tart sample has a warm and gentle appearance, but the design itself is flexible enough to inspire different color interpretations. Soft pastels can emphasize the romantic character, while neutral shades can create a more understated look.
Because the original pattern is based on a clear construction rather than a complex motif, the design remains recognizable even when a different color is selected.
Complete Pattern Reference
- Level: Easy/beginner
- Gauge: 4 inches (10 cm): 6 rows
- Finished size: 9 inches x 17.5 inches (23 cm x 44.5 cm), excluding ties
- Yarn: 1 skein Universal Yarn Vireo, Apricot Tart
- Hook: 5.5 mm
- Starting ring: Chain 4 and slip stitch through the first chain
- Row 1: Ch 3 (= DC), 5 DC in ring; ch 2, 6 DC in ring
- Rows 2-3: Follow the specified filet crochet sequence
- Rows 4-12: Alternate Rows 2 and 3, finishing on Row 3
- First tie: Chain 40 and work back with slip stitches
- Edging: Shells of 7 DC separated by SC anchors
- Second tie: Chain 40 and work back with slip stitches
- Final step: Fasten off and tidy loose ends
Frequently Asked Questions
Is this really a beginner crochet pattern?
Yes. The original pattern is described as easy/beginner. The main body uses a repeating sequence of two rows, and the edging uses shells made from double crochet stitches.
What crochet hook does the pattern require?
The original instructions call for a 5.5 mm crochet hook.
What yarn was used in the sample?
The sample uses one skein of Universal Yarn Vireo in Apricot Tart. Vireo is made from 80% tencel and 20% wool.
What are the finished measurements?
The bandana measures 9 inches x 17.5 inches (23 cm x 44.5 cm), excluding the ties on each side.
How many rows make up the main bandana?
Rows 4-12 alternate Rows 2 and 3, finishing on Row 3, after the initial Row 1 and the establishment of the repeating structure.
How long is each tie?
Each tie begins with a chain of 40.
How many double crochet stitches are in each shell?
Each shell contains 7 DC.
Does the pattern require sewing?
The ties are crocheted directly onto the project, so they do not require separate sewing. A tapestry needle is used at the end to tidy loose ends.
Can another yarn color be used?
The design can be crocheted in different colors. The original sample uses Apricot Tart, so another color would create a variation of the original appearance.
Final Thoughts

The Crochet Lovely Bandana is a beautiful project for anyone who enjoys feminine accessories, open crochet textures, and Cottagecore-inspired handmade designs. Its construction is approachable, yet the finished result has enough decorative detail to look far more elaborate than the individual stitches might suggest.
The filet crochet body creates the foundation, with Rows 2 and 3 providing the repeating structure that shapes the bandana. The shell stitch edging then frames the project with a decorative scalloped finish, while the integrated 40-chain ties complete the accessory without requiring separate sewn pieces.
For beginners, the project is also a useful exercise in reading crochet instructions carefully. Paying attention to the central chain-2 space, the skipped stitches in the openwork row, the inclusion of chain spaces in Row 3, and the exact shell construction will help keep the finished piece consistent.
The original combination of Universal Yarn Vireo in Apricot Tart and a 5.5 mm crochet hook gives the bandana its soft, feminine appearance and beautiful drape. The finished size is 9 inches x 17.5 inches (23 cm x 44.5 cm), excluding the ties.
Whether you are making the original Apricot Tart version or simply using the design as inspiration for another color, this Crochet Lovely Bandana is a satisfying project that combines practical construction with a graceful handmade aesthetic.