
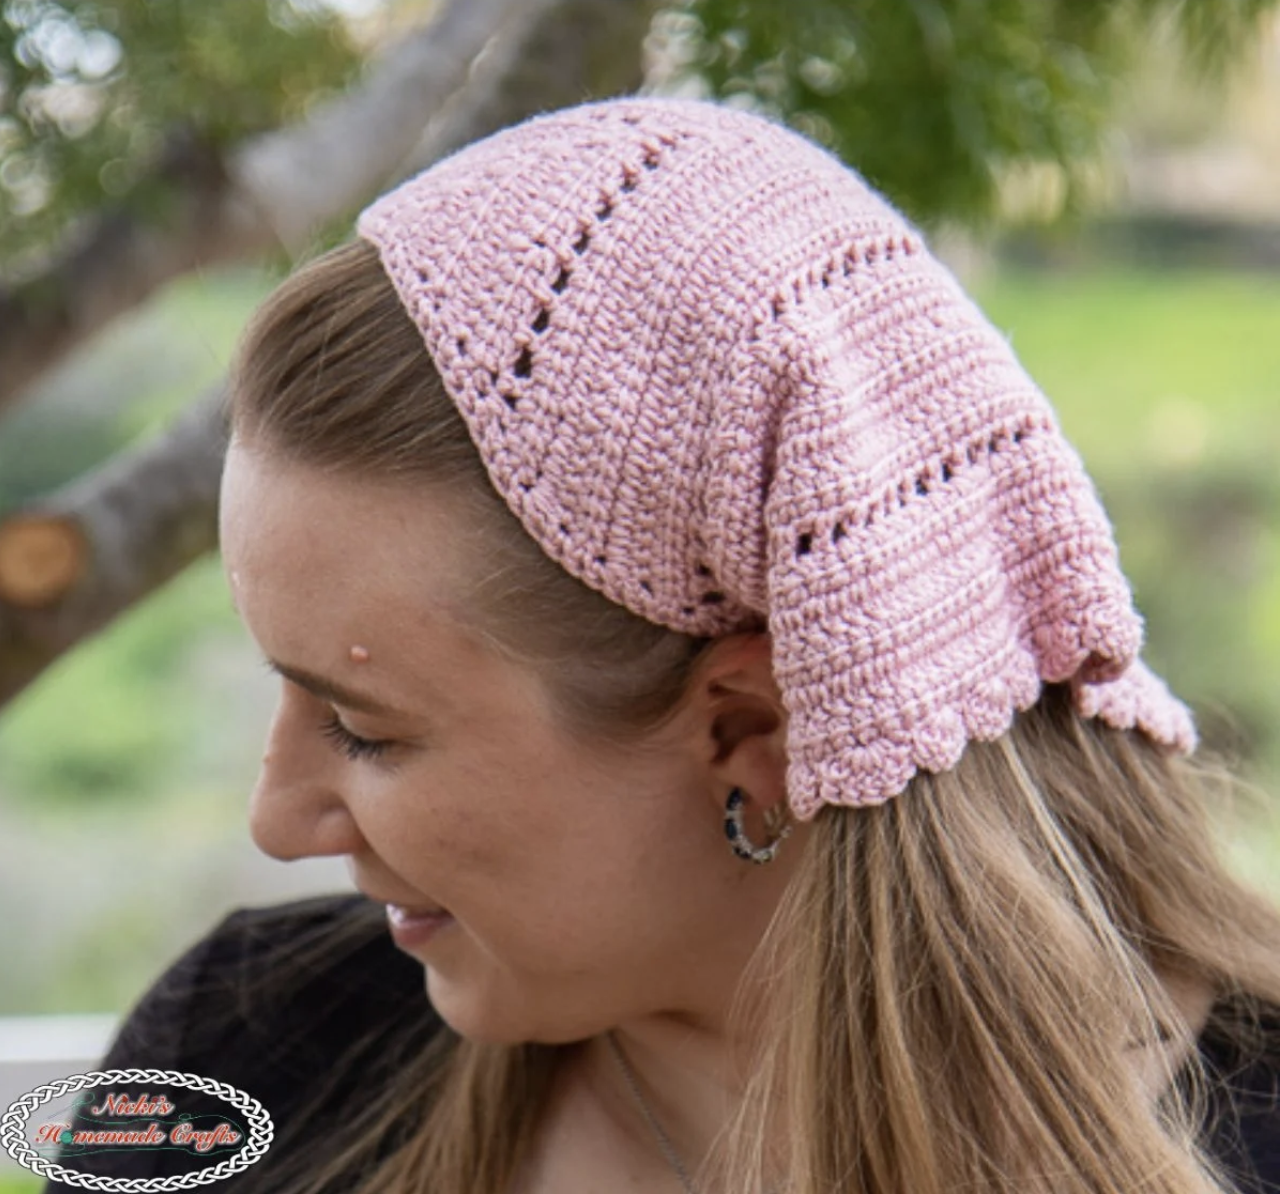
Linked Crochet Bandana Tutorial: Stitch Checkpoints, Triangle Construction, and Finishing Details
If you enjoy crochet accessories that are small enough to finish in a reasonable amount of time but still teach useful techniques, this linked crochet bandana is an excellent project to explore. The design combines a growing triangle, linked double crochet, a filet-style row, simple crochet straps, and a scalloped border.
The bandana was designed as both a practical and decorative accessory. It can be worn to keep hair away from the face or simply used as a fun handmade addition to an outfit. Its compact construction also makes it a useful project for crocheters who want to become more familiar with linked crochet.
The finished size given in the pattern is 12.5 x 21 inches, and the stated gauge is 5 ldc x 2 rows = 1 square inch. The original materials list calls for one skein of Mary Maxim Sunrise in Desert, a 3.75mm crochet hook, scissors, and a tapestry needle.

What You Will Make
The finished project is a triangular crochet bandana worked from the center outward. Instead of beginning with a long foundation chain, the pattern starts with a magic ring. The first rows establish the center and then use increases to expand the triangle.
Linked double crochet is the principal stitch throughout the main body. This makes the project especially useful if your goal is to practice linked crochet in an actual finished accessory rather than only working isolated stitch samples.
The design also includes a filet crochet row. This row is deliberately different from the linked double crochet sections: it uses DCs and ATC, together with chain spaces and skipped stitches. After that change of texture, the pattern returns to the Row 2 construction for its repeated sections.
Once the body reaches its complete 23-row structure, the finishing process adds two straps and a scalloped border.
Essential Pattern Information
- Yarn: Mary Maxim Sunrise
- Color: Desert
- Quantity: 1 skein
- Hook: 3.75mm
- Gauge: 5 ldc x 2 rows = 1 square inch
- Finished Size: 12.5 x 21 inches
- Starting Method: Magic ring
- Main Stitch: Linked double crochet
- Body: 23 rows
- Straps: Chain 40 for each strap
- Long Edge: 2 sc’s per ldc
Materials Before You Begin
There are only four basic supplies listed in the original pattern, so preparation is straightforward.
- Mary Maxim Sunrise — Desert, 1 skein
- 3.75mm crochet hook
- Scissors
- Tapestry needle
The tapestry needle is particularly useful at the end when the pattern instructs you to fasten off and weave in the ends. Keeping it nearby from the beginning means you will not need to stop when you reach the finishing stage.
Abbreviations Used in the Pattern
The written pattern uses several standard abbreviations as well as linked crochet terminology. The following list follows the source:
- mr = magic ring
- dc = double crochet
- ch = chain
- sl st = slip stitch
- ldc = linked double crochet
- ATC = Alternative Turning Chain
The pattern defines the scalloped border as *1 sc into first st, sk 1 st, then 5 dc in the next st, sk 1 st, repeat from *.
ATC is described in the source as Alternative Turning Chain, also known as stacked single crochet.
Read These Notes Before Crocheting
The main body is repetitive, but several details can easily be overlooked if you begin crocheting immediately. Keeping these notes in front of you will make the construction easier to follow.
The First CH2 Does Not Count
The pattern specifically states that none of the first CH2s count as a stitch. They are simply used to help start the LDC.
This means you should not add an extra stitch because of the starting chain. Follow the actual stitch instructions rather than treating that CH2 as another counted stitch.
The Linked Connection After a Chain Space Matters
The source notes that after a chain space is created, you crochet a DC and then connect the next LDC to the DC that was just made.
This is an important part of the linked construction. If you are learning linked crochet, this is a good point to slow down and make sure you understand where the next LDC is connected.
Row 6 Is Not an LDC Row
The filet crochet row contains no LDCs. Instead, it uses DCs and ATC. The pattern then gives another important instruction: Now count all CH 1’s as 1 st.
That counting change should be remembered when you return to the Row 2 construction.
Stitch Checkpoint One: The Magic Ring
Begin by making a magic ring. This forms the central starting point of the triangular bandana.
For Row 1, work:
CH2, 4 LDC, CH2, 1 DC, 3 LDC in the ring; tighten ring and turn.
After the stitches are worked into the ring, tighten the ring and turn.
The first checkpoint is simple: make sure the center is secure and that the starting CH2 has not been treated as a counted stitch.
Stitch Checkpoint Two: Row 2
Row 2 establishes the main increase structure that will be repeated throughout much of the project.
Row 2: CH2, 2 LDC in the first st, 1 LDC in each LDC until ch2 sp; [2LDC, CH2, 1 DC, 1 LDC] (the ldc is connected to the dc) in ch2 sp; LDC in each dc until last LDC; 2 LDC in last LDC, turn.
There are three major areas to watch in this row.
- The first stitch receives 2 LDC.
- The central ch2 space receives the specified [2LDC, CH2, 1 DC, 1 LDC] construction.
- The last LDC receives 2 LDC.
These locations provide useful visual and technical checkpoints as the triangle expands.
Rows 3–5: Establish the Repeating Rhythm
Rows 3–5 are worked as Row 2.
This repetition is where the linked crochet fabric begins to develop more noticeably. Rather than changing the construction from row to row, the pattern relies on the same basic increase arrangement.
If you are new to linked crochet, these repeated rows are an opportunity to become more comfortable with the stitch connection. Work at a steady pace and keep the central ch2 space easy to identify.
It can also be useful to stop at the end of each row and confirm that the triangle is expanding consistently before turning and beginning the next repeat.

Stitch Checkpoint Three: The Filet Crochet Row
Row 6 is the first major change in the texture and construction. It is worth treating it as a separate stage instead of assuming it follows the same LDC instructions.
Row 6
[1 ATC, CH 1, 1 DC] in the first st, *CH 1, SK 1, 1 DC, repeat from * until the ch2 sp; [1 DC, CH 1, 1 DC, CH 1] in ch2 sp; **1 DC, CH 1, SK 1, repeat from ** until last LDC, [1 DC, CH 1, 1 DC] in the last LDC, turn.
The chain spaces and skipped stitches give this row its filet-style appearance. The center ch2 space receives another specific combination, so keep that point clearly identified while working across the row.
When the row is complete, apply the source instruction that all CH1s should now be counted as one stitch.
The 23-Row Construction: A Simple Tracking System
The body has a defined repeat structure. After the initial Row 6, the pattern says to repeat Row 2 five times and then repeat Row 6. This sequence is repeated three times, followed by five final repetitions of Row 2.
The completed construction therefore reaches 23 rows.
For practical tracking, you can divide the work into checkpoints rather than trying to remember every row from memory:
- Work Rows 1–5.
- Complete Row 6.
- Repeat Row 2 five times.
- Complete Row 6.
- Repeat Row 2 five times.
- Complete Row 6.
- Repeat Row 2 five times.
- Finish with five repetitions of Row 2.
A simple row counter can be especially helpful because the pattern combines repeated rows with a recurring special row. Marking each completed section can reduce the chance of accidentally skipping or adding a repeat.
Gauge and Size Check
The pattern specifies a gauge of 5 ldc x 2 rows = 1 square inch and a finished size of 12.5 x 21 inches.
These figures give you useful reference points while working. If you are following the pattern exactly, keep the stitch and row instructions unchanged rather than adjusting them to compensate for a visual difference.
When checking your work, remember that the first CH2 does not count as a stitch. Also remember that after the filet row, the pattern specifically tells you to count the CH1s as stitches.
How to Keep the Triangle Balanced
The triangle develops from the placement of the increases. If one side begins to look different from the other, check the written construction at the beginning and end of the Row 2 repeat.
At the beginning of Row 2, the instruction is 2 LDC in the first st. At the other end, the instruction is 2 LDC in last LDC. The center has its own increase sequence inside the ch2 space.
These points provide a natural way to inspect your work without changing the pattern. If the edges appear inconsistent, compare the actual stitch placement against those checkpoints before continuing.
Working the Straps After the Body
Once the 23-row body is finished, the pattern moves into the finishing instructions. The straps are worked directly from the bandana rather than made separately and sewn on.
First Strap
Start with the first strap by making chain 40.
Starting from the second chain from the hook, work 1 sc per chain. Then continue along the long edge of the bandana, working evenly at 2 sc’s per ldc.
This construction gives the first side of the bandana its tie while also providing a neat crochet finish along the long edge.
Second Strap
The pattern then instructs you to crochet the second strap in the same way as the first one.
Keeping the second strap identical to the first is important for a balanced finished accessory. The pattern already provides the exact starting measurement—chain 40—so there is no need to estimate or modify the strap length.
Decorating the Short Sides
After the straps are completed, the short sides of the triangle receive the scalloped border.
Use the following repeat:
*1 sc into first st, sk 1 st, then 5 dc in the next st, sk 1 st, repeat from *
The scallop is formed by five double crochets worked into the next stitch. The skipped stitches separate these groups and create the decorative edge.
Because the border is based on a repeated sequence, it is better to follow the stitch instructions carefully than to try to place the scallops by appearance alone.

Final Finishing
After adding the scalloped border, the pattern gives a straightforward final instruction: Fasten off and weave in ends.
Use the tapestry needle to weave in the remaining yarn ends. A clean finishing stage helps the scalloped border and triangular shape remain the visual focus of the completed accessory.
Once the ends have been secured, the bandana is ready to wear.
Beginner Tips for Linked Crochet
Although the project is compact, beginners may find it easier to approach the construction in small sections.
- Keep the pattern notes visible. The CH2 and CH1 counting instructions are important.
- Identify the center ch2 space before beginning each increase row. This gives you a reliable reference point.
- Do not rush the linked connection. The next LDC is connected to the newly made DC as specified.
- Expect Row 6 to look different. It intentionally uses DCs and ATC rather than LDCs.
- Track each repeated row. The complete body has 23 rows.
- Check both outer increases. They are key points in the Row 2 construction.
- Keep the straps consistent. Both begin with chain 40.
Troubleshooting Guide
The Starting Area Looks Confusing
Return to the first pattern note: the first CH2s do not count as stitches. They are only there to help start the LDC.
The Triangle Is Not Expanding Evenly
Check the Row 2 increase points. The first stitch receives 2 LDC, and the final LDC receives 2 LDC. Also verify the special construction inside the center ch2 space.
The Center Chain Space Does Not Match the Pattern
In Row 2, the center space contains [2LDC, CH2, 1 DC, 1 LDC], and the source specifies that the LDC is connected to the DC.
Row 6 Looks More Open
This is expected. Row 6 is the filet crochet row, and the source explicitly states that it contains no LDCs. The open appearance comes from the chain spaces and skipped stitches used in that row.
I Am Unsure When to Count CH1 as a Stitch
The instruction to count all CH1s as one stitch comes immediately after Row 6. Keep that instruction in mind when returning to the repeated Row 2 construction.
The Two Straps Are Different Lengths
Check that both straps were started with chain 40 and that each was worked from the second chain from the hook with 1 sc per chain. The pattern says to crochet the second strap the same way as the first.
A Useful Way to Read the Pattern While Crocheting
Rather than attempting to read the entire pattern as one block, separate it mentally into construction points.
First comes the magic-ring center and the initial five rows. Then comes Row 6, which changes the stitch approach. After that comes the repeated Row 2 structure, interrupted by the next Row 6 sections. Finally, the completed 23-row triangle moves into the straps and border.
This approach does not change any of the technical instructions. It simply makes the pattern easier to navigate while you work.
Quick Reference for the Body
Keep the following information nearby during the main construction:
- Row 1: CH2, 4 LDC, CH2, 1 DC, 3 LDC in the ring; tighten ring and turn.
- Row 2: Follow the complete increase and center-space instruction.
- Rows 3–5: As Row 2.
- Row 6: Filet crochet construction with ATC, CH1, DC, skips, and the center-space sequence.
- After Row 6: Count all CH1s as 1 stitch.
- Repeat: Row 2 five times, then Row 6, with the complete sequence repeated three times.
- Finish: Five final repetitions of Row 2.
- Total: 23 rows.
Quick Reference for the Finishing
- Begin the first strap with CH 40.
- Starting from the second chain from the hook, work 1 sc per chain.
- Work along the long edge at 2 sc’s per ldc.
- Make the second strap the same way as the first.
- Work the scalloped border on the short sides.
- Border repeat: 1 sc, skip 1, 5 dc in the next stitch, skip 1, repeat.
- Fasten off.
- Weave in the ends.
Frequently Asked Questions
Is the bandana suitable for learning linked crochet?
The original pattern describes this as a small, simple project and specifically presents it as a good project for someone who is new to linked crochet. The repeated LDC construction gives you practice while working toward a finished accessory.
What is the finished size?
The finished size specified by the pattern is 12.5 x 21 inches.
What yarn and color are specified?
The pattern calls for Mary Maxim Sunrise in Desert, using 1 skein.
What hook size is required?
The specified hook is 3.75mm.
What is the stated gauge?
The gauge is 5 ldc x 2 rows = 1 square inch.
How many rows does the body contain?
The construction results in 23 rows, finishing with five repetitions of Row 2.
How are the straps made?
Each strap begins with chain 40. Starting from the second chain from the hook, work 1 sc per chain, then continue along the long edge as instructed.
What border is used?
The short sides are finished with a scalloped border made from repeated groups of 1 sc, a skipped stitch, 5 dc in the next stitch, another skipped stitch, and the repeated sequence.
Final Quality Check
Before considering the project finished, use a few simple checks to review your work:
- Is the body complete with 23 rows?
- Does the finished measurement correspond to the stated 12.5 x 21 inches?
- Were the first CH2s treated as non-counting chains?
- Was the central ch2-space construction followed as written?
- Was Row 6 worked with DCs and ATC rather than LDCs?
- Were the CH1s counted as stitches after Row 6 as instructed?
- Does each strap begin with chain 40?
- Was the long edge worked at 2 sc’s per ldc?
- Was the scalloped border added to the short sides?
- Were all yarn ends fastened off and woven in?
Why the Finished Accessory Is So Practical
A project does not have to be large to teach several useful crochet skills. This bandana begins with a magic ring, introduces linked double crochet, develops a triangle through repeated increases, changes to a filet-style row, returns to the main construction, and then moves into a decorative finishing technique.
The result is a project that combines technique practice with a useful finished object. The triangular silhouette gives the bandana its recognizable shape, while the two straps make it wearable and the scalloped border adds a decorative edge.
The original design was inspired by warm-weather outdoor work and the practical need to keep hair away from the face. That practical purpose remains one of the appealing qualities of the finished project, while its crochet texture and scalloped edge allow it to work equally well as a simple handmade accessory.

Conclusion
This linked crochet bandana is a compact project built around a clear triangular construction. The magic-ring beginning leads into linked double crochet increases, while the filet-style Row 6 introduces a contrasting section before the repeated LDC construction continues.
The technical details are straightforward to track once the important checkpoints are understood: the first CH2s do not count as stitches, the center ch2 space has a specific linked construction, Row 6 contains no LDCs, and the CH1s are counted as stitches after that filet row.
After the 23-row body is complete, the project is finished with two chain-40 straps, 2 sc’s per ldc along the long edge, and a scalloped border along the short sides. Finally, fasten off and weave in the ends.
With its stated 12.5 x 21-inch finished size, one skein of Mary Maxim Sunrise in Desert, and 3.75mm hook, the project offers a practical way to explore linked crochet while creating a wearable handmade bandana.