
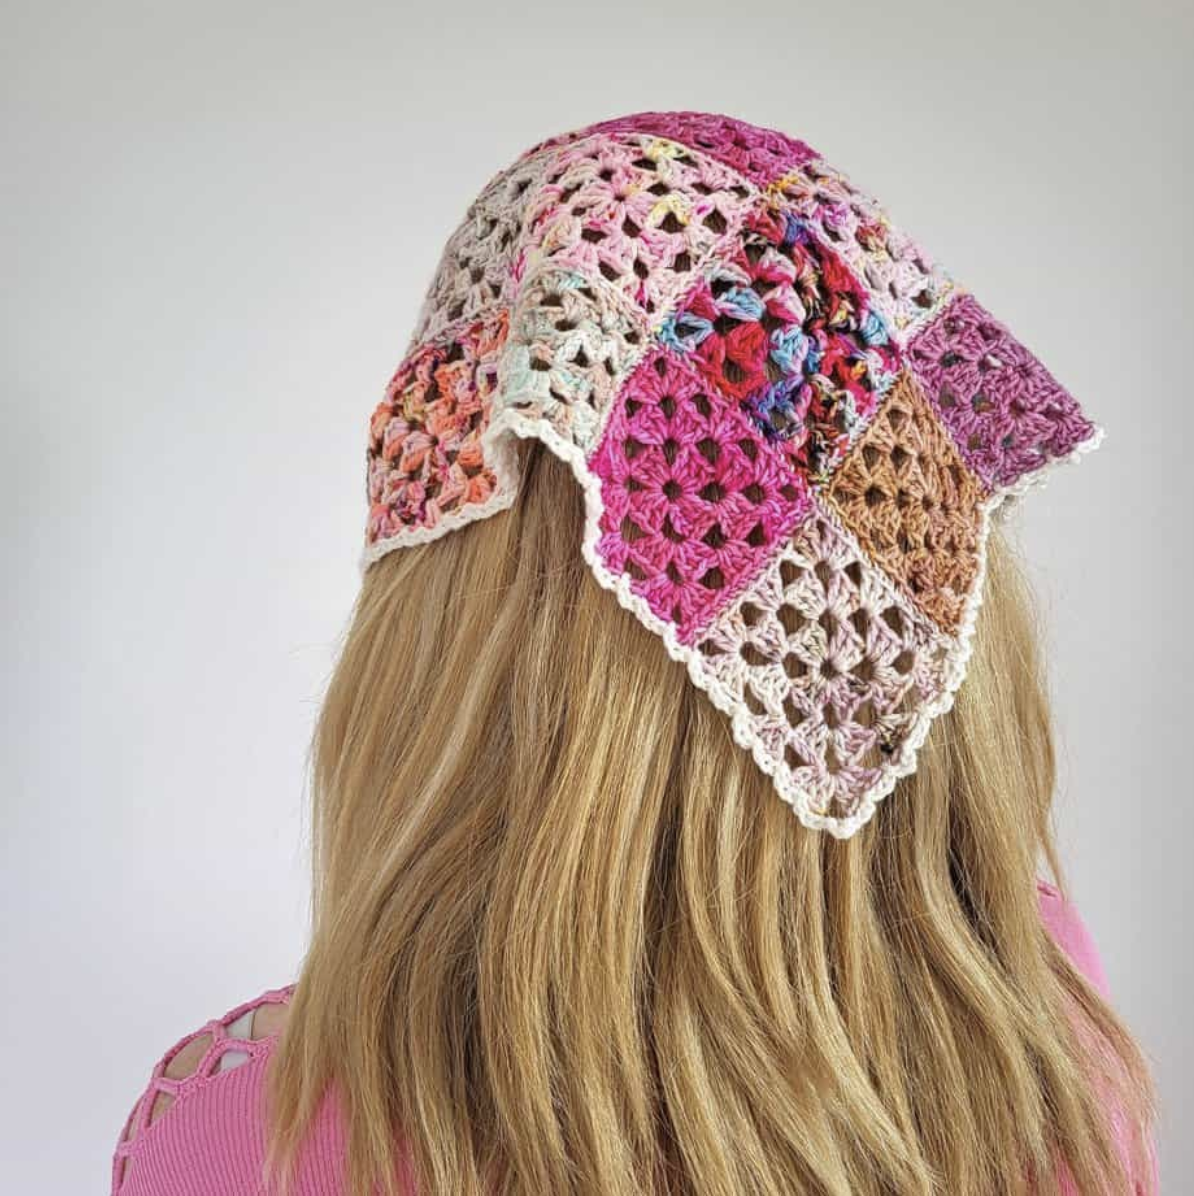

If you are looking for a crochet project that combines classic granny-square techniques with the freedom of colorful patchwork, this crochet bandana head scarf is a beautiful choice. The design is made from small individual motifs that are joined together to form a triangular accessory, then completed with a delicate lacy border and two simple ties.
This project is especially useful for crocheters who have small quantities of fingering weight yarn left from other projects. Rather than needing large amounts of one color, the pattern allows you to bring together different scraps and mini skeins to create a unique handmade accessory.
The finished bandana has a slightly larger shape than a standard bandana. After light blocking, the pictured scarf measures approximately 26 inches [66 cm] wide and 12 inches [30 cm] deep, while the ties measure 10 inches [25 cm] long. It can be worn as a head scarf or styled as a neckerchief.
The construction is divided into several manageable stages: selecting the yarn, crocheting 15 granny squares, making 6 granny triangles, arranging and joining the motifs, lightly blocking the completed patchwork, and finally adding the border and ties.
Project at a Glance
The bandana uses basic crochet stitches, making the project accessible to anyone familiar with making a granny square. The main challenge is not a complicated stitch pattern but keeping the motifs organized and joining them evenly.
- Skill level: Basic stitches; familiarity with making a granny square
- Yarn: Fingering weight yarn
- Approximate yarn amount: 40g
- Main hook: 3.5 mm [E-4]
- Optional smaller version: 3 mm hook
- Granny squares: 15
- Granny triangles: 6
- Finished width: 26 in [66 cm]
- Finished depth: 12 in [30 cm]
- Tie length: 10 in [25 cm]
- Gauge: Not important
- Terms: US crochet terms
The finished measurements are for the pictured bandana after light blocking. Each granny square measures approximately 2.75 inches [7 cm], and each triangle measures approximately 4 inches x 2.75 inches [10 cm x 7 cm].
Gathering Your Crochet Materials
The materials required for this project are simple. You need small amounts of fingering weight yarn in various colors, along with a small amount of neutral yarn for the border and ties.
- Small amounts of fingering weight yarn in various colors
- Small amount of neutral yarn for the border and ties
- 3.5 mm [E-4] crochet hook
- Yarn needle for sewing and weaving in threads
The original project was made with leftover mini skeins containing wool fiber content. The source also states that cotton or acrylic yarn can be used. Approximately 40g of fingering weight yarn is sufficient for the project.
If you would like to make a smaller version, the source notes that a 3 mm hook may be used. The stated finished measurements, however, refer to the pictured version.
Planning the Patchwork Colors
One of the most enjoyable parts of this project happens before the first motif is crocheted. Gather your fingering weight scraps and place the colors together so you can see how they interact.
You can create a coordinated palette by selecting several colors that work harmoniously together. Alternatively, use random colors for a more traditional patchwork feeling. The source also notes that a one-color version would look fantastic.
The border and ties use a small amount of neutral yarn. Keeping this yarn separate while you work the colorful motifs can make the finishing stage easier to organize.

US Crochet Abbreviations
The instructions are written in US crochet terminology. Become familiar with the following abbreviations before starting.
- Beg: beginning
- Ch: chain
- St: stitch
- Sl st: slip stitch
- Dc: double crochet
- Yo: yarn over
- Sp: space
- RS: right side
There are two beginning-chain conventions that are particularly important. Chain 3 at the beginning of a round counts as 1 double crochet. Chain 4 at the beginning of a row counts as 1 double crochet and chain-1 space.
The pattern also uses the term granny cluster for a group of 3 double crochets.
Part One: Making the 15 Granny Squares
The central portion of the bandana begins with 15 granny squares. Each square consists of three rounds. Do not turn your square after each round.
For every square, begin by chaining 5 and slip stitching to the first chain to form a ring.
Round 1
Round 1 (RS): Chain 3, which counts as 1 double crochet here and throughout at the beginning of a round. Work 2 double crochets in the ring. Then repeat the following sequence 3 times: chain 3, 3 double crochets in the ring.
Finish with chain 3 and join with a slip stitch in the 3rd chain of the beginning chain 3. Slip stitch into the next 2 double crochets and the next chain-3 space.
The four chain-3 spaces formed around the ring become the corners of the granny square.
Round 2
Round 2: Chain 3, then work 2 double crochets, chain 3, and 3 double crochets in the same chain space.
Repeat the following sequence 3 times: chain 1, then 3 double crochets, chain 3, and 3 double crochets in the next chain-3 space.
Finish with chain 1 and join with a slip stitch in the 3rd chain of the beginning chain 3. Slip stitch into the next 2 double crochets and the next chain-3 space.
Round 3
Round 3: Chain 3, then work 2 double crochets, chain 3, and 3 double crochets in the same chain space.
Repeat the following sequence 3 times: chain 1, 3 double crochets in the next chain-1 space, chain 1, then 3 double crochets, chain 3, and 3 double crochets in the next chain-3 space.
Finish with chain 1, 3 double crochets in the next chain-1 space, chain 1, and join with a slip stitch in the 3rd chain of the beginning chain 3. Fasten off the yarn.
Repeat these three rounds until you have a total of 15 granny squares.

Checking Your Granny Squares
Before moving on to the triangles, count your completed squares and confirm that you have 15. It is also useful to compare their approximate dimensions. Each square should be approximately 2.75 inches [7 cm].
The pattern states that gauge is not important, so you do not need to treat this measurement as a formal gauge swatch. Instead, it provides a useful reference for keeping the individual motifs reasonably consistent.
If you are using several colors, keep the finished squares organized so that you can later experiment with the final color arrangement without accidentally losing track of the motifs.
Part Two: Crochet the 6 Granny Triangles
The second type of motif is the granny triangle, also described as a half granny square. You need 6 triangles to complete the bandana.
There is no right side for the triangles because both sides are the same. With the first color, chain 5 and slip stitch to the first chain to form a ring.
Triangle Row 1
Row 1: Chain 4, which counts as 1 double crochet and chain-1 space here and throughout at the beginning of a row. Work 3 double crochets, chain 3, 3 double crochets, chain 1, and 1 double crochet in the ring. Turn.
Triangle Row 2
Row 2: Chain 4, 3 double crochets in the first chain-1 space, chain 1, then work 3 double crochets, chain 3, and 3 double crochets in the corner chain-3 space. Chain 1, then work 3 double crochets, chain 1, and 1 double crochet in the last chain-1 space. Turn.
Triangle Row 3
Row 3: Chain 4, 3 double crochets in the first chain-1 space, chain 1, 3 double crochets in the next chain-1 space, chain 1, then work 3 double crochets, chain 3, and 3 double crochets in the corner chain-3 space.
Continue with chain 1, 3 double crochets in the next chain-1 space, chain 1, and 3 double crochets, chain 1, and 1 double crochet in the last chain-1 space. Fasten off the yarn.
Repeat Rows 1 through 3 until you have 6 triangles.

Understanding the Motif Assembly
Once all 21 motifs have been crocheted, the project changes from motif-making to construction. This is an important transition because the arrangement of the pieces determines the shape of the final accessory.
Lay the squares and triangles out according to the placement shown in the assembly layout. Do not rely on memory or arrange the motifs randomly. The triangles and squares are intended to occupy specific positions within the overall shape.
The recommended joining sequence is to attach the motifs first in rows and then attach each row together. This approach can make it easier to keep the overall arrangement organized.

Joining the Motifs Neatly
Hold the right sides of the motifs together and join them through the back loop only by sewing with whip stitching.
If whip stitching is not your preferred joining method, the source also allows you to use a crochet slip stitch or single crochet joining method. The important point is to keep the joins even and avoid creating unnecessary tension.
Try to keep your stitches loose. Tight joining can cause the patchwork to pucker, while loose and even stitches help the motifs sit naturally together.
Take your time during this stage. The individual squares are small, and a neat joining process will have a significant effect on the appearance of the finished bandana.
Blocking the Completed Patchwork
After all the motifs have been joined, the finished piece may look slightly uneven. This is not necessarily a problem. The pattern specifically explains that blocking will sort out any kinks.
Pin out the finished piece and steam block lightly. The stated finished measurements of approximately 26 inches [66 cm] wide and 12 inches [30 cm] deep are measured after light blocking.

Beginning the Border and Ties
After the patchwork has been joined and lightly blocked, the border and ties can be added.
With the right side facing, join the yarn with a slip stitch in the top-right corner chain-4 space of the triangle.
To make the first tie, chain 50. Work 1 single crochet in the 2nd chain from the hook and in each chain across, giving 49 single crochets. Make a slip stitch back into the corner space. The first tie is now complete.

Working Side 1 of the Border
The first side of the border is made using chain stitches and slip stitches that follow the granny clusters and chain-1 spaces.
Side 1: Work the following sequence 3 times: chain 3, slip stitch into the middle double crochet of the next granny cluster, chain 3, and slip stitch into the next chain-1 space.
Then chain 3, skip the join between squares, and slip stitch into the next chain space. Repeat from the beginning across to the next corner space, which is the bottom peak of the scarf.
At this corner, chain 3 and slip stitch back into the same space.
The edging is intentionally delicate, so maintain even tension while moving between the granny clusters and chain spaces. The border should follow the edge of the patchwork without pulling the motifs together.


Working Side 2 of the Border
The second side uses the same decorative edging structure. This symmetry helps frame the triangular patchwork evenly.
Side 2: Work the following sequence 3 times: chain 3, slip stitch into the middle double crochet of the next granny cluster, chain 3, and slip stitch into the next chain-1 space.
Then chain 3, skip the join between squares, and slip stitch into the next chain space. Continue repeating from the beginning across to the next corner space, which is the top-left corner chain-4 space of the triangle.
Once you reach this corner, the second tie can be made.
Making the Second Tie
Chain 50. Work 1 single crochet in the 2nd chain from the hook and in each chain across, giving 49 single crochets. Make a slip stitch back into the corner space.
This completes the second tie. The pattern states that you may add more chains if you want the ties to be longer, while the pictured construction uses 50 chains for each tie.
After completing the second tie, fasten off the yarn and weave in all ends.
Construction Checkpoints
Patchwork projects are easier to manage when you pause at several points and verify the construction before moving forward.
Motif Check
- 15 granny squares are complete.
- 6 granny triangles are complete.
- Each granny square has 3 rounds.
- Each triangle has 3 rows.
- The squares were not turned after every round.
- The triangles were turned according to the written instructions.
Assembly Check
- All motifs have been laid out according to the assembly placement.
- The motifs are joined in rows first.
- The rows are then attached together.
- Joining stitches are loose enough to avoid puckering.
- The finished patchwork has been lightly steam blocked.
Border Check
- The first tie starts at the top-right corner chain-4 space.
- The first tie uses 50 chains and 49 single crochets.
- Side 1 reaches the bottom peak.
- Side 2 reaches the top-left corner chain-4 space.
- The second tie uses 50 chains and 49 single crochets.
- All ends are woven in after fastening off.
Tips for Consistent Granny Motifs
Making 15 squares and 6 triangles means that consistency matters. Although gauge is not important for this project, noticeably different motif sizes can make the assembly stage more difficult.
When making the granny squares, pay attention to the corner chain-3 spaces. These spaces are used repeatedly throughout the rounds and are essential to maintaining the square structure.
For the triangles, remember that the pattern does not designate a right side. Both sides are the same. Follow the written turning instructions after the first two rows and fasten off after Row 3.
Keeping your yarn tension reasonably consistent from one motif to the next will make the final patchwork easier to arrange.
Tips for a Better Joining Finish
Joining is the stage where the individual pieces become one accessory, so it is worth working slowly. Place the motifs carefully before beginning to sew.
When using the recommended whip-stitch method, hold the right sides together and sew through the back loops only. Avoid pulling each stitch tightly. The pattern specifically recommends loose stitches to prevent puckering.
If you prefer crochet joining, a slip stitch or single crochet joining method can be used instead. The source gives both as alternatives to sewing.
Remember that the patchwork does not need to look perfectly smooth immediately after joining. Light blocking is part of the finishing process and can help settle the completed shape.
Color Planning Without Wasting Yarn
Since only approximately 40g of fingering weight yarn is needed, this is an excellent project for small leftovers. Before beginning each motif, compare the available scraps and decide how you want the colors distributed.
You can keep the project visually unified by repeating a few colors across multiple motifs. Alternatively, let each granny square and triangle have its own combination for a more eclectic patchwork effect.
The pattern specifically encourages experimentation with mini skeins and leftovers. There is no requirement to follow a particular color scheme, and a single-color version is also an option.
What to Do If You Want a Smaller Version
The pictured bandana is approximately 26 inches wide and 12 inches deep after light blocking. If you want a smaller version, the source notes that you can use a 3 mm hook.
This is an optional size adjustment mentioned by the original pattern. The technical instructions and stated finished dimensions above refer to the main version made with the 3.5 mm [E-4] hook.
How to Adjust the Ties
The standard ties are approximately 10 inches [25 cm] long. Each is created by chaining 50, then working 49 single crochets back along the chain before slip stitching into the corner space.
If you want longer ties, the pattern specifically states that you may add more chains. This gives you a simple way to customize the tie length without changing the main patchwork construction.
Using the Finished Piece as a Head Scarf
The bandana was designed to be slightly larger than a standard size so that it can comfortably cover the head. Its triangular shape and two ties make it a practical handmade head accessory while the colorful patchwork adds a decorative element.
The final measurements are approximately 26 inches wide by 12 inches deep after light blocking, with ties approximately 10 inches long.
Because the project is made from fingering weight yarn, the resulting accessory is lightweight while still providing the distinctive visual texture of granny crochet.
Wearing It as a Neckerchief
The same design can also be worn around the neck. The source describes it as a versatile accessory that can be used as a head scarf or neckerchief.
The patchwork arrangement makes it particularly suitable for outfits where you want a small handmade statement piece. Color selection can be used to make the finished accessory either subtle and coordinated or bright and playful.
Finishing the Crochet Bandana
Once both ties have been completed, fasten off the yarn and weave in all ends. Examine the border to make sure the decorative edging is even and the joins remain neat.
If the patchwork needs further settling, the light blocking process described in the pattern can help smooth the final shape. The finished accessory should retain the triangular silhouette formed by the 15 granny squares and 6 granny triangles.

Frequently Asked Questions
What yarn weight is used?
The pattern uses fingering weight yarn. Approximately 40g can be used, with small amounts in various colors and a small amount of neutral yarn for the border and ties.
What crochet hook size is required?
The main version uses a 3.5 mm [E-4] crochet hook. The source mentions a 3 mm hook as an option for a smaller version.
How many granny squares are required?
You need 15 granny squares. Each square is worked through 3 rounds.
How many triangles are needed?
You need 6 granny triangles. Each triangle is worked through 3 rows.
Is gauge important?
No. The pattern states that gauge is not important. Approximate motif measurements are provided as useful references.
Which crochet terminology is used?
The pattern is written in US crochet terms.
How long are the ties?
The pictured ties are approximately 10 inches [25 cm] long. Each tie is made with a 50-chain starting chain and 49 single crochets worked back along it.
Can the ties be made longer?
Yes. The source specifically notes that you may add more chains to make the ties longer.
How should the motifs be joined?
The recommended method is to hold the right sides together and sew through the back loop only using whip stitching. A crochet slip stitch or single crochet joining method can also be used.
What should I do if the patchwork puckers?
Check your joining tension and keep the stitches loose. The pattern specifically recommends loose stitches to avoid puckering. Light blocking can also help settle the finished piece.
Final Pattern Reference
For quick reference, the complete project consists of the following technical elements:
- 3.5 mm [E-4] crochet hook
- Fingering weight yarn
- Approximately 40g yarn
- Various yarn colors
- Small amount of neutral yarn for border and ties
- 15 granny squares
- 6 granny triangles
- Granny square size approximately 2.75 in [7 cm]
- Triangle size approximately 4 in x 2.75 in [10 cm x 7 cm]
- Finished size approximately 26 in [66 cm] wide x 12 in [30 cm] deep after light blocking
- Ties approximately 10 in [25 cm] long
- Gauge is not important
- US crochet terms
- Chain 3 counts as 1 dc at the beginning of a round
- Chain 4 counts as 1 dc and ch-1 space at the beginning of a row
- 3 dc equals a granny cluster
Final Thoughts
This patchwork crochet bandana brings together many of the things that make crochet enjoyable: colorful yarn, classic granny construction, small manageable motifs, and the satisfaction of assembling separate pieces into a finished wearable item.
The project begins simply with granny squares and triangles, but the final arrangement gives it a much more distinctive appearance. The 15 squares and 6 triangles create the patchwork center, while the border and ties turn that center into a finished accessory.
It is also an excellent way to make meaningful use of small fingering weight yarn scraps. You can experiment with mini skeins, leftovers, coordinated colors, random combinations, or a single color while keeping the underlying pattern construction unchanged.
For the neatest result, focus on consistency while making the motifs, follow the assembly layout carefully, and keep your joining stitches loose. Once the patchwork is complete, light steam blocking can help smooth out any kinks before the border is added.
Finally, the simple 50-chain ties and delicate border provide the finishing details that make the piece practical to wear. Whether you choose to style it as a head scarf or a neckerchief, the finished patchwork bandana offers a colorful handmade accessory with a timeless crochet character.