
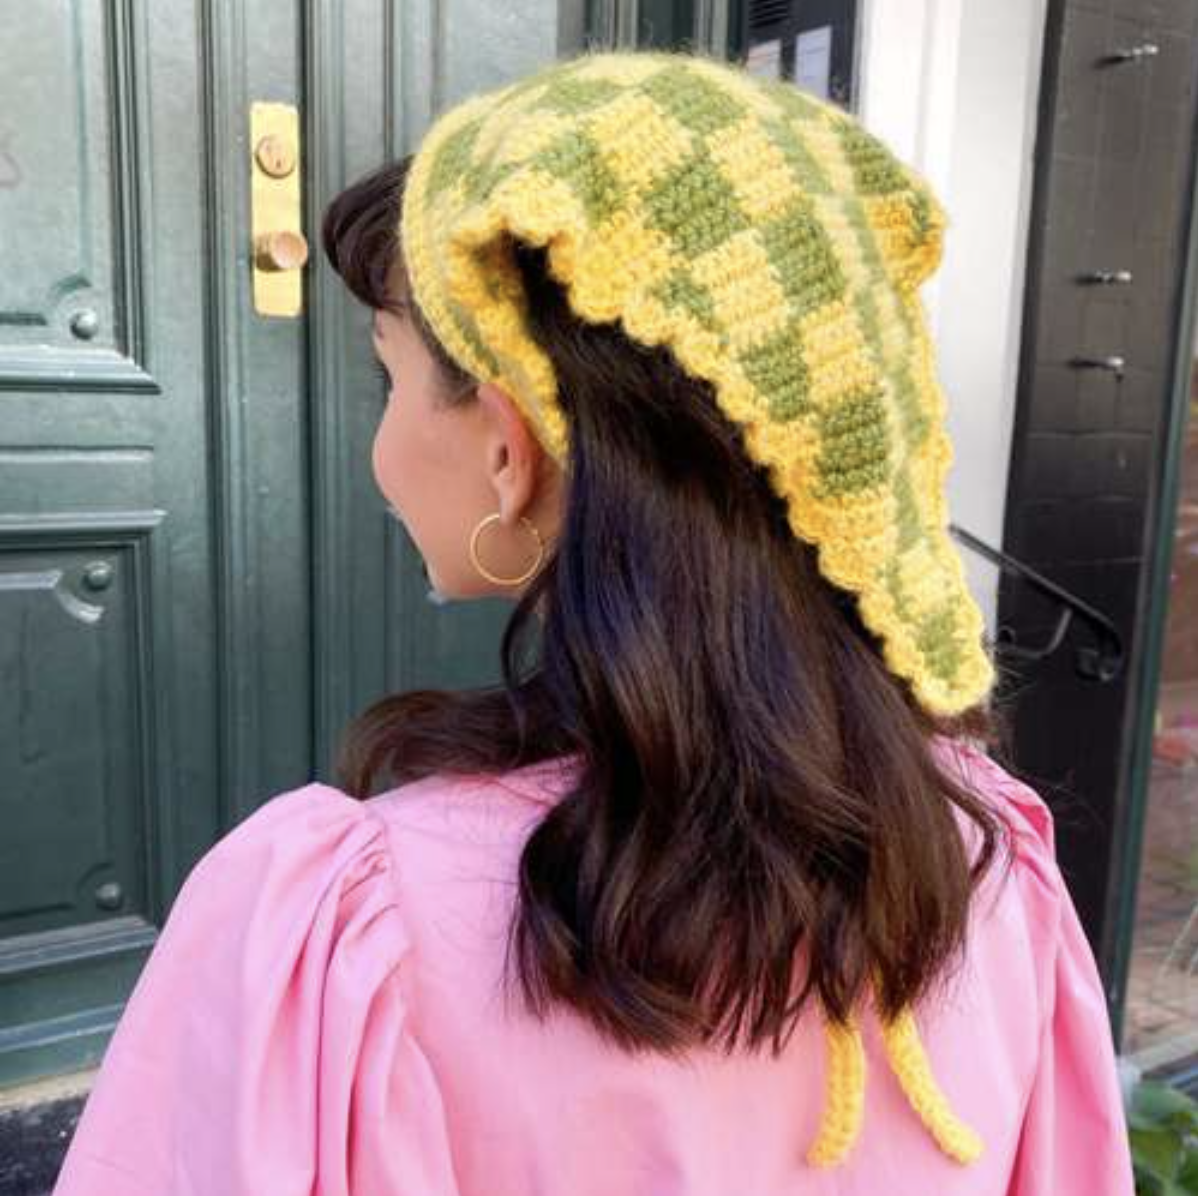
The Bonnie Bandana is a distinctive crochet accessory built around color, texture, and simple but carefully organized shaping. Designed by Laura Hjertefryd / Laura Takahashi Christiansen for Hobbii Design, this one-size bandana measures 34 cm (13.4 inches) in width and is designed especially for the cold season rather than as a traditional lightweight bandana.
What makes this project especially interesting is the way the color arrangement develops into a chequered pattern while the fabric gradually narrows. The bandana is worked in one piece, then finished with a waved edging and tie strings crocheted directly onto the completed piece. The combination of Friends Cotton 8/4 and Diablo creates a thick yet soft feeling, while the changing colors provide plenty of visual interest.
This guide presents the pattern as a workshop-style process. Instead of simply moving from one instruction to the next, the sections emphasize useful checkpoints so you can understand what you should be watching as the bandana develops. The original technical instructions remain unchanged, including the hook size, yarn combinations, stitch counts, row progression, color changes, edging construction, and tie-string measurements.

Project Overview
Bonnie is an intermediate crochet project. The pattern is worked with three strands in total: one strand of Friends Cotton 8/4 and two strands of Diablo. The two Diablo strands come from the same skein, with the crocheter working from both ends of that skein at the same time. This detail is important because the construction depends on maintaining the intended three-strand combination throughout the work.
The bandana uses two color combinations. The yellow combination pairs Friends Cotton 8/4 in Lemon Curd (22) with Diablo in Primrose (51). The green combination pairs Friends Cotton 8/4 in Olive (109) with Diablo in Olive (20).
The main bandana starts with Yellow and is built through alternating blocks of yellow and green. The first section establishes the initial color arrangement, while later rows change the color worked over each section to create the chequered effect. Every row becomes shorter because the first stitch is skipped at the beginning of each row.
Once the final stitch remains, the main bandana is fastened off. The waved edging is then added directly along the sides, followed by the tie strings. These finishing stages are not separate pieces that need to be attached later; they are crocheted directly onto the bandana.
Materials and Yarn Setup
- 1 skein of Friends Cotton 8/4 col Lemon Curd (22)
- 1 skein of Friends Cotton 8/4 col Olive (109)
- 1 skein of Diablo col Primrose (51)
- 1 skein of Diablo col Olive (20)
- Crochet hook 5.5 mm
Friends Cotton 8/4 from Hobbii is 100% cotton. One 50 g (1.75 oz) skein contains 160 m (174 yds).
Diablo from Hobbii is made from 40% acrylic, 30% mohair, and 30% polyamide. One 25 g (0.8 oz) skein contains 225 m (246 yds).
The working method is one strand of Friends Cotton 8/4 together with two strands of the same color Diablo. The pattern specifically notes that the two Diablo strands should be worked from both ends of the same skein at the same time.
The Two Color Combinations
Yellow: one strand Friends Cotton 8/4 col Lemon Curd (22) plus two strands Diablo col Primrose (51).
Green: one strand Friends Cotton 8/4 col Olive (109) plus two strands Diablo col Olive (20).
Before beginning, it is helpful to arrange the yarn so the three working strands can move together without unnecessary tangling. The pattern depends on these three strands being treated as one working unit, so keeping them organized makes the color changes easier to manage.
Gauge, Size, and Pattern Language
The finished project is one size. The stated width is 34 cm (13.4 inches).
The gauge is 10 x 10 cm (4” x 4”) = 16 sl st x 17 rows.
The pattern uses the following abbreviations:
- Ch = chain
- Sl st = slip stitch
- Sc = single crochet
- Dc = double crochet
- Hdc = half double crochet
Because the pattern is written as a compact set of instructions, it is useful to keep the stitch-count checkpoints nearby while working. The stitch count decreases by one stitch with every row because the first stitch is skipped at the beginning of each row.
Understanding the Construction Before You Crochet
Bonnie is worked in one piece. The main bandana is created first, followed by two finishing elements: the waved edging and the tie strings.
The main section begins with a chain of 55 plus 1 turning chain. The first row establishes alternating blocks of five stitches in yellow and five stitches in green. From that point, the piece becomes progressively narrower.
The important construction idea is that the row length is not maintained. Instead, every new row begins by skipping the first stitch. This creates the gradual reduction that eventually produces the bandana shape.
At the same time, the colors are not simply carried in one unchanging arrangement. The first five rows establish one relationship between the colors, and Row 6 changes the relationship so that the chequered effect can develop. The following rows continue the alternating color placement, and the color arrangement changes every five rows.
Keeping these two ideas separate can make the pattern much easier to understand: the shape is created by the skipped first stitch, while the visual pattern is created by the color placement.
Stage One: Starting the Bandana
Start with Yellow.
The first instruction is:
Ch 55 1 turning chain (55).
The pattern then gives an important instruction that applies throughout the bandana section: when starting each row, skip the first stitch. This means the stitch count decreases by 1 stitch for every row.
This is one of the most important checkpoints in the entire project. If the first stitch is accidentally worked instead of skipped, the shaping will not follow the stated progression.
Row 1 Checkpoint
For Row 1, work alternately 5 sc yellow and 5 sc green until the end of the row.
The goal at this stage is to establish the first color blocks clearly. Rather than concentrating only on the finished appearance, look at the row as a sequence of five-stitch color sections.
Once Row 1 is complete, you should also be able to identify where the yellow and green sections sit. This makes it easier to follow the color placement in the next rows.
Rows 2–5 Checkpoint
For Rows 2–5, skip the first stitch and work alternately yellow over yellow and green over green.
The stated stitch counts are:
- Row 2: 54
- Row 3: 53
- Row 4: 52
- Row 5: 51
These counts provide a useful progress check. If the count does not follow the stated sequence, stop and review the beginning of the row before continuing.
During these rows, the instruction is to keep yellow over yellow and green over green. This maintains the first color-block arrangement before the pattern changes direction in Row 6.

Stage Two: Creating the Chequered Pattern
Row 6
Row 6 is the transition point in the color arrangement.
Skip the first stitch, and now work over yellow and yellow over green, to create the chequered pattern (50).
The stated count for Row 6 is 50 stitches.
This row is worth treating as a dedicated checkpoint because it changes how the colors relate to the stitches underneath. The pattern specifically identifies this row as the point where the chequered pattern is created.
Do not add an extra row or alter the color sequence. The visual effect develops from following the stated color placement and continuing the shaping at the same time.
Rows 7–10
For Rows 7–10, skip the first stitch, and work alternately green over green and yellow over yellow.
The pattern then instructs you to continue in this manner, changing the colors every 5 rows until 1 stitch remains.
This is an excellent place to establish a rhythm. At the beginning of each row, remember the shaping instruction first: skip the first stitch. Then follow the color placement for that section. Keeping these two actions mentally separate can reduce mistakes.
The Repeating Progression
After Row 10, continue like this, changing colors every 5 rows until 1 st remains. Fasten off.
The important phrase here is “changing colors every 5 rows.” The pattern does not ask you to improvise new color blocks. Instead, the established sequence continues while the bandana gradually narrows.
A practical way to work through this section is to check three things at the beginning and end of each row:
- Confirm that the first stitch has been skipped.
- Confirm that the colors are being worked according to the current five-row section.
- Keep track of the changing stitch count as the bandana narrows.
These are process checkpoints rather than additional pattern instructions. They help you stay aligned with the original pattern without changing it.
How the Shape Develops
The shape of Bonnie comes from a very straightforward repeated reduction: one stitch is lost at the beginning of every row because the first stitch is skipped.
That means the long starting edge gradually becomes shorter as the rows progress. At the same time, the color blocks create a strong visual structure across the narrowing fabric.
The combination is what gives the finished bandana its recognizable triangular form. The shaping does not require a separate series of complicated increases and decreases. Instead, the pattern uses the skipped first stitch as its consistent shaping instruction.
For an intermediate crocheter, this makes the project particularly useful as a study in how a repeated small action can control the overall silhouette of a finished accessory.
Fastening Off the Main Bandana
Continue the established pattern until 1 stitch remains. The source instruction is to fasten off at that point.
Before moving to the edging, take a moment to look over the completed bandana. The color arrangement should show the intended chequered appearance, and the fabric should have narrowed progressively from the original starting chain.
This is also a good point to make sure the yarn ends are available for finishing. The edging and tie strings are worked directly onto the bandana, so the completed main section needs to be ready for the next construction stage.
Stage Three: Adding the Waved Edging
The waved edging is crocheted with Yellow.
Place the work with the right side facing you. Join the yarn in the side of Row 1.
Work 1 sc, then repeat the following sequence along the side:
(3 dc in one row, 2 sc)
Continue this repeat along the side until reaching the tip at the final row. Then continue along the other side.
Finish with one sc in the first row, on the opposite side from where you started.
The edging is an important visual finishing element because it follows the outer sides of the triangular bandana. The combination of 3 dc in one row followed by 2 sc creates the waved effect described in the pattern.
Edging Checkpoint
When checking your edging, focus on placement rather than trying to force a particular number of repeats. The source gives the construction in relation to the rows: begin at the side of Row 1, work the stated repeat along the side, reach the tip at the final row, continue along the other side, and finish with one sc in the first row on the opposite side.
This keeps the edging tied to the actual shape of your completed bandana.
Stage Four: Building the Tie Strings Directly Onto the Bandana

The tie strings are also worked with Yellow.
Begin with:
Ch 80
Continue along the wrong side of the bandana and work 1 sc in each stitch along the opposite side of Row 1.
Then:
Ch 80, turn.
Now work 1 hdc in each stitch.
The source gives the resulting stitch count as:
80 + 55 + 80 = 215
Fasten off and weave in the ends.
Why the Tie-String Checkpoint Matters
The tie-string stage contains several exact numbers in a short sequence, so it is helpful to read the entire instruction before beginning. There are 80 chains at the first end, the work then crosses the opposite side of Row 1 with 1 sc in each stitch, followed by another 80 chains, and then the return is worked in hdc.
The source explicitly records the combined count as 215. Keeping this checkpoint visible while working makes it easier to verify that the construction has been followed as written.
Finishing the Bandana
After the final hdc section, fasten off and weave in the ends.
Finishing is especially important on a project such as Bonnie because the accessory is handled and tied when worn. Take time to secure and weave in the yarn ends neatly according to your usual finishing method without changing the pattern’s construction.
Once the ends are woven in, gently arrange the bandana so the triangular shape, waved edging, and tie strings are easy to see. The finished width given by the pattern is 34 cm (13.4 inches).
Stitch Checkpoints at a Glance
The following checklist summarizes the exact progression from the source without adding new pattern instructions.
- Start with Yellow.
- Ch 55 and make 1 turning chain (55).
- Row 1: alternate 5 sc yellow and 5 sc green until the end.
- Rows 2–5: skip the first stitch and work yellow over yellow and green over green.
- Row counts: 54, 53, 52, 51.
- Row 6: skip the first stitch and follow the stated color change to create the chequered pattern (50).
- Rows 7–10: skip the first stitch and work alternately green over green and yellow over yellow.
- Continue changing colors every 5 rows until 1 stitch remains.
- Fasten off the main bandana.
- With Yellow, add the waved edging along both sides.
- With Yellow, make the tie strings using Ch 80 at each end.
- Work 1 sc in each stitch along the opposite side of Row 1.
- Ch 80 and turn.
- Work 1 hdc in each stitch (80+55+80 = 215).
- Fasten off and weave in ends.
Common Workflow Mistakes to Watch For
Forgetting the First-Stitch Decrease
The source emphasizes that the first stitch is skipped when starting each row. Because this decreases the stitch count by one stitch for every row, forgetting the skip affects the shaping. Treat this as the first checkpoint whenever you begin a new row.
Mixing Up the Two Color Combinations
Remember that Yellow is Friends Cotton 8/4 Lemon Curd (22) with Diablo Primrose (51), while Green is Friends Cotton 8/4 Olive (109) with Diablo Olive (20). Each color combination consists of one Friends Cotton 8/4 strand and two Diablo strands.
Using Only One Diablo Strand
The pattern specifically requires two strands of Diablo of the same color. These are worked from both ends of the same skein at the same time. Maintaining this three-strand setup is part of the original construction and should not be substituted with a different yarn arrangement.
Changing the Color Rhythm Too Early
The pattern changes colors every 5 rows. The first five rows establish the initial arrangement, Row 6 creates the chequered pattern, Rows 7–10 continue the stated arrangement, and the established method continues from there.
Changing the Edging Construction
The waved edging has its own specific sequence: 1 sc at the beginning, then repeated sections of 3 dc in one row and 2 sc, continuing toward the tip and then along the other side. Keeping the edging connected to the rows of the completed bandana helps maintain the intended shape.
Tips for Keeping the Three Strands Organized
Because each working color uses one strand of Friends Cotton 8/4 and two strands of Diablo, yarn management deserves attention. Keep the three strands aligned as you crochet rather than allowing one strand to become consistently looser than the others.
When switching between Yellow and Green, make sure the complete three-strand color combination changes together. The visual effect of Bonnie depends on the coordinated color changes, while the yarn combination provides the thick yet soft feeling described by the pattern.
It can also help to pause occasionally and look at the fabric from a short distance. Color changes are easier to recognize across the full fabric than when you are concentrating on only the stitches immediately under your hook.
Reading the Pattern as a Colorwork Exercise
Bonnie is a useful project for seeing how color placement can transform a simple stitch structure. The stitches themselves are familiar: sc, dc, and hdc are used in different parts of the pattern. The visual character comes from where those stitches are worked in relation to the two colors.
The bandana therefore rewards careful observation. Rather than rushing through the rows, compare each new section with the previous color arrangement. The pattern tells you exactly when to maintain yellow over yellow and green over green, and when the arrangement changes to produce the chequered appearance.
This is also why the row checkpoints matter. The numbers are not just measurements; they show how the fabric is narrowing while the color design is progressing.
Final Project Review
Before considering the Bonnie Bandana finished, review the major construction points:
- The project is one size.
- The finished width is 34 cm (13.4 inches).
- The main piece is worked in one piece.
- The main section begins with Yellow.
- Each working color uses one strand of Friends Cotton 8/4 and two strands of Diablo.
- The first stitch is skipped at the beginning of every row in the bandana section.
- The stitch count decreases by one stitch for every row.
- The color arrangement changes every 5 rows as specified.
- The waved edging is crocheted directly onto the sides of the bandana.
- The tie strings are also crocheted directly onto the bandana.
- The final tie-string count is 80+55+80 = 215.
- The project is fastened off and the ends are woven in at the end.
Frequently Asked Questions
What size is the Bonnie Bandana?
The pattern is one size and gives a finished width of 34 cm (13.4 inches).
What crochet hook is used?
The pattern uses a 5.5 mm crochet hook.
How many strands are worked together?
Three strands are worked together: one strand of Friends Cotton 8/4 and two strands of Diablo. The two Diablo strands are taken from both ends of the same skein.
What colors are used?
The Yellow combination is Friends Cotton 8/4 Lemon Curd (22) with Diablo Primrose (51). The Green combination is Friends Cotton 8/4 Olive (109) with Diablo Olive (20).
How does the bandana become narrower?
The first stitch is skipped when starting each row, decreasing the stitch count by one stitch for every row.
When does the color pattern change?
The pattern changes colors every 5 rows. Row 6 is specifically described as creating the chequered pattern, followed by the stated color arrangement in Rows 7–10 and the continuation of the same method.
How are the ties made?
With Yellow, Ch 80, continue along the wrong side of the bandana and work 1 sc in each stitch along the opposite side of Row 1, then Ch 80 and turn. Work 1 hdc in each stitch. The source gives the count as 80+55+80 = 215.
Enjoy the Finished Bonnie Bandana
The Bonnie Bandana brings together several satisfying crochet techniques in one compact project: progressive shaping, coordinated color changes, a textured three-strand yarn combination, decorative edging, and directly crocheted tie strings.
The key to a successful result is not adding complexity to the pattern. Instead, concentrate on following the original checkpoints accurately. Skip the first stitch at the beginning of each row, observe the stated color arrangement, respect the five-row color rhythm, and keep the three yarn strands working together. Once the main piece is complete, the waved edging and tie strings provide the finishing structure.
With its chequered color play and thick yet soft feeling, Bonnie is designed to be worn during the cold season while still retaining the recognizable character of a bandana. The final triangular shape, waved edging, and long ties complete the design and make the construction easy to appreciate from both the front and back.
Take your time with the checkpoints, keep the original stitch counts in view, and let the color changes build the design row by row. When the final ends have been woven in, the Bonnie Bandana is ready to enjoy.