
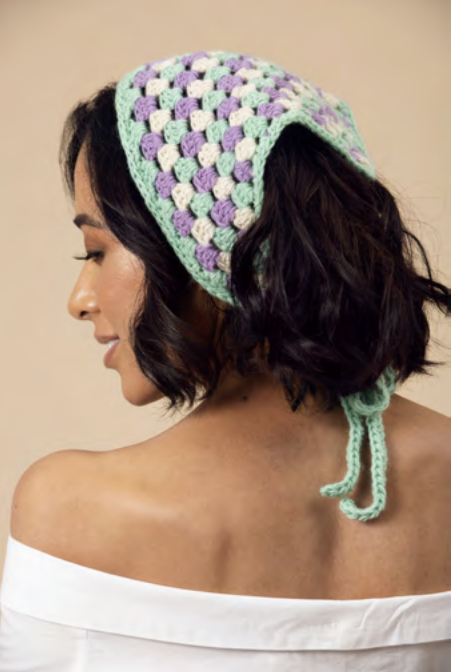
The Sofia Bandana is a simple crochet accessory designed by Toni Lipsey, with an easy construction that makes it a practical project for crocheters who want to practice double crochet, chain spaces, color changes, and clean finishing techniques. The finished bandana measures approximately 18 inches wide by 8 inches long, creating a compact triangular shape that can be worn as a stylish handmade accessory.
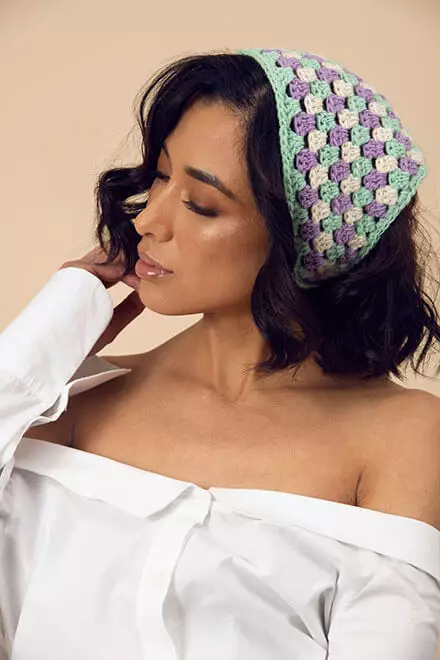
This guide presents the project as a complete crochet workshop, taking you from yarn preparation and gauge through the striped body, color changes, ties, edging, and final finishing. The original pattern instructions remain the technical reference throughout, while the additional explanations are intended to make the process easier to follow, especially if you are still becoming comfortable with crochet pattern terminology.
Project Overview
The Sofia Bandana is rated Easy and is made in one size. Its finished measurements are 18 inches wide by 8 inches long. The project is worked with a US I/9 (5.5mm) crochet hook, or a hook size needed to obtain the stated gauge.
The design uses AMANO SKINNY YANA, with each hank containing 100g and 437 yards. The pattern uses a three-stripe technique and has an important construction feature: the yarn is not cut every time the color changes. Instead, the yarn is carried up the side of the work.
That detail is especially useful for keeping the color transitions efficient. It also means that the side of the bandana is an active part of the construction, so keeping your color changes neat and your carried yarn controlled will help the finished piece look polished.
Materials You Will Need
- Hook: US I/9 (5.5mm) crochet hook or size needed to obtain gauge.
- Yarn A: 1 hank AMANO SKINNY YANA, 100g per 437yd hank, #1502 Blanca, 55 yards.
- Yarn B: 1 hank AMANO SKINNY YANA, 100g per 437yd hank, #1516 [Unknown], 55 yards.
- Yarn A as listed in the source: 1 hank AMANO SKINNY YANA, 100g per 437yd hank, #1512 Botanical, 115 yards.
- Scissors.
- Tapestry needle.
The original source identifies the third yarn line with the letter A, even though the instructions use A, B, and C for the three-color sequence. That source labeling has been retained here rather than changing or interpreting it.
Before You Begin: The Most Important Pattern Notes
There are several instructions that should be understood before the first stitch is made. They affect the entire construction of the bandana.
- Hold the yarn double throughout.
- The pattern uses a three-stripe technique.
- Do not cut the yarn when changing color.
- Carry the yarn up the side of the work.
- Change color on the last stitch of each row unless otherwise instructed.
- The starting ch-4 counts as dc + ch 1.
These instructions work together. The three-stripe appearance is not achieved by cutting and rejoining the yarn after every row. Instead, the colors are changed as instructed while the unused yarn is carried along the side.
For a beginner, the most useful habit is to pause at every row ending and check the color-change instruction before turning. Doing this consistently is much easier than discovering several rows later that the stripe sequence has shifted.
Understanding the Gauge
The stated gauge is 3.5 inches equal to 4 3dc groups, and 3.75 inches equal to 8 rows. The source instructs you to adjust the hook to meet gauge.
Gauge is particularly important when you want your finished bandana to resemble the stated 18-inch wide by 8-inch long measurements. Even when the project is relatively small, differences in stitch height and width can accumulate as the rows progress.
If your gauge does not match, the pattern specifically tells you to adjust your hook. Do not change the stitch instructions or row count to compensate. The technical instructions remain the same; the hook is the element that should be adjusted to meet gauge.
Reading the Color Sequence
The pattern begins with A in Row 1. At the end of Row 1, the color changes to B. At the end of Row 2, the color changes to C. At the end of Row 3, the color changes to A. Row 4 then changes to the next color at the end of the row, and Rows 5 through 18 continue the established color-change sequence.
The most important point is that the colors are changed at the specified point rather than at the beginning of an unrelated row. Because the source says to change color on the last stitch of each row unless otherwise instructed, this is a good place to slow down and make sure the transition is secure.
When carrying the yarn up the side, avoid pulling it tightly. A carried strand that is too tight can draw the edge inward. At the same time, it should not be left excessively loose. Aim for a relaxed strand that follows the natural edge of the fabric.

Row-by-Row Crochet Instructions
Row 1: Establishing the Beginning
With A, chain 5. Work (3dc, ch 1, dc) in the 5th chain from the hook. Turn, then change color to B.
This first row establishes the foundation of the triangular construction. Take care when working into the 5th chain from the hook, since this first group forms the starting point from which the following rows expand.
After completing the row, turn your work and change to B as instructed. Remember that the pattern uses the yarn double throughout.
Row 2: Beginning the Expansion
Chain 4. Work 3dc in the first ch-1 space, ch 1, 3dc in the turning-chain space, ch 1, dc in the 3rd chain of the turning chain. Turn, then change color to C.
The starting ch-4 is significant because it counts as a double crochet plus a chain 1. Keeping that counting rule in mind will make the following rows easier to understand.
At the end of the row, change to C. This continues the three-stripe technique without cutting the yarn.
Row 3: Adding Another 3dc Group
Chain 4. Work 3dc in the first ch-1 space, ch 1, 3dc in the next ch-1 space, ch 1, 3dc in the turning-chain space, ch 1, dc in the 3rd chain of the turning chain. Turn, then change color to A.
This row introduces another 3dc group into the growing fabric. Pay attention to the sequence of ch-1 spaces because these spaces provide the locations for the 3dc groups.
Row 4: Establishing the Repeat
Chain 4. Work 3dc in the first ch-1 space, ch 1, then work (3dc in the next ch-1 space, ch 1) to the turning chain. Work 3dc in the turning-chain space, ch 1, dc in the 3rd chain of the turning chain, then change to the next color.
Row 4 establishes the repeating structure used for the remainder of the main body. Once you understand where the 3dc groups and ch-1 spaces belong, the remaining rows become much more rhythmic.
Rows 5–18: Maintaining the Established Pattern
Rows 5 through 18 are worked by repeating Row 4 while maintaining the color changes.
The key phrase here is “Repeat Row 4.” This means the stitch placement and structural sequence established in Row 4 should remain consistent. The fabric continues to grow while the stripe colors continue according to the established sequence.
At the end of Row 18, change color to A. Fasten off A and B as instructed.
Because these rows form the largest portion of the bandana, this is an ideal point for a quick visual checkpoint. The fabric should show the expanding triangular shape, the stripe arrangement should remain consistent, and the side should remain reasonably even.
A Simple Stitch Checkpoint System
Rather than trying to inspect everything at once, check the project at several stages.
Checkpoint One: After Row 1
- Confirm that the starting chain was worked correctly.
- Confirm that the 3dc, ch 1, dc sequence was worked in the 5th chain from the hook.
- Confirm the color change to B.
Checkpoint Two: After Row 3
- Confirm that the fabric is beginning to expand.
- Check the placement of the 3dc groups in the ch-1 spaces.
- Confirm the color sequence has moved through A, B, C, and back to A as instructed.
Checkpoint Three: After Row 4
- Use Row 4 as the structural reference for the remaining rows.
- Check that the ch-1 spaces remain visible.
- Make sure the side carrying technique is not pulling the edge inward.
Checkpoint Four: After Row 18
- Confirm that all 18 rows have been completed.
- Confirm the color change to A at the end of Row 18.
- Fasten off A and B as instructed.
- Prepare for the finishing section.
How to Keep the Three-Stripe Technique Neat
The three-stripe technique is one of the defining features of this project. Since the pattern specifically says not to cut the yarn when changing color, the side edge becomes an important visual and structural area.
Carry the yarn up the side rather than pulling it across the back of the work. This keeps the unused color close to the edge and avoids unnecessary strands across the center of the bandana.
When changing color on the last stitch of a row, take a moment to make the transition clean. Avoid rushing through the final stitch simply because the row is finished. The final stitch is where the next color begins its role in the stripe sequence.
If the side edge looks slightly different from the interior fabric, remember that this is the location where the carried yarn is being managed. The finishing process will help create the final outline of the bandana.
Beginning the Finishing Construction
Once the main body is complete, the pattern moves into the finishing stage. The ties are created with chains and half double crochet stitches, while single crochet is used along the row ends and top edge.
First Tie
Chain 65. Work hdc in the 3rd chain from the hook and in each chain across.
This creates the first long tie. When working the chain, keep your tension consistent. A very tight chain can make the tie feel rigid, while inconsistent chain tension can create an uneven appearance.
Working Along the Row Ends
Rotate the work to continue along the row ends. Work 2sc in the end of each row to the chain at the bottom tip of the bandana. Work 3sc in the chain, then work 2sc in the end of each row to the next corner.
This part of the finishing creates the edging around the triangular body. Because the row ends form the sides of the bandana, consistent placement helps the edge remain smooth.
Work carefully at the bottom tip. The pattern specifically calls for 3sc in the chain at the bottom tip, while the row ends receive 2sc in each row end. Follow these numbers exactly rather than substituting a different edging ratio.
Second Tie
Chain 65. Work hdc in the 3rd chain from the hook and each chain across.
This creates the second tie and balances the construction from the opposite side.
Finishing the Top Edge
Work along the top of Row 18. Sc in each stitch and ch-1 space across to the last stitch, then slip stitch in the last stitch. Fasten off A.
The top edge is the final major crocheted edge of the bandana. Work into each stitch and ch-1 space as specified. Since the ch-1 spaces are part of the established pattern structure, remember that they are included in this finishing instruction.
Once the slip stitch is completed in the last stitch, fasten off A.
Weaving in the Ends
The source instructs you to weave in all remaining ends. This is an important finishing step, especially because the project uses several colors and carries yarn along the side.
Use a tapestry needle and secure the remaining yarn ends neatly. Avoid leaving long loose tails that could become visible or catch during wear.
For the cleanest result, take your time rather than trimming immediately. Secure the ends first, then trim excess yarn after you are confident that each end is properly anchored.
Light Steam Blocking
The final instruction is to steam block lightly as needed.
Blocking can help the finished bandana settle into a more even shape, but the source specifically says to steam block lightly as needed. The word “lightly” is important. Treat blocking as a finishing aid rather than something that should radically reshape the crochet fabric.
Before finishing, check that the bandana is lying naturally and that the edges look even. If a light steam block is needed, use it carefully and avoid changing the finished proportions intentionally.
Common Beginner Mistakes to Avoid
Cutting the Yarn at Every Color Change
The pattern specifically instructs you not to cut the yarn when changing color. Carry the yarn up the side instead.
Forgetting That the Starting Ch-4 Counts
The starting ch-4 counts as dc + ch 1. Forgetting this can make the structure of the rows confusing, particularly around the turning-chain space.
Changing Color at the Wrong Point
The pattern instructs you to change color on the last stitch of each row unless otherwise instructed. Make the color change part of your row-ending routine.
Changing the Number of Rows
The main body is worked through Row 18. Do not add or remove rows in an attempt to alter the finished size. The source gives the finished measurements and gauge separately.
Pulling the Carried Yarn Too Tightly
When carrying yarn up the side, excessive tension can affect the edge. Let the carried yarn follow the edge naturally rather than pulling it tightly.
Changing the Finishing Stitch Counts
The finishing section specifies 2sc in the end of each row, 3sc in the chain at the bottom tip, and then 2sc in the row ends on the other side. These numbers are part of the pattern and should be followed as written.
Quick Project Checklist
- Confirm the project is being made in the Easy skill level structure provided by the source.
- Use a US I/9 (5.5mm) hook or the size needed to obtain gauge.
- Hold yarn double throughout.
- Check the gauge: 3.5 inches = 4 3dc groups.
- Check the gauge: 3.75 inches = 8 rows.
- Use the three-stripe technique.
- Do not cut the yarn during color changes.
- Carry the yarn up the side.
- Change color on the last stitch of each row unless otherwise instructed.
- Complete Rows 1 through 18.
- Change to A at the end of Row 18.
- Fasten off A and B.
- Make the first 65-chain tie with hdc worked from the 3rd chain.
- Work 2sc along the row ends to the bottom tip.
- Work 3sc in the chain at the bottom tip.
- Work 2sc along the row ends to the next corner.
- Make the second 65-chain tie with hdc worked from the 3rd chain.
- Sc across the top of Row 18 in each stitch and ch-1 space.
- Slip stitch in the last stitch.
- Fasten off A.
- Weave in all remaining ends.
- Steam block lightly as needed.
Pattern Abbreviations and Terms
The source includes the following abbreviations and terminology. They are retained here as provided so that the pattern language remains consistent.
- Beg: Beginning
- Bor: Beginning of round
- Bpdc: Back post double crochet
- CC: Change color
- Ch: Chain
- CO: Cast n
- Dc: Double crochet
- Dc2tog: Double crochet 2 stitches together, 1 stitch decreased
- Dec’d: Decreased
- Esc: Extended single crochet
- Est’d: Established
- Fpdc: Front post double crochet
- Hdc: Half double crochet
- Inc’d: Increased
- K: Knit
- K2tog: Knit 2 stitches together. 1 stitch decreased.
- K3tog: Knit 3 stitches together. 2 stitches decreased.
- M: Marker
- M1L: Insert left needle, from front to back, under the horizontal strand which lies between the stitch just knit, and the following stitch; then knit into the back of this loop. 1 stitch increased.
- M1R: Insert left needle, from back to front, under the horizontal strand which lies between the stitch just knit, and the following stitch; then knit into this loop. 1 stitch increased.
- P: Purl
- P3tog: Purl 3 stitches together. 2 stitches decreased.
- Patt: Pattern
- PM: Place marker
- Pwise: Purlwise
- Rem: Remain
- Rep: Repeat
- Rnd: Round
- RS: Right side
- Sc: Single crochet
- Sl: Slip
- Sl st: Slip stitch
- Sm: Slip Marker
- Sp: Space
- Ssk: Slip next 2 stitches, individually, knitwise. Return them to the left needle without twisting and knit them together through the back loop. 1 stitch decreased.
- St st: Stockinette stitch
- St(s): Stitch(es)
- W&T: Wrap and turn
- Yo: Yarn over
Final Quality Check
Before considering the Sofia Bandana complete, look at the project as a whole. The finished measurements are 18 inches wide by 8 inches long. The main body should contain Rows 1 through 18, with the three-stripe technique maintained throughout.
Check the side edges for evenness, especially where the yarn was carried upward. Inspect the top edge to make sure the single crochet finishing is complete across the stitches and ch-1 spaces. Check both ties for consistent construction and make sure the finishing ends have been securely woven in.
Finally, if the fabric would benefit from it, follow the source instruction to steam block lightly as needed.
Why This Project Works Well for Beginners
The Sofia Bandana is a useful learning project because it combines several fundamental crochet skills without requiring a complicated shaping system. The repeated 3dc groups create a rhythm that becomes easier to recognize as the project progresses, while the three-stripe technique introduces controlled color changes.
The finishing section also gives beginners experience with several different stitch placements. You work into chains, along row ends, around the bottom tip, and across the top edge. This makes the project useful practice for understanding how crochet fabric can be edged and finished from different directions.
Perhaps most importantly, the project encourages careful pattern reading. The instructions about the starting ch-4, carrying yarn, changing colors, and maintaining the Row 4 repeat all demonstrate how small details influence the final result.
Final Thoughts
The Sofia Bandana is a compact project with a clear construction path: establish the foundation, expand the triangular body through the repeated rows, maintain the three-stripe color technique, add the two ties, finish the edges, and complete the final details.
For the best result, focus on consistency rather than speed. Match the gauge, hold the yarn double throughout, keep the color changes organized, and use Row 4 as your structural reference for Rows 5–18. When the main body is complete, follow the finishing instructions carefully, particularly the stitch counts around the bottom tip and row ends.
With its 18-inch wide by 8-inch long finished size, three-stripe construction, and straightforward repeated stitch pattern, the Sofia Bandana offers an approachable way to create a polished handmade accessory while practicing several useful crochet techniques.