
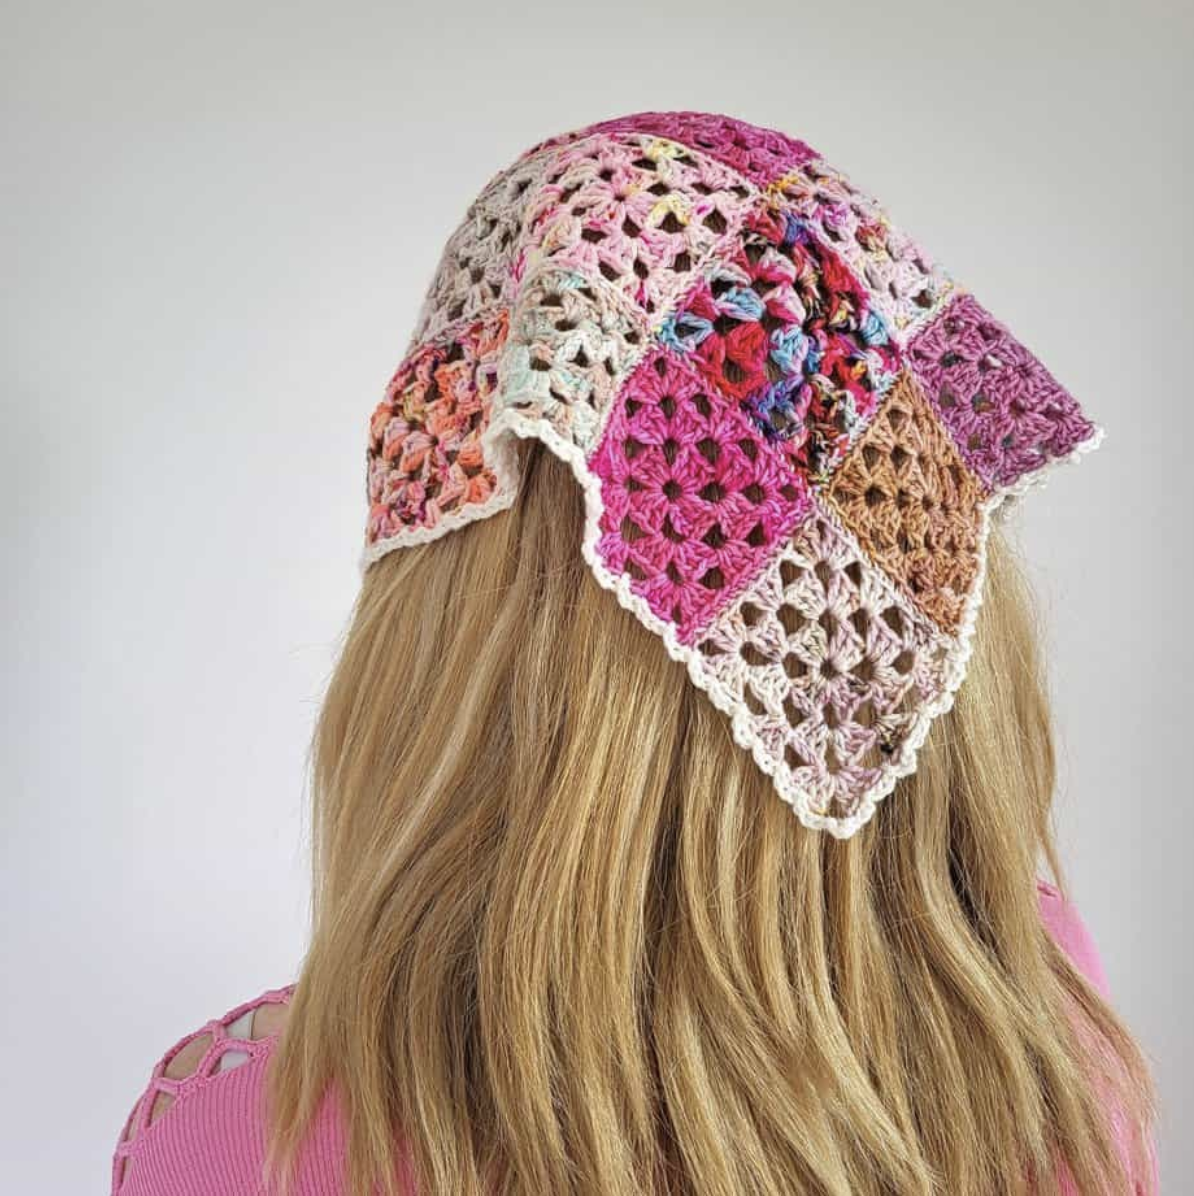

A handmade accessory does not have to require a complicated stitch pattern to make a strong impression. This patchwork crochet bandana combines familiar granny-square construction with simple granny triangles to create a lightweight head scarf with a beautiful vintage and bohemian character. The result is a wearable project that makes excellent use of small quantities of fingering weight yarn.
The design is particularly appealing for crocheters who enjoy working with color. Instead of committing to one large skein or a single shade, you can gather mini skeins and leftover yarn and turn those small amounts into a coordinated patchwork accessory. The finished piece can be colorful and playful, carefully coordinated, or even made entirely in one color.
This version is intentionally a little larger than a standard bandana. After light blocking, the pictured scarf measures approximately 26 inches (66 cm) wide and 12 inches (30 cm) deep, with ties measuring 10 inches (25 cm) long. That extra room allows it to work comfortably as a head scarf while also making it suitable for wearing as a neckerchief.
The project is made from 15 granny squares and 6 granny triangles. Once the motifs are crocheted, they are arranged according to the assembly layout and joined together. A delicate decorative border and two ties are then worked around the completed patchwork shape.
A Creative Stash Crochet Project
Patchwork crochet is an especially satisfying technique because every small motif becomes part of a larger design. You do not need to crochet one large fabric from beginning to end. Instead, you can make individual squares and triangles, place them together, and watch the final shape develop during assembly.
The source design was inspired by the beauty of small hand-dyed yarn scraps. Fingering weight leftovers are particularly suitable because the project uses only small quantities of each color. The pattern states that approximately 40g of fingering weight yarn can be used.
You can choose colors before beginning, but there is no required color sequence. One approach is to select a defined palette and repeat related shades throughout the motifs. Another is to embrace the patchwork idea and allow every square to look different. A single-color version is also suggested as an attractive possibility.
The neutral yarn reserved for the border and ties provides a simple finishing element around the colorful motifs. It also helps visually frame the patchwork center without taking attention away from the individual granny squares.

What You Need for the Bandana
The materials list is pleasantly short. The project requires fingering weight yarn in various colors, a small amount of neutral yarn, a 3.5 mm crochet hook, and a yarn needle. Scissors are naturally useful for finishing, although the written materials list specifically identifies the hook and yarn needle along with the yarn requirements.
- Small amounts of fingering weight yarn in various colors
- Small amount of neutral yarn for the border and ties
- 3.5 mm [E-4] crochet hook
- Yarn needle for sewing and weaving in ends
- Approximately 40g of fingering weight yarn in total
The original project used leftover mini-skein yarn with wool fiber content. The pattern also states that cotton or acrylic yarn can be used. The important yarn category specified by the source is fingering weight.
If you want to create a smaller version, the source mentions using a 3 mm hook. The pictured bandana, however, uses the 3.5 mm [E-4] hook and has the finished measurements given below.
Finished Measurements and Motif Sizes
Knowing the target measurements gives you useful checkpoints while working on the individual motifs and during final assembly.
- Finished width: 26 in [66 cm]
- Finished depth: 12 in [30 cm]
- Tie length: 10 in [25 cm]
- Each granny square: approximately 2.75 in [7 cm]
- Each triangle: approximately 4 in x 2.75 in [10 cm x 7 cm]
- Gauge: Not important
The measurements for the finished scarf are given after light blocking. The design was made slightly larger than a standard size so that it could provide more coverage when worn on the head or create a noticeable silhouette as a neck scarf.
Because gauge is not important for this pattern, the project does not require the same kind of gauge preparation associated with larger garments. The motif dimensions and the finished arrangement are more useful points of reference.
US Crochet Abbreviations
This pattern is written in US crochet terms. Keeping the terminology consistent is important because the instructions use double crochet stitches throughout the granny motifs and border construction.
- Beg: beginning
- Ch: chain
- St: stitch
- Sl st: slip stitch
- Dc: double crochet
- Yo: yarn over
- Sp: space
- RS: right side
There are also two important beginning-chain conventions. A chain 3 at the beginning of a round counts as 1 double crochet. A chain 4 at the beginning of a row counts as 1 double crochet and a chain-1 space.
The pattern also uses the term granny cluster to mean 3 double crochets. Remembering this definition makes the border instructions easier to follow because the edging refers directly to the middle double crochet of the next granny cluster.
Build the Granny Squares First
The central patchwork requires 15 granny squares. Each square is worked through three rounds, and the pattern specifically instructs you not to turn the square after each round.
Before beginning, select the yarn color for the square and prepare your first ring by chaining 5 and slip stitching to the first chain.
Round 1: Establishing the Four Corners
Round 1 (RS): Chain 3, which counts as 1 double crochet here and throughout at the beginning of a round. Work 2 double crochets in the ring. Then repeat the following sequence 3 times: chain 3 and 3 double crochets in the ring. Finish with chain 3 and join with a slip stitch in the 3rd chain of the beginning chain 3. Slip stitch into the next 2 double crochets and the next chain-3 space.
This first round creates the basic four-corner structure. The chain-3 spaces are especially important because they become the corner spaces used in the following rounds.
Round 2: Expanding the Square
Round 2: Chain 3. In the same chain space, work 2 double crochets, chain 3, and 3 double crochets. Then repeat the following sequence 3 times: chain 1, followed by 3 double crochets, chain 3, and 3 double crochets in the next chain-3 space. Finish with chain 1 and join with a slip stitch in the 3rd chain of the beginning chain 3. Slip stitch into the next 2 double crochets and the next chain-3 space.
At this point, the square becomes more recognizable. The corner groups contain the chain-3 spaces that define the shape, while the chain-1 spaces between them provide locations for the next round of granny clusters.
Round 3: Completing Each Square
Round 3: Chain 3. In the same chain space, work 2 double crochets, chain 3, and 3 double crochets. Then repeat the following sequence 3 times: chain 1, 3 double crochets in the next chain-1 space, chain 1, followed by 3 double crochets, chain 3, and 3 double crochets in the next chain-3 space. Finish with chain 1, 3 double crochets in the next chain-1 space, chain 1, and join with a slip stitch in the 3rd chain of the beginning chain 3. Fasten off the yarn.
Repeat the complete three-round square instructions until you have 15 finished granny squares.

Make the Six Granny Triangles
The second motif used in the bandana is the granny triangle, also described as a half granny square. You need 6 triangles in total.
Unlike the granny squares, the triangles have no designated right side because both sides are the same. Begin with the first color, chain 5, and slip stitch to the first chain to form a ring.
Row 1
Row 1: Chain 4. This counts as 1 double crochet and a chain-1 space here and throughout at the beginning of a row. Work 3 double crochets, chain 3, 3 double crochets, chain 1, and 1 double crochet in the ring. Turn.
Row 2
Row 2: Chain 4, then work 3 double crochets in the first chain-1 space. Chain 1. In the corner chain-3 space, work 3 double crochets, chain 3, and 3 double crochets. Chain 1. In the last chain-1 space, work 3 double crochets, chain 1, and 1 double crochet. Turn.
Row 3
Row 3: Chain 4, then work 3 double crochets in the first chain-1 space. Chain 1. Work 3 double crochets in the next chain-1 space, chain 1, then work 3 double crochets, chain 3, and 3 double crochets in the corner chain-3 space. Chain 1, 3 double crochets in the next chain-1 space, chain 1, and 3 double crochets, chain 1, and 1 double crochet in the last chain-1 space. Fasten off the yarn.
Repeat these three rows until all 6 triangles have been completed.

Arrange All the Motifs Before Sewing
Once the 15 squares and 6 triangles are ready, resist the temptation to join them immediately. First, arrange every motif according to the placement shown in the assembly layout. This is an important stage because the triangles and squares work together to create the final bandana silhouette.
The recommended assembly process is to attach the motifs in rows first and then attach the rows together. When sewing the motifs, hold the right sides together and join through the back loop only using whip stitching.
The source also gives two alternatives if whip stitching is not your preferred method: you can use a crochet slip stitch joining method or a single crochet joining method. Whichever method you choose, aim for even joins and avoid pulling the stitches too tightly.

How to Join the Patchwork
Joining is one of the most important finishing stages because it transforms the individual motifs into a single piece. Keep the stitches loose enough to prevent the fabric from puckering. At the same time, try to make your joins as even as possible so that the motif edges line up cleanly.
If the patchwork looks slightly irregular while you are joining it, do not assume that something has gone wrong. The source specifically notes that blocking will sort out kinks in the completed piece.
After the patchwork has been assembled, pin out the finished piece and steam block lightly. The finished measurements of 26 inches wide and 12 inches deep are stated after light blocking.

Add the First Tie and Begin the Border
With the right side facing, join the yarn with a slip stitch in the top-right corner chain-4 space of the triangle.
Begin the first tie by chaining 50. Work 1 single crochet in the 2nd chain from the hook and in each chain across, giving 49 single crochets. Make a slip stitch back into the corner space. This completes the first tie.
From here, the decorative edging travels along the side of the patchwork. The border is built from chain spaces and slip stitches worked into the granny clusters and chain-1 spaces.

Work Side 1 of the Lacy Border
For the first side, begin the edging sequence by working the following three times: chain 3, slip stitch into the middle double crochet of the next granny cluster, chain 3, and slip stitch into the next chain-1 space.
Then chain 3, skip the join between squares, and slip stitch into the next chain space. Continue repeating the complete sequence across the side until you reach the next corner space at the bottom peak of the scarf.
At that corner, chain 3 and slip stitch back into the same space.
The border provides a delicate transition between the colorful patchwork and the outside edge. Work carefully around each join, especially where two squares meet, so that the edging follows the intended path across the motifs.


Complete Side 2 and Make the Second Tie
The second side follows the same basic decorative edging pattern. Work the sequence three times: chain 3, slip stitch into the middle double crochet of the next granny cluster, chain 3, and slip stitch into the next chain-1 space.
Then chain 3, skip the join between squares, and slip stitch into the next chain space. Continue across the side until you reach the next corner space, which is the top-left corner chain-4 space of the triangle.
Once you arrive at this corner, make the second tie using the same construction as the first. Chain 50, then work 1 single crochet in the 2nd chain from the hook and in each chain across, giving 49 single crochets. Make a slip stitch back into the corner space to finish the second tie.
The source notes that you may add more chains if you want your ties to be longer. This is a simple way to personalize the tie length while retaining the specified construction of the bandana.
Tips for Keeping the Motifs Neat
Although the stitch pattern itself is based on basic crochet stitches, the quality of the finished accessory depends heavily on consistency. Each granny square should have the same three-round construction, and each triangle should follow the same three-row construction.
When making multiple motifs, it can be useful to check their approximate dimensions as you work. Each square should be approximately 2.75 inches (7 cm), while each triangle should measure approximately 4 inches by 2.75 inches (10 cm by 7 cm).
Do not turn the granny squares after each round. The triangles are different because the instructions explicitly tell you to turn after Rows 1 and 2.
When changing between different scrap colors, take care to fasten off as directed. The granny square pattern specifically ends Round 3 by fastening off the yarn. The triangle pattern likewise fastens off after Row 3.
Beginner-Friendly Checkpoints
If this is your first patchwork crochet accessory, breaking the project into checkpoints can make the process much easier to manage.
Checkpoint 1: Yarn Selection
Gather your fingering weight scraps and decide whether you want a coordinated, random, or single-color appearance. Reserve the neutral yarn for the border and ties.
Checkpoint 2: Square Collection
Complete 15 granny squares. Check that every square has three rounds and that the corners are clearly formed.
Checkpoint 3: Triangle Collection
Complete 6 granny triangles. Remember that triangles do not have a right side because both sides are the same.
Checkpoint 4: Layout
Place all 21 motifs according to the assembly layout before sewing. This is the easiest time to inspect the overall color distribution and motif placement.
Checkpoint 5: Joining
Join the motifs by rows and then join the rows together. Keep your joining stitches loose enough to avoid puckering.
Checkpoint 6: Blocking
Pin out the completed patchwork and steam block lightly. This helps settle the shape and smooth out kinks.
Checkpoint 7: Border and Ties
Add the first 50-chain tie, work the decorative edging around both sides, and finish with the second 50-chain tie.
Checkpoint 8: Final Finishing
Fasten off and weave in all ends. Check the border, ties, joins, and overall shape before wearing the finished bandana.
Troubleshooting the Assembly Stage
What if the joined fabric puckers?
Check your joining tension. The source specifically recommends keeping the stitches loose to avoid puckering. Light blocking can also help smooth the completed piece.
What if the motifs do not look perfectly smooth?
Do not worry too early in the process. The pattern explains that blocking will sort out kinks. Once the motifs are joined, pin the piece out and steam block lightly.
Can I use a different fiber?
The source says that cotton or acrylic yarn can be used, while the original version used leftover mini skeins with wool fiber content. The specified yarn category is fingering weight.
Can I make the bandana smaller?
The source notes that a 3 mm hook can be used to make a smaller version. The stated finished measurements apply to the pictured version made with the specified 3.5 mm [E-4] hook.
Can the ties be longer?
Yes. The pattern specifically states that you may add more chains if you want longer ties.
Styling the Finished Crochet Bandana
The finished accessory is versatile enough to be worn in more than one way. Its original purpose is a head scarf, where the larger dimensions allow it to cover the head comfortably. The same triangular construction also makes it suitable as a neckerchief.
The patchwork appearance works particularly well when you want an accessory with a handmade, vintage-inspired feel. Because the colors can be selected from your own stash, the final result can complement your existing wardrobe or become a deliberately colorful statement piece.
For a softer, more coordinated appearance, use a controlled palette throughout the 15 squares and 6 triangles. For a more traditional patchwork feel, allow different scraps to appear throughout the individual motifs.
Complete Pattern Reference
- Pattern terminology: US crochet terms
- Skill level: Basic stitches; familiarity with making a granny square
- Hook: 3.5 mm [E-4]
- Optional smaller version: 3 mm hook
- Yarn: Fingering weight
- Approximate yarn amount: 40g
- Granny squares: 15
- Granny triangles: 6
- Square size: Approximately 2.75 in [7 cm]
- Triangle size: Approximately 4 in x 2.75 in [10 cm x 7 cm]
- Finished size: Approximately 26 in [66 cm] wide x 12 in [30 cm] deep after light blocking
- Ties: 10 in [25 cm] long
- Gauge: Not important
- Border yarn: Small amount of neutral yarn
- Join: Back-loop-only whip stitch, with slip-stitch or single-crochet joining also possible
A Simple Way to Organize the Project
If you prefer to spread the work over several crochet sessions, this design lends itself naturally to a modular approach. Begin by preparing your yarn scraps and make the granny squares. Because every square uses the same three rounds, you can settle into a comfortable rhythm while experimenting with color combinations.
Next, complete the six triangles. Keep the finished motifs together so that none are accidentally misplaced when you begin the assembly stage.
After all motifs are finished, dedicate a separate session to arranging them. This lets you concentrate entirely on the final layout before joining. Once the rows are assembled, join the rows together and move on to blocking.
The border and ties can then be treated as the final decorative stage. Because the ties are created from chains and single crochet, they are relatively straightforward once the patchwork center is complete.
Final Finishing Checklist
- 15 granny squares completed
- 6 granny triangles completed
- All motifs arranged according to the assembly layout
- Motifs joined evenly
- Joining tension kept loose enough to prevent puckering
- Finished patchwork lightly steam blocked
- First tie completed with 50 chains and 49 single crochets
- Side 1 border completed
- Side 2 border completed
- Second tie completed with 50 chains and 49 single crochets
- All yarn ends woven in
Final Thoughts on This Patchwork Crochet Project
This patchwork crochet bandana is a lovely example of how simple motifs can create a much more elaborate-looking finished accessory. The individual granny squares and triangles are approachable pieces, but their arrangement gives the completed scarf its distinctive geometric character.
The project also offers plenty of room for creative color choices while keeping the technical instructions consistent. The source does not require a specific color arrangement, so you can use the project to explore your stash and make something that feels completely personal.
From the first chain-5 ring to the final woven-in end, the construction follows a clear progression: create 15 granny squares, make 6 triangles, arrange and join the motifs, lightly block the patchwork, and finish the edges with the decorative border and two ties.
The result is a lightweight accessory measuring approximately 26 inches wide and 12 inches deep after light blocking, with 10-inch ties. Wear it as a head scarf for a handmade bohemian look or style it as a neckerchief for another way to show off the colorful patchwork.
Most importantly, this project demonstrates why small yarn scraps can be worth saving. A collection of fingering weight leftovers can become a cohesive handmade accessory when combined through classic granny construction. With careful motif placement, loose and even joining, and a light final blocking, the individual pieces become one beautiful patchwork crochet bandana.