
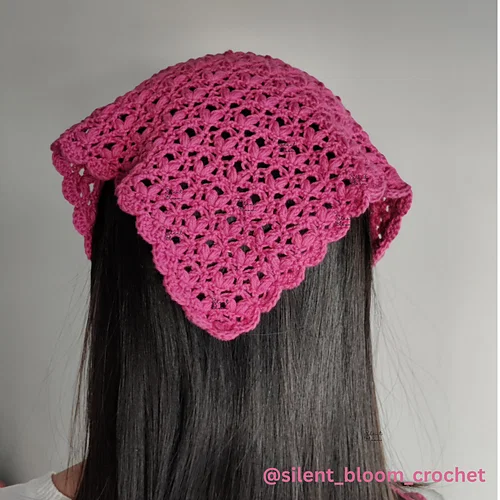
The Love Puff Bandana is a triangular crochet accessory with a delicate openwork fabric, raised puff-stitch motifs, a scalloped shell border, and long ties. This tutorial takes a visual-workshop approach: instead of treating the pattern as one long block of instructions, we will look at the project in stages and use the supplied photographs and diagrams as checkpoints along the way.
The pattern is written in US crochet terms and is designed around one 50 g skein of weight 1 cotton yarn with a 3.5 mm or E-4 hook. It offers three sizes, with the main body stopping at Row 27 for Size S, Row 31 for Size M, or Row 35 for Size L. The source also includes separate right-handed and left-handed diagrams and visual sequences. fileciteturn0file0

Project at a Glance
The construction is easier to understand if you think of the bandana as three connected components. First comes the triangular main part, which grows wider as the rows progress. Second is the shell border, which travels around the two sides and the bottom point. Third are the long ties, which are crocheted from the upper area so the finished bandana can be secured around the head.
The decorative identity of the project comes from the HDC3PUFF stitch. Puff rows alternate with openwork rows. On odd rows beginning with Row 3, the pattern adds another repeat as the triangle becomes wider. The even rows beginning with Row 4 also gain an additional repeat. This repeating expansion is the reason the fabric gradually develops from a small point into the broad triangular shape shown in the photographs.
Materials and Stitch Language
- Yarn: One 50 g skein of weight 1 cotton yarn. The reference yarn used by the designer was 170 m or 186 yds per 50 g.
- Hook: 3.5 mm or E-4.
- Terms: US crochet terms.
Abbreviations Used in the Pattern
- YO = yarn over
- ST = stitch
- CH = chain
- CH-3 SP = chain-3 space
- SL ST = slip stitch
- SC = single crochet
- DC = double crochet
- HDC3PUFF = half double crochet 3 puff stitch
The HDC3PUFF is made by working (YO, insert hook, YO, pull up a loop) ×3 into the same stitch, then YO and pull through 6 loops, followed by YO and pull through both loops. Because this stitch is repeated throughout the main body, it is worth becoming comfortable with the motion before moving into the longer rows.
Important Counting Rules
Several small details in the source are especially important for maintaining the intended stitch placement. CH 3 at the beginning of a row does count as a ST on top of the DC in the previous row, so the HDC3PUFF should be worked in the next DC. CH 1 does not count as a ST. CH 3 between puff stitches does not count as a ST. CH 2 between SC and DC does not count as a ST.
These rules explain why the stitch counts printed at the end of the rows do not simply correspond to every visible chain. Treat the stated counts as checkpoints rather than trying to count every chain space as a stitch.
Choose Your Finished Width Before Crocheting
The designer recommends measuring from one earlobe, up over the head to the place where you want the flat edge of the bandana to sit, and down to the other earlobe. This gives the width needed across the head, excluding the strings.
- Size S: 27 rows for width of 36 cm or 14 inches.
- Size M: 31 rows for width of 43 cm or 17 inches.
- Size L: 35 rows for width of 50 cm or 20 inches.
The source notes that gauge is not super important and does not have to be matched, but provides a reference for those who want to follow the finished sizes: 15.5 cm or 5.6 inches wide for 19 stitches (row 11) × 9.4 cm or 3.7 inches tall for 11 rows.
Stage One: Establish the Point
The first row creates the starting point of the triangle. From here, Row 2 establishes the open spaces, and Row 3 brings the puff motif back into the structure. The alternating rhythm becomes the foundation for everything that follows.
Row 1
CH 1+3, (HDC3PUFF, CH 3, HDC3PUFF, DC) all into the 1st CH. Turn. (4)
Row 2
CH 3+1, DC in the DC from the previous row, CH 2, SC in CH-3 SP, CH 2, (DC, CH 1, DC) in the 3rd CH from the previous row. Turn. (5)
Row 3
CH 3, [(HDC3PUFF, CH 3, HDC3PUFF) in the DC, DC in the SC]×1, (HDC3PUFF, CH 3, HDC3PUFF) in the DC, DC in the 3rd CH from previous row. Turn. (7)
Row 4
CH 3+1, DC in DC, [CH 2, SC in CH-3 SP, CH 2, DC in DC]×1, CH 2, SC in CH-3 SP, CH 2, (DC, CH 1, DC) in 3rd CH from previous row. Turn. (7)
Row 5
CH 3, [(HDC3PUFF, CH 3, HDC3PUFF) in DC, DC in SC]×2, (HDC3PUFF, CH 3, HDC3PUFF), DC in 3rd CH from previous row. Turn. (10)
Row 6
CH 3+1, DC in DC, [CH 2, SC in CH-3 SP, CH 2, DC in DC]×2, CH 2, SC in CH-3 SP, CH 2, (DC, CH 1, DC) in 3rd CH from previous row. Turn. (9)

Stage Two: Continue the Alternating Row Rhythm
Starting with Row 7, the construction becomes predictable. Puff rows carry the textured flower-like motifs, while the following openwork rows connect them with chains, single crochet, and double crochet. The number of repeats increases as the triangle widens.
Row 7
CH 3, [(HDC3PUFF, CH 3, HDC3PUFF) in DC, DC in SC]×3, (HDC3PUFF, CH 3, HDC3PUFF), DC in 3rd CH from previous row. Turn. (13)
Row 8
CH 3+1, DC in DC, [CH 2, SC in CH-3 SP, CH 2, DC in DC]×3, CH 2, SC in CH-3 SP, CH 2, (DC, CH 1, DC) in 3rd CH from previous row. Turn. (11)
Row 9
CH 3, [(HDC3PUFF, CH 3, HDC3PUFF) in DC, DC in SC]×4, (HDC3PUFF, CH 3, HDC3PUFF), DC in 3rd CH from previous row. Turn. (16)
Row 10
CH 3+1, DC in DC, [CH 2, SC in CH-3 SP, CH 2, DC in DC]×4, CH 2, SC in CH-3 SP, CH 2, (DC, CH 1, DC) in 3rd CH from previous row. Turn. (13)
Row 11
CH 3, [(HDC3PUFF, CH 3, HDC3PUFF) in DC, DC in SC]×4, (HDC3PUFF, CH 3, HDC3PUFF), DC in 3rd CH from previous row. Turn. (19)
Row 12
CH 3+1, DC in DC, [CH 2, SC in CH-3 SP, CH 2, DC in DC]×4, CH 2, SC in CH-3 SP, CH 2, (DC, CH 1, DC) in 3rd CH from previous row. Turn. (15)
Row 11 is also the row mentioned in the gauge reference. It can serve as a useful visual and measurement checkpoint, but the source specifically says the gauge is not super important.
Rows 13–18
Row 13: CH 3, [(HDC3PUFF, CH 3, HDC3PUFF) in DC, DC in SC]×5, (HDC3PUFF, CH 3, HDC3PUFF), DC in 3rd CH from previous row. Turn. (22)
Row 14: CH 3+1, DC in DC, [CH 2, SC in CH-3 SP, CH 2, DC in DC]×5, CH 2, SC in CH-3 SP, CH 2, (DC, CH 1, DC) in 3rd CH from previous row. Turn. (17)
Row 15: CH 3, [(HDC3PUFF, CH 3, HDC3PUFF) in DC, DC in SC]×6, (HDC3PUFF, CH 3, HDC3PUFF), DC in 3rd CH from previous row. Turn. (25)
Row 16: CH 3+1, DC in DC, [CH 2, SC in CH-3 SP, CH 2, DC in DC]×6, CH 2, SC in CH-3 SP, CH 2, (DC, CH 1, DC) in 3rd CH from previous row. Turn. (19)
Row 17: CH 3, [(HDC3PUFF, CH 3, HDC3PUFF) in DC, DC in SC]×7, (HDC3PUFF, CH 3, HDC3PUFF), DC in 3rd CH from previous row. Turn. (28)
Row 18: CH 3+1, DC in DC, [CH 2, SC in CH-3 SP, CH 2, DC in DC]×7, CH 2, SC in CH-3 SP, CH 2, (DC, CH 1, DC) in 3rd CH from previous row. Turn. (21)

Stage Three: Work Through the Middle of the Triangle
As the bandana gets wider, the instructions remain structurally similar even though the repeats become longer. Keeping track of the row number and the printed stitch count is the simplest way to stay oriented.
Rows 19–24
Row 19: CH 3, [(HDC3PUFF, CH 3, HDC3PUFF) in DC, DC in SC]×8, (HDC3PUFF, CH 3, HDC3PUFF), DC in 3rd CH from previous row. Turn. (31)
Row 20: CH 3+1, DC in DC, [CH 2, SC in CH-3 SP, CH 2, DC in DC]×8, CH 2, SC in CH-3 SP, CH 2, (DC, CH 1, DC) in 3rd CH from previous row. Turn. (23)
Row 21: CH 3, [(HDC3PUFF, CH 3, HDC3PUFF) in DC, DC in SC]×9, (HDC3PUFF, CH 3, HDC3PUFF), DC in 3rd CH from previous row. Turn. (34)
Row 22: CH 3+1, DC in DC, [CH 2, SC in CH-3 SP, CH 2, DC in DC]×9, CH 2, SC in CH-3 SP, CH 2, (DC, CH 1, DC) in 3rd CH from previous row. Turn. (25)
Row 23: CH 3, [(HDC3PUFF, CH 3, HDC3PUFF) in DC, DC in SC]×10, (HDC3PUFF, CH 3, HDC3PUFF), DC in 3rd CH from previous row. Turn. (37)
Row 24: CH 3+1, DC in DC, [CH 2, SC in CH-3 SP, CH 2, DC in DC]×10, CH 2, SC in CH-3 SP, CH 2, (DC, CH 1, DC) in 3rd CH from previous row. Turn. (27)
Rows 25–27: Reaching Size S
Row 25: CH 3, [(HDC3PUFF, CH 3, HDC3PUFF) in DC, DC in SC]×11, (HDC3PUFF, CH 3, HDC3PUFF), DC in 3rd CH from previous row. Turn. (40)
Row 26: CH 3+1, DC in DC, [CH 2, SC in CH-3 SP, CH 2, DC in DC]×11, CH 2, SC in CH-3 SP, CH 2, (DC, CH 1, DC) in 3rd CH from previous row. Turn. (29)
Row 27: CH 3, [(HDC3PUFF, CH 3, HDC3PUFF) in DC, DC in SC]×12, (HDC3PUFF, CH 3, HDC3PUFF), DC in 3rd CH from previous row. Stop here for size S. Turn. (43)
Size S is therefore complete at the main-body stage after Row 27. Do not continue to Row 28 if you are making Size S and following the stated stopping point.
Rows 28–31: Extending to Size M
Row 28: CH 3+1, DC in DC, [CH 2, SC in CH-3 SP, CH 2, DC in DC]×12, CH 2, SC in CH-3 SP, CH 2, (DC, CH 1, DC) in 3rd CH from previous row. Turn. (31)
Row 29: CH 3, [(HDC3PUFF, CH 3, HDC3PUFF) in DC, DC in SC]×13, (HDC3PUFF, CH 3, HDC3PUFF), DC in 3rd CH from previous row. Turn. (46)
Row 30: CH 3+1, DC in DC, [CH 2, SC in CH-3 SP, CH 2, DC in DC]×13, CH 2, SC in CH-3 SP, CH 2, (DC, CH 1, DC) in 3rd CH from previous row. Turn. (33)
Row 31: CH 3, [(HDC3PUFF, CH 3, HDC3PUFF) in DC, DC in SC]×14, (HDC3PUFF, CH 3, HDC3PUFF), DC in 3rd CH from previous row. Stop here for size M. Turn. (49)
Rows 32–35: Completing Size L
Row 32: CH 3+1, DC in DC, [CH 2, SC in CH-3 SP, CH 2, DC in DC]×14, CH 2, SC in CH-3 SP, CH 2, (DC, CH 1, DC) in 3rd CH from previous row. Turn. (35)
Row 33: CH 3, [(HDC3PUFF, CH 3, HDC3PUFF) in DC, DC in SC]×15, (HDC3PUFF, CH 3, HDC3PUFF), DC in 3rd CH from previous row. Turn. (52)
Row 34: CH 3+1, DC in DC, [CH 2, SC in CH-3 SP, CH 2, DC in DC]×15, CH 2, SC in CH-3 SP, CH 2, (DC, CH 1, DC) in 3rd CH from previous row. Turn. (37)
Row 35: CH 3, [(HDC3PUFF, CH 3, HDC3PUFF) in DC, DC in SC]×16, (HDC3PUFF, CH 3, HDC3PUFF), DC in 3rd CH from previous row. Stop here for size L. (55)

Shape and Tension Notes
If your tension is tight and you do not want the bandana to become too narrow, the source offers two spacing adjustments. Use CH 4 instead of CH 3 between HDC3PUFFs, and use CH 3 instead of CH 2 between the SCs and DCs. The same tip can be used when making a shawl from the construction: work the shell border and SCs on top but leave out the strings.
If the bandana is already complete and feels narrow, the source suggests tugging at every row to stretch it wider. It also notes that the crochet construction naturally makes the bandana slant slightly to one side. A right-handed crocheter may see the left side slightly wider, while a left-handed crocheter may see the right side slightly wider.
To improve that shape, the designer suggests blocking the bandana by pinning along the middle and stretching the narrow side as much as possible. This is a finishing adjustment rather than a change to the crochet instructions.
Stage Four: Add the Shell Border
Before beginning the border, rotate the bandana 135° so you can crochet along the side. The main body must have an odd number of rows, meaning the final row should be a puff-stitch row. The border then alternates DC 5 shells and slip stitches along the sides.
There is one deliberate exception: the bottom shell uses DC 7. The designer changed the bottom shell from 5 DC to 7 DC to prevent the border from curling. Some photographs and the demonstration video show 5 DC because they document the earlier version. When following the written pattern, use 7 DC for the bottom shell.
Size S Border
DC 5 in the same ST you ended the puff stitch row on (3rd CH in the top of row 26), [SL ST into the next row (top of the DC), DC 5 in the row after that (3rd CH)]*12 (repeats), SL ST into the top of row 1 (top of the DC).
Bottom: DC 7 into the 1st CH of the bandana. Rotate it 100° and SL ST into the first row on the other side. Continue up the other side in the same way with DC 5 and SL ST alternating every other row. You should end up with 27 shells in total. Don’t cut the yarn!
Size M Border
DC 5 in the same ST you ended the puff stitch row on (3rd CH in the top of row 30), [SL ST into the next row (top of the DC), DC 5 in the row after that (3rd CH)]*14 (repeats), SL ST into the top of row 1 (top of the DC).
Bottom: DC 7 into the 1st CH of the bandana. Rotate it 100° and SL ST into the first row on the other side. Continue up the other side in the same way with DC 5 and SL ST alternating every other row. 31 shells in total. Don’t cut the yarn!
Size L Border
DC 5 in the same ST you ended the puff stitch row on (3rd CH in the top of row 34), [SL ST into the next row (top of the DC), DC 5 in the row after that (3rd CH)]*16 (repeats), SL ST into the top of row 1 (top of the DC.
Bottom: DC 7 into the 1st CH of the bandana. Rotate it 100° and SL ST into the first row on the other side. Continue up the other side in the same way with DC 5 and SL ST alternating every other row. 35 shells in total. Don’t cut the yarn!

Stage Five: Crochet the Ties
The ties use the same long foundation chain for every size: CH 80. The difference between sizes is the number of body repeats worked between the two ties.
Size S Ties
CH 80, SC in the 2nd CH from the hook, SC 78, SC in 3rd CH of the last puff stitch row, [SC in HDC3PUFF, SC 3 in CH-3 SP, SC in HDC3PUFF, SC in DC]*14, CH 80, rotate 180°, SC in the 2nd CH from the hook, SC 78, SL ST into the DC. Fasten off and weave in the ends.
Size M Ties
CH 80, SC in the 2nd CH from the hook, SC 78, SC in 3rd CH of the last puff stitch row, [SC in HDC3PUFF, SC 3 in CH-3 SP, SC in HDC3PUFF, SC in DC]*16, CH 80, rotate 180°, SC in the 2nd CH from the hook, SC 78, SL ST into the DC. Fasten off and weave in the ends.
Size L Ties
CH 80, SC in the 2nd CH from the hook, SC 78, SC in 3rd CH of the last puff stitch row, [SC in HDC3PUFF, SC 3 in CH-3 SP, SC in HDC3PUFF, SC in DC]*18, CH 80, rotate 180°, SC in the 2nd CH from the hook, SC 78, SL ST into the DC. Fasten off and weave in the ends.

Right-Handed or Left-Handed?
The source includes separate diagrams and visual sequences for both right-handed and left-handed crocheters. Use the diagram that matches your working direction when checking the orientation of the motifs and border. The written instructions remain the technical reference for the row numbers, repeats, and stitch counts.
The supplied visual materials also include demonstrations in which thicker yarn and a larger hook are used. Those tools are for demonstration, not a replacement for the stated project materials. For the actual project, the source specifies one 50 g skein of weight 1 cotton yarn and a 3.5 mm or E-4 hook.
Quick Size Comparison
- Small: Stop the main body after Row 27; target width 36 cm or 14 inches; finish with 27 shells; use the Size S tie repeat ×14.
- Medium: Stop the main body after Row 31; target width 43 cm or 17 inches; finish with 31 shells; use the Size M tie repeat ×16.
- Large: Stop the main body after Row 35; target width 50 cm or 20 inches; finish with 35 shells; use the Size L tie repeat ×18.
Beginner Checklist
- Use weight 1 cotton yarn and a 3.5 mm or E-4 hook.
- Keep the US crochet abbreviations nearby.
- Remember that the beginning CH 3 counts as a ST.
- Remember that CH 1, CH 3 between puff stitches, and CH 2 between SC and DC do not count as stitches.
- Check the printed stitch count after every row.
- Keep the odd/even row rhythm clear as the triangle expands.
- Stop at Row 27, 31, or 35 according to your chosen size.
- Make sure the last main-body row is odd-numbered before beginning the border.
- Use DC 7 for the bottom shell.
- Keep the yarn attached after the shell border until the pattern tells you to finish.
- Work CH 80 for each tie.
- Fasten off and weave in the ends.
- Use blocking if you want to correct the natural sideways slant.
Troubleshooting Guide
The puff motifs do not look evenly spaced.
Return to the beginning-chain rules and verify the placement of each HDC3PUFF in the DC. Also check that CH 3 between puff stitches is not being counted as a stitch.
The triangle seems narrower than expected.
Check your tension first. The pattern gives an optional wider-spacing method for tight tension: CH 4 between HDC3PUFFs and CH 3 between SCs and DCs. The source also allows the finished rows to be gently stretched.
The sides lean slightly.
This is described as a natural characteristic of the crochet construction. Blocking can help: pin along the middle and stretch the narrow side as much as possible.
The shell border curls at the point.
Use the written instruction of DC 7 for the bottom shell. The designer specifically changed it from 5 DC to 7 DC to prevent curling.
I am following the video and the bottom shell looks different.
The source explains that the video demonstrates 5 shells instead of 7 like the pictures, and that the bottom shell was changed from 5 DC to 7 DC. Follow the updated written instruction for the bottom shell.
Finishing and Visual Inspection
Once the ties are finished and the ends are woven in, lay the bandana flat and inspect the entire outline. The main body should form a triangle, the puff motifs should repeat across the openwork rows, and the shell border should frame the sides and point.
Compare the proportions against the chosen size rather than expecting every sample photograph to have identical dimensions. The source explicitly notes that the demonstration uses thicker yarn and a larger hook, so those images are primarily instructional references.
If the fabric needs a small shape correction, blocking is the most appropriate finishing step according to the source. The goal is to improve the balance of the finished triangle without changing the stitch pattern itself.
Video Reference Note
The source includes video tutorials for the right-handed and left-handed row demonstrations, as well as shell-border and tie demonstrations. It also notes that the video links may be clickable when the file is opened through the Google Drive PDF reader but not necessarily with Word PDF, so a different PDF reader may be needed if a link does not open properly.
Final Thoughts
The Love Puff Bandana is a good example of how a small set of stitches can create a surprisingly detailed accessory. The project relies on the interaction of puff stitches, double crochet, single crochet, and chain spaces rather than a complicated collection of techniques. Once the alternating row rhythm is understood, the growing triangle becomes much easier to follow.
The most important part of the project is accuracy at the checkpoints. Keep the exact row number in view, respect the special counting rules, and use the printed stitch count to confirm your work. Choose the size by the stated measurement method, stop on the correct odd-numbered row, and then move into the shell border.
The border and ties finish the project with a practical purpose as well as decorative detail. The updated 7-DC bottom shell helps prevent curling, while the CH 80 ties provide the long fastening sections. Finally, blocking can help refine the natural asymmetry that may occur from crochet tension and working direction.
Pattern credit: Love Puff Bandana by Silent Bloom Crochet, Original Pattern © 2026. The source states that finished items may be sold with credit to the designer. It also asks that the original pattern and photographs not be copied, shared, or reposted.