
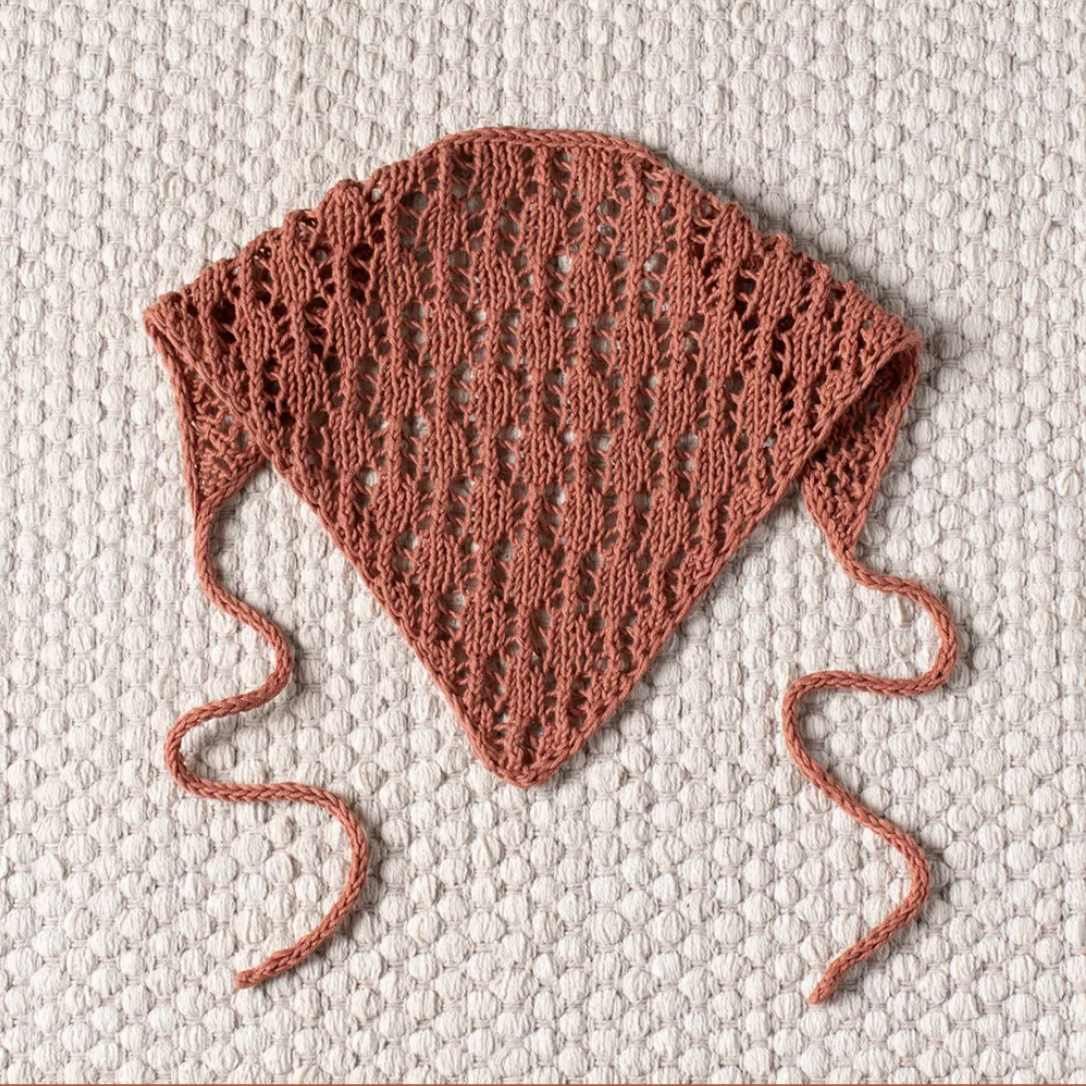
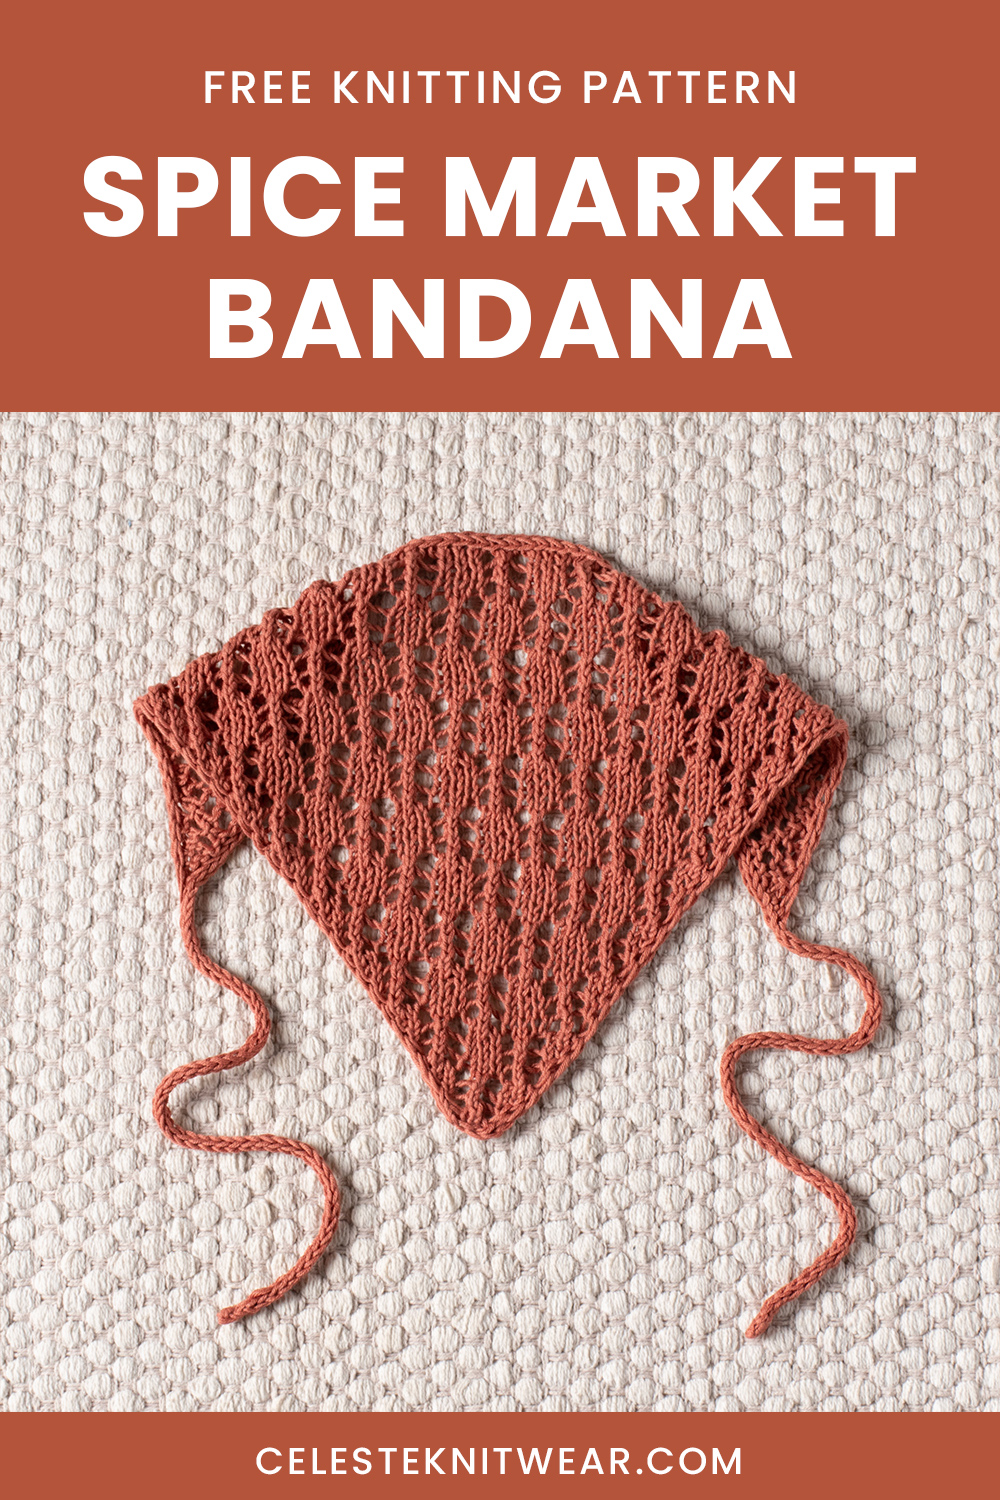
The Spice Market Bandana is a lightweight summer knitting project that combines an elegant lace stitch with a practical triangular construction. Made with sport-weight cotton yarn, this one-size accessory is designed to be worked back and forth from the bottom edge upward. As the knitting grows, carefully positioned increases expand the triangle while the lace pattern creates an airy decorative fabric.
What makes this project especially appealing is its clean finishing. The first and last two stitches of every row create an i-cord edging, helping the sides remain neat and preventing them from curling. Once the triangular body is complete, two long i-cord ties are incorporated into the construction, creating a simple finished bandana that can be tied securely around the head.
Before You Begin: How This Bandana Is Constructed
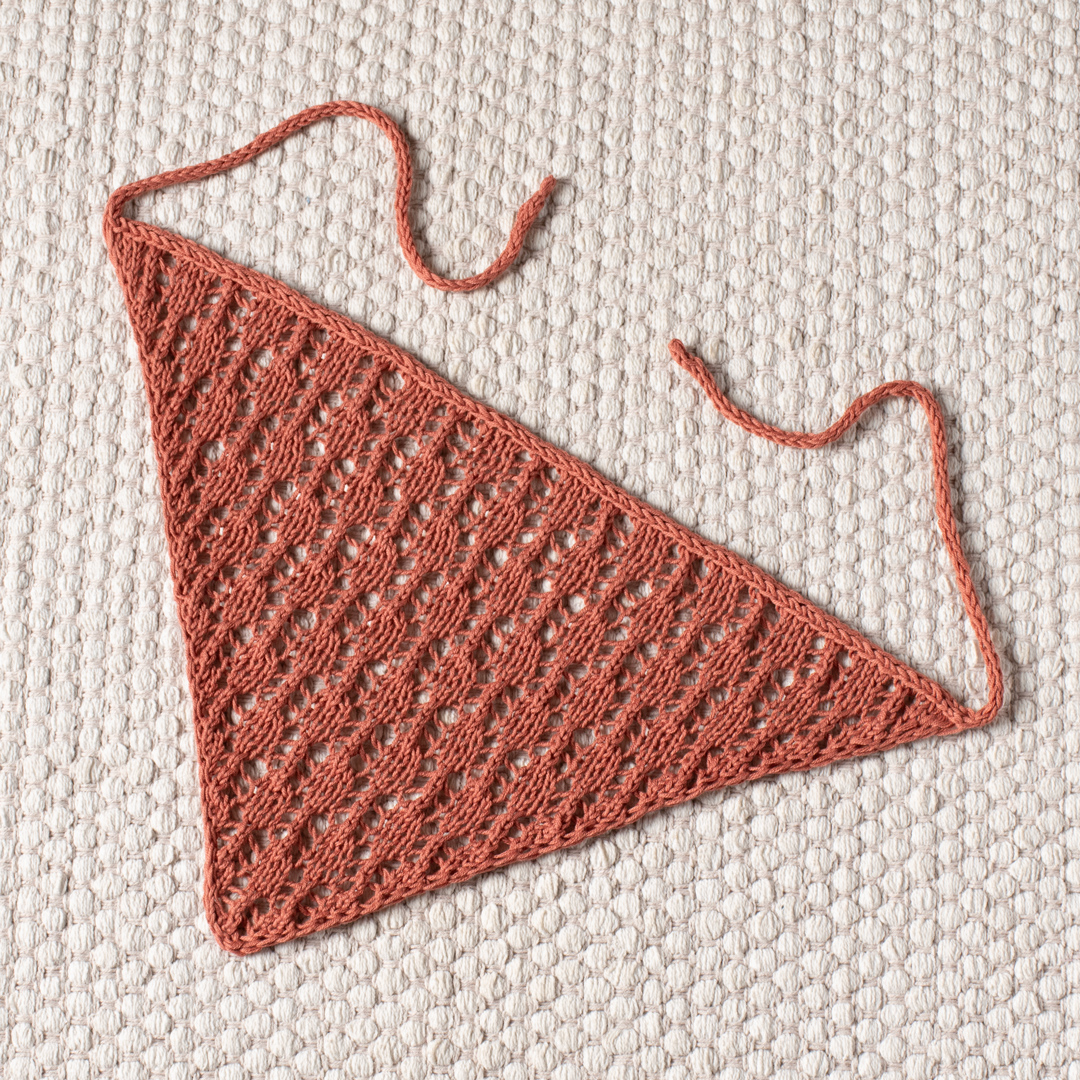
Although the finished bandana looks like a relatively simple triangular accessory, its construction is carefully planned. The project starts at the bottom point with only 5 stitches. The triangle then becomes wider through increases worked on the right side of the fabric.
The knitting remains flat throughout the main body, so there is no need to join the work into a round. Every row follows the same basic edge principle: the first two stitches are knitted and the final two stitches are slipped with the yarn in front. These stitches form the i-cord-style border.
The central portion contains the lace design. Yarn overs create the open areas of the lace, while k3tog decreases balance those increases within the motif. At the same time, M1R and M1L increases near the edges add two stitches on each right-side increase row.
After the desired length is reached, the triangular body is left on the needle with its live stitches intact. A separate three-stitch i-cord is then knitted on DPNs. The first i-cord is connected to the live edge stitches using ssk, and the same i-cord structure continues across the edge. Finally, a second approximately 30 cm i-cord is worked from the remaining three stitches.
Finished Measurements and Gauge
The pattern is written for one size.
- Length without ties: 40cm / 15.75in.
- Height: 23cm / 9in.
The specified gauge is:
10 x 10 cm (4 x 4in) = 24 stitches x 32 rows in stockinette stitch after blocking.
Gauge is particularly useful when the finished measurements matter. The stated gauge is measured after blocking, so the fabric should be evaluated under the same condition when checking the project against the published measurements.
Yarn, Needles, and Notions
Yarn
The original pattern specifies Drops Safran in the color red clay (uni color 59), using 1 ball.
The design is intended for sport-weight cotton yarn, making the finished accessory suitable for a lightweight summer wardrobe. When following the original specifications, keep the stated yarn type, color, and quantity in mind.
Knitting Needles
For the main bandana, use 3mm (US 2.5) knitting needles.
The two ties are made with a pair of 3mm (US 2.5) DPNs.
Notions
- Tapestry needle
- Measuring tape
- Scissors
A measuring tape is particularly useful because both the finished bandana dimensions and the approximately 30 cm length of each i-cord tie are specified in the pattern.
Understanding the Edge Before Starting the Lace
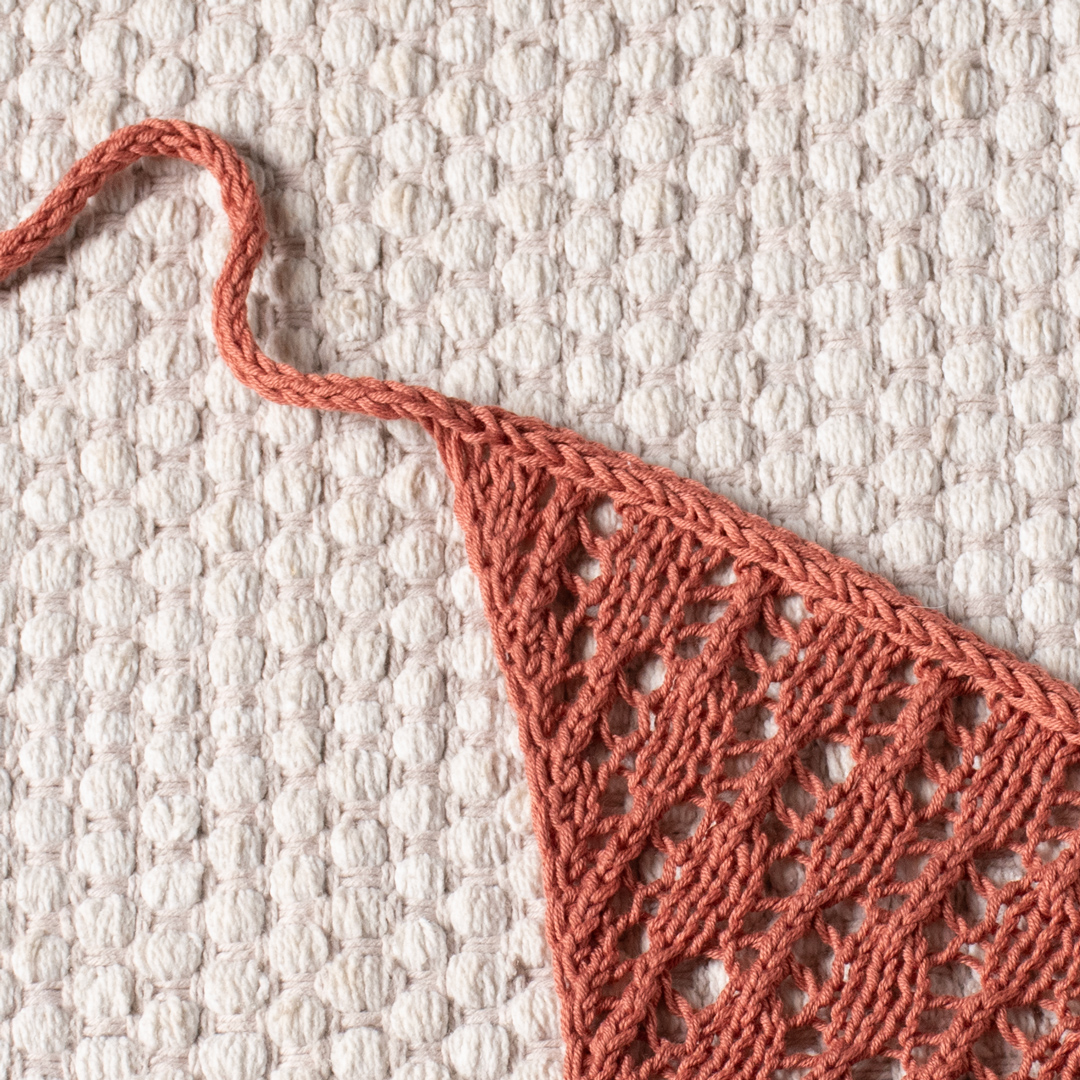
The edge construction is worth understanding before beginning the first increase. The pattern uses two stitches at each side to create an i-cord edging.
On every row, knit the first two stitches. At the opposite edge, slip the last two stitches as if to purl with the yarn in front. These stitches should not be tightened.
This detail matters because pulling the edge stitches too firmly can interfere with the neat appearance and natural shape of the border. The edge needs enough looseness to form the intended i-cord effect.
The Increase Structure
The bandana grows by increasing two stitches on each right-side increase row. One increase is made near the beginning using M1R, while the other is made near the end using M1L.
The position of these increases is important. They are worked before and after the central lace section but inside the two-stitch i-cord borders.
The pattern notes also state that the increased stitches should not be tightened. Keeping them relaxed helps the growing triangle maintain an even shape.
If you want to simplify the increase technique, the pattern allows the M1L and M1R increases to be replaced with yarn overs.
Pattern Abbreviations
These are the abbreviations used throughout the pattern:
- k – knit.
- k3tog – knit 3 stitches together: slip the next 2 stitches knitwise (slip both stitches together, not one by one) to the right-hand needle, knit the next stitch, pass the 2 slipped stitches over the knit stitch.
- p – purl.
- RS – right side.
- sl – slip stitch as if to purl with yarn in front.
- ssk – slip 1 stitch knitwise, slip the next stitch knitwise, return the 2 stitches back to the left needle, knit those 2 stitches together through the back loops.
- WS – wrong side.
- yo – yarn over.
- *-* – repeat the instructions in between the asterisks the number of times specified.
Step 1: Cast On the Bandana
Begin by casting on 5 stitches.
This small starting point forms the bottom of the triangular bandana. The first few rows gradually establish both the lace structure and the side edging.
Step 2: Work the Set-Up Rows
The setup section consists of eight rows. It establishes the foundation for the repeated lace pattern that follows.
Set-Up Row (WS)
k2, p1, sl2.
This first wrong-side row is deliberately short. It establishes the two-stitch borders and the central stitch.
Row 1 (RS)
k2, M1R, k1, M1L, sl2 (7sts).
The first right-side increase row takes the stitch count from 5 to 7.
Row 2
k2, p to last 2 sts, sl2.
Keep the first two stitches relaxed and maintain the same edge treatment at the end.
Row 3
k2, M1R, yo, k3tog, yo, M1L, sl2 (9sts).
This is the first setup row to display the basic lace relationship between yarn overs and the centered k3tog decrease.
Row 4
k2, p to last 2 sts, sl2.
Row 5
k2, M1R, k1, yo, k3tog, yo, k1, M1L, sl2 (11sts).
Row 6
k2, p to last 2 sts, sl2.
Row 7
k2, M1R, k2, yo, k3tog, yo, k2, M1L, sl2 (13sts).
Row 8
k2, p to last 2 sts, sl2.
At the end of the setup section, the stitch count after Row 7 is 13 stitches. This is an excellent checkpoint before moving into the six-row repeating pattern.
Step 3: Begin the Main Lace Pattern
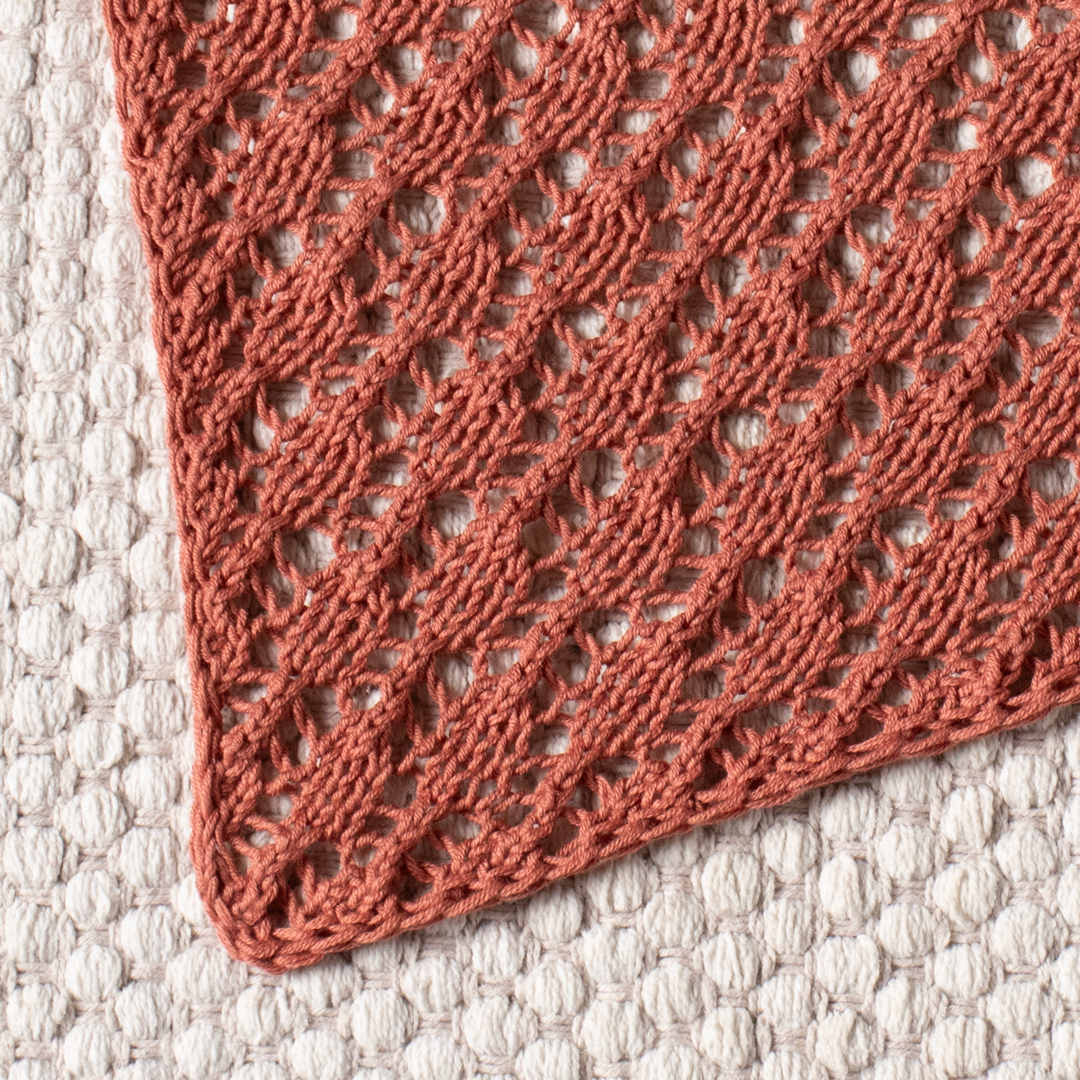
The main body is worked using a six-row repeat. The right-side rows contain the shaping increases and lace motif, while the wrong-side rows maintain the simple edge and purl structure.
Pattern Row 1 (RS)
k2, M1R, *yo, k3tog, yo, k3* to last 5sts, yo, k3tog, yo, M1L, sl2 (2sts increased).
Follow the repeat between the asterisks exactly as written until the specified number of stitches remain. The row finishes with the final lace actions, the M1L increase, and the two slipped edge stitches.
Pattern Row 2 (WS)
k2, p to last 2 sts, sl2.
This is a simple wrong-side checkpoint. There are no increases on this row.
Pattern Row 3
k2, M1R, k1, *yo, k3tog, yo, k3* to last 6sts, yo, k3tog, yo, k1, M1L, sl2 (2sts increased).
The extra k1 on each side changes the amount of fabric surrounding the central lace repeat as the triangle grows.
Pattern Row 4
k2, p to last 2 sts, sl2.
Pattern Row 5
k2, M1R, k2, *yo, k3tog, yo, k3* to last 7sts, yo, k3tog, yo, k2, M1L, sl2 (2sts increased).
Pattern Row 6
k2, p to last 2 sts, sl2.
These six rows form the main repeating unit of the bandana.
How Many Times Should You Repeat the Pattern?
Repeat rows 1-6 9 more times or continue until you reach your desired length.
This is one of the most flexible parts of the pattern. The standard instructions provide nine additional repeats, while also allowing you to stop according to your desired length.
The triangle can therefore be adjusted without changing the fundamental lace motif. If you are modifying the size, use your measuring tape and compare the growing piece with your intended finished dimensions.
Keeping Track of the Lace Pattern
When working lace, it can be useful to treat every six-row repeat as one complete unit. Rows 1, 3, and 5 are the shaping rows, while Rows 2, 4, and 6 are the corresponding wrong-side rows.
The three right-side rows are visually different because the number of plain stitches between the edge increases and the lace section changes position. This is intentional and allows the triangle to grow while keeping the lace pattern integrated into the shape.
A simple way to stay organized is to mark each completed six-row repeat on a piece of paper. The pattern itself should remain your authority for every stitch and row; the checklist is only a tracking aid.
Step 4: Finish the Main Triangle
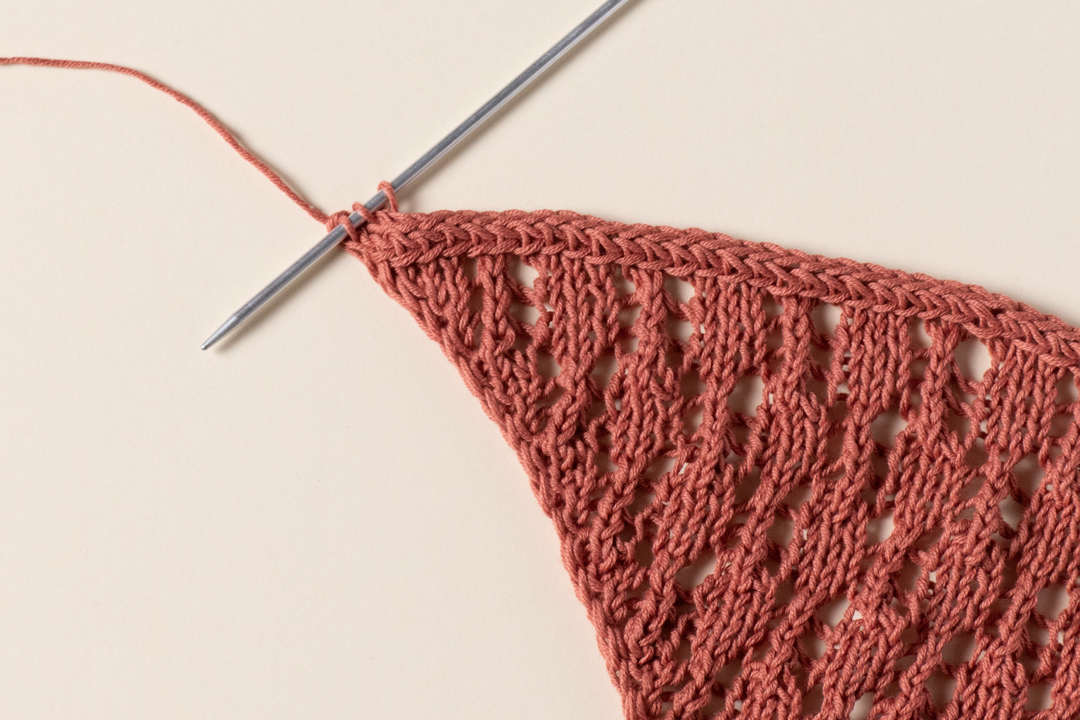
When the desired length has been reached, break the yarn while leaving a 10cm (4″) long tail.
Do not transfer the live stitches to waste yarn or remove them from the needle. The next stage requires those stitches to remain live while the first i-cord tie is joined to the bandana.
Step 5: Knit the First I-Cord Tie
The first tie is worked separately using the 3mm (US 2.5) DPNs.
Cast on 3 stitches and do not turn.
Then repeat:
*Slip the 3 stitches to the right side of the needle. Knit 3.*
Continue until the i-cord tube measures approximately 30 cm.
Do not cut the yarn when the first tie reaches the required length. The yarn remains attached because this same i-cord will be used to form the edging along the bandana.
Step 6: Attach the I-Cord to the Live Bandana Stitches
Transfer the 3 i-cord stitches to the needle while holding the live bandana stitches.
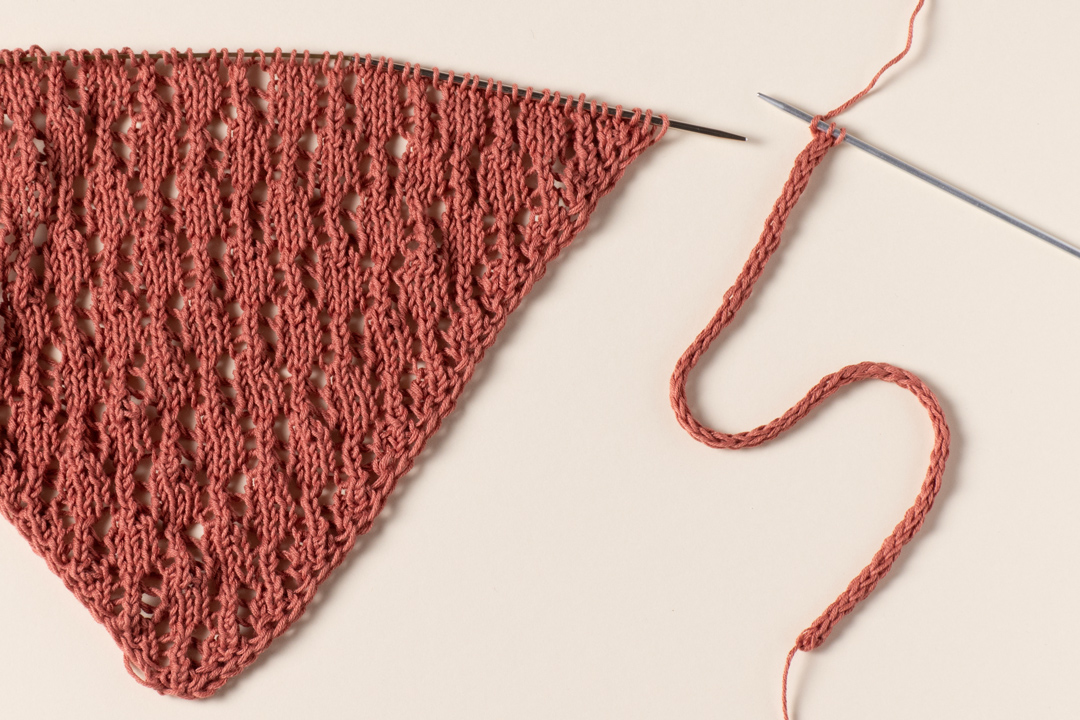
Next, knit the first two i-cord stitches.
Then work ssk, knitting the last i-cord stitch together with the first bandana stitch.
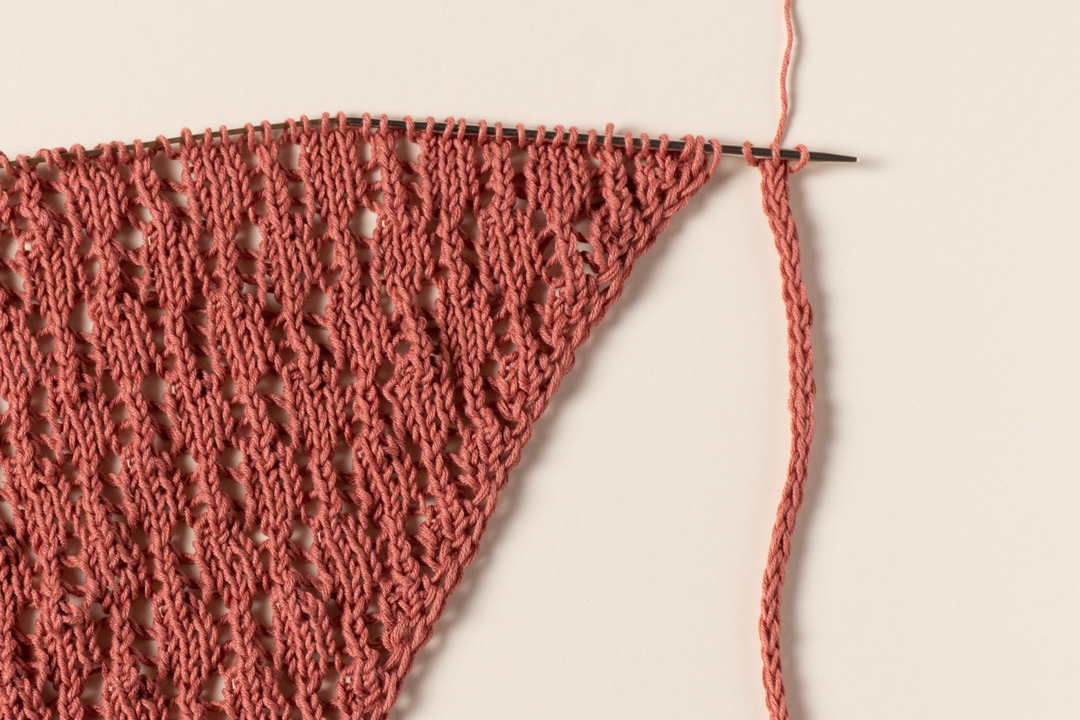
This joining step transforms the separate i-cord into the finished edging. Work carefully here because the relationship between the three i-cord stitches and the live bandana stitches is important to the construction.
Step 7: Continue the I-Cord Edging
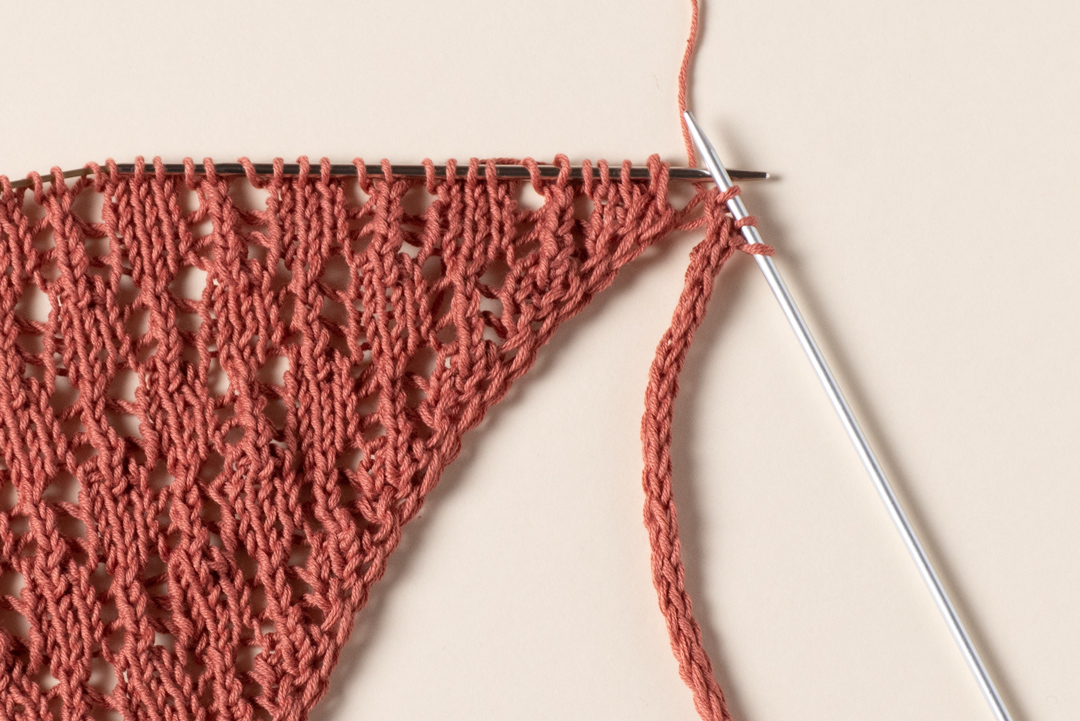
Transfer the first 3 stitches to the needle while holding the live bandana stitches.
Repeat the following steps:
*k2, ssk, transfer 3 stitches to the needle, holding the live bandana stitches*
Continue until you have 3 stitches left.
The repeated sequence steadily incorporates the live bandana edge into the i-cord structure. The result is a continuous border that follows the triangular edge.
Step 8: Work the Second I-Cord Tie
When the edging reaches the point where only 3 stitches remain, begin the second i-cord tie.
Work the same repeated movement:
*Slip the 3 stitches to the right side of the needle. Knit 3.*
Continue until the tube measures approximately 30 cm.
This second tie is worked in the same basic way as the first tie, but it is finished at the end of the project.
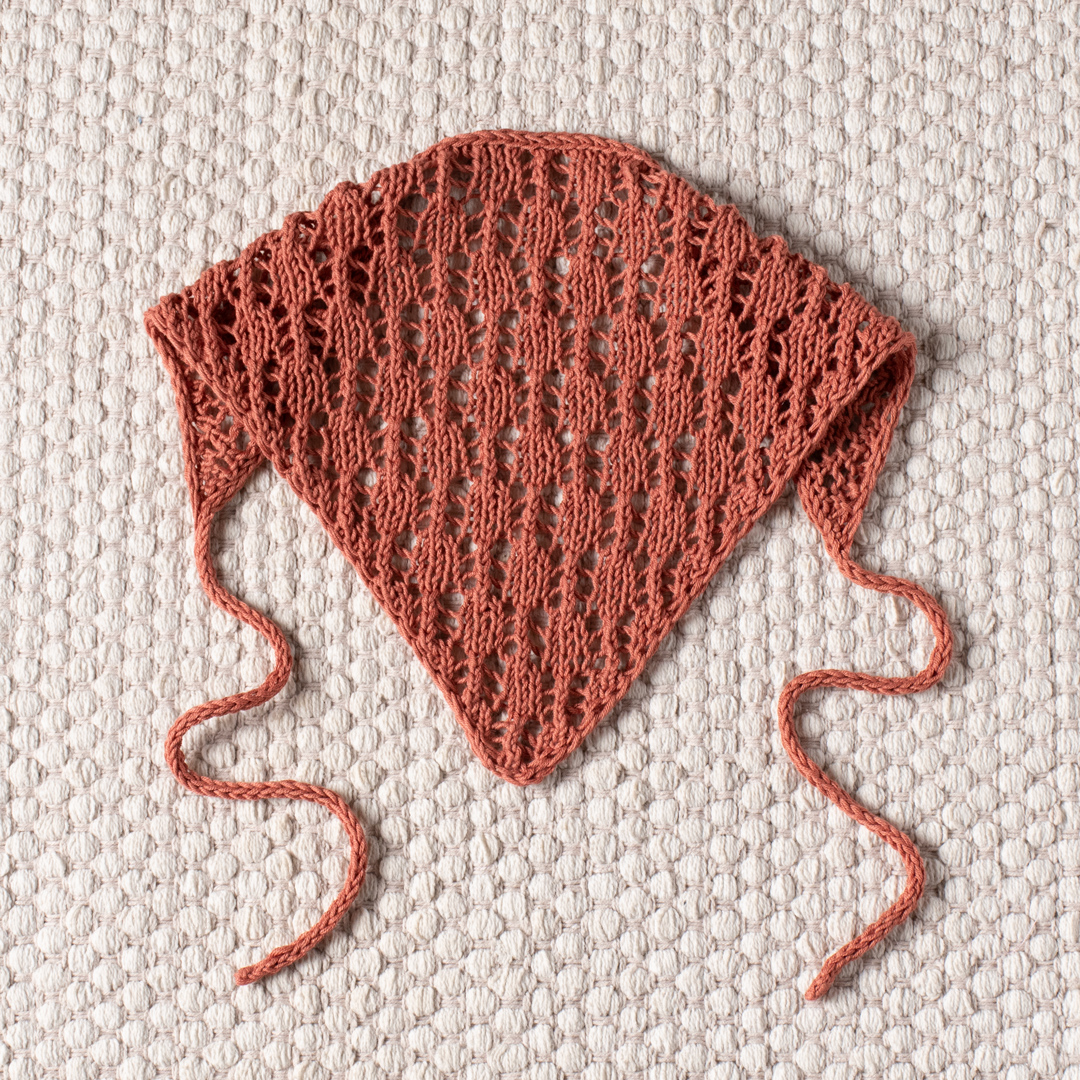
Once the second i-cord reaches approximately 30 cm, bind off, cut the yarn, and weave in the tails.
How the Lace Pattern Works
The decorative fabric is created through a repeated relationship between yarn overs and k3tog decreases. A yarn over introduces additional yarn into the row, while k3tog reduces three stitches into one. The combination produces the open lace effect without allowing the stitch count to increase uncontrollably in the central motif.
The actual growth of the bandana comes from the M1R and M1L increases placed near the sides. This distinction is useful when reading the pattern: the lace stitches create the decorative structure, while the edge increases create the expanding triangle.
Because the pattern alternates right-side lace rows with straightforward wrong-side rows, it is possible to pause after each wrong-side row and check the work before beginning the next shaping row.
Useful Stitch Checkpoints
The setup section contains several explicit stitch-count checkpoints:
- After Row 1: 7 stitches.
- After Row 3: 9 stitches.
- After Row 5: 11 stitches.
- After Row 7: 13 stitches.
These counts are valuable because they let you confirm the increase structure before moving into the longer repeating section.
During the main pattern, each specified right-side increase row states that 2 stitches are increased. If your stitch count does not behave as expected, check the M1R and M1L positions first, then review the lace repeat.
Tips for Managing the Two-Sided Edging
The easiest way to keep the bandana looking symmetrical is to treat the first two and last two stitches as a separate visual frame around the lace section.
At the beginning of every row, look for the first two knitted stitches. At the end, make sure the final two stitches are slipped with yarn in front. Avoid pulling the yarn tightly around these stitches.
On right-side rows, the M1R appears after the opening k2, while the M1L appears before the final sl2. This consistent positioning makes the shaping easier to identify as the bandana grows.
Tips for the I-Cord Construction
The i-cord ties are only three stitches wide, so the process can feel different from ordinary flat knitting. The pattern instructs you not to turn after knitting the three stitches. Instead, the stitches are slipped to the right side of the needle before knitting them again.
Continue this repeated movement until the tube reaches approximately 30 cm. A measuring tape makes this much easier than estimating the length by eye.
When connecting the first tie, keep the live bandana stitches accessible. The i-cord becomes the edging through the repeated k2, ssk, and stitch-transfer sequence.
Common Mistakes to Avoid
Tightening the Edge Stitches
The pattern specifically says not to tighten the edge stitches. Keep them relaxed so the i-cord-style edging can form correctly.
Forgetting the Two Increases
On each right-side increase row, there are two stitches increased. One comes from M1R and the other from M1L. Missing one of these changes the growth of the triangle.
Changing the Lace Instructions
The lace motif depends on the exact relationship between yo and k3tog. Avoid changing the number of yarn overs or decreases unless you are deliberately designing a different pattern.
Cutting the First I-Cord Too Early
The first tie should not be cut after reaching approximately 30 cm. The pattern explicitly instructs you to leave the yarn attached because that i-cord is immediately connected to the bandana.
Removing the Live Stitches
After finishing the triangular body, leave the stitches on the needle. The i-cord edging is constructed using those live stitches.
Size Modification
The pattern is designed as one size, but the instructions allow the length of the triangle to be modified by adding or subtracting repeats.
The main pattern is based on a six-row repeat. The standard instruction is to repeat rows 1-6 nine more times or continue until the desired length is reached.
This flexibility makes the project useful for knitters who want to adjust the accessory without changing its fundamental lace construction. Keep the original gauge, yarn specifications, and stitch sequence in mind when making adjustments.
Finishing Checklist
- Confirm the main triangle has reached the desired length.
- Break the yarn with a 10cm (4″) tail.
- Leave the live stitches on the needle.
- Cast on 3 stitches on the 3mm (US 2.5) DPNs.
- Work the first i-cord to approximately 30 cm.
- Keep the first i-cord attached to the yarn.
- Join it to the live bandana stitches using the specified ssk method.
- Repeat the i-cord edging sequence across the edge.
- Stop when 3 stitches remain.
- Work the second i-cord to approximately 30 cm.
- Bind off.
- Cut the yarn.
- Weave in the tails.
What to Look for in the Finished Bandana
The finished accessory should have a triangular body with a neat lace section running through the center. The side edges should have the clean appearance created by the two-stitch i-cord edging, while the two ties extend from the opposite ends of the finished edge.
The standard finished measurements are 40cm / 15.75in in length without ties and 23cm / 9in in height. Each i-cord tie is approximately 30 cm long.
The cotton construction keeps the project appropriate for a lightweight accessory, while the lace provides visual interest without requiring a complicated overall construction.
Quick Reference for the Complete Construction
For an at-a-glance overview, the project follows this sequence:
- Cast on 5 stitches.
- Work the setup section through Row 8.
- Begin the six-row lace pattern.
- Repeat rows 1-6 9 more times or until the desired length is reached.
- Break the yarn, leaving a 10cm (4″) tail.
- Leave the live stitches on the needle.
- Cast on 3 stitches for the first i-cord.
- Work the first i-cord to approximately 30 cm.
- Connect the i-cord to the live bandana stitches.
- Continue the i-cord edging until only 3 stitches remain.
- Work the second i-cord to approximately 30 cm.
- Bind off and weave in the tails.
Final Thoughts
The Spice Market Bandana offers a satisfying combination of lace knitting, simple shaping, and polished finishing techniques. The main triangle grows from only 5 starting stitches, making the beginning approachable while the repeating lace pattern gradually introduces more visual interest.
The construction also makes the project particularly rewarding for knitters who want to practice more than just basic flat knitting. You will work M1R and M1L increases, yarn overs, k3tog decreases, i-cord knitting, and ssk joins, all within one relatively compact accessory.
The most important thing is to preserve the structure of the original instructions: keep the first and last two stitches as the i-cord-style edge, make the two stated increases on the right-side shaping rows, maintain the lace sequence, and leave the live stitches available for the i-cord edging.
Once the first approximately 30 cm tie has been connected and the edging has been worked across the bandana, the second approximately 30 cm i-cord completes the design. Bind off, weave in the tails, and the lightweight triangular accessory is ready for its final finishing treatment.

With its sport-weight cotton yarn, 3mm needles, adjustable triangular body, and integrated i-cord ties, the Spice Market Bandana is a compact project that can be followed step by step while still offering room for size adjustment through the number of pattern repeats.