
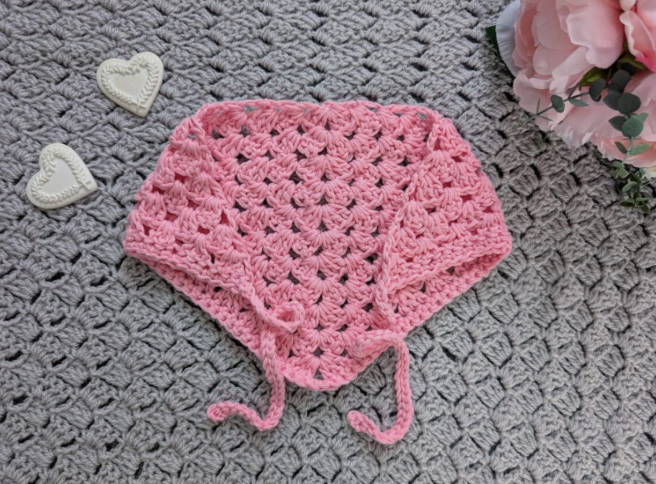
The Crochet Rose Button Bandana is a simple and feminine crochet accessory that combines an easy granny triangle construction with delicate ties and a neat Single Crochet edging. It is a practical project for beginners who want to practice working into chain spaces, building a triangular shape row by row, creating consistent repeats, and finishing a crochet piece with clean ties.
This design uses aran or medium weight 4 yarn and is worked in a single shade, making it straightforward to follow without complicated color changes. The original pattern uses Drops Paris in shade 20 (pink), paired with a 5.5 mm crochet hook. The finished bandana measures approximately 8.5 inches by 18 inches (22 cm by 46 cm), excluding the ties on each side.

What Makes This Bandana a Great Beginner Project?
At first glance, a triangular crochet accessory can look more complicated than it actually is. The main body of this bandana is built through a very regular granny-style structure. Each new row expands the triangle while maintaining the same basic rhythm: chain, work groups of Double Crochet into spaces, add chain spaces, and finish at the opposite side.
That repetition makes the project particularly useful for anyone learning to recognize crochet spaces rather than relying only on individual stitches. Instead of placing every stitch into another stitch, much of the pattern asks you to work groups of 3 Double Crochet into spaces created by chains.
The design also provides several natural checkpoints. As the rows increase, you can visually compare the number of granny groups and chain spaces. This makes it easier to notice a missed group before the mistake becomes difficult to correct.
Once the triangular section is complete, the remaining work consists of creating the first tie, adding Single Crochet edging across the V-shaped portion, creating the second tie, and tidying the loose ends. The construction is therefore divided into manageable stages rather than requiring a complicated finishing technique.
Project Details at a Glance
- Skill level: Easy / beginner
- Yarn: Drops Paris
- Yarn shade: 20 (pink)
- Yarn weight: Aran / Medium 4
- Amount: 2 skeins
- Crochet hook: 5.5 mm
- Gauge: 4 inches (10 cm) = 5 rows of Granny Triangle pattern
- Finished size: 8.5 inches x 18 inches (22 cm x 46 cm), excluding ties on each side
- Scissors: 1 pair
- Tapestry needle: 1
The original pattern uses US crochet terminology, with British terminology provided in brackets. Keeping this terminology in mind is important because Single Crochet and Double Crochet have different names in British crochet terminology.
Materials and Preparation
Before starting, gather the complete material list so that the work can progress without interruptions. The pattern calls for two skeins of Drops Paris in shade 20 (pink), a 5.5 mm crochet hook, scissors, and a tapestry needle.
It is helpful to have your yarn positioned comfortably before beginning the foundation ring. Since the entire design is worked in the same color, you do not need to organize multiple yarn strands or plan color changes.
A tapestry needle is needed toward the end of the project for tidying loose ends. Keep it nearby rather than leaving the finishing stage until the last moment.
Gauge: A Useful Starting Check
The stated gauge is 4 inches (10 cm) for 5 rows of the Granny Triangle pattern. Gauge is especially useful when the finished dimensions matter. Before committing to the complete project, compare your tension with the stated gauge if you want your finished piece to correspond closely to the listed measurements.
Remember that crochet tension can vary naturally from one person to another. The important point is not to change the pattern numbers simply to compensate for a difference. The original pattern specifies its own hook, yarn, rows, and finished dimensions, so those details should remain unchanged when following the pattern as written.
Abbreviations Used in the Pattern
- Ch: Chain
- St: Stitch
- Sl st: Slip stitch
- Sp: Space
- SC: Single Crochet (UK Double Crochet)
- DC: Double Crochet (UK Treble Crochet)
- EOR: End of row
Because the pattern repeatedly refers to spaces, becoming comfortable identifying a chain space is particularly helpful. The granny-style sections depend on placing groups of Double Crochet into the correct spaces rather than randomly between stitches.
Stage One: Forming the Beginning Ring
The project starts with a slip knot followed by a short chain that is joined into a ring. This small foundation establishes the center of the triangular design.
Begin by making a slip knot. Chain 4, then slip stitch through the first chain to form a ring.
At this stage, work carefully rather than pulling the foundation too tightly. The ring needs to remain accessible because the first group of Double Crochet is worked inside it.
Stage Two: Building Row 1
Row 1 establishes the first granny-style cluster. Chain 4, which represents 1 Double Crochet plus a chain space. Then work 3 Double Crochet into the circle. Chain 1, followed by 1 Double Crochet in the circle.
This short first row creates the foundation from which the triangular shape will begin expanding. It is useful to look at the placement of the stitches before moving forward so you can recognize the chain spaces that later rows will use.
Stage Three: Expanding the Triangle
From Row 2 onward, the construction becomes increasingly recognizable as a triangle. Each row starts with Chain 4, followed by a turn. Groups of 3 Double Crochet are worked into the spaces, separated by chain spaces, and the row ends with the final Double Crochet placement.
The progression is deliberate. Each new row contains one additional internal 3-DC group compared with the previous row. This creates the gradual widening of the bandana.
Row 2
Chain 4 (1 DC + ch space), turn. Place 3 DC inside the next space; chain 1, 3 DC, chain 1, 1 DC in the next and last space.
Row 3
Chain 4 (1 DC + ch space), turn. Place 3 DC in the next space; chain 1, 3 DC in the next space; chain 1, 3 DC, chain 1, 1 DC in the next and last space.
After these early rows, the pattern begins to develop a clear visual rhythm. If you are new to granny-style crochet, pause occasionally and identify each space before inserting your hook.
Rows 4 Through 6: Establishing the Repeating Structure
Row 4
Chain 4 (=1 DC + ch 1 sp), turn. Place 3 DC in the next space; [ch 1, 3 DC in next sp] 2 x; ch 1, 3 DC, ch 1, 1 DC in the next and last space.
Row 5
Chain 4 (=1 DC + ch 1 sp), turn. Place 3 DC in the next space; [ch 1, 3 DC in next sp] 3 x; ch 1, 3 DC, ch 1, 1 DC in the next and last space.
Row 6
Chain 4 (=1 DC + ch 1 sp), turn. Place 3 DC in the next space; [ch 1, 3 DC in next sp] 4 x; ch 1, 3 DC, ch 1, 1 DC in the next and last space.

Rows 4, 5, and 6 are useful checkpoints because the repeated section becomes easy to recognize visually. The number inside the brackets increases by one on each row. Keeping that progression in mind can help you follow the written pattern without losing your place.
Rows 7 Through 9: Keeping the Pattern Organized
Row 7
Chain 4 (=1 DC + ch 1 sp), turn. Place 3 DC in the next space; [ch 1, 3 DC in next sp] 5 x; ch 1, 3 DC, ch 1, 1 DC in the next and last space.
Row 8
Chain 4 (=1 DC + ch 1 sp), turn. Place 3 DC in the next space; [ch 1, 3 DC in next sp] 6 x; ch 1, 3 DC, ch 1, 1 DC in the next and last space.
Row 9
Chain 4 (=1 DC + ch 1 sp), turn. Place 3 DC in the next space; [ch 1, 3 DC in next sp] 7 x; ch 1, 3 DC, ch 1, 1 DC in the next and last space.
At this point, the triangular body should be substantially wider than it was at the beginning. A good habit is to compare both sides visually. The design is built symmetrically, so an obvious difference between the two sides can be a useful signal to review the previous row.
Rows 10 and 11: Completing the Main Triangle
Row 10
Chain 4 (=1 DC + ch 1 sp), turn. Place 3 DC in the next space; [ch 1, 3 DC in next sp] 8 x; ch 1, 3 DC, ch 1, 1 DC in the next and last space.
Row 11
Chain 4 (=1 DC + ch 1 sp), turn. Place 3 DC in the next space; [ch 1, 3 DC in next sp] 9 x; ch 1, 3 DC, ch 1, 1 DC in the next and last space.
Do not fasten off after Row 11. The yarn remains attached because it will be used immediately to create the first tie.

How to Check the Triangle Before Adding the Ties
Before continuing, take a moment to inspect the main body. The finished size is intended to be 8.5 inches by 18 inches (22 cm by 46 cm), excluding the ties on each side. The exact appearance can vary slightly depending on individual crochet tension, but the construction should clearly form a triangle.
Look for evenly spaced granny groups and a consistent edge. If you notice a missing group or an unusual gap, review the most recent row before proceeding. It is generally easier to identify where something changed while the row is still fresh in your memory.
Stage Four: Making the First Tie
With the yarn still attached after Row 11, begin the first tie. Chain 35.
Skip the first chain and slip stitch through the second chain and every chain across. This creates a narrow crocheted cord from the foundation chain.
Once you reach the end of the tie, slip stitch through the Double Crochet on the side of the bandana to secure the strap fully.
Do not fasten off at this point. The same attached yarn will continue into the edging section.
Keeping the Tie Even
When making a chain of this length, try to keep the tension consistent from beginning to end. If the starting chains become dramatically tighter or looser, the finished tie may look uneven. The pattern specifically calls for 35 chains, so keep the chain count exact rather than adding or removing chains to alter the length.
The slip stitches are also important because they create the narrow tie structure. Work through the required chains carefully and avoid accidentally skipping additional chains.
Stage Five: Adding the Single Crochet Edge
After the first tie is completed, the next stage is to place Single Crochet across the V part of the bandana.
For Row 1, work Single Crochet across the first side of the V, placing SC in each stitch. At the top of the V, which is the chain 2 from the previous row, place 2 SCs. Then continue with Single Crochet across the second side.
Do not fasten off after completing this edging.
The purpose of this stage is to provide a defined finish along the V-shaped portion while also continuing the construction toward the second tie.

Stage Six: Creating the Second Tie
Once the Single Crochet edging has been completed, begin the second tie from the attached yarn.
Chain 35. Skip the first chain and slip stitch through the second chain and every chain across.
At the end, slip stitch through the Double Crochet on the side of the bandana to secure the strap.
This mirrors the first tie and completes the basic wearable structure of the accessory. The two ties provide the method for securing the bandana when worn.
After the second tie has been secured, fasten off. Tidy all loose ends with the tapestry needle.
Finishing Without Losing the Clean Shape
The finishing stage may be short, but it has an important visual effect. Loose ends should be tidied carefully so they do not distract from the triangle, ties, or edging.
Use the tapestry needle to deal with the remaining loose yarn ends. Avoid pulling the finished fabric excessively while hiding the ends. The goal is to maintain the shape that has already been created.
Once the loose ends have been tidied, gently examine the accessory from both sides. Check that the ties are securely attached and that the edging follows the V without obvious gaps.
Understanding the Construction as a Series of Checkpoints
One of the easiest ways to approach this project is to divide it into checkpoints instead of viewing the pattern as one long sequence.
- Checkpoint 1: Slip knot and Chain 4 joined into a ring.
- Checkpoint 2: Row 1 establishes the first granny-style structure.
- Checkpoint 3: Rows 2 and 3 begin the triangular expansion.
- Checkpoint 4: Rows 4 through 6 continue the increasing internal groups.
- Checkpoint 5: Rows 7 through 9 continue the same progression.
- Checkpoint 6: Rows 10 and 11 complete the main triangle.
- Checkpoint 7: Chain 35 creates the first tie.
- Checkpoint 8: Single Crochet is worked across the V.
- Checkpoint 9: The second Chain 35 tie is created.
- Checkpoint 10: Fasten off and tidy all loose ends.
This method is especially useful for beginners because it separates the project into recognizable stages. You can finish one stage, inspect it, and then continue to the next.
Common Beginner Issues to Watch For
Confusing Stitches With Spaces
The granny triangle relies heavily on working into spaces. If a pattern instruction says to place 3 DC inside the next space, look specifically for the opening created by the chain rather than automatically inserting the hook into a stitch.
Losing Track of the Bracketed Repeat
From Row 4 onward, the number of times the bracketed section is worked increases by one each row. If you are unsure where you are, use the row number as your guide and carefully count the required repeats.
Forgetting to Turn
Rows 2 through 11 instruct you to turn after the initial Chain 4. Turning consistently helps the triangular piece develop correctly.
Fastening Off Too Early
After Row 11, do not fasten off. The attached yarn is required for the first tie and the following Single Crochet edging. Likewise, do not fasten off after the first tie or after the edging because the construction continues from the same working yarn.
Changing the Tie Length
Both ties are made with Chain 35. Keep this number unchanged when following the original pattern.
A Simple Quality Check Before Wearing
When the project is finished, use a short checklist to make sure all major elements are present.
- The main triangle has been worked through Row 11.
- The finished triangle follows the intended granny-style construction.
- The first tie contains Chain 35.
- The first chain of the tie was skipped before beginning the slip stitches.
- The first tie is secured through the Double Crochet on the side of the bandana.
- The Single Crochet edging covers the first side of the V, the top point, and the second side.
- There are 2 SCs at the top of the V in the chain 2 from the previous row.
- The second tie contains Chain 35.
- The second tie is secured through the Double Crochet on the side of the bandana.
- The project is fastened off only after the second tie is secured.
- All loose ends have been tidied.
Why the Pink Color Works So Well With This Design
The original pattern uses Drops Paris in shade 20 (pink), which gives the finished accessory a distinctly feminine appearance. Because the design is constructed from simple granny-style groups, the color remains visually important without competing with a complicated stitch texture.
The single-color approach also makes this pattern approachable for beginners. There are no color changes to manage, no separate strands to carry, and no additional ends created by switching shades throughout the triangle.
The result has a subtle boho character while remaining delicate enough to work as a light seasonal accessory.

Practical Tips for a Neater Result
Keep your working tension as consistent as possible, especially during the foundation chain and ties. Consistency helps the accessory maintain a balanced appearance.
When working the granny triangle, pay attention to the spaces rather than trying to memorize every stitch individually. The repeated structure becomes much easier to follow when you recognize the visual pattern of chain space, 3-DC group, chain space, and the next group.
At the end of each row, take a brief look at the edge before turning. This small pause can help confirm that the final Double Crochet has been placed correctly and that you are ready to begin the next row.
For the Single Crochet edging, pay special attention to the top of the V. The pattern specifically calls for 2 SCs in the chain 2 from the previous row. This placement is part of the written construction and should not be substituted with a different stitch count.
Frequently Asked Questions
What skill level is this crochet bandana?
The pattern is rated Easy and is suitable for beginners. The main body uses a repeating granny triangle structure, followed by simple ties and Single Crochet edging.
What yarn does the original pattern use?
The original pattern uses 2 skeins of Drops Paris in shade 20 (pink).
What crochet hook size is required?
The specified hook is a 5.5 mm crochet hook.
What is the gauge?
The gauge is 4 inches (10 cm) for 5 rows of the Granny Triangle pattern.
What size will the finished bandana be?
The finished size is 8.5 inches x 18 inches (22 cm x 46 cm), excluding the ties on each side.
How many rows are used for the main triangle?
The main triangle is worked through Row 11. The pattern then continues directly into the first tie without fastening off.
How long is each tie?
Each tie begins with Chain 35. After skipping the first chain, slip stitches are worked through the remaining chains, and the tie is secured to the side of the bandana through the Double Crochet.
Does the pattern require color changes?
No. The supplied pattern uses Drops Paris in shade 20 (pink), and the construction is presented as a single-color project.
When should I fasten off?
Do not fasten off after Row 11 because the attached yarn is used for the first tie and edging. Do not fasten off after the first tie or the Single Crochet edging. After the second tie is secured through the Double Crochet on the side of the bandana, fasten off and tidy all loose ends.
Quick Pattern Reference
For quick navigation while crocheting, remember the overall sequence: foundation ring, Row 1, expanding Rows 2 through 11, first Chain 35 tie, Single Crochet edging across the V, second Chain 35 tie, then finishing.
The most important numerical progression occurs inside Rows 4 through 11. The bracketed 3-DC repeat increases progressively from 2 repetitions in Row 4 to 9 repetitions in Row 11. Keeping this progression visible while working can make the written instructions much easier to manage.
Final Thoughts
The Crochet Rose Button Bandana is an excellent example of how a small number of familiar crochet techniques can produce a stylish finished accessory. The main triangle is built gradually through granny-style groups, while the two 35-chain ties and Single Crochet edging provide the final structure.
For beginners, the project offers several useful lessons at once: forming a foundation ring, turning rows, working into chain spaces, following bracketed repeats, checking symmetry, creating narrow ties with slip stitches, and finishing a project neatly.
The pattern remains straightforward because the original technical instructions are consistent from beginning to end. Once the triangle reaches Row 11, the project moves naturally into the first tie, edging, and second tie. There is no need to introduce complicated finishing techniques or additional decorative stitches.
Whether you are making the bandana as a handmade accessory, a quick crochet project, or a thoughtful gift, the combination of the pink Drops Paris yarn, simple triangular construction, and delicate ties gives the finished piece a charming feminine look with a slight boho feel.
Most importantly, take your time with the repeated granny sections and use the row numbers as checkpoints. If the spaces, groups, and edges remain organized as the triangle grows, the final stages become much easier. After the second tie is attached and the loose ends are tidied, your Crochet Rose Button Bandana is ready to become a lightweight handmade accessory for the warmer seasons and beyond.