
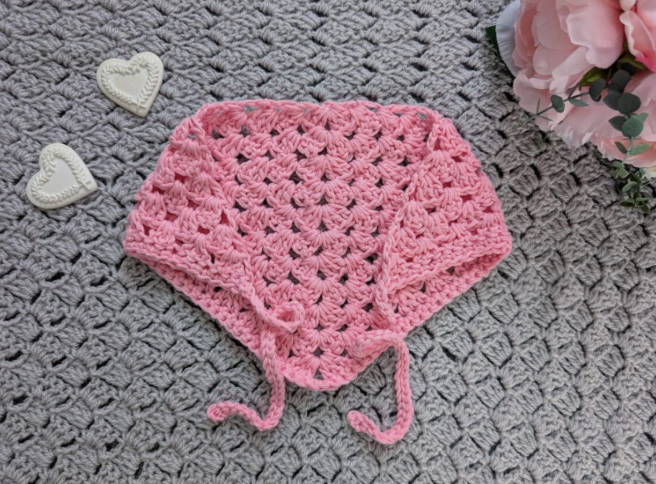

The Crochet Rose Button Bandana is a charming accessory that combines a classic granny triangle construction with a soft, feminine style. Designed with aran or medium 4 yarn, this project grows quickly and uses a straightforward sequence of Double Crochet stitches, chain spaces, and simple finishing techniques. The result is a wearable handmade bandana that can add a delicate cottagecore or boho touch to an outfit.
This pattern is particularly suitable for crocheters who enjoy projects that are small enough to complete relatively quickly but still provide useful practice with fundamental crochet techniques. The main triangle is worked row by row, becoming wider as additional granny-style groups are added. Once the triangle is complete, two 35-chain ties and a Single Crochet edging transform the crocheted fabric into the finished accessory.
The original design is worked in Drops Paris shade 20, pink, using a 5.5 mm crochet hook. The finished bandana body measures 8.5 x 18 inches (22 x 46 cm), excluding the ties. The stated gauge is 4 inches (10 cm) for 5 rows of the Granny Triangle pattern.
What Makes This Bandana Special?
A bandana does not need a complicated stitch pattern to make an impact. In this design, the simplicity of the granny triangle is part of its appeal. The stitch arrangement creates an open, recognizable texture while allowing the triangular shape to develop naturally from a very small starting ring.
The pattern also has a practical advantage: the main fabric does not require a complicated assembly process. The ties are created directly from the completed triangle, while the V-shaped portion receives a simple Single Crochet edging. This keeps the finishing process accessible to beginners.
The original pink color gives the project a distinctly feminine appearance, but the construction is flexible enough to work beautifully in many different colors. Drops Paris is available in a variety of shades, making the same basic pattern suitable for different personal styles.
Project Details at a Glance
Before picking up your hook, it is helpful to understand the complete construction. The project can be divided into four main stages:
- Creating the starting ring and crocheting the granny triangle.
- Completing the 11-row triangular body.
- Creating the first and second 35-chain ties.
- Adding the Single Crochet edging across the V and finishing the loose ends.
The yarn remains attached after Row 11, so there is no need to cut the yarn before beginning the first tie. The same approach is used when moving from the edging to the second tie, making the entire finishing sequence efficient and straightforward.
Materials Required
- 2 skeins of Drops Paris in shade 20 (pink)
- A 5.5 mm crochet hook
- A pair of scissors
- A tapestry needle
The original pattern specifically uses Drops Paris yarn. It is an aran/medium 4 yarn and is made from 100% cotton. The pattern uses two skeins in shade 20, which is pink.
A 5.5 mm crochet hook is paired with the yarn for this project. Keeping the specified hook size and yarn weight together is important when you want your finished project to remain consistent with the original pattern’s gauge and measurements.
Gauge and Finished Measurements
The stated gauge for the Granny Triangle pattern is:
4 inches (10 cm) = 5 rows of Granny Triangle pattern.
The finished size of the bandana body is:
8.5 x 18 inches (22 x 46 cm), excluding the ties on each side.
These measurements give you a useful reference point as you work through the triangle. The ties are not included in the stated finished body measurements, so they should be considered separately when evaluating the final size of the complete accessory.
Understanding the Crochet Terminology
The pattern uses US crochet terminology and provides the British equivalents in brackets. If you normally work with UK terminology, take a moment to review the abbreviations before beginning.
- Ch: chain
- St: stitch
- Sl st: slip stitch
- Sp: space
- SC: Single Crochet (UK Double Crochet)
- DC: Double Crochet (UK Treble Crochet)
- EOR: End of row
In particular, remember that the SC and DC terminology in this pattern follows the US system. Keeping the terminology consistent throughout the project will help prevent confusion when moving between the body, edging, and ties.
Beginning the Triangle
Start by making a slip knot. Chain 4, then slip stitch through the first chain to create a ring.
The small ring forms the foundation for the first granny-style section. The first row establishes the basic shape from which the triangular body will grow.
For Row 1, chain 4, which counts as a Double Crochet plus a chain space. Work 3 Double Crochets into the circle. Chain 1, then work 1 Double Crochet into the circle.
The combination of Double Crochet groups and chain spaces establishes the structure that will be repeated and expanded throughout the following rows.
Building Rows 2 Through 4
Row 2 begins with chain 4, representing 1 Double Crochet plus a chain space. Turn your work. Place 3 Double Crochets inside the next space, then chain 1. Work 3 Double Crochets, chain 1, and 1 Double Crochet in the next and last space.
For Row 3, chain 4, turn your work, and place 3 Double Crochets in the next space. Chain 1 and place 3 Double Crochets in the next space. Chain 1, work 3 Double Crochets, chain 1, and finish with 1 Double Crochet in the next and last space.
Row 4 follows the same basic construction. Chain 4, turn your work, and place 3 Double Crochets in the next space. Repeat [chain 1, 3 Double Crochets in the next space] 2 times. Then chain 1, work 3 Double Crochets, chain 1, and finish with 1 Double Crochet in the next and last space.
At this point, the triangle should already be visibly developing. The growing number of granny clusters is what creates the expanding shape.
Rows 5 Through 8: Continuing the Expansion
The middle section of the pattern uses exactly the same basic rhythm while increasing the number of repeated granny clusters.
Row 5: Chain 4 (= 1 DC + chain 1 space), turn your work, place 3 DC in the next space; repeat [chain 1, 3 DC in the next space] 3 times; chain 1, 3 DC, chain 1, then 1 DC in the next and last space.
Row 6: Chain 4 (= 1 DC + chain 1 space), turn your work, place 3 DC in the next space; repeat [chain 1, 3 DC in the next space] 4 times; chain 1, 3 DC, chain 1, then 1 DC in the next and last space.
Row 7: Chain 4 (= 1 DC + chain 1 space), turn your work, place 3 DC in the next space; repeat [chain 1, 3 DC in the next space] 5 times; chain 1, 3 DC, chain 1, then 1 DC in the next and last space.
Row 8: Chain 4 (= 1 DC + chain 1 space), turn your work, place 3 DC in the next space; repeat [chain 1, 3 DC in the next space] 6 times; chain 1, 3 DC, chain 1, then 1 DC in the next and last space.
When working these rows, the most useful visual feature is the sequence of chain spaces. Each space provides a clear location for the next granny cluster. If you are new to this style of crochet, taking a moment to identify the spaces before inserting the hook can make the pattern easier to follow.

Rows 9, 10, and 11
The final three rows of the triangular body continue the same progression.
Row 9: Chain 4 (= 1 DC + chain 1 space), turn your work, place 3 DC in the next space; repeat [chain 1, 3 DC in the next space] 7 times; chain 1, 3 DC, chain 1, then 1 DC in the next and last space.
Row 10: Chain 4 (= 1 DC + chain 1 space), turn your work, place 3 DC in the next space; repeat [chain 1, 3 DC in the next space] 8 times; chain 1, 3 DC, chain 1, then 1 DC in the next and last space.
Row 11: Chain 4 (= 1 DC + chain 1 space), turn your work, place 3 DC in the next space; repeat [chain 1, 3 DC in the next space] 9 times; chain 1, 3 DC, chain 1, then 1 DC in the next and last space.
Do not fasten off after Row 11. The yarn is intentionally left attached so you can proceed directly into the first tie.
Reading the Increasing Repeat Pattern
One helpful way to understand the structure is to observe how the repeated section changes from row to row. The number of [chain 1, 3 DC in next space] repeats increases progressively.
- Row 5: 3 repeats
- Row 6: 4 repeats
- Row 7: 5 repeats
- Row 8: 6 repeats
- Row 9: 7 repeats
- Row 10: 8 repeats
- Row 11: 9 repeats
This progression is a useful checkpoint while crocheting. It does not replace the written instructions, but it can help you identify where you are in the triangular construction.
As the number of repeats increases, the triangle naturally becomes wider. This is the defining characteristic of the granny triangle used for this bandana.
Creating the First 35-Chain Tie
Once Row 11 is complete, keep the yarn attached. The first tie is created directly from the bandana rather than being crocheted separately and sewn on afterward.
Chain 35. Skip the first chain and slip stitch through the second chain and every chain across. Continue until you reach the end of the chain.
When you reach the end, slip stitch through the Double Crochet on the side of the bandana to secure the strap fully onto the project.
Do not fasten off.
This method produces a simple narrow tie that continues naturally from the triangular body. When making the chain, consistent tension will help the strap maintain an even appearance.

Working the Single Crochet V Edging
After completing the first tie, work a Single Crochet edging across the V-shaped section of the bandana.
Begin Row 1 by placing Single Crochets across the first side of the V, working one Single Crochet into each stitch. At the top of the V, identified in the original instructions as the chain 2 from the previous row, place 2 Single Crochets.
Continue by placing Single Crochets across the second side of the V.
Do not fasten off.
The edging is deliberately simple. It provides a neat finish around the V without introducing a new complicated stitch pattern. The two Single Crochets at the top are specifically included in the original construction and should be maintained exactly as written.
Making the Second Tie
With the yarn still attached after the edging, begin the second tie.
Chain 35. Skip the first chain and slip stitch through the second chain and every chain across. Once you reach the end, slip stitch through the Double Crochet on the side of the bandana to secure the strap fully onto the project.
After securing the second tie, fasten off. Use the tapestry needle to tidy all loose ends.

Finishing and Tidying Loose Ends
The final finishing step is simple but should not be overlooked. Once the second tie has been secured and the yarn has been fastened off, use a tapestry needle to tidy all loose ends.
Work carefully so the ends are secure without creating unnecessary bulk. A clean finish is particularly useful for a wearable accessory because the bandana is designed to be handled and tied.
After finishing, take a moment to look over the entire piece. Check that both ties have been secured to the appropriate Double Crochet on their respective sides and that the central V has the completed Single Crochet edging.
Helpful Tips for Beginner Crocheters
The pattern is classified as easy/beginner, but a few simple habits can make the experience even smoother.
Keep Track of Your Rows
The body consists of 11 rows. Since each row increases the triangular shape, knowing which row you have completed makes it easier to follow the growing repeat sequence.
Pay Attention to Chain Spaces
The granny triangle relies heavily on working into spaces. Instead of trying to insert your hook into individual stitches when the instructions call for a space, look for the open chain-1 areas between the granny clusters.
Turn Your Work as Instructed
Each main row includes a turn after the opening chain 4. Maintaining this orientation helps the triangular fabric develop according to the original construction.
Do Not Fasten Off Too Early
The instructions specifically state not to fasten off after Row 11. The attached yarn is needed to create the first tie. Likewise, the yarn remains attached after the first tie and after the Single Crochet edging so the next stage can be worked directly.
How to Keep the Triangle Looking Even
Although the granny triangle is straightforward, maintaining even tension is useful for achieving a neat final shape. Try to avoid making some chain spaces significantly tighter or looser than others.
The triangular construction naturally expands through its repeated clusters. If one section appears unusually tight, it may affect the overall appearance of the finished bandana. Consistent crochet tension can help the granny clusters sit more evenly across the fabric.
The stated gauge provides another useful reference. Five rows of the Granny Triangle pattern should measure 4 inches (10 cm). The gauge is not something to modify in the pattern; rather, it is the original measurement provided for the design.
Color Possibilities
The original project is made in Drops Paris shade 20, pink. Pink emphasizes the feminine character of the design and works particularly well with the soft handmade appearance of the granny triangle.
However, the original designer notes that the bandana can be crocheted in many different colors. This makes it easy to personalize the accessory without changing the construction itself.
A single-color version keeps the triangle visually clean and highlights the texture of the granny clusters. Different colors can instead change the mood of the accessory while retaining the same basic shape and instructions.
Why This Is a Useful Seasonal Crochet Project
Small accessories are especially appealing when you want a project that can be completed faster than a garment, blanket, or large home accessory. This bandana is designed around a relatively compact triangular body, and the aran/medium 4 yarn helps the project grow quickly.
The finished accessory is practical as well as decorative. A handmade bandana can be styled as part of a casual wardrobe and can bring a little handmade personality to an otherwise simple outfit.
The feminine and slightly boho character also makes this design especially suited to spring and summer styling, while the accessory format means it is not restricted to one season.
Pattern Construction Checklist
- Make a slip knot.
- Chain 4 and slip stitch through the first chain to form a ring.
- Complete Rows 1 through 11 of the Granny Triangle.
- Do not fasten off after Row 11.
- Create the first tie with Chain 35.
- Skip the first chain and slip stitch through the second and every chain across.
- Secure the tie to the Double Crochet on the side of the bandana.
- Do not fasten off.
- Work the Single Crochet edging across the V.
- Place 2 Single Crochets at the top of the V.
- Create the second tie with Chain 35.
- Secure the second tie to the Double Crochet on the side.
- Fasten off.
- Tidy all loose ends with the tapestry needle.
Quick Technical Reference
Skill level: Easy/beginner
Yarn: 2 skeins of Drops Paris in shade 20 (pink)
Yarn category: Aran/medium 4
Fiber: 100% cotton
Hook: 5.5 mm crochet hook
Gauge: 4 inches (10 cm) = 5 rows of Granny Triangle pattern
Finished body size: 8.5 x 18 inches (22 x 46 cm), excluding ties
Main body: 11 rows
Each tie: Chain 35
Main stitch: Double Crochet
Edging: Single Crochet
Terminology: US terms, with British terms in brackets
Frequently Asked Questions
Is this bandana suitable for beginners?
Yes. The pattern is classified as easy/beginner and is based on a simple Granny Triangle construction. Familiarity with chains, Double Crochet, slip stitches, and working into spaces will make the project easier to follow.
What yarn is used for the original design?
The original pattern uses 2 skeins of Drops Paris in shade 20, pink. The yarn is aran/medium 4 and 100% cotton.
What crochet hook size is required?
The original pattern specifies a 5.5 mm crochet hook.
How large is the finished bandana?
The finished bandana body measures 8.5 x 18 inches (22 x 46 cm), excluding the ties on each side.
How long are the ties?
Each tie begins with a chain of 35. The first chain is skipped, and slip stitches are worked through the second and every chain across before the tie is secured to the bandana.
Do I fasten off after Row 11?
No. The original instructions specifically say not to fasten off after Row 11 because the attached yarn is used to create the first tie.
What crochet terminology does the pattern use?
The pattern uses US crochet terms, with British equivalents in brackets. For example, SC means Single Crochet in US terminology and UK Double Crochet in British terminology, while DC means Double Crochet in US terminology and UK Treble Crochet.
Final Thoughts

The Crochet Rose Button Bandana demonstrates how a simple granny triangle can be transformed into a practical and stylish accessory with only a few finishing techniques. The body grows through 11 rows of a repeating granny-style construction, while the two 35-chain ties make the finished piece wearable.
For a beginner, the project offers a useful introduction to working into chain spaces and recognizing repeating stitch structures. For an experienced crocheter, it provides a fast and enjoyable accessory project that can be completed without complicated shaping or extensive assembly.
The original pink Drops Paris version has a soft, feminine appearance, while the designer’s choice of a versatile aran/medium 4 cotton yarn makes the design suitable for experimenting with different colors. The result is a bandana that can easily become a handmade staple for casual, cottagecore, or boho-inspired outfits.
By keeping track of the 11 rows, maintaining the specified chain spaces, following the increasing granny-cluster repeats, and completing the ties exactly as instructed, you can reproduce the original construction while enjoying a project that is approachable, practical, and quick to crochet.