
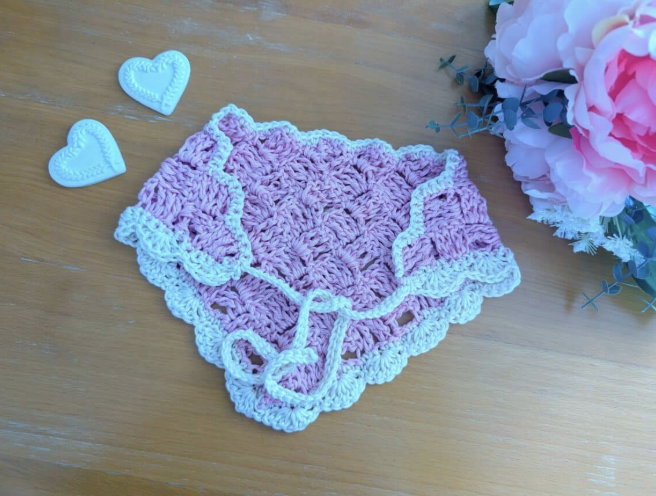
A handmade crochet accessory can transform a simple outfit while giving you the satisfaction of creating something completely by hand. This delicate bandana combines a graceful Treble C2C construction with a soft Shell Stitch edging, creating a lightweight accessory with a romantic and timeless character. The finished design is easy enough for beginners who are comfortable with basic crochet stitches and enjoy working from a clear sequence of rows.
This tutorial presents the project as a complete construction and finishing guide. Instead of treating the pattern as one long sequence, we will look at the important checkpoints along the way: preparing the yarn and hook, building the first C2C squares, expanding the triangular shape through Rows 3-11, adding the contrasting border and ties, and completing the decorative Shell Stitch edging.

What Makes This Crochet Bandana Special?
The beauty of this project comes from the way two straightforward crochet techniques work together. The main body is created using a Treble C2C pattern, producing a diagonal texture made from small square sections. The edging then changes the character of the project by introducing a contrasting Off White yarn and a shell-style border.
The Treble C2C construction gives the fabric height and a slightly open, airy quality. Because treble crochet creates a taller stitch, the finished fabric has a soft appearance and graceful drape. The diagonal arrangement of the squares also gives the bandana visual movement without requiring complicated shaping instructions.
The Shell Stitch edging adds a different texture. Instead of leaving the edges plain, the second round creates groups of five double crochet stitches that form the decorative shell effect. The result is a feminine finish that complements the geometric C2C body.
The original design uses Desert Rose and Off White, a combination that creates a gentle romantic appearance. The blush-like pink works beautifully with the creamy contrast, making the finished accessory suitable for spring days, garden strolls, or everyday outfits that need a small handmade detail.
Project Specifications at a Glance
- Skill level: Easy/beginner.
- Terminology: US crochet terms, with British terms provided in brackets.
- Finished size: 7,7” (19 cm) x 16” (40,5 cm).
- Gauge: 4” (10 cm) x 4” (10 cm): 4 “clusters” of C2C pattern.
- Main construction: Treble C2C.
- Decorative finish: Shell Stitch edging.
- Main color: Desert Rose.
- Border color: Off White.
- Main hook: 4,5 mm crochet hook.
Keeping these details beside you while crocheting can make the project easier to follow. In particular, the finished measurements and gauge provide useful reference points when checking your work, while the row and stitch counts help confirm that the C2C construction is progressing as intended.
Materials You Need Before Starting
The original pattern uses two skeins of Drops Muskat yarn in two different shades. The first is Desert Rose, which is used for the main bandana. The second is Off White, which is used for the edging and ties.
- 1 skein Drops Muskat yarn in shade Desert Rose, or 1 skein of your preferred 100% mercerized cotton yarn in a light 3/DK weight.
- 1 skein Drops Muskat yarn in shade Off White, or 1 skein of your preferred 100% mercerized cotton yarn in a light 3/DK weight.
- 4,5 mm crochet hook.
- Scissors.
- Tapestry needle.
The source specifically identifies the yarn as 100% mercerized cotton when describing the preferred alternative. This is part of the original material specification, so it is important not to substitute a completely different yarn category if you want to stay close to the intended project.
Before beginning, make sure you can identify the two colors easily. Desert Rose is the yarn used to construct the C2C body, while Off White is introduced later for the border and ties. Keeping the two balls or skeins separated from the beginning helps prevent an accidental color change during the main construction.
Understanding the Abbreviations
The pattern uses several abbreviations. The source follows US crochet terminology and gives the corresponding British terminology where applicable.
- Ch: Chain.
- St: Stitch.
- Sl st: Slip stitch.
- SC: Single Crochet (UK Double Crochet).
- TC: Treble Crochet (UK Double Treble Crochet).
- DC: Double Crochet (UK Treble Crochet).
- EOR: End of Round/end of row.
One particularly important point is the difference between TC and DC in this pattern. The C2C body uses Treble Crochet, while the decorative second border round uses Double Crochet. Following the terminology exactly as written will help preserve the intended texture and structure.
Gauge and Finished Measurements
The stated gauge is 4” (10 cm) x 4” (10 cm), with 4 “clusters” of the C2C pattern. This gauge information gives you a useful way to compare your crochet tension with the original design.
The finished bandana measures 7,7” (19 cm) x 16” (40,5 cm). These measurements describe the completed project and can be used as a reference after the main body and finishing work are complete.
Because crochet tension can vary from person to person, checking your work as you build the C2C section is useful. The most important thing is not to alter the written row sequence simply to force the project to match a different personal tension. The source pattern should remain the technical authority for the construction.
Before the First Chain: Set Up Your Workspace
For a small accessory such as this one, organization can make the crochet process much more comfortable. Place the 4,5 mm hook, Desert Rose yarn, scissors, and tapestry needle within easy reach. Keep the Off White yarn separate until the main C2C body is finished.
It is also helpful to have the abbreviation list available while working. Beginners may find that the repeated construction becomes easier after the first few rows because the same basic movements are used to create the additional squares.
Do not rush the first row. The opening chain determines the foundation for the first group of treble crochet stitches, so this is a useful checkpoint before the project begins to expand.
Building the Main Body: The First C2C Checkpoint
Begin with the Desert Rose yarn and make a slip knot.
Row 1
Chain 7. Work a TC in the 5th chain from the hook and in each stitch along. At the end of this row, you should have 4 TC.
This is the first structural checkpoint of the project. The original instruction is very specific: the treble crochet stitches are worked beginning in the 5th chain from the hook, resulting in 4 TC.
If you are new to C2C-style construction, this first row may look surprisingly small. That is normal. The bandana grows by adding square sections, so the finished shape develops gradually rather than appearing immediately.
Row 2: Creating the First Square Expansion
For Row 2, chain 7 and turn the work. Work a TC in the 5th chain from the hook and in each stitch along, giving you another 4 TC.
Now comes an important joining movement. Turn the work to slip stitch in between the 3rd and 4th TC from the previous row. Chain 4, which counts as a TC throughout the pattern, and add 3 TC in between the 3rd and 4th TC from the previous row to form a square.

The first square is an important visual checkpoint. Once you understand where the slip stitch connects and where the next group of treble crochet stitches is placed, the following rows become much more repetitive and predictable.
Row 3: Establishing the Repeating Construction
Row 3 repeats the basic C2C idea while adding another square.
Chain 7 and turn the work. Work a TC in the 5th chain from the hook and a TC in each stitch along, giving 4 TC. Then slip stitch to the previous square in between the 3rd and 4th TC.
Next, chain 4, which counts as a TC, and add 3 TC in that space. Slip stitch to the previous square in between the 3rd and 4th TC.
Then chain 4, again counting as a TC, and add 3 TC in that space. Finish this section by slip stitching to the previous square in between the 3rd and 4th TC.
This row demonstrates the basic expansion principle that will continue through the next several rows. The individual squares are joined through the spaces created by the previous square, producing the diagonal texture characteristic of the C2C construction.
Rows 4-11: Continue the C2C Expansion
Rows 4-11 follow the same basic construction as Row 3. Repeat Row 3, adding the required number of squares as you progress along the row.
This is the longest repeated portion of the project, so it is useful to work methodically. Rather than trying to memorize the whole sequence, focus on the repeated checkpoint: build the chain and treble section, connect to the previous square, create the next square with chain 4 and 3 TC, then connect to the previous square again.
The source does not provide a separate numerical stitch total for every one of Rows 4-11. Instead, it instructs you to repeat Row 3 while adding the required number of squares. Therefore, do not introduce a new stitch count or alter the written construction. The row sequence itself is the guide.

After completing Row 11, fasten off the Desert Rose yarn. This marks the end of the main body and the transition to the contrasting finishing color.
How to Check Your C2C Work Before the Border
Before attaching the Off White yarn, pause for a quick visual inspection. The main body should show the diagonal arrangement created by the Treble C2C technique. Look for consistent square construction and check that the joins between the sections are secure.
This is also a good time to compare the general proportions of your work with the stated finished size of 7,7” (19 cm) x 16” (40,5 cm). Remember that the final border and ties contribute to the finished appearance, so the body itself should not be treated as the complete finished measurement.
If you notice a mistake in the C2C section, it is better to identify it before starting the border. The Off White edging is intended to finish the project, so beginning the decorative section after the main construction has been checked can make the final stages more enjoyable.
Introducing the Off White Yarn
Attach the Off White yarn to the project in the stitch where you fastened off. The border is worked across the three sides of the project for Round 1.
The border begins across the “straight” edge and then continues around the two other sides of the bandana, which form the “V” part. This first round also incorporates the two ties, making the finishing stage both decorative and functional.

Round 1: Straight Edge, V Sides, and the First Tie
Start Round 1 with chain 1, which counts as a SC. Work SC all across the “straight” edge, following the placement shown in the source.
At the first corner, create the first tie. Chain 45. Then slip stitch into the second chain and continue slip stitching across the chain until the end. Slip stitch into the project to anchor the tie.
This tie is deliberately integrated into the border rather than attached as a separate piece later. That makes the transition from the bandana edge to the tie part of the same finishing process.
After anchoring the first tie, continue working SCs across the V side of the bandana.
Creating the Second Tie
When you reach the other corner, create the second tie using the same construction. Chain 45, slip stitch into the second chain, and continue slip stitching through the chain until you reach the end. Then slip stitch into the project to anchor it.
The two ties give the finished bandana its flexible wearing options. They can be used to secure the accessory beneath the chin, around a hairstyle, or in another delicate styling arrangement.
Continue the Round 1 border as instructed around the remaining V-side edge.
A Key Round 1 Stitch Checkpoint
The original pattern notes that there is no specific number of SCs given across the bandana. However, the SCs across the bandana need to be a multiple of 5.
This is an important technical detail and should not be replaced with an invented stitch count. If you are checking your work, focus on the stated multiple-of-5 requirement rather than trying to force the edge into a number that is not supplied by the pattern.
The edge should also remain visually comfortable rather than becoming noticeably tight or stretched. Work carefully and maintain consistent tension as you move around the V-shaped sides.
Round 2: The Shell Stitch Effect
Round 2 is worked only on the two V sides of the bandana. It does not continue around the straight edge.
Begin with chain 1. This chain does not count as a stitch.
Work a SC into the first stitch. Skip 2 stitches. Work 5 DC into the next stitch. Skip 2 stitches, then work a SC into the next stitch.
Repeat this sequence until EOR:
- SC into the first stitch.
- Skip 2 stitches.
- Work 5 DC into the next stitch.
- Skip 2 stitches.
- SC into the next stitch.
- Repeat until EOR.
The groups of 5 DC are what create the soft shell-like scallops along the V-shaped edges. The contrast between the simple SC sections and fuller DC groups gives the border its decorative rhythm.

Once the repeated shell sequence reaches EOR, fasten off and tidy the loose ends.
Why the Shell Border Changes the Look of the Project
The main body has a geometric quality because it is built from C2C squares. The Shell Stitch edging introduces rounded, softer shapes along the V sides. This contrast is one of the most attractive features of the design.
The Off White color also makes the edge visually distinct from the Desert Rose body. Rather than blending into the main fabric, the border frames the project and emphasizes the shape created by the C2C construction.
Because the border is concentrated on the V sides in Round 2, the decorative effect naturally draws attention toward the lower portion of the bandana. This helps preserve the delicate character of the accessory without covering the entire C2C surface with additional texture.
Finishing the Loose Ends Neatly
After fastening off, tidy the loose ends with the tapestry needle. This is a small step, but it can make a substantial difference to the finished appearance of a handmade accessory.
Work carefully so that the loose ends are secure and do not distract from the clean lines of the border. Take particular care around the color transition between Desert Rose and Off White, because this is where the main body meets the finishing section.
Once the ends have been tidied, gently inspect the ties and the shell border. The ties should remain clearly defined, while the shell groups should be easy to distinguish along the V sides.
Common Beginner Checkpoints
Check the first row
Row 1 should finish with 4 TC. If the first row does not have the stated number, stop and check the starting chain and the position of the first TC before continuing.
Check the first square
In Row 2, make sure the new square is formed in the space between the 3rd and 4th TC from the previous row. This placement is central to the C2C construction.
Check the repeating joins
During Row 3 and Rows 4-11, pay attention to the slip stitches that connect the new square sections to the previous squares. The repeated joining movement is what keeps the C2C structure connected.
Check the color transition
Desert Rose is used for the main C2C body. Off White is introduced only after fastening off the main color and is used for the border and ties.
Check the Round 1 multiple
The source specifically states that the SCs across the bandana need to be a multiple of 5. Do not invent a different stitch count.
Check Round 2 placement
Round 2 is worked only on the two V sides. Its sequence is SC, skip 2, 5 DC in the next stitch, skip 2, SC in the next stitch, repeated until EOR.
Ways to Wear the Finished Bandana
One of the appealing qualities of this project is its versatility. The finished bandana can be tied under the chin for a vintage-inspired appearance. This styling emphasizes the romantic character of the Desert Rose and Off White color combination.
It can also be draped over the hair as a headscarf. Another option is to use the ties around a bun or ponytail, turning the handmade piece into a delicate hair accessory.
The bandana can also be worn as a subtle neck accessory. Its soft shape and decorative border allow it to add texture without overwhelming an outfit.

Quick Construction Checklist
- Prepare Desert Rose yarn and the 4,5 mm crochet hook.
- Make a slip knot.
- Complete Row 1 with Ch 7 and 4 TC.
- Complete Row 2 and create the first square.
- Complete Row 3 using the repeated square-and-join construction.
- Repeat Row 3 through Rows 4-11, adding the required number of squares.
- Fasten off Desert Rose.
- Attach Off White yarn at the fastening-off stitch.
- Work Round 1 across the three sides.
- Create the first chain-45 tie at the first corner.
- Continue SCs across the V side.
- Create the second chain-45 tie at the other corner.
- Finish the Round 1 border.
- Work Round 2 only across the two V sides.
- Use the SC, skip 2, 5 DC, skip 2, SC sequence.
- Fasten off.
- Tidy the loose ends with a tapestry needle.
Frequently Asked Questions
Is this bandana suitable for beginners?
Yes. The source rates the project as Easy/beginner. The construction uses familiar crochet actions such as chains, treble crochet, slip stitches, single crochet, and double crochet. The main challenge for a beginner is keeping track of where each C2C square connects, but the repeated structure makes the process easier to recognize as the project grows.
Which yarn is used for the main body?
The main body uses 1 skein of Drops Muskat yarn in shade Desert Rose, or 1 skein of a preferred 100% mercerized cotton yarn in a light 3/DK weight.
Which yarn is used for the border?
The edging and ties use 1 skein of Drops Muskat yarn in shade Off White, or 1 skein of a preferred 100% mercerized cotton yarn in a light 3/DK weight.
What hook size does the pattern use?
The specified crochet hook is 4,5 mm.
How many rows are used for the C2C body?
The pattern begins with Row 1, followed by Rows 2 and 3, and then repeats the Row 3 construction through Rows 4-11. Rows 4-11 instruct the crocheter to repeat Row 3 while adding the required number of squares.
Where are the ties made?
The ties are created during Round 1 at the two corners. Each tie begins with Chain 45, followed by slip stitches through the chain and an anchoring slip stitch into the project.
Does the second border round cover the whole bandana?
No. Round 2 is worked only on the two V sides of the bandana.
What creates the shell effect?
The shell effect comes from working 5 DC into the same stitch after skipping 2 stitches, with SC stitches separating the groups according to the written repeat.
Final Quality Check
When the bandana is complete, compare the finished piece with the main technical checkpoints rather than judging it only by appearance. Confirm that the main body was worked through Row 11, that Desert Rose was used for the C2C section, and that Off White was used for the border and ties.
Check that both ties were created with Chain 45 and that Round 2 was applied only to the two V sides. Look at the shell groups and make sure the decorative sequence remains clear and consistent.
The finished size should be 7,7” (19 cm) x 16” (40,5 cm), and the stated gauge is 4” (10 cm) x 4” (10 cm): 4 “clusters” of C2C pattern.
Enjoy Your Handmade Accessory
This delicate crochet bandana is a wonderful example of how a relatively simple combination of techniques can produce an accessory with a polished handmade appearance. The Treble C2C body supplies the diagonal texture and soft drape, while the contrasting Shell Stitch edging adds gentle scalloped detail.
For beginners, the project offers useful practice with repeated square construction, slip-stitch joining, color changes, border placement, and decorative stitch repeats. For more experienced crocheters, it provides a relaxing project that can be completed as a graceful handmade accessory.
The romantic Desert Rose and Off White palette gives the finished piece a timeless quality, while the ties make it practical to style in different ways. Whether worn beneath the chin, over the hair, around a bun or ponytail, or as a delicate neck accessory, the finished bandana remains a small but distinctive handmade detail.
Most importantly, follow the original stitch sequence carefully, use the stated checkpoints to monitor your progress, and take your time during the finishing stage. The combination of Treble C2C and Shell Stitch edging is what gives this project its distinctive character, and careful construction allows those two techniques to work together beautifully.