
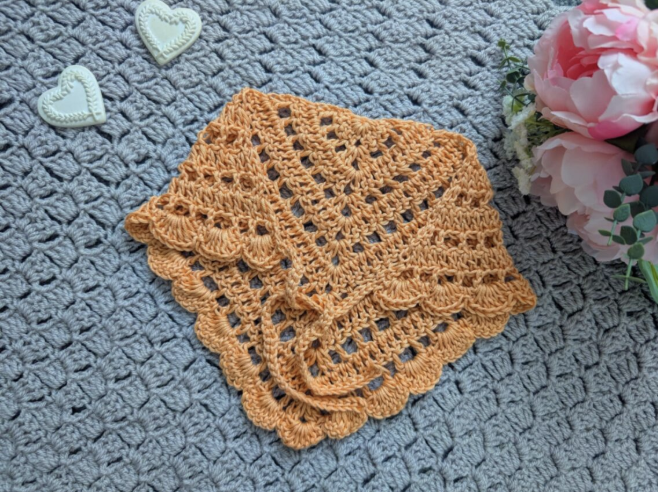

If you enjoy crochet accessories that are delicate, feminine, and practical, the Crochet Lovely Bandana is a beautiful project to add to your handmade collection. This easy crochet pattern creates a lightweight triangular bandana with an open filet crochet design and a decorative shell stitch border. The result is a soft Cottagecore-inspired accessory that feels both romantic and handmade.
The construction is particularly appealing because the bandana is made as one connected project. The main body is worked first, using a repeating combination of two rows. Once the body is complete, the first tie is crocheted directly from the project. The shell stitch edging is then worked around the sides, and the second tie is created at the end. There is no need to sew separate ties onto the finished bandana.
The original sample uses Universal Yarn Vireo in the shade Apricot Tart. This yarn is made from 80% tencel and 20% wool and is known for its beautiful drape and range of attractive colors. Paired with a 5.5 mm crochet hook, it produces the soft appearance that makes this bandana especially charming.
A Delicate Crochet Accessory with a Cottagecore Feel
The Crochet Lovely Bandana has a distinctly feminine appearance. Its openwork fabric gives the project an airy quality, while the shell edging adds a decorative border without making the design feel heavy.
The style fits naturally with the Cottagecore aesthetic, which is inspired by countryside living, rural themes, floral details, handmade crafts, and nostalgic simplicity. A crocheted accessory such as this one is an especially natural match for that aesthetic because the handmade texture becomes part of the overall design.
The Apricot Tart color used in the original project adds a warm and gentle quality. However, the pattern can also be crocheted in other colors. The structure remains the same, while the color can completely change the personality of the finished accessory.
Despite its detailed appearance, the pattern is rated easy/beginner. The main techniques are familiar crochet stitches, and the central body follows a repeat that becomes easier to recognize as you progress.
Project Details Before You Begin
Before picking up your hook, it is helpful to have the key project specifications in one place. The original pattern provides a specific yarn, hook size, gauge, and finished measurement.
- Skill level: Easy/beginner
- Yarn: 1 skein of Universal Yarn Vireo
- Yarn shade: Apricot Tart
- Fiber content: 80% tencel and 20% wool
- Crochet hook: 5.5 mm
- Gauge: 4 inches (10 cm): 6 rows
- Finished bandana size: 9 inches x 17.5 inches (23 cm x 44.5 cm), excluding ties
- Terms: US crochet terms, with British terms in brackets
The original pattern also calls for a pair of scissors and a tapestry needle. The scissors are needed when finishing the project, while the tapestry needle is used to tidy the loose ends after fastening off.
Materials for the Lovely Bandana
For the original version, prepare one skein of Universal Yarn Vireo in Apricot Tart. The yarn contains 80% tencel and 20% wool. The original designer has also used Vireo for the Vintage Beauty Shawl, making it a familiar yarn choice within the designer’s crochet work.
You will also need a 5.5 mm crochet hook, scissors, and a tapestry needle.
Because the original pattern gives a specific gauge and finished size, keeping the stated hook and yarn together is useful if you want your finished bandana to resemble the original version as closely as possible.
Crochet Abbreviations Used in the Pattern
The instructions use US crochet terminology. This distinction matters because the names of some stitches differ between US and British crochet terminology.
- Ch: Chain
- St: Stitch
- Sl st: Slip stitch
- Sp: Space
- SC: Single Crochet (UK Double Crochet)
- DC: Double Crochet (UK Treble Crochet)
- EOR: End of row
If you normally follow UK crochet patterns, make sure to use the US interpretation given above when working this project. In particular, the abbreviation DC refers to US Double Crochet.
Getting the First Ring Ready
The project begins with a very small foundation. Start by making a slip knot.
Next, chain 4. Slip stitch through the first chain to form a ring.
This ring becomes the foundation for the first row. Although the beginning looks small, it establishes the central area from which the triangular bandana will gradually expand.
One of the most important features to identify from the beginning is the center chain-2 space. As the pattern develops, this space will repeatedly be used as the central point of the shaping.
Working Row 1
For Row 1, chain 3. This chain counts as a DC.
Work 5 DC into the ring. Then chain 2, followed by 6 DC into the ring.
This first row establishes the starting shape of the bandana. It also creates the chain-2 area that becomes the top center of the project in the following rows.
At this stage, there is no need to worry about the final appearance. The bandana will become much more recognizable as the repeated rows are added.
Understanding the Two Main Body Rows
The central part of the bandana is built around two important row structures. Rather than introducing a new complicated stitch pattern in every round, the project alternates Rows 2 and 3.
This repetition is helpful for beginners because you can learn the visual difference between the two rows and then use that knowledge as a checkpoint while working.
Row 2: Creating the Open Filet Structure
Chain 3, which counts as a DC, and turn your work. Place a DC into the first stitch.
Then work the following sequence:
Chain 1, skip 1 stitch, DC.
Continue this sequence until you reach the penultimate stitch before the chain-2 space at the top of the project.
Skip the last stitch before the chain-2 space. Then work 2 DC, chain 2, and 2 DC into the chain-2 space at the top of the project.
After the center, skip 1 stitch. Continue with DC in the next stitch, chain 1, skip 1 stitch, and DC until you reach the last stitch.
Place 2 DC into the last stitch to complete the row.
The chain spaces created in this row are responsible for much of the open appearance of the filet crochet design. It is therefore important not to accidentally work into a skipped stitch or omit a chain space.
Row 3: Building the Structured Row
Chain 3, which counts as a DC, and turn your work. Place another DC into the first stitch.
Place a DC into the next stitch until you reach the chain-2 space at the top of the project. The instructions specifically include the chain spaces when working across the row.
When you reach the center, place 2 DC, chain 2, and 2 DC into the chain-2 space from the previous row.
Continue by placing a DC into each stitch across, including chain spaces, until the end of the row.
Finish by placing 2 DC into the last stitch.
This row creates a denser appearance than Row 2. Alternating the openwork row and the structured row gives the central body its characteristic filet crochet look.

Rows 4 Through 12
Once Rows 2 and 3 are established, the pattern becomes a repeat.
Rows 4-12: Alternate Rows 2 and 3, finishing on a Row 3.
This instruction should be followed exactly because the number of rows contributes to the finished dimensions and the shape of the bandana.
For a beginner, one of the easiest ways to stay organized is to count each completed row rather than relying only on the visual size of the project. The pattern specifically ends the main body on Row 12, and that final row must be a Row 3.
You can also use the center chain-2 space as a visual checkpoint. Every row returns to this central location, and the 2 DC, chain 2, 2 DC grouping helps maintain the shape.
How to Keep the Main Body Even
The filet crochet section is simple, but the skipped stitches and chain spaces require attention. Small changes in stitch placement can affect the appearance of the openwork.
When working Row 2, look for the repeating rhythm of chain 1, skip 1 stitch, and DC. This rhythm should continue on both sides of the center.
When working Row 3, remember that the instructions tell you to place DC stitches across the row, including the chain spaces. This is different from the openwork structure of Row 2.
The central chain-2 space should remain clearly visible. If you lose track of it, pause before continuing. Finding the center before starting the next section can make the shaping much easier to follow.
Visualizing the Growing Triangle
The bandana begins with a compact ring and gradually grows into a triangular shape. The center chain-2 space acts as the point around which the rows expand.
As the rows progress, the combination of stitches at the center and the additional structure toward the edges creates the widening shape needed for the finished accessory.
The open spaces also become more apparent as the fabric grows. Rather than looking like a solid triangular piece, the filet crochet design creates a lighter visual texture.
This is one of the reasons the project looks more intricate than the actual stitch techniques might suggest.

Creating the First Tie Without Sewing
After finishing the main body on Row 12, you can move directly into the first tie.
Do not fasten off.
Chain 40. Then slip stitch through the second chain from the hook. Continue slip stitching into each chain across until you reach the end of the chain.
Once you reach the end, slip stitch through the first stitch on the project to secure the tie to the project.
Do not fasten off after securing the first tie.
This continuous construction is one of the practical highlights of the pattern. Instead of making a separate strap and attaching it later, the tie grows directly from the completed body.

Moving Into the Shell Stitch Edging
With the first tie secured and the yarn still attached, the next stage is the shell stitch edging.
Chain 3, which counts as a DC. Place 6 DC into the first chain space on the project. Together, the chain 3 and the 6 DC form the first shell.
Then place a SC directly into the next space to anchor the edging down.
Continue the edging with the following sequence:
Go directly into the next chain space and place 7 DC to create a shell. Then go directly into the next space with a SC.
Repeat this sequence until you reach the last space on the first side.
The shell border changes the appearance of the project considerably. The simple filet crochet body now has a decorative scalloped frame that emphasizes the feminine character of the bandana.
Working the Center of the Shell Border
When you reach the top of the project, the edging has a specific center instruction.
Skip 2 DC and place 7 DC into the chain-2 space at the very top of the project.
Then skip 2 DC.
Continue with a SC into the next space followed by 7 DC into the next space. Repeat this sequence from the pattern until the end of the row.
The center shell is an important visual point because it sits at the top of the triangular bandana. Following the specified placement keeps the border aligned with the shape of the body.
Do not fasten off after completing the shell stitch edging.

How the Shell Stitch Creates the Decorative Border
Each shell contains 7 DC. Between the shells, a single crochet anchors the edging into the next space.
This creates a repeated pattern of larger groups followed by small anchor stitches. The result is a scalloped edge that contrasts nicely with the more geometric openwork of the filet crochet center.
When crocheting the shells, try to keep your tension consistent. Seven double crochet stitches are worked into the same space, so the finished shell naturally requires more room than a single stitch.
Keeping the stitches reasonably even helps the border maintain a regular appearance across the bandana.
Completing the Second Tie
After finishing the shell edging, the yarn remains attached so you can immediately create the second tie.
Chain 40.
Slip stitch through the second chain from the hook and continue slip stitching into each chain across until you reach the end of the chain.
Then slip stitch through the first stitch on the project to secure the tie to the project.
Now you can fasten off and tidy up all loose ends.
The second tie mirrors the construction of the first, giving the finished bandana two matching ties without requiring separate sewing or additional attachment pieces.
Finishing the Bandana
Once the second tie has been secured, fasten off. Use the tapestry needle to tidy all loose ends.
At this stage, take a moment to look over the shell edging and openwork body. Make sure the border is sitting neatly and that the loose ends have been secured without pulling the filet crochet fabric out of shape.
The finished bandana should measure 9 inches x 17.5 inches (23 cm x 44.5 cm), excluding the ties, according to the original pattern.
The ties are not included in that finished measurement, so do not use the total tip-to-tip length including both ties when comparing the central bandana body with the stated dimensions.
Beginner Tips for a Smoother Crochet Experience
This project is classified as easy/beginner, but a few habits can make the experience more enjoyable.
First, keep your terminology consistent. The pattern uses US terms. If you normally crochet using UK terminology, refer to the abbreviation list whenever you see DC or SC.
Second, identify the center early. The chain-2 space is a recurring reference point throughout the body. Finding it before beginning each row can help prevent shaping mistakes.
Third, count your rows. Rows 4-12 must alternate Rows 2 and 3, and the sequence must finish on Row 3. Counting is more reliable than estimating the size visually.
Fourth, pay attention to chain spaces. Row 2 uses them to create the openwork, while Row 3 specifically includes them when placing DC stitches across the row.
Finally, do not fasten off too early. The first tie, shell edging, and second tie are connected through the same continuous construction.
A Practical Checkpoint List
- Make a slip knot.
- Chain 4 and form a ring with a slip stitch.
- Complete Row 1.
- Work Row 2 using the chain-space and skipped-stitch sequence.
- Work Row 3 across the stitches and chain spaces.
- Alternate Rows 2 and 3 through Rows 4-12.
- Finish the main body on Row 3.
- Without fastening off, chain 40 for the first tie.
- Work slip stitches back through the tie.
- Secure the first tie to the project.
- Begin the shell stitch edging.
- Work 7-DC shells with SC anchors between them.
- Work the central 7-DC shell into the top chain-2 space as instructed.
- Complete the edging without fastening off.
- Chain 40 for the second tie.
- Work slip stitches back along the second tie.
- Secure the second tie to the project.
- Fasten off.
- Tidy all loose ends with a tapestry needle.
Troubleshooting the Filet Crochet Section
My open spaces do not look even
Review the Row 2 sequence carefully. The pattern uses chain 1, skip 1 stitch, and DC repeatedly. Accidentally working into a stitch that should be skipped can change the spacing of the openwork.
The center point looks wrong
Locate the chain-2 space at the top of the project and check the stitches immediately around it. The pattern repeatedly uses 2 DC, chain 2, 2 DC in this center space.
My bandana looks more solid than the sample
Check whether you are alternating Rows 2 and 3 correctly. Row 2 creates the openwork structure, while Row 3 works DC stitches across the stitches and chain spaces.
The shell border looks uneven
Check that each shell contains 7 DC. Also make sure the single crochet anchor is placed directly into the appropriate space between shells.
I accidentally fastened off after the first tie
The original instructions say not to fasten off after creating the first tie. The yarn needs to remain attached for the shell stitch edging. If following the original construction, the first tie and edging are worked continuously.
Keeping the Original Dimensions in Mind
The stated finished size is 9 inches x 17.5 inches (23 cm x 44.5 cm), excluding the ties. The pattern also gives a gauge of 4 inches (10 cm): 6 rows.
These measurements are useful checkpoints, especially if you are making the project with the specified Universal Yarn Vireo and 5.5 mm hook. Changing yarn, hook size, tension, or the number of rows can affect the final dimensions.
For the original pattern, the main body should be completed through Row 12, finishing on a Row 3. The two ties are each created from a chain of 40.
Why the Construction Is Beginner Friendly
A major advantage of this project is that it does not require complicated assembly. Many crochet accessories involve creating multiple components and sewing them together. Here, the main body, ties, and edging are connected through the crochet process.
The first tie is created immediately after the main body. The yarn remains attached while the shell edging is worked. The second tie is then created at the end of the edging.
This approach allows the crocheter to concentrate on one continuous project instead of managing several separate pieces.
The body also offers repetition. Once you understand the difference between Rows 2 and 3, the repeated structure becomes predictable, making it easier to settle into a steady rhythm.
The Role of the Yarn in the Finished Look
Universal Yarn Vireo is the yarn selected for the original bandana. It contains 80% tencel and 20% wool, and the original project uses the shade Apricot Tart.
The designer describes the yarn as having beautiful colors and a beautiful drape. These qualities suit the bandana especially well because the accessory is designed to look delicate rather than stiff.
The open filet crochet structure allows the yarn to remain visually light, while the shell edging adds enough texture to define the outer edge.
If you choose another color for a personal variation, the overall style can remain feminine and Cottagecore-inspired while the color creates a different mood.
Ideas for Wearing the Finished Bandana
The finished Crochet Lovely Bandana is a versatile handmade accessory. Its triangular shape and two ties make it suitable for styling as a classic head or hair accessory.
The openwork design works particularly well with relaxed, feminine, vintage-inspired, and Cottagecore outfits. The shell edging adds a handmade decorative element that can become a subtle focal point.
The original Apricot Tart color creates a warm appearance, but a crocheter could explore other shades while maintaining the same stitch construction.
Because the bandana is relatively compact, it is also an enjoyable project for crocheters who want to create a wearable accessory without committing to a large garment or blanket.
Frequently Asked Questions
What is the skill level of this bandana pattern?
The original pattern is rated easy/beginner. It uses basic stitches and a repeating two-row structure.
What hook size should I use?
The original pattern specifies a 5.5 mm crochet hook.
What yarn is used?
The original project uses 1 skein of Universal Yarn Vireo in Apricot Tart. The yarn is made from 80% tencel and 20% wool.
What is the gauge?
The stated gauge is 4 inches (10 cm): 6 rows.
What is the finished size?
The finished bandana measures 9 inches x 17.5 inches (23 cm x 44.5 cm), excluding the ties on each side.
How many rows are used for the main body?
Rows 4-12 alternate Rows 2 and 3, finishing on Row 3. The project begins with Row 1 before this repeating section.
How long is each tie?
Each tie begins with chain 40.
How many stitches make each shell?
Each shell consists of 7 DC.
Do I need to sew the ties onto the bandana?
No. The ties are crocheted directly from the project. The first tie is made immediately after the main body, and the second tie is created after the shell edging.
Can I crochet this pattern in another color?
Yes. The design can be crocheted in different colors. The original sample uses Apricot Tart.
A Final Look at the Finished Design

The Crochet Lovely Bandana is a wonderful project for crocheters who appreciate simple construction with an elegant result. Its filet crochet body gives the accessory an airy appearance, while the shell stitch border adds a distinctly feminine finishing touch.
The project is also a useful introduction to several important crochet skills. You will practice reading stitch abbreviations, maintaining a repeating row structure, working into chain spaces, skipping stitches correctly, and identifying a central shaping point.
At the same time, the construction demonstrates how ties can be incorporated directly into a crochet project. The first tie is worked with 40 chains and attached to the project with slip stitches. The shell edging then continues without fastening off, followed by the second 40-chain tie.
Following the original instructions carefully is the best way to preserve the intended proportions. The main body alternates Rows 2 and 3 through Rows 4-12 and finishes on Row 3. The stated finished size is 9 inches x 17.5 inches (23 cm x 44.5 cm), excluding the ties, with a gauge of 4 inches (10 cm): 6 rows.
The original combination of Universal Yarn Vireo in Apricot Tart and a 5.5 mm crochet hook gives the bandana its soft, graceful character. The 80% tencel and 20% wool fiber composition complements the openwork design and contributes to the lovely drape described for the yarn.
Whether you are a beginner searching for a manageable crochet accessory or an experienced crocheter looking for a quick Cottagecore-inspired project, this bandana offers a satisfying combination of repetition, texture, and decorative detail.
Once the final tie is secured and the loose ends are tidied, the result is a delicate handmade accessory that demonstrates how basic crochet stitches can be arranged into something both practical and beautiful.