

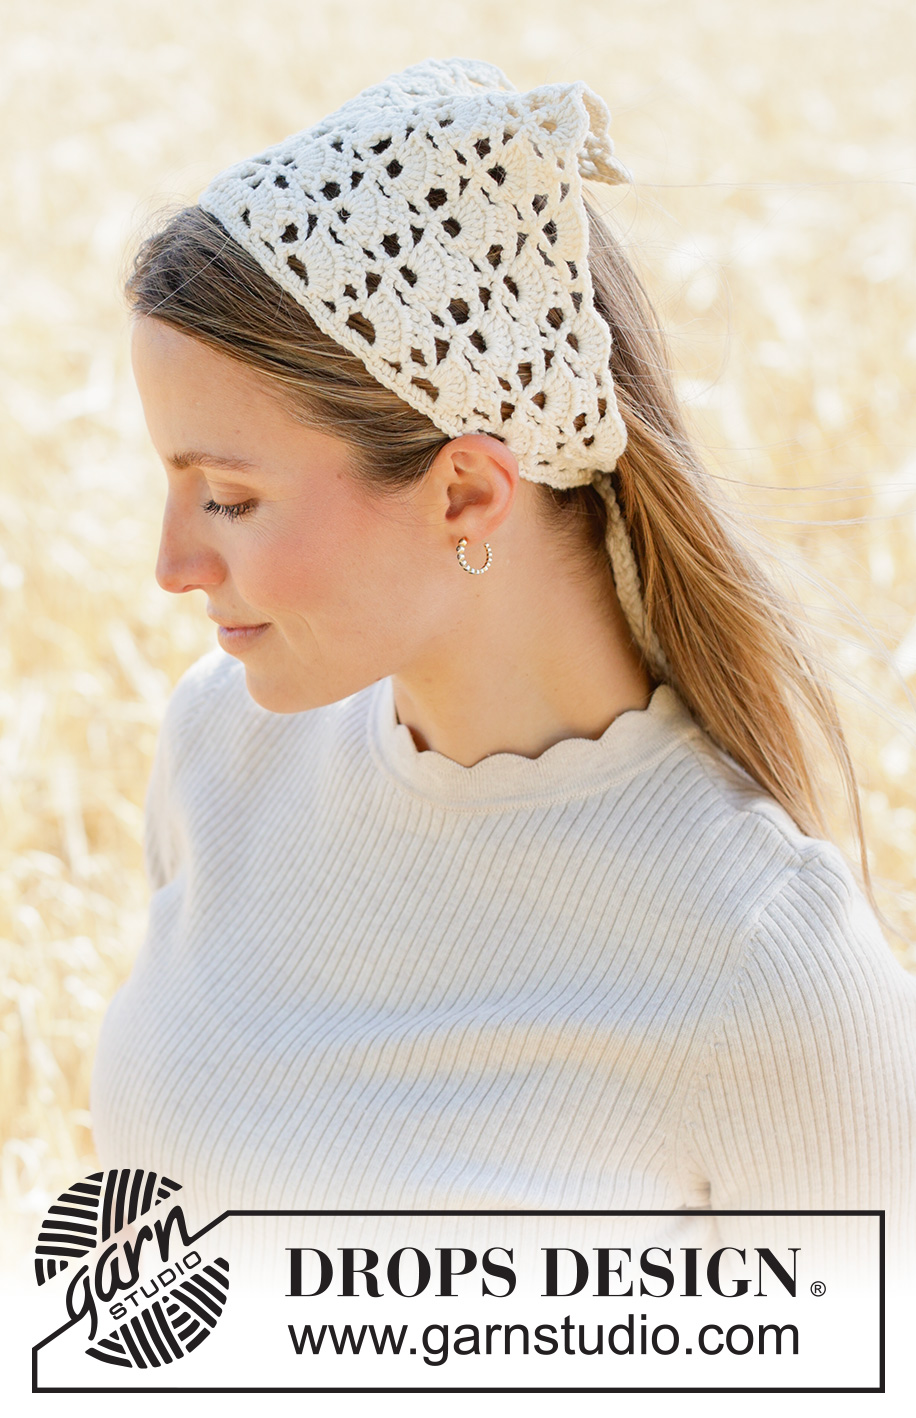
If you love handmade accessories with an airy, delicate appearance, the Moon Dust Bandana is a beautiful crochet project to add to your wardrobe. This crocheted headscarf combines an open fan pattern with a simple triangular construction, creating an accessory that looks intricate without requiring a complicated assembly process.
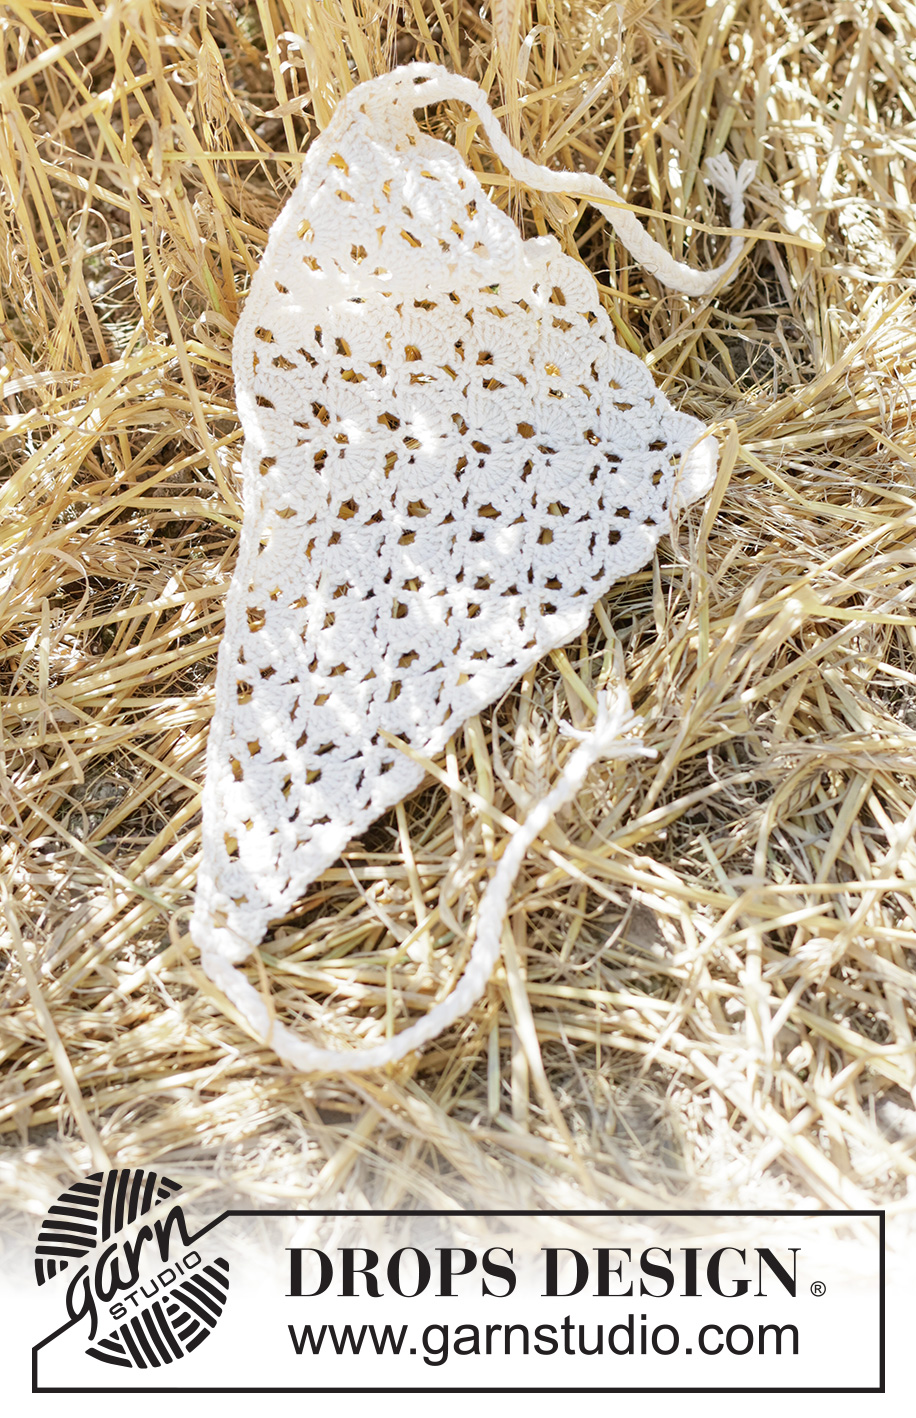
The design is worked back and forth rather than in rounds, gradually developing into a triangle. Once the main triangular section is complete, the longest edge receives a finishing row of double crochets. Two braided cords are then added at the ends so the finished bandana can be securely fastened around the head.
This version of the pattern uses DROPS Cotton Merino in colour 01, Off White, with a 3.5 mm crochet hook. The finished piece measures 44 cm in length without the cords and 18 cm in height when measured along the middle. The combination of the soft off-white yarn and open lace-like structure gives the finished accessory a light, summery character.
This guide walks through the project from preparation and gauge to the fan-pattern construction, finishing edge, braided cords, and final shaping. The original technical information is retained throughout, while the explanations are organized to make the construction easier to follow.
Moon Dust Bandana at a Glance
The Moon Dust Bandana is a triangular crocheted headscarf designed around a repeating fan pattern. The piece is worked back and forth, with the pattern expanding as additional repeats are introduced on both sides of the centre section.
- Pattern: DROPS 265-7
- Design: DROPS Design, Pattern cm-162
- Yarn group: B
- Finished length: 44 cm without cords
- Finished height: 18 cm
- Yarn: DROPS Cotton Merino from Garnstudio
- Yarn amount: 50 g
- Yarn colour: Colour 01, Off White
- Crochet hook: DROPS Crochet Hook size 3.5 mm
- Gauge: 20 treble crochets wide and 10 rows high = 10 x 10 cm
- Construction: Worked back and forth in a triangular shape
- Finishing: A double-crochet row along the long edge
- Cords: Two braided cords, one at each end of the long edge
What Makes This Crochet Bandana Special?
The defining feature of this project is the fan-pattern structure. Instead of creating a solid fabric, the crochet stitches form repeated open spaces that allow the background to show through. This gives the bandana a lace-inspired appearance while keeping the construction relatively straightforward once the chart sequence is understood.
The triangular shape is also important to the finished look. The work begins from the smaller central starting area and expands outward through the pattern repeats. As the piece grows, additional repeats of the designated pattern sections are incorporated on each side.
The finished accessory can be worn in several ways, but the construction is especially suited to being tied behind the head. The cords are attached at the two ends of the longest side, allowing the triangular fabric to sit across the hair and the cords to secure it in place.

Materials You Need
Yarn
The specified yarn is DROPS Cotton Merino from Garnstudio, which belongs to yarn group B. The pattern calls for 50 g in colour 01, Off White.
Keeping the specified yarn and colour is particularly useful for maintaining the appearance represented by the pattern. The off-white shade highlights the open spaces in the fan pattern and gives the finished bandana its soft, neutral appearance.
Crochet Hook
Use a DROPS Crochet Hook size 3.5 mm. The hook size is part of the original technical specifications and should be considered together with the stated crochet tension.
Additional Materials
The pattern does not require buttons, safety eyes, stuffing, sewing components, or other decorative materials. The finishing cords are made from the same DROPS Cotton Merino yarn, using strands cut to the specified length.
Check Your Crochet Tension Before Starting
The stated crochet tension is 20 treble crochets in width and 10 rows in height with a 3.5 mm hook = 10 x 10 cm.
This is an important checkpoint because the dimensions of the finished triangular fabric depend on maintaining the intended tension. The pattern specifically notes that hook size is only a guide. If you have too many stitches within 10 cm, change to a larger hook. If you have too few stitches within 10 cm, change to a smaller hook.
For this project, do not treat the gauge as an optional detail. The bandana has a specific finished length and height, and a substantial difference in stitch or row tension can affect how quickly the triangular shape reaches the required measurement.
- Target width: 20 treble crochets per 10 cm
- Target height: 10 rows per 10 cm
- Hook used for the stated gauge: 3.5 mm
- Gauge measurement: 10 x 10 cm
Understanding the Crochet Charts
The pattern uses diagrams A.1 through A.7. These diagrams are essential to understanding the fan-pattern construction and the final edge.
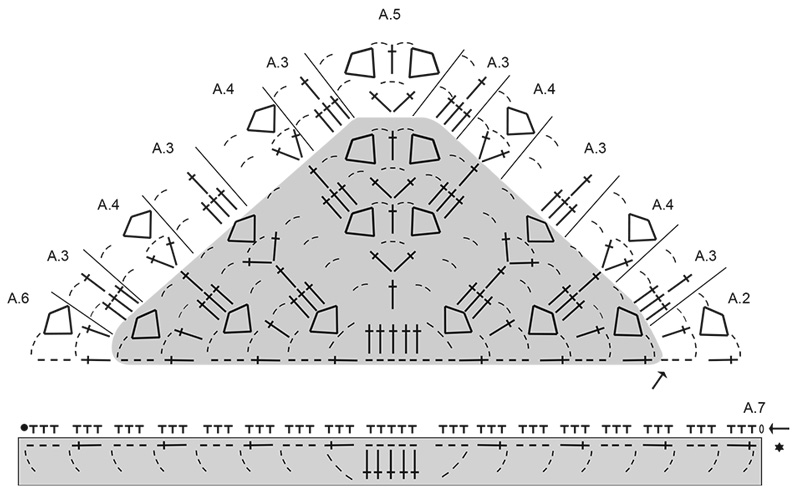
When working diagrams A.2 through A.6, the grey section represents A.1. This grey area has already been worked; it is shown again in the later diagrams to make it easier to understand how the new stitches continue from the previously completed section.
The same principle applies to diagram A.7. Its grey section shows how the stitches relate to the already established work, helping you understand where the finishing row continues along the longest side of the triangle.
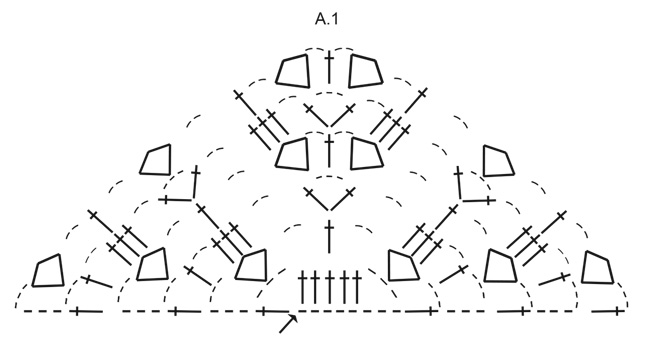
When reading crochet charts, remember that the symbols represent individual stitches and chain spaces rather than written-out rows. The pattern includes symbols for chain stitches, treble crochets, starting points, groups of seven treble crochets worked around a chain space, already-worked rows, slip stitches, and double crochets.
It is useful to keep the chart beside your work while crocheting. Rather than trying to memorize the entire diagram, concentrate on the current section and use the grey portions as visual checkpoints.
Starting the Triangular Headscarf
The main headscarf is worked back and forth using the 3.5 mm crochet hook and DROPS Cotton Merino. Begin by following diagram A.1.
A.1 creates the initial structure from which the larger triangular fan pattern develops. Take your time with this first section because it establishes the central arrangement that later diagrams build upon.
Once diagram A.1 is complete, the construction continues through diagrams A.2 to A.6. At this stage, the grey section in those diagrams should not be treated as a new piece to crochet. It represents the A.1 section that has already been completed and is included to demonstrate how the new pattern continues.
How the Fan Pattern Expands
After A.1, the pattern follows a carefully organized sequence across the row. Work A.2 around the chain space at the beginning of the row. Then work A.3 and A.4 until there are 7 treble crochets left before the chain space in the middle of A.1.
Next, work A.3, followed by A.5 across the stitches in the middle. After the centre section, continue with A.3 and A.4 until there are again 7 treble crochets left before the chain space at the end of the row. Work A.3, then finish the row with A.6 around the chain space.
This sequence is the key to maintaining the symmetry of the triangular fabric. The centre section is treated differently from the outer sections, while the A.3 and A.4 repeats gradually create more of the decorative fan pattern on both sides.
The Two-Row Expansion Checkpoint
One of the most useful checkpoints in this pattern comes from the way the repeats expand. Each time the 2 rows in A.2 to A.6 are worked, there is room for 2 more repeats of A.3 and A.4 on each side.
This is a useful way to monitor the growth of the bandana without needing to count every decorative opening across the entire fabric. The pattern itself provides a built-in expansion rhythm: after each two-row sequence, the sides accommodate two additional A.3 and A.4 repeats.
As you work, compare the left and right sides visually. The triangular piece should remain balanced around its central section. If the two sides appear different, stop before continuing several more rows and check the current chart section.
Maintaining the Correct Shape
Because the finished piece is triangular, consistent tension is especially important. An overly tight or loose section can make the lace pattern appear uneven and can influence the final proportions.
Try to keep your treble crochets at a consistent height. Chain spaces should also remain reasonably even throughout the fabric. This is not about forcing every loop to look identical; it is about maintaining a stable crochet rhythm so the fan pattern develops evenly.
The centre of the piece is another important visual checkpoint. Since the pattern repeatedly references the chain space in the middle of A.1, use that centre as your orientation point when checking the work.
When to Stop the Main Pattern
Continue the repeating pattern until the piece measures 18 cm, measured along the middle.
The pattern also specifies that you should finish after a complete repeat in height. This is important: do not simply stop at an arbitrary point when the ruler reaches 18 cm. The final section should also complete the required repeat in height.
Once this part is finished, do not cut the strand. The next stage uses the existing working strand to continue with the finishing edge along the longest side of the triangle.
Adding the Double-Crochet Edge
Once the triangular section has reached the specified height and the complete repeat has been finished, the next stage is the finishing edge.
The pattern describes the piece as a triangle. Along the longest side, work a row of double crochets. Rotate the piece so that you can continue from the same side, then work A.7 along the long side.
Diagram A.7 shows the beginning, middle, and end of the row rather than displaying every stitch in the entire length. This means the chart should be used as a guide to the construction of the edge while following its repeated structure across the long side.
After completing A.7 along the long side, cut and fasten the strand. The crocheted triangle is now ready for its final functional detail: the two braided cords.
Making the Two Braided Cords
The cords are made separately using the same DROPS Cotton Merino yarn.
For each cord, cut 6 strands of DROPS Cotton Merino, each 80 cm long.
To attach the first cord, thread the six strands halfway through the piece at the outermost point at one end of the long side. Once threaded through, you will have 12 strands of equal length.
Divide those 12 strands into 3 bunches of 4 strands. Plait the three bunches together until there is 3 cm left.
At that point, tie a strand around the plait and fasten it securely. Repeat the same process at the opposite end of the long side to create the second cord.
Cord Construction Checklist
- Cut 6 strands.
- Make every strand 80 cm long.
- Thread the strands halfway through one outermost end of the long side.
- Make 12 strands of equal length.
- Divide them into 3 bunches.
- Keep 4 strands in each bunch.
- Plait the three bunches.
- Stop when 3 cm remains.
- Tie a strand around the plait.
- Fasten the cord well.
- Repeat the entire process at the other end of the long side.
Why the Cords Matter
The cords are more than a decorative finishing touch. They provide the fastening system that allows the triangular headscarf to be secured around the head. Their placement at the two outermost ends of the longest edge follows the geometry of the finished triangle.
When plaiting, try to maintain an even tension throughout the cord. Keeping the three bunches balanced helps create a neat braid and gives both cords a similar appearance.
How the Finished Bandana Looks When Worn
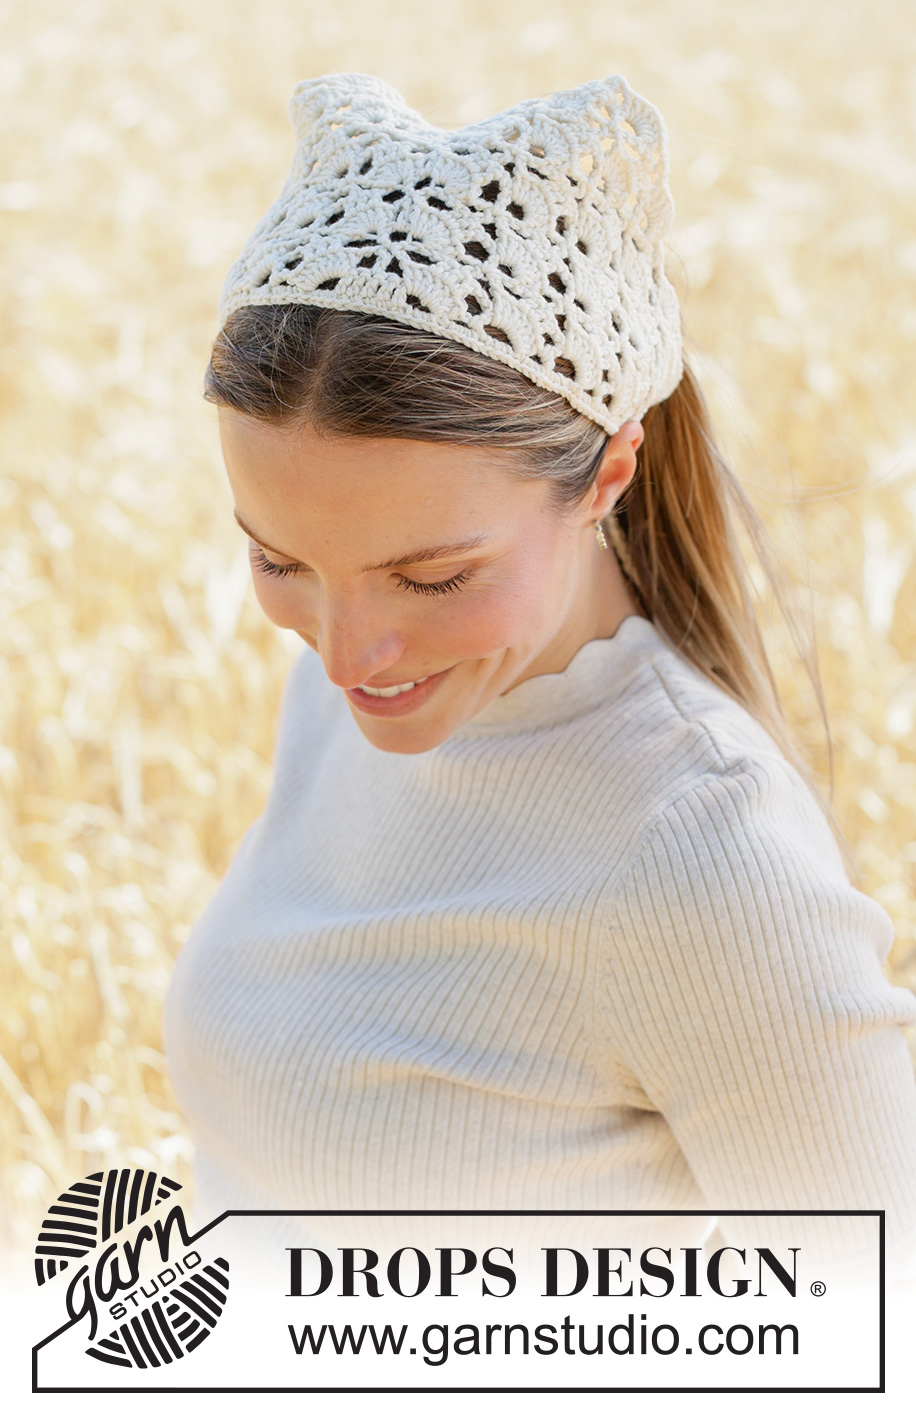
The Moon Dust Bandana has a particularly distinctive appearance when worn because the triangular fabric can sit across the top and back of the head while the open fan pattern remains visible.

The front view also makes the centre of the design easy to appreciate. The repeating fan motifs create an airy surface rather than a dense fabric, while the finished long edge provides a defined border between the open pattern and the fastening cords.
From the back, the triangular shape spreads naturally across the hair. The pattern remains decorative without becoming visually heavy, making the finished piece suitable for a relaxed accessory style.
Beginner-Friendly Stitch Checkpoints
Although the pattern is chart-based, several simple checkpoints can make the process easier to manage.
Checkpoint 1: Confirm the Hook
Make sure you are working with a 3.5 mm crochet hook before starting the main fabric.
Checkpoint 2: Confirm the Yarn
Use 50 g of DROPS Cotton Merino in colour 01, Off White, as specified.
Checkpoint 3: Check the Gauge
Your target is 20 treble crochets across and 10 rows high over a 10 x 10 cm area.
Checkpoint 4: Identify the Centre
The later instructions repeatedly refer to the chain space in the middle of A.1. Keep this centre clearly identifiable as the work expands.
Checkpoint 5: Watch the Side Expansion
After every two rows of A.2 to A.6, there should be room for two additional A.3 and A.4 repeats on each side.
Checkpoint 6: Measure the Middle
Continue until the triangle measures 18 cm along the middle, and make sure the final section ends after a complete repeat in height.
Checkpoint 7: Keep the Working Strand
Do not cut the strand immediately after the triangular section. Continue directly into the long-edge finishing row.
Common Mistakes to Avoid
The most common difficulty with a chart-based triangular project is losing track of where the centre section begins and ends. The Moon Dust pattern uses a combination of A.2, A.3, A.4, A.5, and A.6 across the row, so the centre should remain your main orientation point.
Another potential problem is treating the grey areas in the later diagrams as new rows to crochet. They are not additional fabric. They represent previously worked sections so that you can see how the next stitches connect to the existing work.
It is also important not to stop simply because the fabric looks large enough. The specified measurement is 18 cm along the middle, and the pattern requires the work to finish after a complete repeat in height.
Finally, take care when preparing the cords. The original instructions call for 6 strands measuring 80 cm each, which become 12 equal-length strands when threaded halfway through the piece. Changing the number or length of strands would change the specified cord construction.
A Simple Workflow for the Whole Project
- Gather 50 g of DROPS Cotton Merino in colour 01, Off White.
- Prepare a 3.5 mm DROPS crochet hook.
- Check the target tension of 20 treble crochets and 10 rows per 10 cm.
- Study diagrams A.1 through A.7 before beginning.
- Work A.1 as the starting section.
- Continue with A.2 to A.6 as directed.
- Use the grey areas as references to the already-worked A.1 section.
- Maintain the central chain-space reference point.
- After each two-row sequence, allow for two additional A.3 and A.4 repeats on each side.
- Continue until the piece measures 18 cm along the middle.
- Finish after a complete repeat in height.
- Do not cut the strand.
- Rotate the triangle and work A.7 along the longest side.
- Cut and fasten the strand after completing A.7.
- Prepare the first cord from six 80 cm strands.
- Thread them halfway through the outermost end of the long side.
- Divide the resulting 12 strands into three groups of four.
- Plait until 3 cm remains.
- Tie and fasten the plait securely.
- Repeat for the second cord at the opposite end.
Final Thoughts on the Moon Dust Bandana
The Moon Dust Bandana is a lovely example of how a relatively compact crochet project can combine texture, openwork, shaping, and practical construction in one accessory. Its triangular silhouette gives it an immediately recognizable bandana shape, while the fan pattern provides the delicate lace effect that makes the design stand out.
The most important parts of the project are consistency and chart orientation. Keeping the 3.5 mm hook, the stated gauge, and the central structure in mind will make the expanding pattern much easier to follow. The grey sections in diagrams A.2 to A.6 are especially helpful because they show how the new pattern relates to the previously completed A.1 section.
Once the main triangle reaches 18 cm along the middle and the required complete repeat has been finished, the project transitions into a straightforward finishing stage. The A.7 edge gives the longest side a defined border, while the two braided cords provide the practical fastening needed to wear the finished headscarf.
The result is a lightweight off-white crochet accessory with an airy fan pattern and a clean triangular shape. Whether viewed from the side, back, or front, the openwork design remains the defining feature of the finished piece.
For the best results, treat the measurements and stitch tension as fixed checkpoints rather than approximations. Work carefully through the diagrams, maintain the centre of the design, and use the expansion rhythm to check that the two sides remain balanced. With those points under control, the Moon Dust Bandana becomes an enjoyable project that combines decorative crochet with a very wearable final result.