
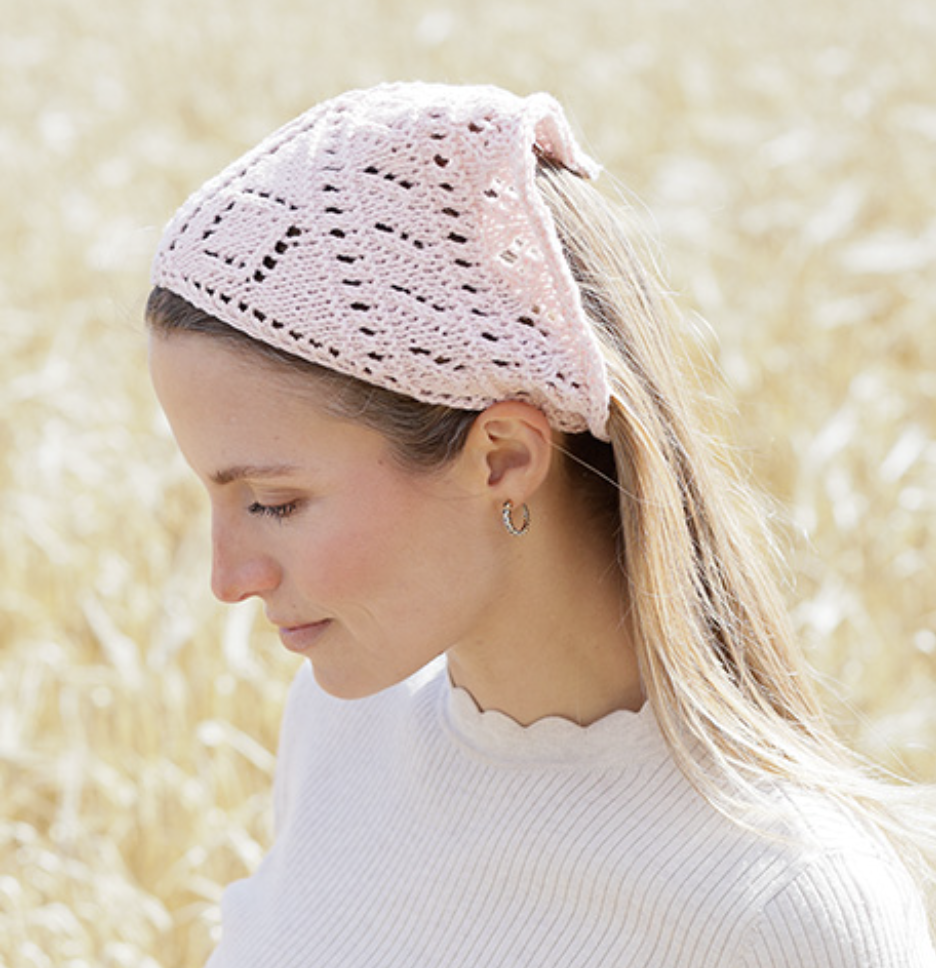
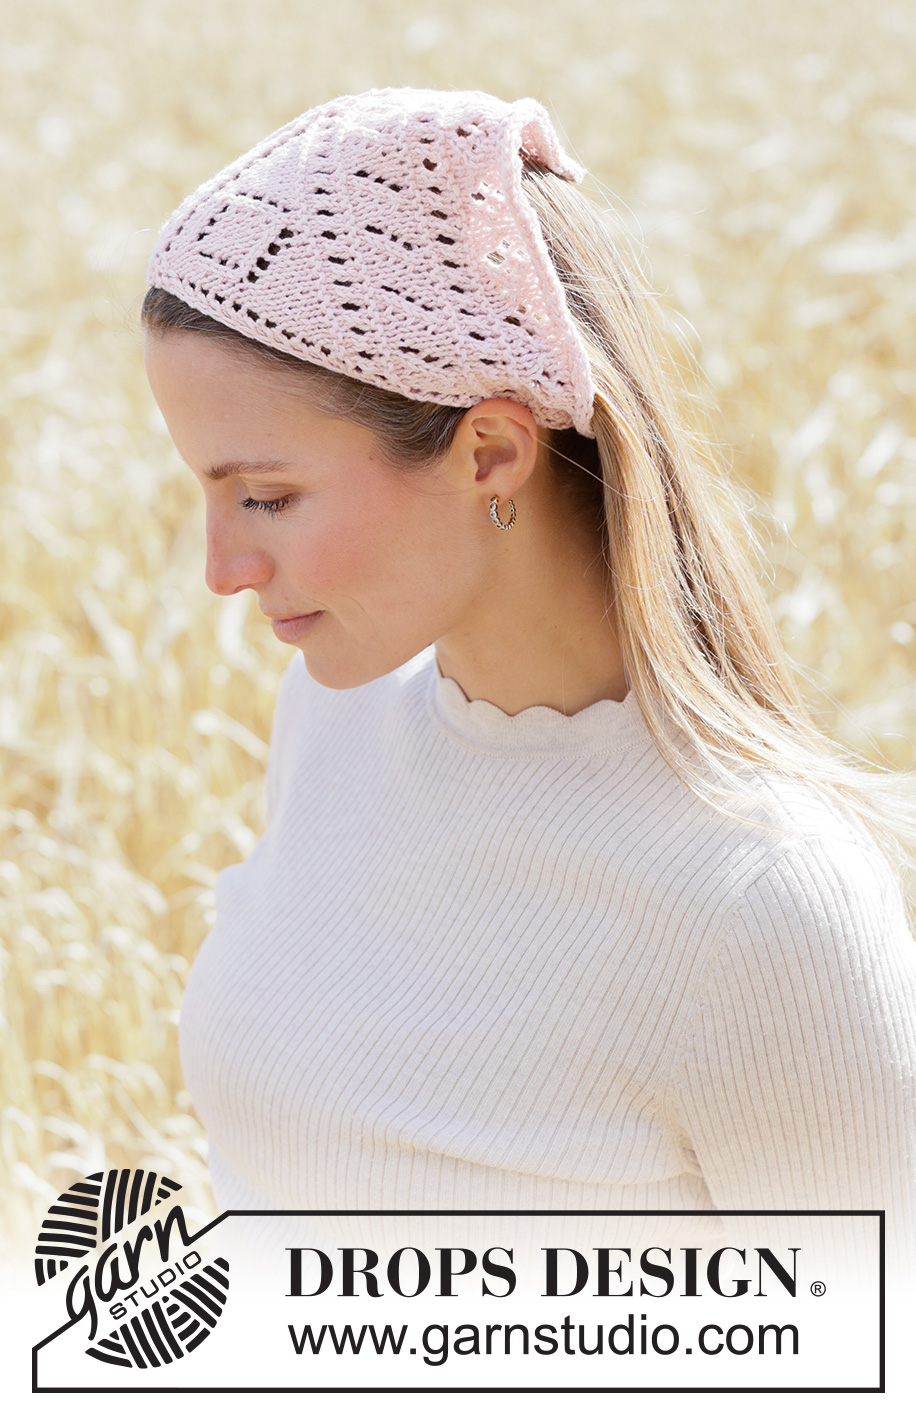
The Rosy Rhythm Bandana is a delicate knitted headscarf designed with an attractive lace pattern and neat I-cord details. The finished piece forms a triangle and is worked back and forth from the middle outward, allowing the distinctive lace motif to grow gradually as the stitch count increases. Once the triangular scarf is complete, an I-cord cast-off creates a clean finishing edge, while braided cords are added to the two ends of the long side so the bandana can be tied securely.
This design is particularly appealing if you enjoy small knitting projects that introduce several useful techniques in one project. Although the finished bandana looks intricate, its construction follows a clear progression: begin with only 7 stitches, work a short foundation section, follow the charted lace motifs, expand the design to its full width, finish with the I-cord cast-off, and finally make the two braided ties.
The original design is DROPS 265-5, also identified as Pattern cm-161. It uses DROPS Cotton Merino from Garnstudio and belongs to yarn group B. The supplied pattern specifies one size, with a finished length of 46 cm without the cords and a height of 23 cm.
Project at a Glance
Before beginning, it helps to understand the overall shape and construction. This is not a conventional rectangular scarf. Instead, the fabric starts at the centre and grows outward, producing a triangular headscarf. The centre stitch remains an important reference point throughout the charted sections.
- Pattern: DROPS 265-5, Pattern cm-161
- Project: Rosy Rhythm Bandana
- Finished length: 46 cm without cords
- Finished height: 23 cm
- Yarn: DROPS Cotton Merino
- Yarn group: B
- Yarn quantity: 50 g
- Colour: 05, Powder Pink
- Needle: DROPS circular needle size 4 mm
- Needle length: 60 cm
- Gauge: 21 stitches and 28 rows in stocking stitch on 4 mm needles = 10 x 10 cm
The gauge is important because the finished measurements depend on the relationship between stitch width and row height. The 4 mm needle is the size specified by the pattern, but it should be treated as a guide in relation to your knitting tension. If you obtain too many stitches over 10 cm, the pattern recommends changing to a larger needle. If you obtain too few stitches over 10 cm, change to a smaller needle.
Understanding the Construction Before You Start
The most useful way to approach this project is to think of it as a triangle that expands from a narrow centre point. The first five rows establish the beginning of the shape. After that, the lace charts control the increases, decreases, yarn overs, and central motifs.
The work is knitted back and forth rather than in the round. The first row is worked from the wrong side. A special three-stitch I-cord edge is maintained at both sides of every row. This creates a stable and decorative border while keeping the edges visually tidy.
The pattern also uses a central stitch as a reference. After the first chart sequence, the piece reaches 69 stitches. The second chart sequence then expands the work further until there are 121 stitches. Keeping track of these stitch counts is one of the easiest ways to confirm that the shaping is progressing correctly.
The Three Edge Stitches with I-Cord
The three edge stitches are used consistently at the beginning and end of each row. This detail is essential because the edge treatment is part of the finished design rather than an optional decorative addition.
At the beginning of a row, slip 1 stitch purl-wise with the yarn held in front, knit 1, and work 1 garter stitch. At the end of the row, work until 3 stitches remain, work 1 garter stitch, slip 1 stitch purl-wise with the yarn in front, and knit 1.
The same edge method is used from both the right side and the wrong side. It is therefore worth becoming comfortable with this sequence before beginning the lace chart. Consistent tension along these edges will help the triangular bandana retain its clean outline.
Garter Stitch in This Pattern
The garter stitch definition used by the design is straightforward: when working back and forth, knit every row from both the right and wrong side. One ridge in height equals two rows.
Because the bandana includes lace sections and I-cord edges, it is useful to distinguish the garter stitch edges from the lace pattern in the charts. The charts show the pattern rows from the right side, while the written instructions explain how the special edge stitches are handled on every row.
Starting the Bandana: Rows 1 to 5
Cast on 7 stitches using the 4 mm circular needle and DROPS Cotton Merino in colour 05 Powder Pink. The work is knitted back and forth, with the first row worked from the wrong side.
Row 1 — Wrong Side
Work the 3 stitches according to the three edge-stitch I-cord instructions, knit 1, and then work the remaining 3 stitches according to the same edge-stitch method.
This opening row establishes the centre of the triangular piece while maintaining the decorative edge treatment on both sides.
Row 2 — Right Side
Work the 3 edge stitches as established, make 1 yarn over, knit 1, make 1 yarn over, and finish with the 3 edge stitches. This produces 9 stitches.
Row 3 — Wrong Side
Work the 3 edge stitches, knit 3, and then work the final 3 edge stitches. The central section is beginning to widen while the edges remain controlled by the I-cord treatment.
Row 4 — Right Side
Work the 3 edge stitches, make 1 yarn over, knit 1, make 1 yarn over, knit 1, make 1 yarn over, knit 1, make 1 yarn over, and finish with the 3 edge stitches. There are now 13 stitches.
Row 5 — Wrong Side
Work the 3 edge stitches, knit 7, and work the final 3 edge stitches.
These five foundation rows are short, but they establish the central structure that the lace charts will build upon. Check your stitch count before moving to the first chart sequence.
Beginning the Main Lace Pattern
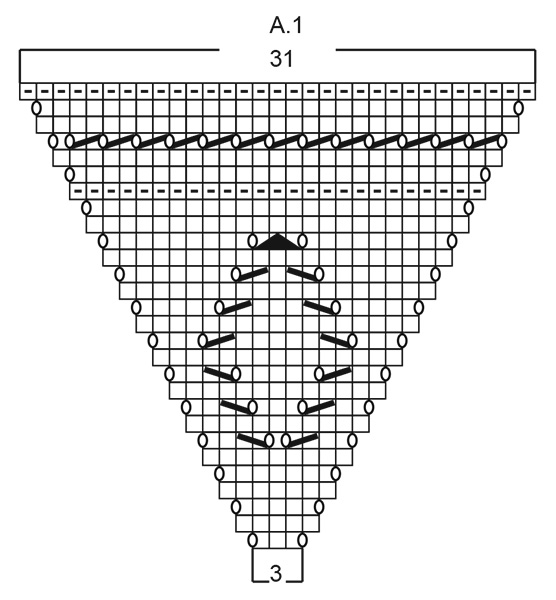
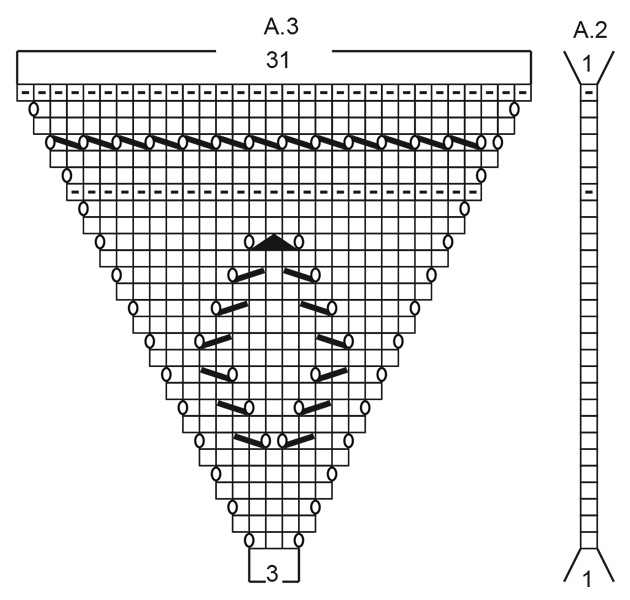
After the five foundation rows, continue with the main pattern. The first row of the charted section is worked from the right side. Maintain the 3 edge stitches at the beginning, work A.1, then work A.2 across 1 stitch as the mid-stitch, followed by A.3, and finish with the 3 edge stitches.
At this stage, place 1 marker in the mid-stitch and allow the marker to follow the work. This marker is a useful visual checkpoint because the triangular construction is organised around the centre of the piece.
The first chart sequence includes A.1, A.2, and A.3. A.1 and A.3 form the expanding lace sections on either side of the central motif, while A.2 represents the single middle stitch. Follow the chart rows carefully rather than attempting to judge the shaping only by appearance.
Reading the Lace Charts
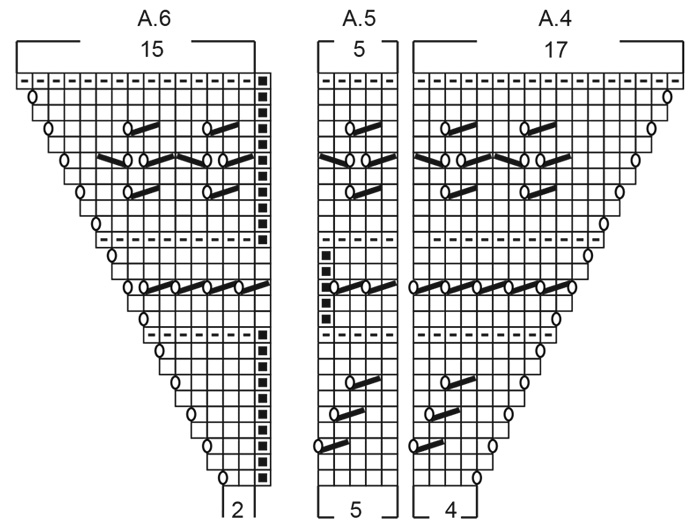
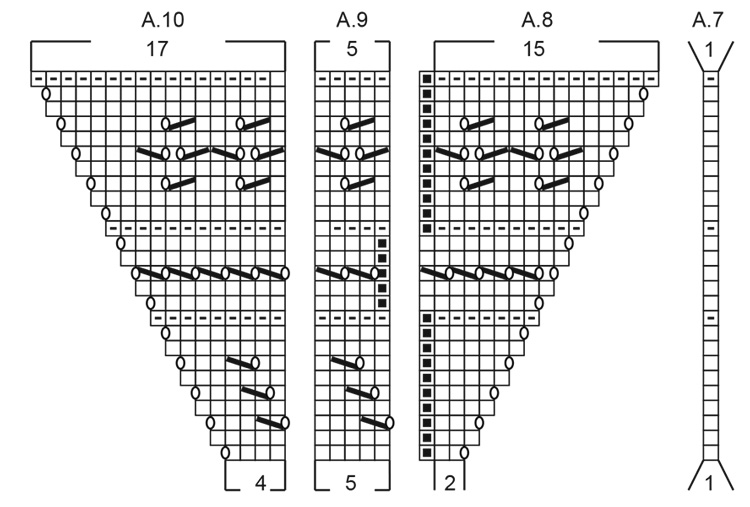
The diagrams are an important part of this project because they show the lace pattern visually. The symbols represent different knitting actions, including knit stitches, knit-two-together decreases, slipped stitches passed over knitted stitches, yarn overs, and sections where there is no stitch.
One of the most important chart habits is to remember that the diagrams show the rows in the pattern from the right side. When reading the written explanations alongside the chart, keep the right-side and wrong-side orientation in mind.
- A horizontal line symbol represents a knit stitch from the right side and a purl stitch from the wrong side.
- The designated wrong-side symbol represents a knit stitch from the wrong side.
- Knit 2 together is used as a decrease.
- The slip-1, knit-1, pass-slipped-stitch-over symbol creates another decrease.
- The yarn-over symbol creates an increase and an open space in the lace.
- The symbol involving two slipped stitches, one knit stitch, and passing the slipped stitches over creates a central decrease.
- A no-stitch symbol means to move directly to the next symbol in the chart.
Because lace patterns combine increases and decreases, the number of stitches does not simply grow whenever yarn overs appear. The surrounding decreases balance the lace structure while the overall pattern shaping creates the triangular silhouette.
First Major Stitch Checkpoint: 69 Stitches
Continue through the first chart sequence until the diagrams are finished. At the end of this section, there should be 69 stitches.
This is an important checkpoint. If your count is different, it is better to stop and review the previous chart rows before continuing. Look particularly at yarn overs, paired decreases, and the position of the centre stitch.
Maintaining the specified knitting tension is also important at this stage. Lace fabric can appear slightly different depending on how tightly the stitches are worked, so keeping a consistent rhythm will help the final dimensions remain close to the stated 46 cm length and 23 cm height.
The Second Chart Sequence
Once the first diagrams are complete and you have reached 69 stitches, begin the next chart sequence. Again, the first row of this section is worked from the right side.
Keep the 3 edge stitches at the beginning and end of every row. Work A.4 across 4 stitches, then A.5 five times in width. At this point there are 2 stitches left before the mid-stitch. Work A.6 across 2 stitches, followed by A.7 across the 1-stitch mid-stitch. Then work A.8 across 2 stitches, followed by A.9 five times in width, work A.10 across 4 stitches, and finish with the established 3 edge stitches.
The repetition of A.5 and A.9 is particularly important in this part of the project. Since these chart sections repeat across the width, it helps to mark each completed repeat mentally or with removable markers if that makes chart reading easier.
Keeping the Centre Easy to Find
The centre stitch becomes increasingly useful as the bandana grows. The marker placed in the mid-stitch provides a reliable reference point when the chart expands to both sides.
Rather than trying to count the entire row every time, work outward from the centre and compare the left and right sides. The lace should develop symmetrically around the centre. If one side appears to have a different sequence of increases or decreases from the other, stop and compare the chart before continuing.
This approach is especially helpful in the second half of the design, where multiple chart sections are repeated across the width.
Second Major Checkpoint: 121 Stitches
Continue working through the second set of diagrams until they are finished. The completed piece should have 121 stitches, and the last row of this chart sequence is worked from the wrong side.
The 121-stitch checkpoint is the final major stitch-count confirmation before the special cast-off. Take a moment to verify the count and check that the triangular shape is balanced. This is also a useful point to measure the piece and compare it with the stated dimensions.
The completed bandana should measure approximately 46 cm along the long side and 23 cm along the mid-stitch. The scarf is triangular, so measurements should be taken according to the locations specified by the pattern rather than treating it like a rectangular piece.
Finishing the Main Fabric with an I-Cord Cast-Off
The final edge is completed with an I-cord cast-off. This creates a narrow tubular edge that complements the three-stitch I-cord treatment used along the sides.
When working the last row from the wrong side, cast on 2 stitches at the end of the row and turn the work.
For Row 1 from the right side, knit 1, knit 2 twisted together, then slip the 2 stitches from the right needle back onto the left needle without turning. The yarn tightens the fabric into a small tube as this sequence is repeated.
Repeat the same Row 1 until only 2 stitches remain. Slip these 2 stitches onto the left needle and cast off. Cut the yarn and fasten it securely.
Working the cast-off with consistent tension is helpful. The I-cord should look neat and continuous rather than loose in some areas and tight in others.
Adding the Two Braided Cords
The final stage is to make the cords that allow the bandana to be fastened around the head. Cut 6 strands of DROPS Cotton Merino, each measuring 80 cm in length.
Thread the strands halfway through the piece at the outermost point of one end of the long side. After threading them through, there will be 12 strands of equal length.
Divide these strands into 3 bunches of 4 strands each. Plait the three bunches until approximately 3 cm remains unplaited. Tie a strand around the plait and fasten it well.
Repeat the same process at the opposite end of the long side to create the second cord.
The cords are an important functional element of the design, so check that both are attached securely. Keeping the two cords approximately equivalent in construction also helps the finished bandana hang evenly when worn.
How the Finished Bandana Looks When Worn

The long side of the triangular bandana rests around the head, while the cords extend from the two ends and can be tied to secure the accessory. The open lace pattern gives the fabric a light appearance, while the Powder Pink colour creates the soft look shown in the original design.
Because the project is worked from the centre outward, the lace arrangement creates a strong visual direction toward the point of the triangle. The centre marker used during knitting therefore has both a practical role during construction and a relationship to the finished symmetry of the design.
Practical Tips for a Smooth Knitting Session
Keep the Edge Routine Consistent
The three edge stitches are repeated throughout the project. Avoid treating them as ordinary chart stitches. Work them according to the dedicated I-cord edge instructions on every row.
Use the Centre Marker
The pattern specifically recommends placing a marker in the mid-stitch after beginning the charted pattern. Keeping that marker visible makes it much easier to divide the lace mentally into left and right sections.
Check Before Moving Between Charts
The 69-stitch and 121-stitch counts are valuable checkpoints. If the count is incorrect, review the chart before moving forward rather than hoping the difference will correct itself later.
Watch Yarn Overs and Decreases Together
Lace designs depend on the relationship between increases and decreases. When reading a chart, do not focus on yarn overs alone. Check the corresponding decreases in the surrounding rows so the overall structure remains balanced.
Maintain Even Tension
The specified gauge is 21 stitches by 28 rows in stocking stitch over 10 x 10 cm using the 4 mm needle. Although lace can behave differently from stocking stitch, the stated tension remains the project’s reference point.
Quick Construction Checklist
- Confirm the 4 mm, 60 cm circular needle.
- Prepare 50 g of DROPS Cotton Merino in colour 05 Powder Pink.
- Check the 21-stitch by 28-row stocking-stitch gauge over 10 x 10 cm.
- Cast on 7 stitches.
- Complete Rows 1 through 5.
- Begin the charted lace pattern with A.1, A.2, and A.3.
- Place the marker in the mid-stitch.
- Continue until the first chart section reaches 69 stitches.
- Work the second chart sequence using A.4 through A.10 as specified.
- Continue until the piece reaches 121 stitches.
- Confirm that the final chart row is worked from the wrong side.
- Complete the I-cord cast-off.
- Cut and fasten the yarn.
- Measure approximately 46 cm along the long side and 23 cm along the mid-stitch.
- Cut 6 strands, each 80 cm long, for the first cord.
- Thread them halfway through one end of the long side.
- Divide the resulting 12 strands into 3 groups of 4.
- Plait until 3 cm remains.
- Tie and fasten the plait securely.
- Repeat the cord construction at the opposite end.
Common Troubleshooting Checkpoints
If the beginning looks wider or narrower than expected, first check the stitch counts in Rows 2 and 4. These rows establish the early increases, producing 9 stitches and then 13 stitches respectively.
If the first chart section does not finish with 69 stitches, review the yarn-over and decrease symbols. Also confirm that the single centre stitch represented by A.2 has been handled correctly.
If the second chart section does not finish with 121 stitches, review the repeated A.5 and A.9 sections as well as the centre sequence involving A.6, A.7, and A.8. The centre marker can help separate these sections while you work.
If the edges appear uneven, pay attention to the three-stitch I-cord treatment. Because those stitches are worked differently from the main chart, inconsistent handling can make the borders look different from one row to another.
A Final Look at the Lace Design
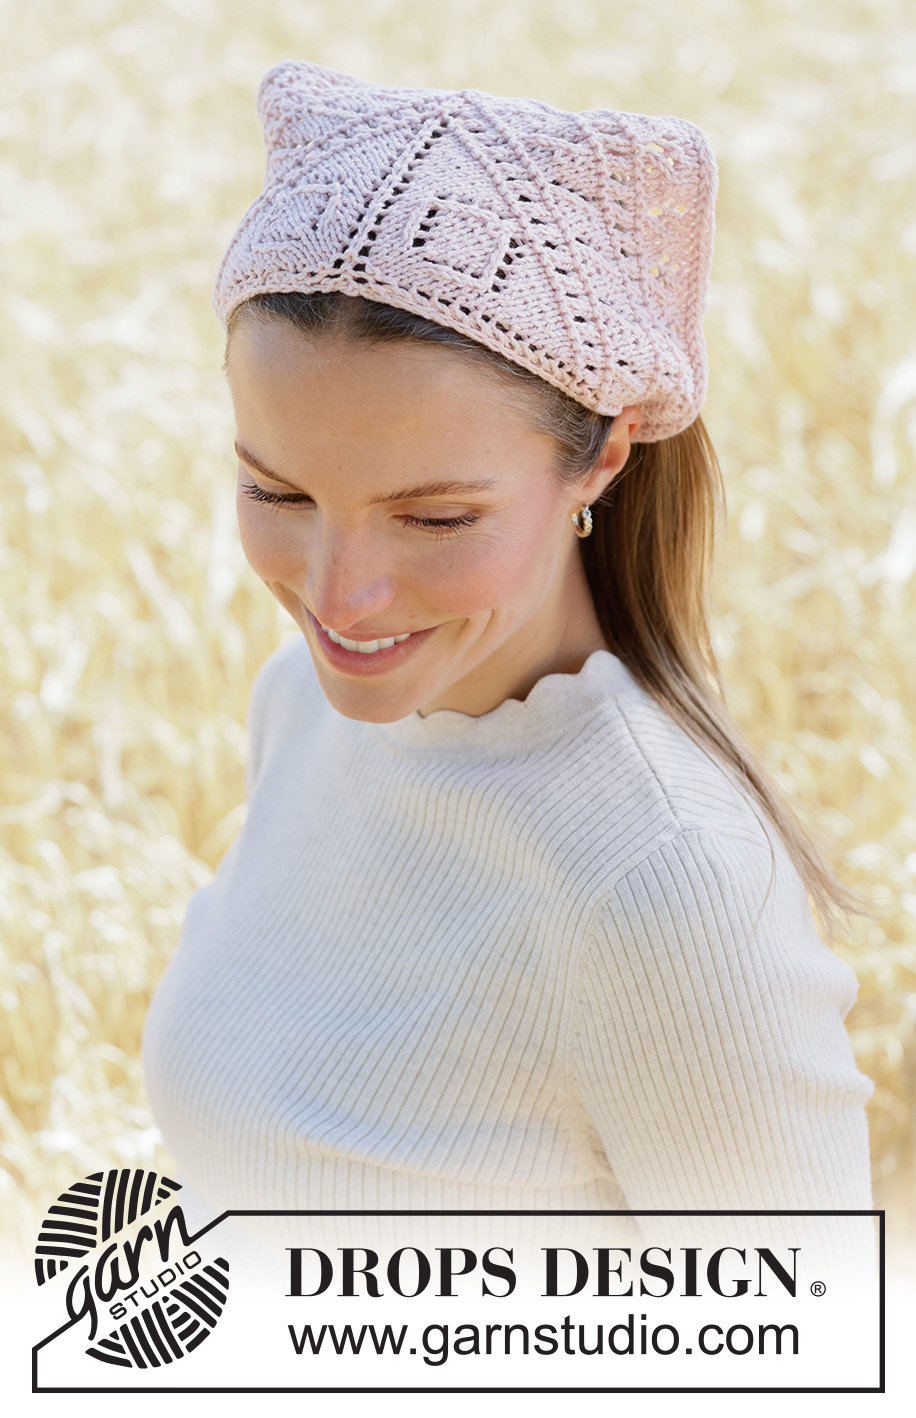
The finished Rosy Rhythm Bandana combines several techniques in a compact project: garter stitch, yarn overs, lace decreases, chart reading, I-cord edges, an I-cord cast-off, and braided ties. The result is a lightweight triangular accessory with a distinctly handmade appearance.
The design is also a useful exercise in working symmetrically. Beginning with only 7 stitches and gradually expanding to 121 stitches makes the construction easy to follow when the stitch counts are treated as regular checkpoints. The chart sections then provide the decorative structure that gives the finished bandana its characteristic openwork appearance.
Final Thoughts
The Rosy Rhythm Bandana is a small but technique-rich knitting project. Its construction is carefully organised around a central stitch, while the lace charts progressively transform a narrow beginning into a triangular accessory. The three-stitch I-cord edges provide a polished border, and the final I-cord cast-off continues that clean tubular finish across the last edge.
For the most reliable result, keep the original stitch counts, measurements, needle size, yarn specification, and chart sequence as your primary checkpoints. Take your time when reading the lace diagrams, especially when working the repeated sections, and use the centre marker to maintain symmetry.
Once the 121-stitch stage is complete, the final steps are straightforward: finish with the I-cord cast-off, secure the yarn, prepare the 80 cm strands, and make the two braided cords. The finished piece measures approximately 46 cm along the long side and 23 cm along the centre, without the cords.
With its Powder Pink colour, lace texture, triangular silhouette, and practical braided ties, this bandana makes a charming accessory while also providing a focused project for knitters who want to practise lace chart reading and I-cord techniques in a manageable format.