
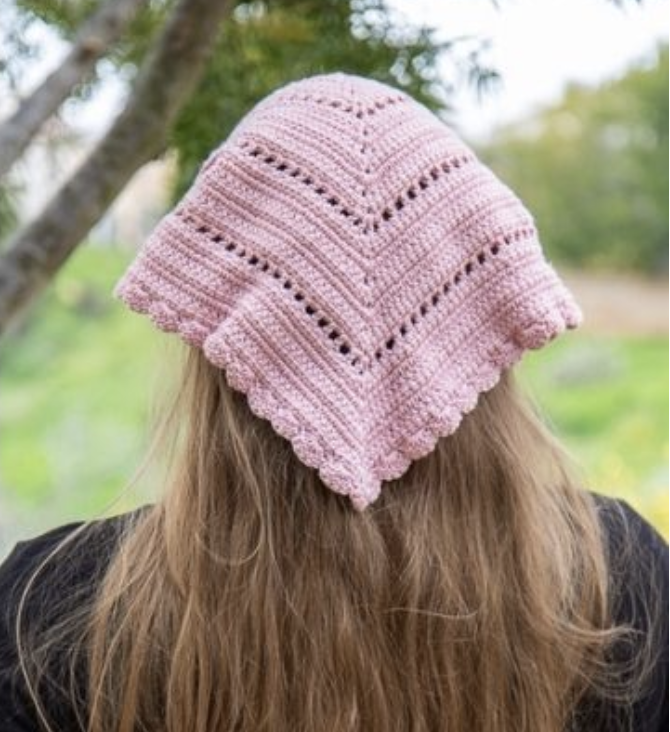
How to Crochet a Linked Triangle Bandana: A Complete Pattern and Finishing Guide
A crochet bandana is a satisfying project when you want something handmade that can be completed without committing to a large, time-consuming piece. This linked crochet bandana takes that idea a step further by using linked double crochet as the main stitch, creating a distinctive triangular fabric that can be finished with practical ties and a decorative scalloped edge.
The project begins at the center with a magic ring and gradually expands through a series of increases. The construction is deliberately repetitive, making it easier to become comfortable with linked double crochet as the triangle grows. A filet-style row periodically interrupts the main texture, providing a visual change and a useful opportunity to practice double crochet, chain spaces, skipped stitches, and the Alternative Turning Chain.
According to the source pattern, the completed bandana measures 12.5 x 21 inches, with a gauge of 5 ldc x 2 rows = 1 square inch. The specified materials are one skein of Mary Maxim Sunrise in Desert, a 3.75mm hook, scissors, and a tapestry needle.

Before You Pick Up Your Hook
This is a relatively compact crochet project, but its construction includes several details that are important to preserve. The most useful approach is to understand the architecture of the bandana before beginning the first row.
The center starts with a magic ring. The first five rows establish the triangular increase pattern using linked double crochet. Row 6 changes to a filet-style construction. After that, the pattern alternates between five repetitions of Row 2 and another Row 6, with the complete repeat occurring three times and the body finishing with five repetitions of Row 2.
The resulting body contains 23 rows. Once those rows are complete, the long edge receives the two straps and the short sides receive the scalloped border.
Pattern Details at a Glance
| Detail | Pattern Information |
|---|---|
| Yarn | Mary Maxim Sunrise |
| Color | Desert |
| Quantity | 1 skein |
| Hook | 3.75mm |
| Gauge | 5 ldc x 2 rows = 1 square inch |
| Finished Size | 12.5 x 21 inches |
| Body | 23 rows |
Materials You Need
The supply list is intentionally short. Have the following materials ready:
- Mary Maxim Sunrise in Desert — 1 skein
- 3.75mm crochet hook
- Scissors
- Tapestry needle
The project does not call for additional buttons, fasteners, beads, or separate decorative components. The straps and scalloped border are worked as part of the finishing process.
Understanding the Stitch Language
Before beginning, it helps to have the abbreviations in front of you. The pattern uses both familiar crochet terminology and the linked double crochet stitch that gives the project its name.
- mr = magic ring
- dc = double crochet
- ch = chain
- sl st = slip stitch
- ldc = linked double crochet
- ATC = Alternative Turning Chain
The scalloped border is worked using this exact repeat: *1 sc into first st, sk 1 st, then 5 dc in the next st, sk 1 st, repeat from *.
The source also identifies ATC as Alternative Turning Chain, or stacked single crochet.
Three Pattern Notes to Keep Beside You
Do Not Count the Initial CH2 as a Stitch
The pattern specifically notes that none of the first CH2s count as a stitch. They are there to help start the LDC. This is one of the first details worth highlighting because it affects how you read the first part of the repeated rows.
Pay Attention to the Central Connection
After a chain space is created, the pattern instructs you to crochet a DC and then connect the next LDC to the newly made DC. This linked connection is part of the construction and should be followed exactly.
Row 6 Does Not Use LDC
The filet crochet row is intentionally different. The source notes that there are no LDCs in this row. Instead, the row uses DCs and ATC. Afterward, all CH1s are counted as one stitch.
Start with the Magic Ring
The magic ring forms the center from which the triangle grows. Once your magic ring is ready, begin the first row.
Row 1 — Create the Center
CH2, 4 LDC, CH2, 1 DC, 3 LDC in the ring; tighten ring and turn.
The row places all of these stitches directly into the ring. After completing them, tighten the ring and turn.
Keep the opening CH2 separate in your mind from the actual stitch count. It is a starting chain for the LDC rather than a counted stitch.
Establishing the Increase Pattern
The second row is where the triangular growth becomes more apparent. The increases happen at both outer ends, while the central ch2 space forms the key middle point of the triangle.
Row 2
CH2, 2 LDC in the first st, 1 LDC in each LDC until ch2 sp; [2LDC, CH2, 1 DC, 1 LDC] (the ldc is connected to the dc) in ch2 sp; LDC in each dc until last LDC; 2 LDC in last LDC, turn.
There are several useful checkpoints in this row. Begin with the non-counting CH2, place 2 LDC in the first stitch, work through the LDCs until the center chain-2 space, complete the specified central sequence, continue across, and finish with 2 LDC in the final LDC.
The two outer increases and the central construction work together to expand the triangle.
Rows 3–5
As row 2.
Rows 3, 4, and 5 repeat the same construction. The simplicity of this repetition is helpful because it allows you to concentrate on consistent stitch placement and the linked crochet technique.

Take a Break at Row 6
Row 6 is an excellent place to pause and carefully read the instructions before crocheting. The fabric changes because this is the filet crochet row, not another linked double crochet row.
Row 6 — Filet Crochet Construction
[1 ATC, CH 1, 1 DC] in the first st, *CH 1, SK 1, 1 DC, repeat from * until the ch2 sp; [1 DC, CH 1, 1 DC, CH 1] in ch2 sp; **1 DC, CH 1, SK 1, repeat from ** until last LDC, [1 DC, CH 1, 1 DC] in the last LDC, turn.
The row uses a repeating combination of chain spaces, skipped stitches, and double crochets. At the center ch2 space, follow the specified group exactly.
Once the row is complete, the pattern gives a specific counting instruction:
Now count all CH 1’s as 1 st.
This instruction prepares the work for the return to the Row 2 construction.
Managing the 23-Row Body
The body can feel easier to manage if you divide it into repeat sections rather than viewing all 23 rows as one continuous sequence.
After Row 6, the pattern tells you to repeat Row 2 five times and then repeat Row 6. This sequence is repeated three times, and the piece ends with five repetitions of Row 2.
The structure is therefore:
- Rows 1–5: linked double crochet construction.
- Row 6: filet crochet row.
- Row 2 repeated five times.
- Row 6.
- Row 2 repeated five times.
- Row 6.
- Row 2 repeated five times.
- Finish with Row 2 repeated five times.
The complete construction results in 23 rows. A row counter or handwritten checklist can help you keep track of each repetition while preserving the exact pattern sequence.
Keeping Your Work Consistent
Linked crochet rewards consistent attention to where the next stitch connects. If the fabric starts looking unexpectedly loose or distorted, return to the specific instruction for the current row rather than changing the stitch count.
The most important landmarks are the first stitch, the center ch2 space, and the final LDC. The repeated Row 2 instructions place increases at the first and last points, while the center receives the special linked construction.
The gauge of 5 ldc x 2 rows = 1 square inch provides the stated reference for the finished fabric. The intended finished size is 12.5 x 21 inches.
When to Check Your Triangle
You do not need to wait until the final row to look at the shape. The growing triangle gives you several opportunities to make sure the construction is behaving as expected.
After repeating Row 2, look for the general triangular expansion created by the increases. If the two outer edges are developing differently, check the beginning and ending increases before continuing.
At each Row 6, expect the fabric to look different because the filet-style construction creates chain spaces. The change in appearance is intentional and should not be treated as an error.
Working the First Strap
Once the 23-row body is complete, the pattern moves into the straps and border.
Start with the first strap by making chain 40. From the second chain from the hook, work 1 sc per chain.
After completing that chain section, crochet evenly along the long edge of the triangle, working 2 sc’s per ldc.
This creates the first tie while simultaneously finishing the long edge of the bandana.
Repeat the Strap Construction
The second strap is crocheted in the same way as the first one. Begin with another chain 40, then work 1 sc per chain starting from the second chain from the hook before continuing along the long edge as directed.
Keeping the two straps identical in their starting construction helps produce a balanced finished bandana. There is no need to invent a separate measurement for the second strap; the pattern explicitly says to crochet it the same way as the first.
Adding the Decorative Scalloped Edge
The short sides of the triangle are finished with a scalloped border. This gives the bandana a softer decorative edge and provides a clear finishing detail around the two short sides.
Use the following repeat:
*1 sc into first st, sk 1 st, then 5 dc in the next st, sk 1 st, repeat from *
The structure is simple to remember: one single crochet, skip one, five double crochets in the next stitch, skip one, and repeat.
The five double crochets grouped together create each scallop. Work the sequence along the short sides as specified.
Finishing and Weaving in the Ends
After the border is complete, fasten off and weave in the ends. The tapestry needle from the materials list is useful for this final stage.
Although the project is small, clean finishing makes a significant difference to the final appearance. Secure the yarn ends and weave them in carefully so that the bandana is ready to be worn without loose tails distracting from the border or triangle.

A Practical Way to Organize the Pattern
If you are working from the written instructions, it can help to divide your notes into three stages: construction, texture change, and finishing.
Construction Stage
Rows 1–5 establish and enlarge the triangle using linked double crochet. Row 2 becomes the main repeat, with increases at the outer edges and the characteristic center sequence.
Texture-Change Stage
Row 6 introduces the filet-style section. It uses ATC, DC, CH1, and skipped stitches rather than LDC. After this row, remember that the CH1s count as one stitch.
Finishing Stage
After the 23-row body is complete, add the two chain-40 straps, work along the long edge at 2 sc’s per ldc, add the scalloped border to the short sides, fasten off, and weave in the ends.
Troubleshooting the Triangle
The Triangle Is Growing Unevenly
Start by checking whether both outer increases have been completed as written. In Row 2, 2 LDC are worked into the first stitch and 2 LDC into the last LDC.
The Center Does Not Look Right
Check the ch2 space in Row 2. The specified sequence is [2LDC, CH2, 1 DC, 1 LDC], with the LDC connected to the DC.
I Accidentally Counted the Starting CH2
The source specifically says that the first CH2s do not count as stitches. If you have counted them, return to the relevant row and compare the stitch placement with the written instructions.
Row 6 Looks Very Different
That difference is intentional. Row 6 is the filet crochet row and contains no LDCs. Its open chain-space structure is part of the design.
I Lost My Place in the Repeats
Use the 23-row structure as a checkpoint. Mark each completed Row 6 and keep track of the five Row 2 repeats that follow it. This makes it easier to resume the project after a break.
Why This Is a Useful Linked Crochet Practice Project
The project has a useful balance between repetition and variety. The repeated LDC rows allow you to become familiar with linked crochet, while Row 6 breaks up the rhythm and introduces a different stitch arrangement.
Because the finished object is a bandana, you can see the effect of the technique in a wearable piece rather than practicing on a swatch that has no final purpose. The triangular shape also provides an immediate visual reference as the rows grow.
The project is especially suitable for someone interested in learning more about linked crochet while keeping the overall project manageable. The source pattern itself describes the bandana as a small, simple project and presents it as a good starting point for those who are new to linked crochet.
Frequently Asked Questions
What size is the completed bandana?
The finished size is 12.5 x 21 inches.
What yarn color is specified?
The pattern specifies Mary Maxim Sunrise in Desert.
How much yarn is needed?
The pattern calls for 1 skein.
Which hook size should be used?
The specified crochet hook is 3.75mm.
What is the gauge?
The stated gauge is 5 ldc x 2 rows = 1 square inch.
How many rows are in the bandana?
The repeat structure results in 23 rows, with the project finishing with five repetitions of Row 2.
How are the straps started?
Each strap starts with chain 40. From the second chain from the hook, work 1 sc per chain.
How is the long edge crocheted?
The finishing instructions specify 2 sc’s per ldc along the long edge.
What type of border is used?
The short sides receive a scalloped border consisting of 1 sc, skip 1 stitch, 5 dc in the next stitch, skip 1 stitch, and repeat.
Final Pattern Checklist
- Prepare Mary Maxim Sunrise in Desert, 1 skein.
- Use a 3.75mm hook.
- Begin with a magic ring.
- Remember that the first CH2s do not count as stitches.
- Work Rows 1–5 according to the written instructions.
- Work Row 6 as the filet crochet row using DCs and ATC.
- Count CH1s as one stitch after Row 6.
- Follow the specified Row 2 and Row 6 repeat structure.
- Complete the 23-row body.
- Make the first strap with CH 40.
- Work 1 sc per chain from the second chain from the hook.
- Work 2 sc’s per ldc along the long edge.
- Make the second strap the same way.
- Add the scalloped border to the short sides.
- Fasten off and weave in the ends.
Ready to Wear Your Handmade Bandana
Once the final ends have been woven in, the project is complete and ready to wear. The finished triangle offers two functions in one small handmade accessory: it can help keep hair away from the face while also adding a decorative crochet detail to an outfit.
The linked double crochet fabric gives the bandana its central character, while the filet-style rows and scalloped border provide additional visual interest. The straps complete the practical construction and allow the triangular piece to be tied into place.
For anyone interested in learning linked crochet, this project provides a clear progression from a magic-ring center to a growing triangular fabric, through a contrasting filet section, and finally into a simple but attractive finishing stage. By following the original stitch counts, row sequence, measurements, and finishing instructions carefully, you can create the same 12.5 x 21-inch linked crochet bandana described in the pattern.