
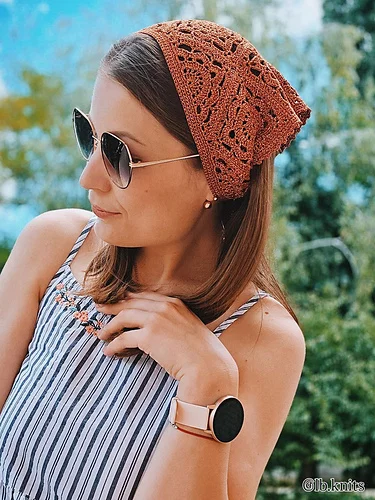
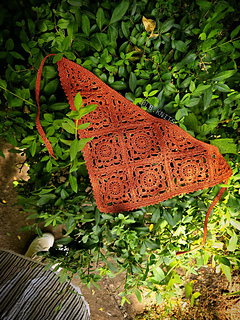
If you love crochet accessories that combine an elegant handmade appearance with a clearly structured construction, the LB.KNITS crochet bandana is a beautiful project to explore. This one-size design is built from separate motifs that are joined into a single fabric before the edging and ties are added. The result is a lightweight triangular-style head accessory with a decorative motif surface and long ties for wearing and adjusting the finished piece.
What Makes This Bandana Construction Special?
Rather than crocheting the entire accessory as one continuous piece from beginning to end, this pattern begins with individual motifs. The foundation of the project consists of 6 whole motifs and 4 half motifs. These pieces are then brought together with a joining stitch to create one unified fabric. Once the main fabric is complete, the pattern moves into the edging, followed by the two ties and the final finishing process.
This construction approach is particularly useful for crocheters who enjoy working with repeatable components. Each motif can be completed individually, giving you a chance to become familiar with its structure before moving on to the joining stage. At the same time, the half motifs have a specific role in shaping the final fabric and should not be treated as interchangeable with the whole motifs.
The original pattern recommends making 6 whole motifs according to Scheme 1 and 4 half motifs according to Scheme 2. The motifs are then connected according to Scheme 3. The joining sequence is important: the pattern specifies working first in the direction shown by the red arrows and then in the direction shown by the green arrows.
Project Specifications at a Glance
Before starting, it is helpful to keep all of the original project information together. The recommended yarn is Cofil S.R.L art. Minerva, with a specification of 380 m per 100 g, worked in one strand. The recommended crochet hook is 2.25 mm. The additional tools are a needle and scissors.
- Pattern: КОСИНКА LB.KNITS
- Designer: Liliya Bardiievska / LB.KNITS
- Date shown in the source: July 2025
- Yarn: Cofil S.R.L art. Minerva, 380 m/100 g
- Yarn construction: One strand
- Crochet hook: 2.25 mm
- Additional tools: Needle and scissors
- Size: ONE SIZE
- Designer sample head circumference: 56 cm
- Finished height: 25 cm
- Finished width: 49 cm
- Ties: 30 cm each
- Yarn usage: 42 g
- Whole motifs: 6
- Half motifs: 4
The source does not provide a numerical gauge, so no separate gauge measurement should be added to this project. Likewise, the source does not specify a color-change sequence, safety eyes, nose, mouth, or other amigurumi-style components because this is a wearable accessory rather than a stuffed figure.
Prepare Before You Crochet
Preparation is especially useful for a motif-based project. Set out the 2.25 mm hook, the recommended Cofil S.R.L art. Minerva yarn, a needle, and scissors. Because the finished design depends on multiple motifs being joined together, it is worth keeping the completed pieces organized as you work.
A simple way to stay organized is to separate the 6 whole motifs from the 4 half motifs. This prevents the two motif types from becoming mixed together and makes the joining stage easier to manage. You do not need to change the pattern or introduce additional stitch counts; the goal is simply to keep the components identifiable until they are ready to be joined.
Another useful preparation step is to make sure your working area gives you enough room to lay motifs next to one another. This becomes important when following Scheme 3 because the joining is performed in two directional stages. The source specifically instructs the crocheter to join using a joining stitch, first following the red-arrow direction and then following the green-arrow direction.
Stage One: Build the Six Whole Motifs
The first major checkpoint is the completion of the 6 whole motifs. These are made according to Scheme 1. At this point, the objective is not to assemble the bandana immediately but to complete the required number of whole components before moving to the half motifs and joining stage.
Working on individual motifs gives you an opportunity to pay close attention to the visual structure shown in the source. Keep your tension as consistent as possible from one motif to the next. Consistency is helpful because the motifs will eventually become one continuous fabric, and noticeable differences between pieces can make joining less comfortable.
There is no need to invent additional rounds, modify the motif, or simplify the construction. The source provides Scheme 1 as the reference for the whole motif, so follow that scheme exactly. If you are using the written article as a companion to the original pattern, keep the source scheme available while crocheting because the diagram contains the construction information for this component.
Stage Two: Complete the Four Half Motifs
After the 6 whole motifs, prepare the 4 half motifs according to Scheme 2. These pieces are essential to the final shape and are not simply smaller versions to be substituted for whole motifs. Their purpose is connected to how the assembled fabric transitions into the edging.
Once again, keeping the four half motifs together as a separate group can make the next stage much easier. When all 10 components are ready, you can compare them with the intended construction before beginning the joining process.
Joining the Motifs Into One Fabric
The joining stage is one of the most important structural parts of this design. The source instructs you to join the motifs with a joining stitch as shown in Scheme 3. The order matters: first work in the direction indicated by the red arrows, and then continue in the direction indicated by the green arrows.
For a beginner, it can be tempting to connect whichever edges appear closest or most convenient. However, the visual arrangement of the motifs is part of the construction, so it is better to use Scheme 3 as the authority for the exact joining route. Keep the components positioned according to the diagram before beginning the joining stitch.
Work calmly through the joining stage. If you notice that a motif is twisting, stop and reposition it before continuing. This is not a new instruction from the source but a practical way to avoid making the joining process more difficult. The original technical requirement remains unchanged: the pieces are joined with a joining stitch according to Scheme 3, first along the red-arrow direction and then along the green-arrow direction.
When the joining is finished, the separate motifs become one fabric. This is an important visual checkpoint because the project now changes from individual motif work to edge finishing.
Understanding the Edging Section
Once the motifs have been united, the next task is the edging. The source states that the bandana is worked with turning rows as shown in Scheme 4. In row 3, picots are made according to Scheme 5.
The edging should therefore be approached as its own distinct stage rather than treated as an afterthought. Keep Scheme 4 and Scheme 5 close by while working. The diagrams determine the edging structure and the location of the picots.
A particularly important transition occurs in row 3. The source instructs that in row 3 you move to working the edging around the 4 half motifs. At the end of row 3, the yarn is cut. This transition leads directly into the construction of the ties.
Row 3 Checkpoint: The Transition to the Ties
The third-row transition is worth treating as a dedicated checkpoint. Before cutting the yarn at the end of row 3, make sure the edging has been completed according to the source diagrams and that you have reached the section around the 4 half motifs.
The source then instructs you to make 80 п.сб. This is part of the original tie construction and should be preserved exactly rather than replaced with a guessed equivalent. Crochet terminology can vary between pattern systems and languages, so retaining the source abbreviation is the safest way to keep the technical instruction faithful.
First Tie: Row 1
The tie section begins with a specific sequence. In row 1, work 80 ст.б.н. for the first tie. Attach it to the bandana as shown by the yellow arrow in Scheme 4. Then work the N quantity of ст.б.н. on the bandana from the side of the 4 half motifs.
The source then instructs you not to cut the yarn. Continue by making 80 п.сб. for the second tie, and turn the work to the wrong side, indicated in the source as вив.с.
This sequence is worth reading completely before beginning because the first tie is not treated as an isolated piece. The working yarn continues through the central bandana section and into the second tie. Cutting the yarn at the wrong point would interrupt the construction described in the pattern.
Second Tie and Repeated Rows
Row 2 begins with 80 ст.б.н. for the second tie. After that, work сб.б.н. to the end of the first tie. The source then instructs you to repeat row 2 two more times.
After the additional two repetitions of row 2 are complete, cut the working yarn and hide all ends. This completes the crocheted construction of the ties and brings the project to the finishing stage.
Why Finishing Matters for This Project
The source includes a detailed wet-finishing section, and this step is important because the completed accessory is a wearable item whose final appearance benefits from careful finishing. The pattern recommends that the first wash preferably be done by hand and says that drying on blockers is optional.
Before wet finishing, hide the ends on the wrong side, but do not cut the yarn at this point. This instruction should be followed before washing so that the loose ends are controlled during the finishing process.
Wet Finishing: The Original Sequence
Prepare a basin with water at approximately 30–35°C. Add a detergent intended for wool or silk, and leave the item in the water for 15 minutes.
After 15 minutes, remove the bandana from the soapy water and gently remove excess water. Avoid treating the wet accessory roughly. The source specifically calls for careful removal of excess water rather than aggressive wringing.
Next, rinse the item in clean water at approximately 30–35°C and carefully remove the excess water again.
Place the bandana on a towel and roll the towel and item into a roll. Press the resulting roll slightly. The towel absorbs excess moisture from the project, leaving the bandana semi-wet.
Once the excess moisture has been removed in this way, carefully lay the item on a horizontal surface and allow it to dry.
Final End Treatment
After the bandana is completely dry, the source instructs you to cut the ends on the wrong side, leaving approximately 3 mm. This final trimming should therefore happen only after drying, not before the wet-finishing process.
The source also says that you may steam the finished item with an iron or steamer if desired. This step is optional. It should be considered a finishing choice rather than a modification to the crocheted structure.
Keeping the Finished Measurements in Perspective
The finished size given by the source is 25 cm in height and 49 cm in width, with ties of 30 cm. The pattern is listed as ONE SIZE, and the designer’s sample was made for a head circumference of 56 cm.
These measurements provide useful checkpoints when evaluating the completed project. However, the pattern does not instruct the crocheter to alter the motif count to create another size. Therefore, the safest approach is to preserve the stated construction of 6 whole motifs and 4 half motifs rather than attempting to add or remove components.
The yarn consumption listed by the source is 42 g. The recommended yarn is Cofil S.R.L art. Minerva at 380 m/100 g, worked in one strand. Keeping the recommended yarn specification and hook size together is important because both are part of the original technical setup.
Common Construction Checkpoints
- Material checkpoint: Cofil S.R.L art. Minerva, 380 m/100 g, one strand.
- Hook checkpoint: 2.25 mm.
- Motif checkpoint: 6 whole motifs according to Scheme 1.
- Half-motif checkpoint: 4 half motifs according to Scheme 2.
- Joining checkpoint: use a joining stitch according to Scheme 3.
- Joining order: red-arrow direction first, then green-arrow direction.
- Edging checkpoint: turning rows according to Scheme 4.
- Picot checkpoint: picots in row 3 according to Scheme 5.
- Row 3 transition: move to the edging of the 4 half motifs.
- First tie: 80 ст.б.н. in row 1.
- Second tie: 80 ст.б.н. in row 2.
- Row repetition: repeat row 2 two more times.
- Final finishing: hide all ends, wet finish, dry, then trim ends to approximately 3 mm on the wrong side.
Beginner-Friendly Ways to Avoid Mistakes
The most useful habit for this pattern is to separate the different stages mentally. First complete the motifs. Then join them. Then work the edging. Then construct the ties. Finally, complete the wet finishing. Keeping these stages distinct makes the pattern much easier to follow.
Another useful habit is to check the number of components before joining. You should have 6 whole motifs and 4 half motifs. This simple count can prevent confusion later.
During joining, do not rely on an improvised layout. Use Scheme 3 and follow its two indicated directions. The red arrows come first, followed by the green arrows.
When reaching the edging, remember that row 3 contains the picot instruction from Scheme 5 and also marks the transition to the edging of the 4 half motifs. This is one of the key points where the project changes from general edging work to the tie construction.
Finally, do not rush the finishing process. The source provides a complete sequence involving soaking, rinsing, towel rolling, horizontal drying, and optional steaming. Following that sequence carefully gives the finished bandana time to settle into its final form.
Styling and Wearing the Finished Bandana
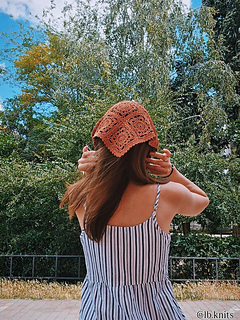
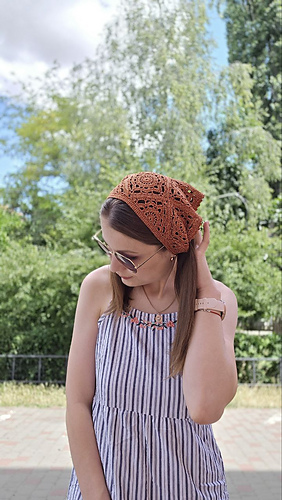
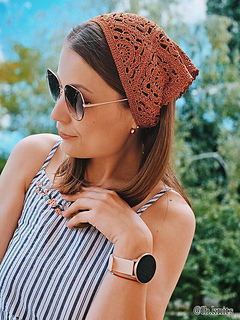
The finished accessory is designed as a wearable bandana with two ties, each specified as 30 cm in the finished size description. The triangular construction makes it suitable for tying around the head, while the motif texture gives it a distinctly handmade appearance.
The photographs of the finished piece show how the accessory can be worn from different angles. The back view emphasizes the shape and ties, while side and front views demonstrate how the fabric sits around the head. Because the project is ONE SIZE and the designer sample has a 56 cm head circumference, these images also provide useful visual context for the stated finished measurements.
A Practical Workflow for the Whole Project
If you are following this design for the first time, think of the project as a sequence of checkpoints rather than one large task. Begin by preparing the recommended yarn and 2.25 mm hook. Make the 6 whole motifs from Scheme 1, followed by the 4 half motifs from Scheme 2. Once all components are ready, arrange them and follow Scheme 3 for the joining sequence.
After the main fabric is united, move to the edging and work the turning rows according to Scheme 4. Follow Scheme 5 for the picots in row 3. During row 3, transition to edging the 4 half motifs. At the end of that row, cut the yarn and continue with the specified 80 п.сб. instruction.
Work row 1 with 80 ст.б.н. for the first tie, attach it as shown by the yellow arrow in Scheme 4, work the N quantity of ст.б.н. on the bandana from the 4 half motif side, and continue without cutting the yarn into the second tie. Make 80 п.сб. for the second tie and turn the work to the wrong side.
For row 2, work 80 ст.б.н. of the second tie and then crochet сб.б.н. to the end of the first tie. Repeat row 2 two more times. Finally, cut the working yarn and hide all ends.
Finishing Checklist Before You Call It Complete
- Confirm that the main fabric contains the required 6 whole motifs and 4 half motifs.
- Confirm that the motifs have been joined according to Scheme 3, following the red-arrow direction first and the green-arrow direction second.
- Check the edging against Scheme 4.
- Check the row 3 picots against Scheme 5.
- Confirm the transition to edging the 4 half motifs in row 3.
- Complete the first and second ties according to the specified instructions.
- Repeat row 2 two additional times.
- Cut the working yarn and hide all ends.
- Before wet finishing, hide the ends on the wrong side without cutting them.
- Wash in approximately 30–35°C water with wool/silk detergent for 15 minutes.
- Rinse in clean approximately 30–35°C water.
- Remove excess moisture gently using the towel-roll method.
- Lay the item horizontally and allow it to dry.
- Once completely dry, trim the ends on the wrong side, leaving approximately 3 mm.
- If desired, steam the finished bandana with an iron or steamer.
Frequently Asked Questions
What yarn does the original pattern recommend?
The recommended yarn is Cofil S.R.L art. Minerva, specified as 380 m/100 g and worked in one strand. The source lists yarn usage as 42 g.
What crochet hook size is required?
The source recommends a 2.25 mm crochet hook.
What size does the finished bandana measure?
The stated finished measurements are 25 cm in height and 49 cm in width, plus ties of 30 cm. The pattern is ONE SIZE, and the designer’s sample had a head circumference of 56 cm.
How many motifs are needed?
The construction begins with 6 whole motifs and 4 half motifs. The whole motifs follow Scheme 1 and the half motifs follow Scheme 2.
How are the motifs joined?
The motifs are joined into one fabric with a joining stitch according to Scheme 3. The source specifies following the red-arrow direction first and then the green-arrow direction.
When are the picots added?
Picots are made in row 3 according to Scheme 5.
How long are the ties?
The finished size description specifies ties of 30 cm. The construction instructions include the specified 80-stitch sequences for the tie work.
Does the source provide a gauge?
No numerical gauge is provided in the source, so no gauge measurement should be assumed or added.
Is wet finishing required?
The source provides wet-finishing instructions and recommends that the first wash preferably be done by hand. Drying on blockers is optional. The finishing process also includes soaking, rinsing, towel drying, horizontal drying, and optional steaming.
Final Thoughts on the LB.KNITS Bandana
The LB.KNITS crochet bandana is a satisfying project for crocheters who enjoy combining motif work with careful assembly and decorative finishing. Its construction is clearly divided into several stages: 6 whole motifs, 4 half motifs, motif joining, turning-row edging, picots, ties, end management, and wet finishing.
The most important principle when working this pattern is to respect the sequence. The individual motifs establish the foundation, the joining stitch transforms them into a single fabric, and the edging creates the finished border before the ties complete the wearable design. The finishing process then gives the completed piece its final treatment.
With a recommended 2.25 mm hook, Cofil S.R.L art. Minerva yarn at 380 m/100 g worked in one strand, and a listed yarn consumption of 42 g, the project has a clearly defined material setup. The finished measurements of 25 cm high by 49 cm wide, plus 30 cm ties, provide useful reference points for the completed accessory.
As you work, keep the original schemes available, especially Scheme 3 for joining, Scheme 4 for the edging and tie attachment, and Scheme 5 for the row 3 picots. Paying close attention at these checkpoints will help preserve the intended construction without changing the original technical instructions.
The source identifies the pattern as being for individual non-commercial use only and states that sale, copying, publication, and distribution are prohibited. The original source also provides the Instagram account @lb.knits and the hashtag #косинка_з_lbknits for finished works.
Once the final wet finishing is complete, the ends have been trimmed to approximately 3 mm on the wrong side, and the optional steaming has been done if desired, the crochet bandana is ready to wear. The combination of individual motifs, structured joining, delicate edging, and long ties creates a distinctive handmade accessory that can be enjoyed as a focused crochet project from start to finish.