
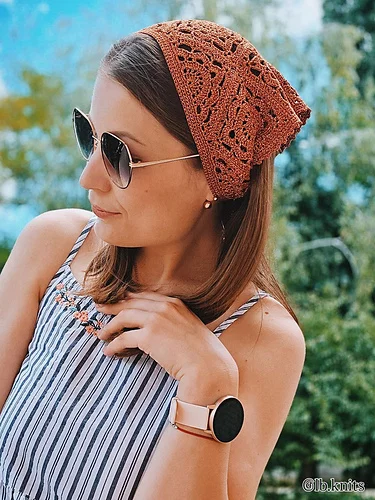
The LB.KNITS crochet bandana is a delicate triangular accessory built from lace motifs and finished with a decorative border and long ties. Its openwork appearance gives the finished piece an elegant, lightweight character, while the motif-based construction creates a beautiful geometric surface that is especially noticeable when the bandana is laid flat.
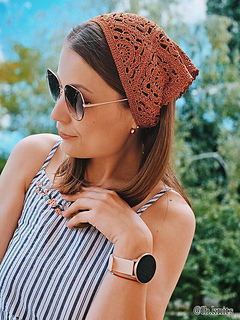
This design was created by Liliya Bardievska of LB.KNITS and the original pattern is dated July 2025. It is a ONE SIZE design, with the designer noting a 56 cm head circumference for the sample. The completed bandana measures 25 cm in height and 49 cm in width, plus ties measuring 30 cm.
Unlike a simple triangular project worked continuously from one point, this bandana is assembled from separate components. The original instructions call for 6 whole motifs made from Scheme 1 and 4 half motifs made from Scheme 2. These pieces are joined into one fabric with a joining stitch according to Scheme 3. The outer edge is then worked with turning rows, picots are introduced in the third row according to Scheme 5, and the ties are created using the stitch quantities specified in the pattern.
This tutorial takes a construction-focused approach. Instead of simply listing the stages, it explains how the different sections fit together, where to pause and check the work, and how to move from the individual lace motifs to the finished wearable bandana while preserving the original technical information.
Project Specifications
Before beginning, gather the materials and keep the original measurements and quantities available throughout the project. The source provides a concise materials list and a specific construction sequence.
- Pattern size: ONE SIZE
- Sample head circumference: 56 cm
- Finished height: 25 cm
- Finished width: 49 cm
- Tie length: 30 cm
- Yarn: Cofil S.R.L art. Minerva
- Yarn specification: 380 m/100 g
- Yarn construction: One strand
- Yarn quantity: 42 g
- Crochet hook: 2.25 mm
- Additional tools: Needle and scissors
The original source does not provide a numerical gauge in the supplied pattern document, so no additional gauge measurement is introduced here. The design is presented as a single-color sample, and the source does not specify a separate color-change sequence.
Understanding the Finished Shape
The finished bandana has a triangular form designed to sit over the hair. The main surface is composed of repeated lace motifs, giving the fabric its decorative appearance. The upper portion can rest around the head while the pointed lower portion extends toward the back.
The ties are attached at the lower sides of the construction and provide the practical means of securing the bandana. The source specifies 30 cm ties in the finished measurements, while the construction itself creates them through the 80-stitch sections described in the tie instructions.
Looking at the finished accessory before beginning can make the construction easier to visualize. The motif arrangement forms the body, the edging follows the triangular outline, and the ties extend from the lower section.
How the Construction Is Divided
The entire project can be understood as four major parts:
- Motif preparation: 6 whole motifs and 4 half motifs.
- Assembly: joining the motifs according to Scheme 3.
- Edging: turning-row border with picots in the third row.
- Ties and finishing: two tie sections followed by end hiding and wet finishing.
This division is useful because each stage has its own diagram or instructions. Scheme 1 is used for the whole motifs, Scheme 2 for the half motifs, Scheme 3 for joining, Scheme 4 for the edging and tie attachment, and Scheme 5 for the picot detail.
Stage One: Create the Six Whole Motifs
The first component of the bandana is the set of whole lace motifs. The original instructions specify 6 whole motifs made according to Scheme 1.
When beginning the first motif, take time to become familiar with the chart. Since this is a lace-based project, the diagram controls the shape and decorative structure of the motif. Rather than trying to translate it into an alternative construction, use Scheme 1 as the direct technical reference.
After completing the first whole motif, keep it nearby as a visual comparison while making the remaining five. This is especially useful because the motifs will eventually be joined together. Consistency between the individual components helps the assembled fabric maintain a coherent appearance.
Once all six whole motifs are complete, keep them together and move to the half motifs. There is no need to assemble the pieces yet; completing all of the components first gives you a clearer view of the complete construction.
Stage Two: Make the Four Half Motifs
The next step is to make 4 half motifs according to Scheme 2.
These half motifs are essential to the triangular shape. They are not optional decorative pieces. Their placement allows the whole motifs to form the larger triangular fabric represented in the construction diagram.
As with the six whole motifs, use the first half motif as a visual reference for the remaining three. Keep the four half motifs separate from the whole motifs until you are ready to arrange all ten pieces for assembly.
At this point, the project should consist of exactly:
- 6 whole motifs from Scheme 1.
- 4 half motifs from Scheme 2.
Having all ten components completed before joining provides a useful checkpoint. It allows you to inspect the pieces individually and become familiar with their shapes before they are connected.
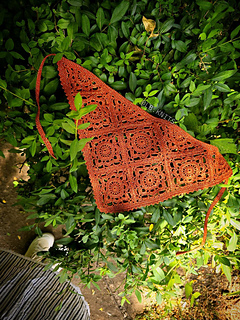
Stage Three: Prepare for Motif Assembly
Once the six whole motifs and four half motifs are complete, arrange them according to Scheme 3.
This diagram is especially important because it shows the direction of the joining process. The source instructs you to begin in the direction of the red arrows and then continue in the direction of the green arrows.
Before making the first joining stitch, place the motifs flat and compare their arrangement with the diagram. This makes it easier to identify the edges that need to be connected and reduces the chance of joining the wrong sections.
Because the final shape is triangular, it is useful to think of the assembly as building the larger fabric from the smaller components. The whole motifs provide the repeated decorative sections, while the half motifs help complete the outside edges.
Stage Four: Join the Motifs
The original pattern specifies that the motifs are joined using a joining stitch. Follow Scheme 3 and work first along the red-arrow direction, followed by the green-arrow direction.
Try to keep the motifs flat while joining. Lace pieces can shift slightly when handled, so periodically placing the developing bandana on a flat surface can make the overall shape easier to evaluate.
The joining process is not simply an assembly convenience. It is part of the design structure. The relationship between the motifs and the joining lines contributes to the geometric appearance of the finished bandana.
Once the joins are complete, inspect the triangular fabric before moving to the border. This is the best point to make sure the entire motif arrangement is correct because the next stage begins to define the outside edge.
Motif Assembly Checkpoint
Before beginning the edging, confirm the following:
- There are 6 complete motifs.
- There are 4 half motifs.
- The ten pieces have been arranged according to Scheme 3.
- The joining stitch has been used.
- The red-arrow direction was completed first.
- The green-arrow direction was completed second.
- The resulting fabric has the intended triangular arrangement.
This checkpoint does not introduce any additional pattern instructions. It simply gives you a practical moment to verify the construction before moving on.
Stage Five: Begin the Turning-Row Edging
After the motifs have been joined, begin the edging using turning rows as shown in Scheme 4.
The border follows the outer shape of the triangular fabric. At this point, the bandana begins to take on the appearance seen in the finished photographs, because the decorative outer edge frames the central motif arrangement.
Follow the direction of Scheme 4 carefully. The source uses the diagram to show the route of the edging around the triangular form and later uses it to indicate the position where the first tie is attached.
Working the border consistently is particularly important because the edging will remain visible around the finished bandana.
Stage Six: Add the Picots
The original instructions specify that picots are worked in the 3rd row according to Scheme 5.
Scheme 5 should be treated as the direct reference for this decorative detail. The picots provide a delicate finish that complements the openwork texture of the motifs.
During this third row, the instructions also transition to edging the 4 ½ motif section. This section becomes important for the tie construction that follows.
At the end of the third row, the original instructions say to cut the yarn.
Before cutting it, check the third-row edging carefully. Confirm that the picot detail has been worked according to Scheme 5 and that the edging has reached the correct section for the tie construction.
Stage Seven: Start the First Tie
After cutting the yarn at the end of the third row, make 80 p.s.b. for the first tie.
Then work Row 1. The source specifies 80 ст.б.н. for the first tie. Attach the first tie to the bandana at the location shown by the yellow arrow in Scheme 4.
After the attachment, work N quantity of ст.б.н. on the bandana from the side of the 4 ½ motif.
The use of the letter N is important. The source does not provide a numerical value for N in the supplied instructions. Therefore, it should not be replaced with a guessed stitch count.
Continue without cutting the yarn.
Stage Eight: Form the Second Tie
After completing the specified bandana section, make another 80 p.s.b. for the second tie.
Then turn the work to the wrong side.
This change of orientation is explicitly included in the original instructions. Keeping track of the right and wrong sides is therefore useful during this stage.
Stage Nine: Work Row 2
For Row 2, work 80 ст.б.н. for the second tie. Then work сб.б.н. to the end of the first tie.
After completing Row 2, repeat it 2 more times.
The repeated rows complete the tie construction. Avoid adding extra rows if you are reproducing the original design, since the source specifies this exact repeat sequence.
When the final repeat has been completed, cut the working yarn and hide all ends.
Understanding the Tie Measurements
The finished pattern gives the ties as 30 cm in length. The construction instructions, however, describe the tie sections using specific stitch quantities.
The first tie begins with 80 p.s.b., followed by 80 ст.б.н. in Row 1. The bandana section is described as N quantity of ст.б.н. from the 4 ½ motif side. The second tie then begins with another 80 p.s.б., and Row 2 contains 80 ст.б.н. for the second tie before continuing to the end of the first tie.
Row 2 is then repeated twice more. These instructions should be followed exactly rather than converted into an alternative tie construction.
Final Crochet Construction Check
Before wet finishing the project, review the complete crochet construction from beginning to end.
- 6 whole motifs from Scheme 1 are complete.
- 4 half motifs from Scheme 2 are complete.
- The motifs are joined using the specified joining stitch.
- The red-arrow joining direction is complete.
- The green-arrow joining direction is complete.
- The turning-row edging from Scheme 4 is complete.
- Picots are present in the third row according to Scheme 5.
- The edging has reached the 4 ½ motif section.
- The first tie begins with 80 p.s.b.
- Row 1 contains 80 ст.б.н. for the first tie.
- The first tie is attached according to the yellow arrow in Scheme 4.
- The N quantity of ст.б.н. is worked from the 4 ½ motif side.
- The second tie begins with 80 p.s.б.
- The work has been turned to the wrong side.
- Row 2 contains 80 ст.б.н. for the second tie.
- Row 2 continues to the end of the first tie with сб.б.н.
- Row 2 has been repeated two additional times.
- The working yarn has been cut.
- All ends have been hidden.
Wet Finishing Instructions
The original LB.KNITS pattern includes a detailed wet-finishing procedure. The first wash is preferably done by hand, and drying on blockers is optional.
Before wet finishing, hide the ends on the wrong side without cutting the yarn. This preparation is specifically included in the source instructions.
Fill a basin with water at approximately 30–35°C. Add a washing product intended for wool/silk and leave the bandana in the water for 15 minutes.
After 15 minutes, remove the bandana from the soapy water and carefully remove excess water. Since the finished piece contains delicate lacework, handle it gently during the entire washing process.
Rinse at the Same Temperature Range
After washing, rinse the finished bandana in clean water at approximately 30–35°C. Carefully remove the excess water again.
The original instructions do not call for aggressive squeezing or twisting. The next stage uses a towel to draw moisture from the fabric.
Use a Towel to Remove Moisture
Place the bandana on a towel and roll it into a cylinder or roll together with the towel. Apply a little pressure to the resulting roll.
The towel absorbs excess moisture from the crochet fabric. According to the source, this process leaves the bandana semi-wet.
Carefully unroll the towel and remove the bandana without pulling on the lace edges.
Dry the Bandana Flat
After the towel step, carefully lay the bandana on a horizontal surface and allow it to dry.
The source notes that drying on blockers is optional. If blockers are used, handle the piece gently and maintain the intended shape of the original triangular design.
Once the bandana is completely dry, cut the ends on the wrong side, leaving approximately 3 mm of end.
The pattern also allows optional steaming with an iron or steamer after the piece is dry.
Why Careful Finishing Is Useful for Lace Crochet
The openwork structure of this bandana makes the finishing stage particularly noticeable. The motifs and border create many spaces and decorative edges, so gentle washing and careful drying help preserve the appearance of the finished fabric.
The original pattern provides all of the important finishing parameters: hand washing, approximately 30–35°C water, a wool/silk washing product, 15 minutes in the washing water, rinsing at approximately 30–35°C, towel rolling to remove moisture, flat drying, optional blocker drying, trimming to approximately 3 mm, and optional steaming.
Following this sequence keeps the finishing process faithful to the original design.
How to Keep the Motif Assembly Organized
One of the easiest ways to make a motif project more manageable is to keep the individual pieces organized before joining. The six whole motifs can be kept together as one group, while the four half motifs can remain in another group.
When all ten pieces are complete, place them on a flat surface before starting the joins. This gives you a chance to compare the physical layout with Scheme 3.
During assembly, work through the red-arrow direction first. Once that section is complete, move to the green-arrow direction. If you become uncertain about the next join, return to the diagram instead of improvising.
How to Approach the Lace Edging
The border stage is easier to understand if you separate the overall route from the decorative stitch detail. Scheme 4 shows the general edging path, while Scheme 5 focuses on the picot arrangement.
The third row is especially important because it contains the picots and also moves the construction toward the 4 ½ motif section. This section leads directly into the tie construction.
Before moving from the edging to the ties, make sure the third row has been completed and the yarn has been cut as directed.
Important Numbers to Keep Nearby
Several numerical details appear throughout the original construction. Keeping them in one place can make it easier to check your progress without changing the instructions.
- 2.25 mm: crochet hook size
- 42 g: yarn consumption
- 6: whole motifs
- 4: half motifs
- 25 cm: finished height
- 49 cm: finished width
- 30 cm: finished tie length
- 80 p.s.b.: first tie section
- 80 ст.б.н.: first tie in Row 1
- N: bandana stitch quantity specified by the source
- 80 p.s.б.: second tie section
- 80 ст.б.н.: second tie in Row 2
- 2 more times: Row 2 repeat
- 30–35°C: washing and rinsing temperature
- 15 minutes: washing time
- 3 mm: approximate end remaining after trimming
A Visual Look at the Completed Shape
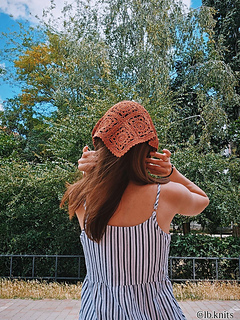
The back view makes the geometry of the finished project particularly easy to appreciate. The lace motifs form the central triangular fabric, while the outer border frames the shape and the ties extend from the lower sides.
This view also demonstrates how the bandana is intended to sit over the hair. The triangular point extends toward the back while the upper edge follows the head.
Styling the Finished Bandana
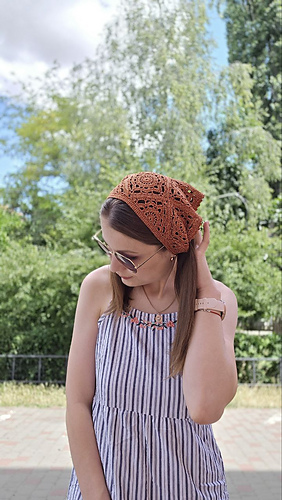
The original photographs show the accessory worn with a simple striped summer dress. The warm rust-colored crochet contrasts nicely with the lighter clothing and allows the lacework to become the main visual detail.
The bandana can be positioned so that the decorative motifs remain visible over the hair. The ties provide a practical way to secure the accessory while preserving the triangular silhouette.
From the side, the lace edge creates a soft decorative frame around the head. From the back, the full triangular shape and motif arrangement become more prominent.
Beginner-Friendly Workflow
If you are new to motif crochet, avoid thinking about the entire project at once. Begin with one whole motif and learn its chart. Once it is complete, use it as a visual reference for the other five.
Then move to the half motifs. After all ten pieces are complete, arrange them together before making any joins.
The assembly can then be treated as a separate task. Follow Scheme 3 and its two joining directions. Once the main fabric is complete, the edging becomes the next focused stage.
Finally, work the ties exactly as written and move to the wet-finishing instructions.
This approach does not modify the original pattern. It simply divides the project into smaller checkpoints so that each part can receive your full attention.
Common Construction Questions
What if the motifs look slightly different?
Use the first completed motif as a visual reference and return to the appropriate chart. The original source does not provide an alternative measurement system, so do not invent a new measurement to compensate.
What should I do if the joining sequence is unclear?
Return to Scheme 3. The source specifically directs you to follow the red arrows first and then the green arrows.
Which diagram should I use for the border?
Use Scheme 4 for the overall turning-row edging and Scheme 5 for the picot detail in the third row.
What happens at the end of the third row?
The edging transitions to the 4 ½ motif section. At the end of the third row, cut the yarn and begin the 80 p.s.b. section for the first tie.
What does N mean in Row 1?
The source states N quantity of ст.б.н. on the bandana from the 4 ½ motif side but does not provide a numerical value in the supplied instructions. Therefore, N should not be replaced with an invented number.
How many times should Row 2 be repeated?
Complete Row 2 once and then repeat it two more times.
What is the finished size?
The original design is ONE SIZE. The sample has a 56 cm head circumference, and the finished bandana measures 25 cm high and 49 cm wide, plus 30 cm ties.
Care Instructions from the Original Pattern
The first wash is preferably performed by hand. Use water at approximately 30–35°C and a washing product intended for wool or silk. Leave the bandana in the water for 15 minutes, then carefully remove excess water.
Rinse it in clean water at approximately 30–35°C. Place it on a towel, roll it into a roll, and press gently so the towel absorbs excess moisture.
Lay the semi-wet bandana flat on a horizontal surface and allow it to dry. Drying on blockers is optional. After the piece is completely dry, trim the ends on the wrong side, leaving approximately 3 mm.
If desired, steam the finished bandana with an iron or steamer.
Quick Reference: Complete Pattern Workflow
- Prepare Cofil S.R.L art. Minerva yarn, 380 m/100 g, one strand.
- Use a 2.25 mm crochet hook.
- Make 6 whole motifs according to Scheme 1.
- Make 4 half motifs according to Scheme 2.
- Arrange the motifs according to Scheme 3.
- Join the motifs with a joining stitch.
- Follow the red-arrow joining direction first.
- Follow the green-arrow joining direction second.
- Begin the turning-row edging according to Scheme 4.
- Work picots in the third row according to Scheme 5.
- Continue around the 4 ½ motif section.
- Cut the yarn at the end of the third row.
- Make 80 p.s.b. for the first tie.
- Work Row 1 with 80 ст.б.н. for the first tie.
- Attach the first tie according to the yellow arrow in Scheme 4.
- Work N quantity of ст.б.н. on the bandana from the 4 ½ motif side.
- Do not cut the yarn.
- Make 80 p.s.б. for the second tie.
- Turn the work to the wrong side.
- Work Row 2 with 80 ст.б.н. for the second tie.
- Work сб.б.н. to the end of the first tie.
- Repeat Row 2 two more times.
- Cut the working yarn.
- Hide all ends.
- Hand wash in approximately 30–35°C water.
- Leave in the washing solution for 15 minutes.
- Rinse in clean 30–35°C water.
- Remove excess moisture with a towel roll.
- Dry flat on a horizontal surface.
- Optionally dry on blockers.
- Trim the wrong-side ends to approximately 3 mm after drying.
- Optionally steam the finished bandana.
Frequently Asked Questions
Is the LB.KNITS bandana one size?
Yes. The original pattern lists the size as ONE SIZE and notes a 56 cm head circumference for the designer’s sample.
What yarn is used?
The recommended yarn is Cofil S.R.L art. Minerva, 380 m per 100 g, worked with one strand.
How much yarn is required?
The source specifies 42 g.
What crochet hook should be used?
The pattern specifies a 2.25 mm crochet hook.
How many whole motifs are needed?
Six whole motifs are made according to Scheme 1.
How many half motifs are needed?
Four half motifs are made according to Scheme 2.
How are the motifs joined?
They are joined using a joining stitch according to Scheme 3. The red-arrow direction is completed first, followed by the green-arrow direction.
When are the picots added?
Picots are worked in the third row according to Scheme 5.
What are the finished dimensions?
The finished bandana is 25 cm high, 49 cm wide, and has 30 cm ties.
How long are the ties?
The finished measurements specify 30 cm ties. The construction uses the 80-stitch sections described in the original instructions.
How many times is Row 2 repeated?
Row 2 is repeated two more times after the first completion.
Can the bandana be blocked?
Yes. The original source says that drying on blockers is optional.
Can the finished piece be steamed?
Yes. After it has completely dried, the source says that the bandana may optionally be steamed with an iron or steamer.
Final Thoughts
The LB.KNITS crochet bandana is a beautiful example of motif-based lace crochet transformed into a practical accessory. Its construction combines six whole motifs, four half motifs, a carefully directed joining process, a turning-row border, decorative picots, and two ties.
The most useful way to approach this project is to respect the stages individually. Complete the motifs first, arrange all ten components, follow the joining directions in Scheme 3, then move to the border and picot work. Once the edging reaches the 4 ½ motif section, follow the specified tie construction carefully, including the 80-stitch sections and the two additional Row 2 repeats.
The wet-finishing stage completes the project. Hand washing at approximately 30–35°C, a 15-minute soak with a wool/silk washing product, careful rinsing, towel rolling, flat drying, optional blocker drying, and optional steaming are all part of the original finishing instructions.
The final result is a lightweight triangular lace bandana measuring 25 cm in height and 49 cm in width, with 30 cm ties. The openwork motifs give the accessory an intricate handmade appearance, while the triangular shape makes it easy to style over the hair.
The original source identifies the design as a July 2025 LB.KNITS pattern by Liliya Bardievska. It also provides the Instagram reference @lb.knits and the hashtag #косинка_з_lbknits for finished works.
The original document states that the pattern is for individual non-commercial use and that sale, copying, publication, or distribution are prohibited. Respect the designer’s stated usage conditions when working with the original pattern.
With the final ends hidden, the piece washed and dried, and the optional finishing completed, your delicate LB.KNITS crochet bandana is ready to wear and enjoy.
Congratulations on completing this elegant lace motif crochet project!