
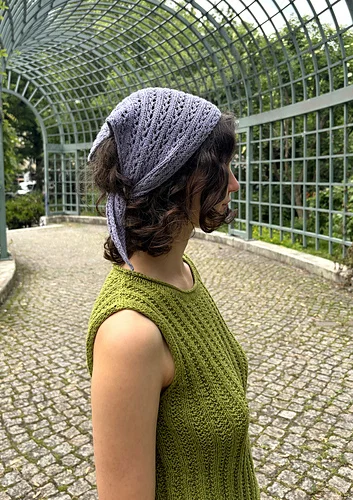
The Garden Vines Bandana is a small knitted accessory, but its construction combines several techniques in a thoughtful sequence. The piece begins at a narrow tip, grows through repeated right-side increases, carries a lace rib pattern across the expanding fabric, and then reverses direction with a carefully selected decrease chart. The result is a triangular bandana with a 90 cm / 36” length and two width options.
What Makes This Pattern Different
One of the most useful features of this design is the way shaping and lace are connected. The increases and decreases are part of the visual structure, so the point where you change from increasing to decreasing matters. The final increase row also determines which decrease chart should be used.
This guide presents the project as a complete construction masterclass. The technical instructions remain faithful to the source pattern, while the surrounding explanations help you understand each stage and keep the work organized.
Pattern Details at a Glance
- Pattern: Garden Vines Bandana Ver 1.3
- Designer: Gerda Wolf / My Knit Projects
- Craft: Knitting
- Size: One size
- Recommended yarn: Sunny Linen by Majo Garn, 50 g = 150 m
- Needles: 3.5 mm / US 4
- Gauge: 30 sts and 28 rows = 10 cm / 4” in lace rib pattern
- Option A: 150 meters / 164 yards
- Option B: 115 meters / 125 yards
- Option A finished size: 90 cm / 36” length and 20 cm / 8” width
- Option B finished size: 90 cm / 36” length and 10 cm / 4” width
Choose Your Version Before Starting
Option A uses 150 meters / 164 yards and reaches 20 cm / 8” in width. Option B uses 115 meters / 125 yards and reaches 10 cm / 4” in width. Both are designed around a 90 cm / 36” finished length.
For a bandana or small triangle scarf, the source recommends a length of at least 80–100 cm / 32–40”. The construction can also be modified by adding repeats for a larger shawl or by working a straight section for a small scarf.
Learn the Chart Symbols First
A blank square means knit on the RS and purl on the WS. A black dot means purl on the RS and knit on the WS. An open circle represents yarn over. Diagonal decrease symbols represent ssk and k2tog. Grey squares represent no stitch. The edge symbol means slip 1 purlwise with yarn at the back on the RS and yarn in front on the WS. Increase symbols represent m1l and m1lp.
Essential Abbreviations
- CO = Cast on
- k = Knit
- k2tog = Knit 2 together
- k3tog = Knit 3 together
- ssk = Slip, slip, knit
- m1l / m1lp = Make 1 left / make 1 left purlwise
- p = Purl
- p2tog = Purl 2 together
- RS = Right side
- sl2 k1 p2sso = Slip 2 sts knitwise, k1, pass two slipped stitches over
- sl2p wyif = Slip 2 sts purlwise with yarn in front
- st(s) = Stitch(es)
- WS = Wrong side
- yo = Yarn over
Build the First Point: Rows 1–21
- Row 1 (WS): Sl2p wyif, p1, sl2p wyif.
- Row 2 (RS): K5.
- Row 3: Sl2p wyif, p1, sl2p wyif.
- Row 4: K2, p1, m1lp, k2.
- Row 5: Sl2p wyif, k2, sl2p wyif.
- Row 6: K2, p1, m1l, p1, k2.
- Row 7: Sl2p wyif, k1, p1, k1, sl2p wyif.
- Row 8: K2, p1, m1l, k1, p1, k2.
- Row 9: Sl2p wyif, k1, p2, k1, sl2p wyif.
- Row 10: K2, p1, m1lp, k2tog, yo, p1, k2.
- Row 11: Sl2p wyif, k1, p2, k2, sl2p wyif.
- Row 12: K2, p1, m1l, p1, yo, ssk, p1, k2.
- Row 13: Sl2p wyif, k1, p2, k1, p1, k1, sl2p wyif.
- Row 14: K2, p1, m1l, k1, p1, k2tog, yo, p1, k2.
- Row 15: Sl2p wyif, k1, p2, k1, p2, k1, sl2p wyif.
- Row 16: K2, p1, m1lp, k2, p1, yo, ssk, p1, k2.
- Row 17: Sl2p wyif, k1, p2, k1, p2, k2, sl2p wyif.
- Row 18: K2, p1, m1l, p1, k2, p1, k2tog, yo, p1, k2.
- Row 19: Sl2p wyif, k1, p2, k1, p2, k1, p1, k1, sl2p wyif.
- Row 20: K2, p1, m1l, k1, p1, k2, p1, yo, ssk, p1, k2.
- Row 21: Sl2p wyif, k1, p2, k1, p2, k1, p2, k1, sl2p wyif.
Entering the Main Lace Rib Repeat
- Row 1 (RS): K2, p1, m1lp, k2tog, yo, *p1, k2, p1, k2tog, yo* repeat to 3 sts before end, p1, k2.
- Row 2 (WS): Sl2p wyif, k1, *p2, k1* repeat to 3 sts before end, k1, sl2p wyif.
- Row 3: K2, p1, m1l, p1, yo, ssk, *p1, k2, p1, yo, ssk* repeat to 3 sts before end, p1, k2.
- Row 4: Sl2p wyif, k1, *p2, k1* repeat to 4 sts before end, p1, k1, sl2p wyif.
- Row 5: K2, p1, m1l, k1, p1, k2tog, yo, *p1, k2, p1, k2tog, yo* repeat to 3 sts before end, p1, k2.
- Row 6: Sl2p wyif, k1, *p2, k1* repeat to 5 sts before end, p2, k1, sl2p wyif.
- Row 7: K2, p1, m1lp, k2, p1, yo, ssk, *p1, k2, p1, yo, ssk* repeat to 3 sts before end, p1, k2.
- Row 8: Sl2p wyif, k1, *p2, k1* repeat to 3 sts before end, k1, sl2p wyif.
- Row 9: K2, p1, m1l, *p1, k2, p1, k2tog, yo* repeat to 3 sts before end, p1, k2.
- Row 10: Sl2p wyif, k1, *p2, k1* repeat to 4 sts before end, p1, k1, sl2p wyif.
- Row 11: K2, p1, m1l, k1, *p1, k2, p1, yo, ssk* repeat to 3 sts before end, p1, k2.
- Row 12: Sl2p wyif, k1, *p2, k1* repeat to 5 sts before end, p2, k1, sl2p wyif.
For Option A, work rows 1–12 until halfway to the desired length or until half of the yarn has been used. In the sample, the increasing section stopped after reaching 71 stitches on a row 6 repeat.
For Option B, stop after row 12 with 26, 32, or 38 stitches to preserve the lace rib symmetry, then work the straight section before beginning the decreases.
The Decrease Transition
The transition from increasing to decreasing follows a specific sequence. Match the final wrong-side increase row with the first right-side decrease row as follows:
- Last WS increase Row 2 → First RS decrease Row 1
- Last WS increase Row 4 → First RS decrease Row 11
- Last WS increase Row 6 → First RS decrease Row 9
- Last WS increase Row 8 → First RS decrease Row 7
- Last WS increase Row 10 → First RS decrease Row 5
- Last WS increase Row 12 → First RS decrease Row 3
If the last RS increase row used k2tog-yo, use Chart 3 for rows 1, 5, and 9 and Chart 4 for rows 3, 7, and 11. If the last RS increase row used yo-ssk, use Chart 4 for rows 1, 5, and 9 and Chart 3 for rows 3, 7, and 11. Once selected, continue with that same chart and do not switch.
Chart 3 Decrease Sequence
- R1 RS: K2, p1, yo, sl2 k1 p2sso, *p1, k2, p1, yo, ssk* repeat to 3 sts before end, p1, k2.
- R2 WS: Sl2p wyif, *k1, p2* repeat to 3 sts before end, k1, sl2p wyif.
- R3: K2, p1, k2tog, *p1, k2, p1, k2tog, yo* repeat to 3 sts before end, p1, k2.
- R4: Sl2p wyif, *k1, p2* repeat to 5 sts before end, k1, p1, k1, sl2p wyif.
- R5: K2, p1, p2tog, k2, p1, yo, ssk, *p1, k2, p1, yo, ssk* repeat to 3 sts before end, p1, k2.
- R6: Sl2p wyif, *k1, p2* repeat to 4 sts before end, k2, sl2p wyif.
- R7: K2, p1, k2tog, k1, p1, k2tog, yo, *p1, k2, p1, k2tog, yo* repeat to 3 sts before end, p1, k2.
- R8: Sl2p wyif, *k1, p2* repeat to 3 sts before end, k1, sl2p wyif.
- R9: K2, p1, k2tog, p1, yo, ssk, *p1, k2, p1, yo, ssk* repeat to 3 sts before end, p1, k2.
- R10: Sl2p wyif, *k1, p2* repeat to 5 sts before end, k1, p1, k1, sl2p wyif.
- R11: K2, p1, p2tog, k2tog, yo, *p1, k2, p1, k2tog, yo* repeat to 3 sts before end, p1, k2.
- R12: Sl2p wyif, *k1, p2* repeat to 4 sts before end, k2, sl2p wyif.
Repeat Chart 3 until 13 stitches remain, then move to Chart 5.
Chart 4 Decrease Sequence
- R1 RS: K2, p1, k3tog, yo, *p1, k2, p1, k2tog, yo* repeat to 3 sts before end, p1, k2.
- R2 WS: Sl2p wyif, *k1, p2* repeat to 3 sts before end, k1, sl2p wyif.
- R3: K2, p1, k2tog, *p1, k2, p1, yo, ssk* repeat to 3 sts before end, p1, k2.
- R4: Sl2p wyif, *k1, p2* repeat to 5 sts before end, k1, p1, k1, sl2p wyif.
- R5: K2, p1, p2tog, k2, p1, k2tog, yo, *p1, k2, p1, k2tog, yo* repeat to 3 sts before end, p1, k2.
- R6: Sl2p wyif, *k1, p2* repeat to 4 sts before end, k2, sl2p wyif.
- R7: K2, p1, k2tog, k1, p1, yo, ssk, *p1, k2, p1, yo, ssk* repeat to 3 sts before end, p1, k2.
- R8: Sl2p wyif, *k1, p2* repeat to 3 sts before end, k1, sl2p wyif.
- R9: K2, p1, k2tog, p1, k2tog, yo, *p1, k2, p1, k2tog, yo* repeat to 3 sts before end, p1, k2.
- R10: Sl2p wyif, *k1, p2* repeat to 5 sts before end, k1, p1, k1, sl2p wyif.
- R11: K2, p1, p2tog, yo, ssk, *p1, k2, p1, yo, ssk* repeat to 3 sts before end, p1, k2.
- R12: Sl2p wyif, *k1, p2* repeat to 4 sts before end, k2, sl2p wyif.
Repeat Chart 4 until 9 stitches remain, then move to Chart 6.
Final Chart 5: 17 Rows
- Row 1 (RS): K2, p1, p2tog, k2, p1, yo, ssk, p1, k2.
- Row 2 (WS): Sl2p wyif, k1, p2, k1, p2, k2, sl2p wyif.
- Row 3: K2, p1, k2tog, k1, p1, k2tog, yo, p1, k2.
- Row 4: Sl2p wyif, k1, p2, k1, p2, k1, sl2p wyif.
- Row 5: K2, p1, k2tog, p1, yo, ssk, p1, k2.
- Row 6: Sl2p wyif, k1, p2, k1, p1, k1, sl2p wyif.
- Row 7: K2, p1, p2tog, k2tog, yo, p1, k2.
- Row 8: Sl2p wyif, k1, p2, k2, sl2p wyif.
- Row 9: K2, p1, yo, sl2 k1 p2sso, p1, k2.
- Row 10: Sl2p wyif, k1, p2, k1, sl2p wyif.
- Row 11: K2, p1, k2tog, p1, k2.
- Row 12: Sl2p wyif, k1, p1, k1, sl2p wyif.
- Row 13: K2, p1, p2tog, k2.
- Row 14: Sl2p wyif, k2, sl2p wyif.
- Row 15: K2, k2tog, k2.
- Row 16: Sl2p wyif, p1, sl2p wyif.
- Row 17: Bind off all sts.
Final Chart 6: 17 Rows
- Row 1 (RS): K2, p1, p2tog, k2, p1, k2tog, yo, p1, k2.
- Row 2 (WS): Sl2p wyif, k1, p2, k1, p2, k2, sl2p wyif.
- Row 3: K2, p1, k2tog, k1, p1, yo, ssk, p1, k2.
- Row 4: Sl2p wyif, k1, p2, k1, p2, k1, sl2p wyif.
- Row 5: K2, p1, k2tog, p1, k2tog, yo, p1, k2.
- Row 6: Sl2p wyif, k1, p2, k1, p1, k1, sl2p wyif.
- Row 7: K2, p1, p2tog, yo, ssk, p1, k2.
- Row 8: Sl2p wyif, k1, p2, k2, sl2p wyif.
- Row 9: K2, p1, yo, k3tog, p1, k2.
- Row 10: Sl2p wyif, k1, p2, k1, sl2p wyif.
- Row 11: K2, p1, k2tog, p1, k2.
- Row 12: Sl2p wyif, k1, p1, k1, sl2p wyif.
- Row 13: K2, p1, p2tog, k2.
- Row 14: Sl2p wyif, k2, sl2p wyif.
- Row 15: K2, k2tog, k2.
- Row 16: Sl2p wyif, p1, sl2p wyif.
- Row 17: Bind off all sts.
Five Habits That Make This Pattern Easier
- Record the last increase row. This determines the correct decrease transition.
- Keep the chart key nearby. Similar lace symbols are easier to identify when the key is immediately available.
- Use row numbers as checkpoints. The 12-row repeats are easier to manage when treated as individual blocks.
- Check the edge treatment regularly. The sl2p wyif instructions are repeated throughout the pattern.
- Do not switch decrease charts randomly. The source specifically connects the chart choice to the last RS increase row.
Common Troubleshooting Points
The stitch count seems wrong
First check whether the problem began on a right-side increase row. The m1l or m1lp creates a new stitch, while the decrease and yarn-over sequence controls the lace structure. Then inspect the edge stitches.
The lace holes are not lining up
Look specifically at the yarn overs and their paired decreases. The pattern uses both k2tog-yo and yo-ssk arrangements in specific rows. A missed yarn over or misplaced decrease can shift the visual column.
The decrease transition is confusing
Return to the last RS increase row. Identify whether it used k2tog-yo or yo-ssk, then apply the corresponding chart rule. Also use the six explicit transition pairings instead of choosing the first decrease row by appearance.
The finished size differs from the sample
The source states that the measurements are based on the sample and that yarn and needle choice can change the measurements. The stated gauge is 30 stitches and 28 rows = 10 cm / 4” in lace rib on 3.5 mm / US 4 needles.
Quick Project Checklist
- One size
- Sunny Linen by Majo Garn: 50 g = 150 m
- Needles: 3.5 mm / US 4
- Gauge: 30 sts and 28 rows = 10 cm / 4”
- Option A: 150 meters / 164 yards
- Option A width: 20 cm / 8”
- Option B: 115 meters / 125 yards
- Option B width: 10 cm / 4”
- Length: 90 cm / 36” for both options
- Option A sample increase checkpoint: 71 stitches on a row 6 repeat
- Option B stopping counts: 26, 32, or 38 stitches after row 12
- Chart 3 stopping point: 13 stitches
- Chart 4 stopping point: 9 stitches
- Final charts: 17 rows
- Final action: Bind off all sts on row 17
Frequently Asked Questions
Is Garden Vines Bandana a crochet pattern?
No. It is a knitting pattern using techniques including knitting, purling, yarn overs, increases, decreases, and slipped stitches.
What yarn is recommended?
The recommended yarn is Sunny Linen by Majo Garn, with 50 g = 150 m.
What needle size is specified?
The recommended needles are 3.5 mm / US 4.
What is the stated gauge?
The gauge is 30 stitches and 28 rows = 10 cm / 4” in lace rib pattern on 3.5 mm / US 4 needles.
Can another yarn be used?
The source states that the pattern works with different yarns and needles and even if the stated gauge is not met. Different choices can change the finished measurements.
What are the finished dimensions?
Both options have a finished length of 90 cm / 36”. Option A is 20 cm / 8” wide, while Option B is 10 cm / 4” wide.
Can the design be made larger?
Yes. The construction can be modified by adding repeats for a larger shawl.
Can it be adapted into a small scarf?
Yes. The source notes that a straight section can be worked for a small scarf.
How do I select the decrease chart?
Check the last RS increase row. If it used k2tog-yo, follow the Chart 3 and Chart 4 allocation specified for that sequence. If it used yo-ssk, use the alternate allocation. Once the appropriate chart is selected, continue with that chart.
Final Thoughts
The Garden Vines Bandana rewards careful reading and organized knitting. Its beauty comes from the relationship between the lace rib pattern and the triangular shaping, so preserving that relationship throughout the project is the key to a successful result.
Work the 21-row opening carefully, then treat each 12-row increase repeat as a clear checkpoint. When the time comes to reverse the shaping, record the final increase row and use the exact transition rule from the source. Continue with the appropriate decrease chart until reaching its specified stitch count, then finish with Chart 5 or Chart 6 and bind off all stitches on row 17.
The finished result is a 90 cm / 36” knitted bandana, with either a 20 cm / 8” or 10 cm / 4” width depending on the chosen option, and a distinctive lace rib structure that gives the Garden Vines Bandana its character.