
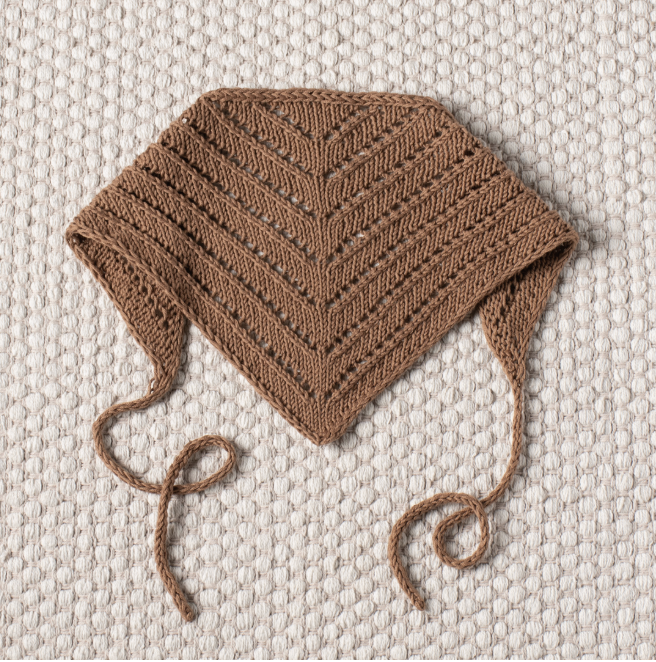
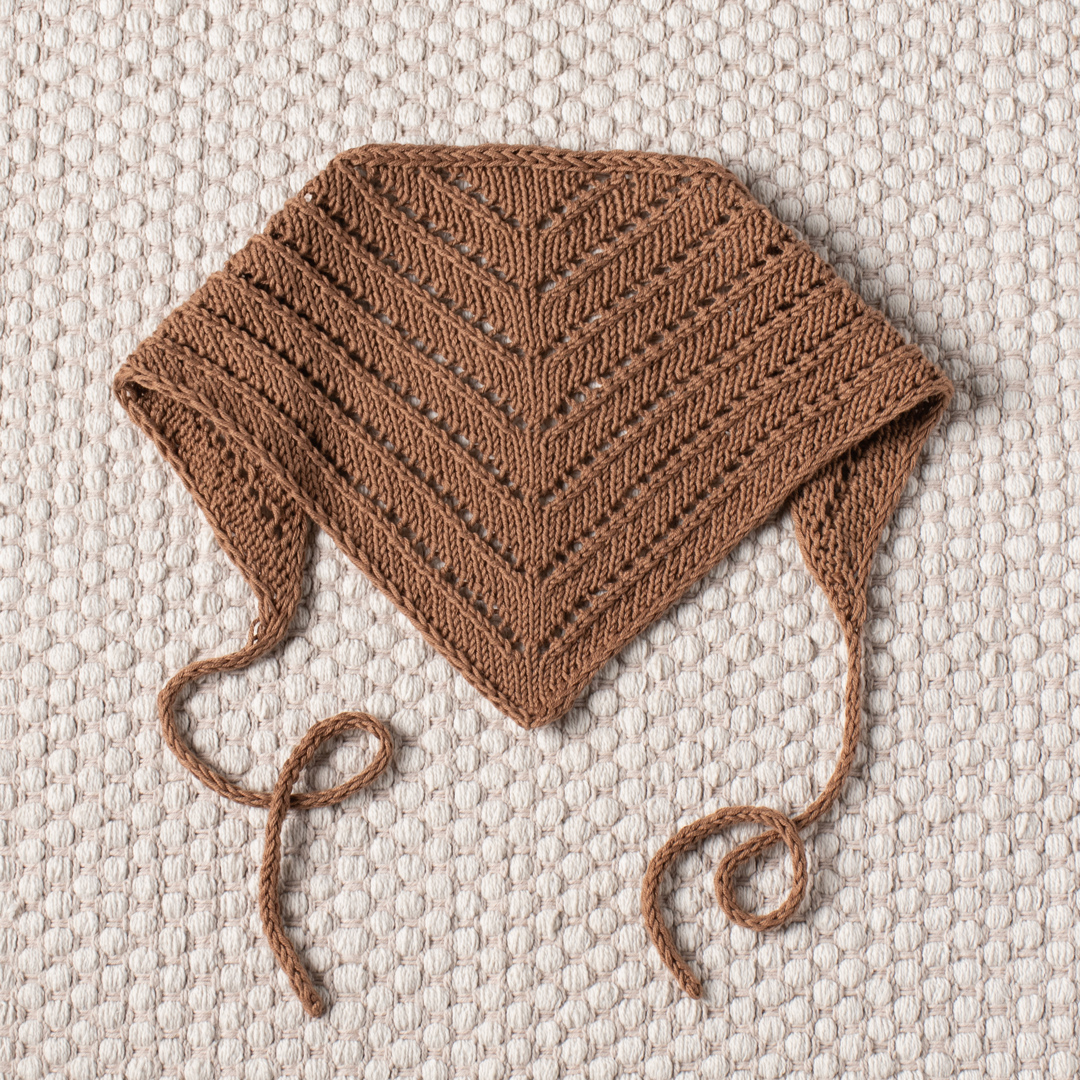
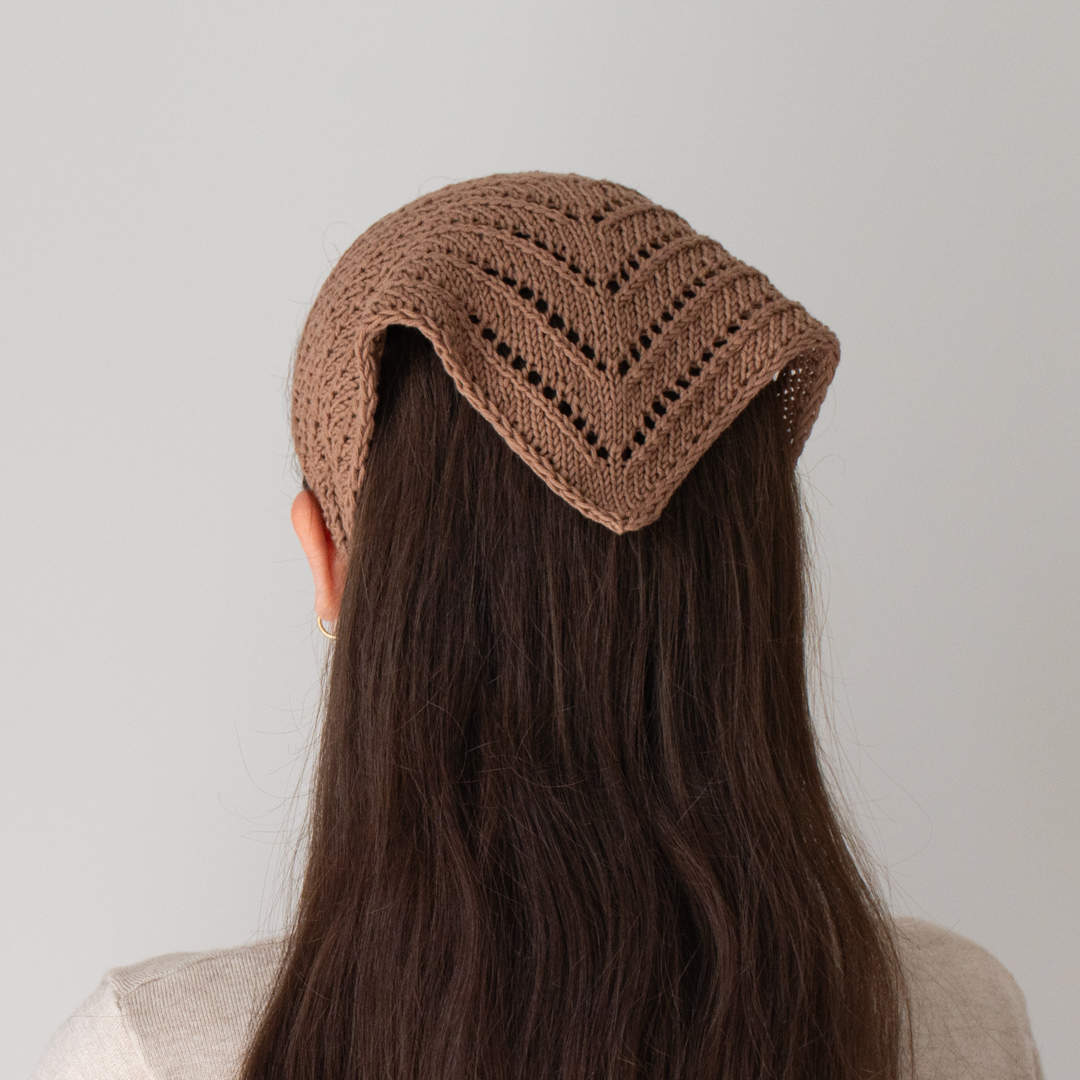
If you are looking for a small knitting project with a polished finished look, the Country Road Bandana offers a lovely combination of simple shaping, delicate eyelets, and practical i-cord finishing. This lightweight summer accessory is knitted from sport-weight cotton yarn and develops from a tiny four-stitch beginning into a triangular bandana with integrated ties.
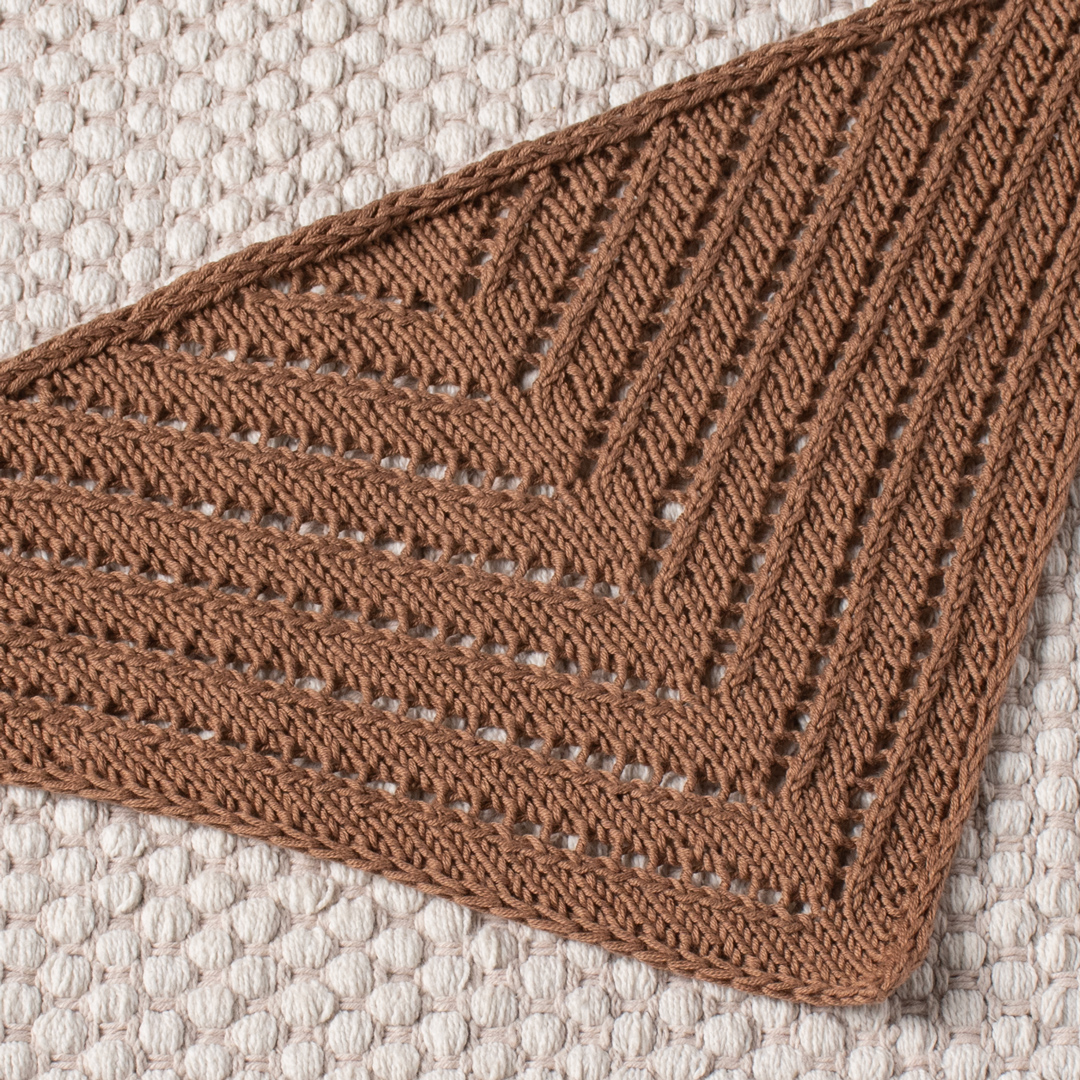
The beauty of this design is in the way the different techniques work together. The triangle grows through increases on the right-side rows, while yarnovers and two types of decreases create the eyelet pattern. A central stitch provides a permanent reference point, and the first and last two stitches create a neat i-cord-style edge.
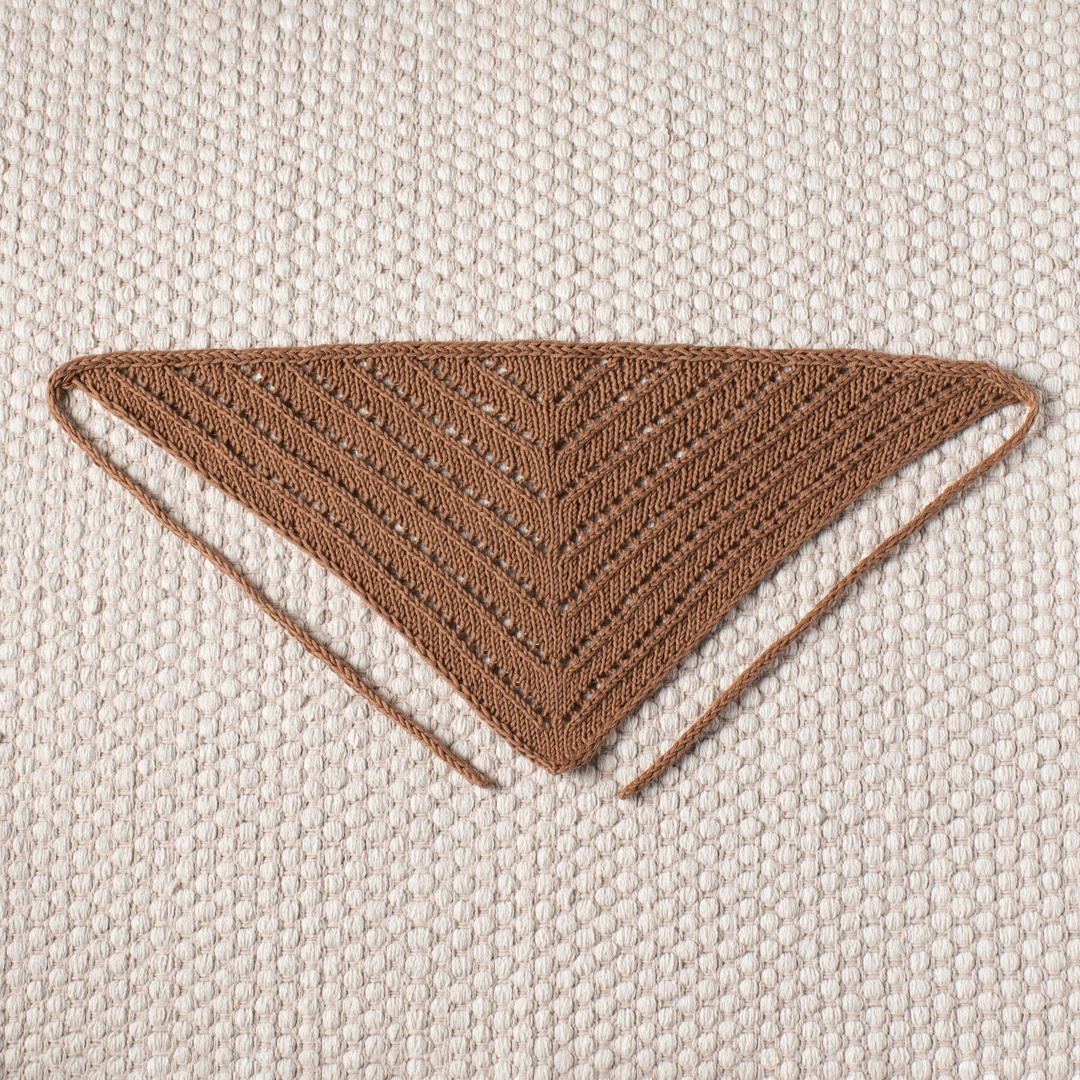
This guide walks through the complete construction while keeping the original technical instructions intact. It covers the materials, gauge, set-up section, central stitch, eyelet rows, first i-cord, integrated edging, second tie, and finishing details. It also includes checkpoints that can make the pattern easier to follow without changing any of its instructions.
Project Overview
The Country Road Bandana is designed in one size. The finished length without the ties is 49cm/19.25in, and the height is 21.5cm/8.5in.
The project is worked back and forth, beginning at the bottom edge. Instead of constructing the bandana from a large cast-on edge, the pattern starts with only four stitches. The fabric gradually becomes wider as yarnovers are added at the edges during the set-up section and later during the main pattern.
Once the triangle reaches the desired length, the live stitches remain on the needle. A separate three-stitch i-cord is then made and connected to the bandana. The same i-cord technique is continued along the edge until three stitches remain, which become the foundation for the second tie.
This means the final ties and border are part of the overall construction rather than separate pieces that need to be attached afterward.
Materials for the Project
- Yarn: Drops Safran in the color almond, uni color 22, 1 ball.
- Main knitting needles: 3mm (US 2.5) knitting needles.
- Tie needles: A pair of 3mm (US 2.5) DPNs.
- Stitch marker: Removable stitch marker.
- Tapestry needle: For weaving in yarn tails.
- Measuring tape: For checking measurements.
- Scissors: For cutting yarn.
The yarn specified by the pattern is sport-weight cotton. The use of the stated needle size and yarn helps establish the intended proportions and fabric characteristics of the original design.
Gauge and Finished Measurements
The gauge is measured in stockinette stitch after blocking:
10 x 10 cm (4 x 4in) = 24 stitches x 32 rows.
The finished bandana is designed as one size with these measurements:
- Length without ties: 49cm/19.25in.
- Height: 21.5cm/8.5in.
The pattern also allows the size to be modified by adding or subtracting repeats. This is particularly useful for adjusting the length of the triangular section while keeping the pattern structure unchanged.
Pattern Language You Need to Know
Before beginning, become familiar with the abbreviations used throughout the instructions.
- CS: Central stitch. Knit on the right side, purl on the wrong side.
- k: Knit.
- k2tog: Knit 2 stitches together.
- p: Purl.
- RS: Right side.
- sl: Slip stitch as if to purl with yarn in front.
- ssk: Slip 1 stitch knitwise, slip the next stitch knitwise, return the 2 stitches back to the left needle, and knit those 2 stitches together through the back loops.
- WS: Wrong side.
- yo: Yarn over.
The pattern also uses asterisks to show repeated instructions. Repeat the instructions between the asterisks as many times as possible before you run out of stitches to work. Since the stitch count changes with each row, the entire sequence is not repeated a fixed number of times.
The Special Role of the I-Cord Edging
The edge treatment is important from the very first row. The first and last two stitches of every row form the i-cord edging.
The instructions are simple:
First two stitches: knit them.
Last two stitches: slip them as if to purl with the yarn in front.
The edge stitches should not be tightened. This point is worth remembering because excessive tension can make the border look narrower or less natural than intended.
The edging also helps prevent the knitted edges from curling, giving the finished triangle a clean outline.
Stage One: Building the Initial Triangle
Begin by casting on 4 stitches.
The first thirteen rows are the set-up section. They gradually increase the number of stitches and prepare the central portion of the bandana for the eyelet pattern.
Set-Up Rows
Row 1 (WS): k2, sl2.
Row 2 (RS): k2, yo, sl2 (5sts).
Row 3: k2, p1, sl2.
Row 4: k2, yo, k1, yo, sl2 (7sts).
Row 5: k2, p to last 2 sts, sl2.
Row 6: k2, yo, k to last 2 sts, yo, sl2 (9sts).
Row 7: k2, p to last 2 sts, sl2.
Row 8: k2, yo, k to last 2 sts, yo, sl2 (11sts).
Row 9: k2, p to last 2 sts, sl2.
Row 10: k2, yo, k to last 2 sts, yo, sl2 (13sts).
Row 11: k2, p to last 2 sts, sl2.
Row 12: k2, yo, k to last 2 sts, yo, sl2 (15sts).
Row 13: k2, p to last 2 sts, sl2.
After row 13, you should have 15 stitches.
Finding and Marking the Central Stitch
After completing the set-up rows, place a removable stitch marker on the Central Stitch (CS). At this stage, the CS is the 8th stitch.
This stitch remains in place throughout the pattern. As the bandana grows, the number of stitches before and after the CS increases with every right-side row.
Think of the central stitch as the fixed midpoint of the triangle. It gives you a reliable place to divide the two sides of the eyelet design and makes it easier to read the changing stitch count.
Stage Two: Working the Eyelet Pattern
The main pattern consists of ten rows. The right-side rows introduce the decorative structure and increase the total stitch count by two. The wrong-side rows are simpler and maintain the i-cord edges.
Work the following rows exactly as written.
Pattern Rows 1–10
Row 1 (RS): k2, yo, *k3, k2tog, yo* to CS, CS, *yo, ssk, k3* to last 2 sts, yo, sl2 (2 sts increased).
Row 2 (WS): k2, p to last 2 sts, sl2.
Row 3: k2, yo, *k3, k2tog, yo* to CS, CS, k1, *yo, ssk, k3* to last 2 sts, yo, sl2 (2 sts increased).
Row 4: k2, p to last 2 sts, sl2.
Row 5: k2, yo, *k3, k2tog, yo* to CS, CS, k2, *yo, ssk, k3* to last 2 sts, yo, sl2 (2 sts increased).
Row 6: k2, p to last 2 sts, sl2.
Row 7: k2, yo, *k3, k2tog, yo* to CS, CS, k3, *yo, ssk, k3* to last 2 sts, yo, sl2 (2 sts increased).
Row 8: k2, p to last 2 sts, sl2.
Row 9: k2, yo, *k3, k2tog, yo* to CS, CS, k4, *yo, ssk, k3* to last 2 sts, yo, sl2 (2 sts increased).
Row 10: k2, p to last 2 sts, sl2.
Repeat rows 1–10 6 more times or until you reach your desired length.
Reading the Eyelet Repeat Correctly
The asterisked sections require special attention. The sequence before the CS is not worked a fixed number of times on every row. Instead, it is repeated according to the number of stitches available before reaching the central stitch.
The same principle applies after the CS. The number of stitches immediately following the central stitch changes on successive right-side rows.
The pattern specifically progresses through these sections:
- Row 1: CS followed by the eyelet sequence.
- Row 3: CS, k1, then the eyelet sequence.
- Row 5: CS, k2, then the eyelet sequence.
- Row 7: CS, k3, then the eyelet sequence.
- Row 9: CS, k4, then the eyelet sequence.
This is why memorizing the first row and repeating it blindly is not recommended. The written pattern is designed to accommodate the changing number of stitches as the triangle becomes larger.
A Note About the Final Stitch Before the CS
There is one additional instruction that is easy to overlook. If your last stitch before the CS is k2tog, also work a yo.
This detail belongs to the original repeat instructions and becomes relevant because the number of stitches changes from row to row. Keep it in mind whenever you reach the central stitch area.
Understanding the Two Decreases
The eyelet pattern uses both k2tog and ssk. They are different techniques and should be worked exactly as specified.
k2tog means knitting two stitches together.
ssk requires you to slip one stitch knitwise, slip the next stitch knitwise, return both stitches to the left needle, and then knit them together through the back loops.
These decreases lean in different directions. Their placement on either side of the central stitch contributes to the visual balance of the eyelet design.
Wrong-Side Rows as Pattern Checkpoints
The wrong-side rows provide a useful opportunity to pause and inspect the project. Rows 2, 4, 6, 8, and 10 all use the same basic instruction:
k2, p to last 2 sts, sl2.
These rows keep the outer edge treatment consistent while allowing you to check that your central stitch and overall triangle are developing as expected.
If something appears incorrect, it is often useful to review the previous right-side row before continuing. The right-side rows are where the decorative yarnovers, decreases, and increases are introduced.
Completing the Main Triangle
Continue repeating the ten-row pattern until you have completed the specified six additional repeats or until you reach your desired length.
When you finish the triangular portion, break the yarn while leaving a 10cm (4″) long tail.
Set the bandana aside with the stitches still on the needle. Do not bind off these stitches because they will be incorporated into the i-cord edging.
Stage Three: Making the First I-Cord Tie
The first tie is made with three stitches using a pair of 3mm (US 2.5) DPNs.
Cast on 3 stitches and do not turn.
Repeat the following two-step movement:
Slip the 3 stitches to the right side of the needle. Knit 3.
Continue until the i-cord tube measures approximately 30 cm.
Do not cut the yarn at this point. The working yarn continues directly into the joining and edging stage.
Joining the I-Cord and Bandana
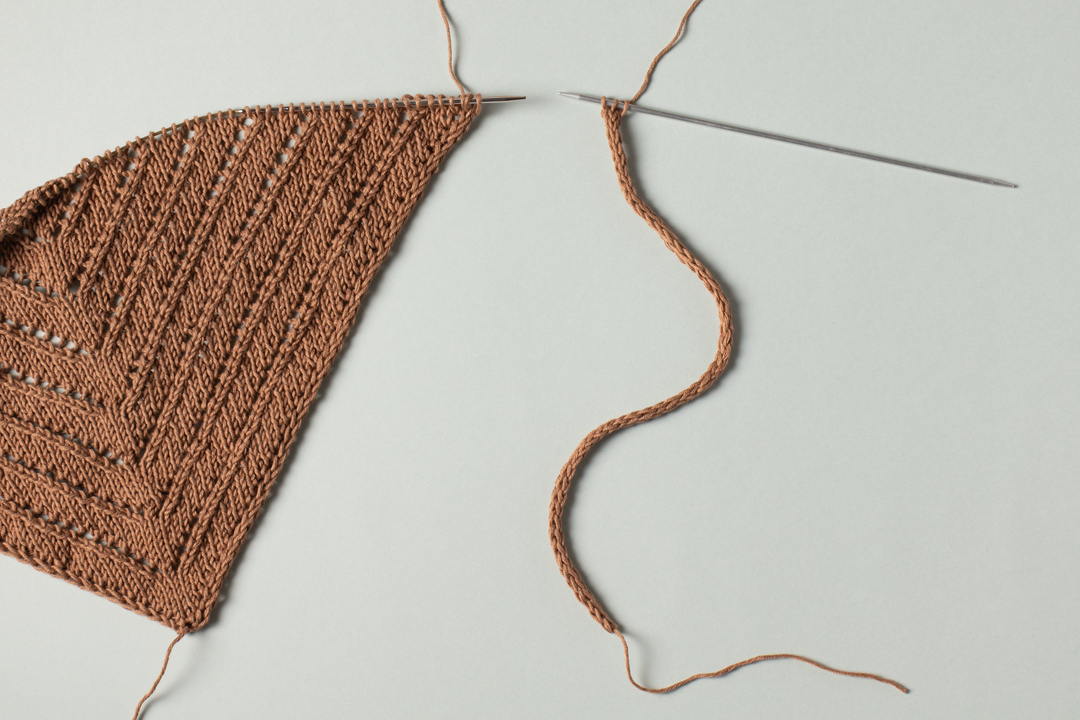
Transfer the three i-cord stitches to the needle while holding the live bandana stitches.
Now knit the first two i-cord stitches and work ssk. This joins the last i-cord stitch with the first bandana stitch.
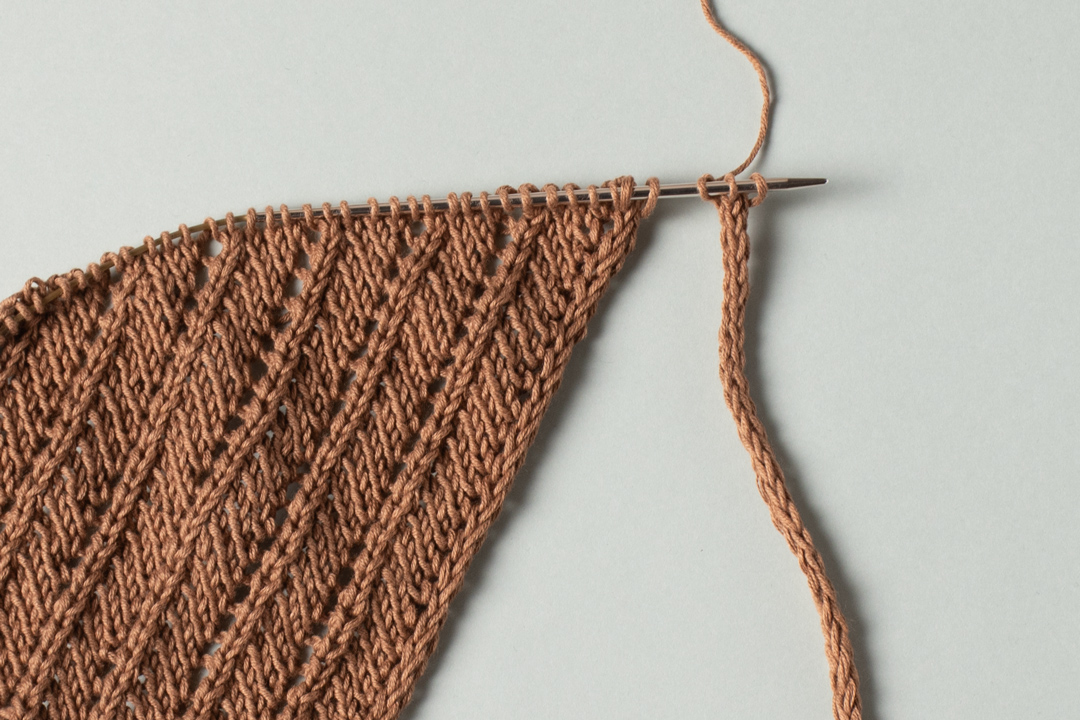
After this first joining step, transfer the first three stitches to the needle while holding the live bandana stitches.
This movement establishes the rhythm used for the remainder of the edging.
Working the Integrated I-Cord Edging
The edging continues by repeating the following sequence:
*k2, ssk, transfer 3 stitches to the needle, holding the live bandana stitches*
Continue repeating these steps until you have 3 stitches left.
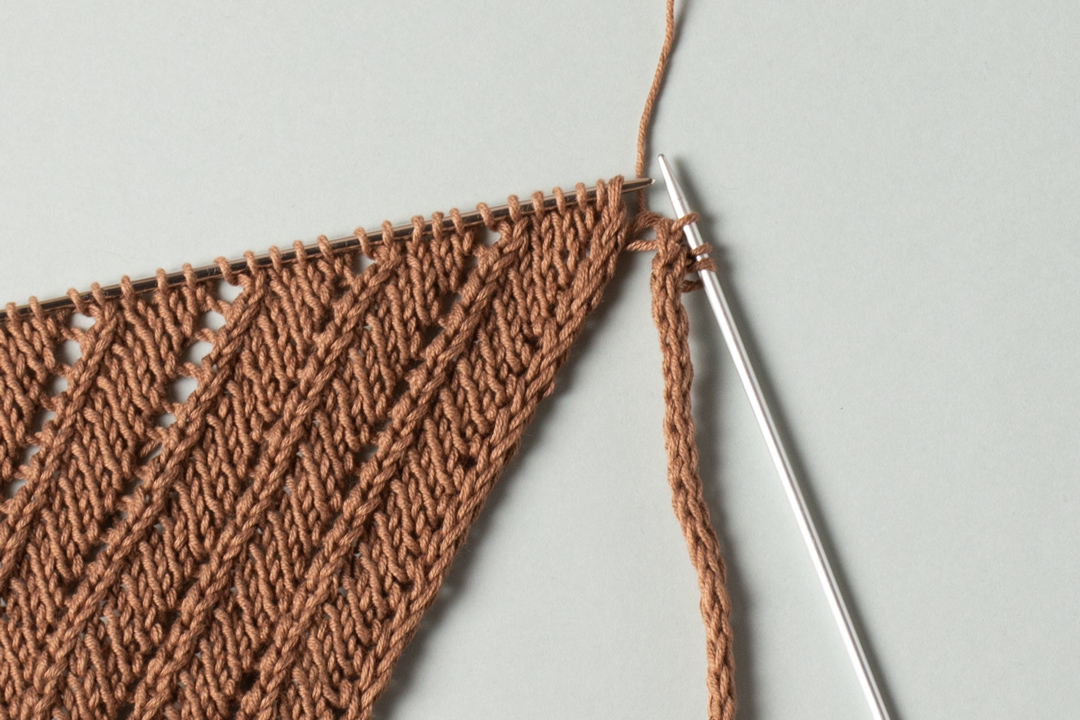
At this stage, the i-cord changes from being a separate tie into the continuous border of the bandana. The repeated joining technique keeps the border attached to the live stitches as you move across the edge.
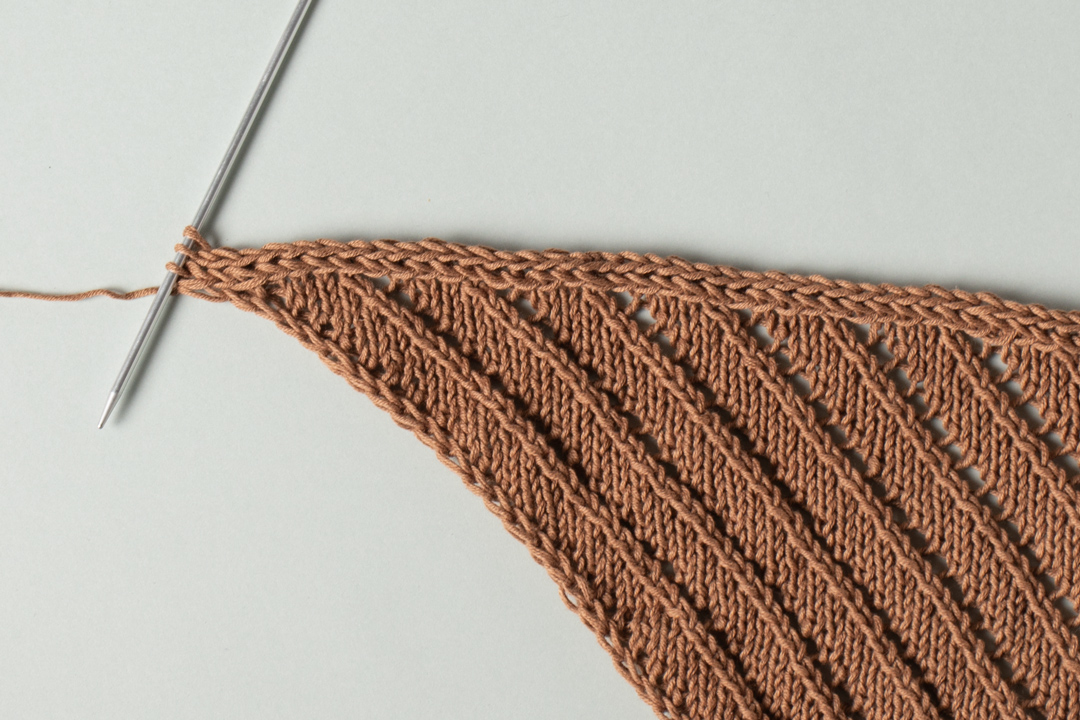
Stage Four: The Second I-Cord Tie
When only three stitches remain, begin the second tie.
Work it in the same way as the first:
Slip the 3 stitches to the right side of the needle. Knit 3.
Continue until the tube measures approximately 30 cm.
Once the second tie reaches approximately 30 cm, bind off, cut the yarn, and weave in the tails.
Why the I-Cord Construction Works So Well
The i-cord technique gives this accessory a particularly clean finish. Instead of creating the triangle, binding it off, and attaching two ties separately, the pattern uses the live stitches to build the edging directly into the project.
The first tie is made first, then connected to the bandana. From there, the same three-stitch structure is repeatedly worked and attached to the live stitches. When the edging reaches the opposite side, the remaining three stitches naturally continue into the second tie.
This creates a continuous path from one tie, around the triangular bandana, and into the other tie.
Keeping Your Work Neat
Small habits can make the knitting process much easier.
Use the removable marker throughout the main pattern. The CS is the most important reference point in the eyelet section.
Keep the edge tension relaxed. The first two stitches and last two stitches are part of the i-cord edging and should not be tightened.
Check every right-side increase. Each right-side pattern row specifies that two stitches are increased.
Do not treat all pattern rows as identical. The number of stitches around the central stitch changes as the bandana grows.
Measure the i-cord ties. Both ties should be worked to approximately 30 cm according to the original instructions.
Keep the live stitches safe. They are required for the i-cord edging, so avoid accidentally binding them off when completing the triangle.
Pattern Troubleshooting
My stitch count seems wrong after a right-side row.
Review the yarnovers and decreases on that row. Every right-side pattern row is marked as increasing the stitch count by two. Also make sure the edge yarnovers have been included.
I cannot tell where the central stitch is.
The central stitch is the eighth stitch after the set-up section, when there are 15 stitches. Place a removable stitch marker directly on it.
The eyelet pattern looks different on one side.
Check that k2tog and ssk are being worked in their specified positions. These two decreases lean in opposite directions and help organize the eyelet structure around the central stitch.
The edge looks too tight.
The pattern specifically says not to tighten the edge stitches. Keep the first two knitted stitches and final two slipped stitches relaxed.
I finished the triangle and want to bind off.
Do not bind off the bandana stitches at this stage. Break the yarn leaving a 10cm (4″) tail and leave the stitches live on the needle. They are needed for the i-cord edging.
When should I cut the yarn after the first tie?
Do not cut it after the first approximately 30 cm i-cord. The same working yarn is used for the connection to the bandana and the i-cord edging.
Adjusting the Size
The original design is one size, but its construction allows the length to be modified. The pattern states that you can add or subtract repeats to easily modify the size of the bandana.
The main section is organized into 10-row repeats. The written instruction is to repeat rows 1–10 six more times or until you reach your desired length.
If you adjust the length, keep the individual pattern instructions unchanged. The central stitch remains in place, and the right-side rows continue to increase by two stitches. This allows the triangle to become longer without changing the basic eyelet construction.
Finishing and Blocking Considerations
The stated gauge is measured after blocking, so blocking is relevant when comparing your finished fabric to the original measurements.
After weaving in the tails, take a moment to look at the overall triangle. Check the edge, eyelets, central area, and ties. The i-cord border should give the bandana a clean outline, while the ties should extend naturally from the two ends.
The finished measurements specified by the pattern are 49cm/19.25in in length without ties and 21.5cm/8.5in in height.
Complete Pattern Checklist
- Use Drops Safran in almond, uni color 22.
- Prepare 1 ball of yarn.
- Use 3mm (US 2.5) knitting needles.
- Prepare a pair of 3mm (US 2.5) DPNs for the ties.
- Have a removable stitch marker ready.
- Cast on 4 stitches.
- Complete set-up rows 1–13.
- Confirm 15 stitches after the set-up.
- Place the marker on the 8th stitch.
- Work pattern rows 1–10.
- Repeat rows 1–10 6 more times or until the desired length.
- Leave a 10cm (4″) tail when breaking the yarn.
- Keep the bandana stitches live.
- Cast on 3 stitches for the first i-cord.
- Work the first tie to approximately 30 cm.
- Join it to the bandana using the specified ssk.
- Continue the i-cord edging until 3 stitches remain.
- Work the second tie to approximately 30 cm.
- Bind off and weave in the tails.
Quick Reference for the Main Pattern
Cast-on: 4 stitches.
After set-up: 15 stitches.
Central stitch: 8th stitch.
Pattern repeat: Rows 1–10.
Right-side increase: 2 stitches increased on each right-side pattern row.
Wrong-side structure: k2, p to last 2 sts, sl2.
First tie: 3-stitch i-cord, approximately 30 cm.
Second tie: 3-stitch i-cord, approximately 30 cm.
Finished length without ties: 49cm/19.25in.
Finished height: 21.5cm/8.5in.
Frequently Asked Questions
What type of yarn does this pattern use?
The pattern uses sport-weight cotton yarn, specifically Drops Safran in almond, uni color 22, with one ball required.
What size needles are needed?
The main project uses 3mm (US 2.5) knitting needles. A pair of 3mm (US 2.5) DPNs is used for the i-cord ties.
How does the bandana get its triangular shape?
The project starts with four stitches and grows through increases on the right-side rows. The set-up section gradually builds the initial triangle, and the main pattern continues the growth with two stitches increased on each right-side pattern row.
What creates the eyelet texture?
The decorative texture comes from yarnovers combined with k2tog and ssk decreases. The two decrease directions help create the visual balance of the eyelet pattern.
Can I change the size?
Yes. The original pattern states that you can add or subtract repeats to modify the size. The main section is repeated in 10-row units.
How long are the i-cord ties?
Each tie is worked until the tube measures approximately 30 cm.
What is the purpose of the first and last two stitches?
They form the i-cord edging. The first two stitches are knitted, while the final two stitches are slipped with yarn in front. This gives the edges a neat appearance and helps prevent curling.
Final Thoughts
The Country Road Bandana is an excellent example of how a small knitted project can combine shaping, lace-like texture, and thoughtful finishing techniques. Starting with only four stitches makes the beginning approachable, while the gradually expanding triangle provides a clear sense of progress.
The central stitch gives the eyelet pattern a dependable reference point, and the combination of yarnovers, k2tog, and ssk creates the delicate open texture. The repeated 10-row section makes the main body easy to organize once the changing stitch count is understood.
The finishing method is perhaps the most distinctive part of the project. The first approximately 30 cm i-cord becomes the starting tie, then joins directly to the live bandana stitches. The i-cord continues as an integrated edging until three stitches remain, and those stitches become the second approximately 30 cm tie.
For a successful result, focus on consistency rather than speed. Keep the central stitch marked, follow the right-side rows carefully, remember that the repeat changes as the stitch count grows, and avoid tightening the edge stitches. When the triangular section is complete, keep the stitches live so the i-cord edging can be worked correctly.
With its 49cm/19.25in finished length without ties, 21.5cm/8.5in height, lightweight cotton yarn, eyelet texture, and integrated i-cord finish, the Country Road Bandana makes a practical and attractive summer knitting project while also offering useful practice with several fundamental knitting techniques.