
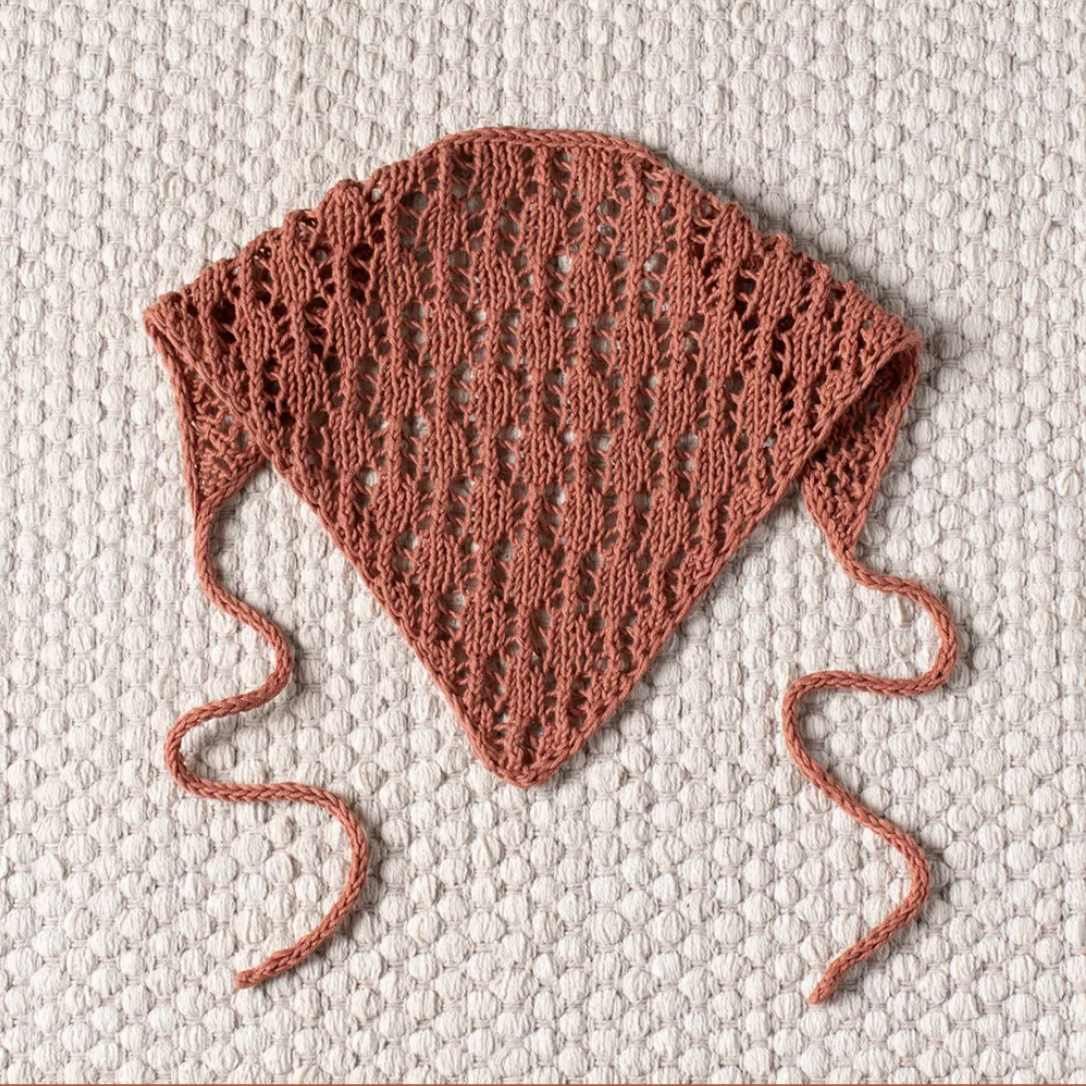
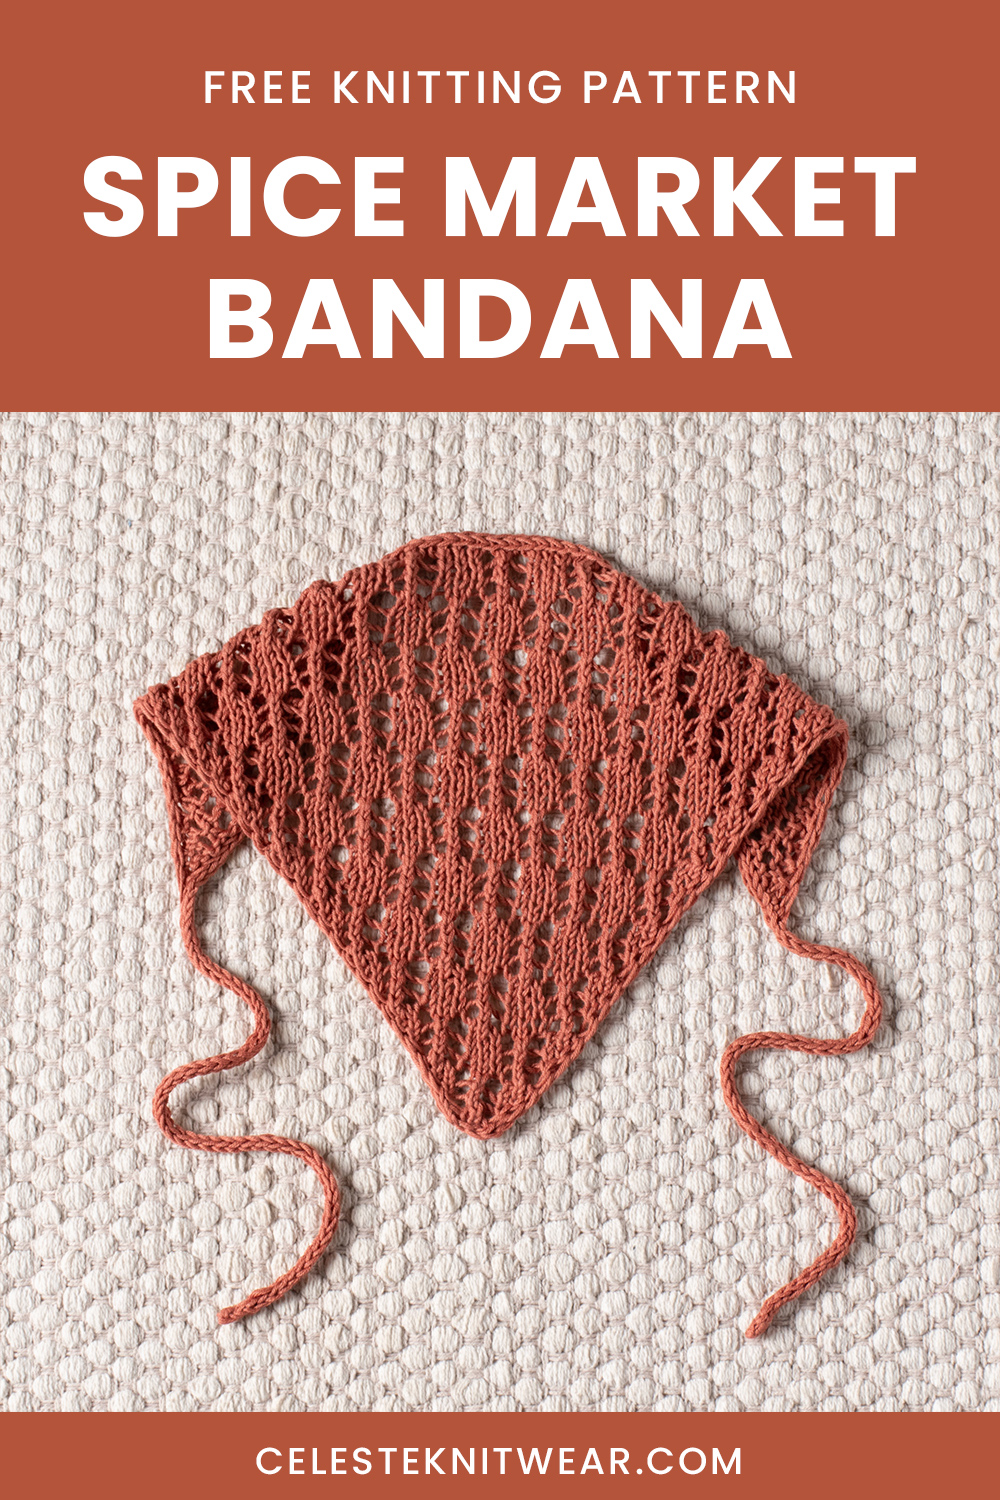
The Spice Market Bandana is a lightweight knitted accessory designed for warm-weather wear. Worked in sport-weight cotton yarn, this triangular bandana combines a delicate lace stitch with neat i-cord edges and long i-cord ties. The result is a simple, practical accessory with a clean handmade finish.
This knitting pattern is worked back and forth, beginning at the bottom point of the triangle and gradually increasing toward the top edge. The construction is particularly convenient because the size can be adjusted by adding or removing pattern repeats. That makes the design useful when you want a slightly smaller or larger bandana while keeping the same basic construction.
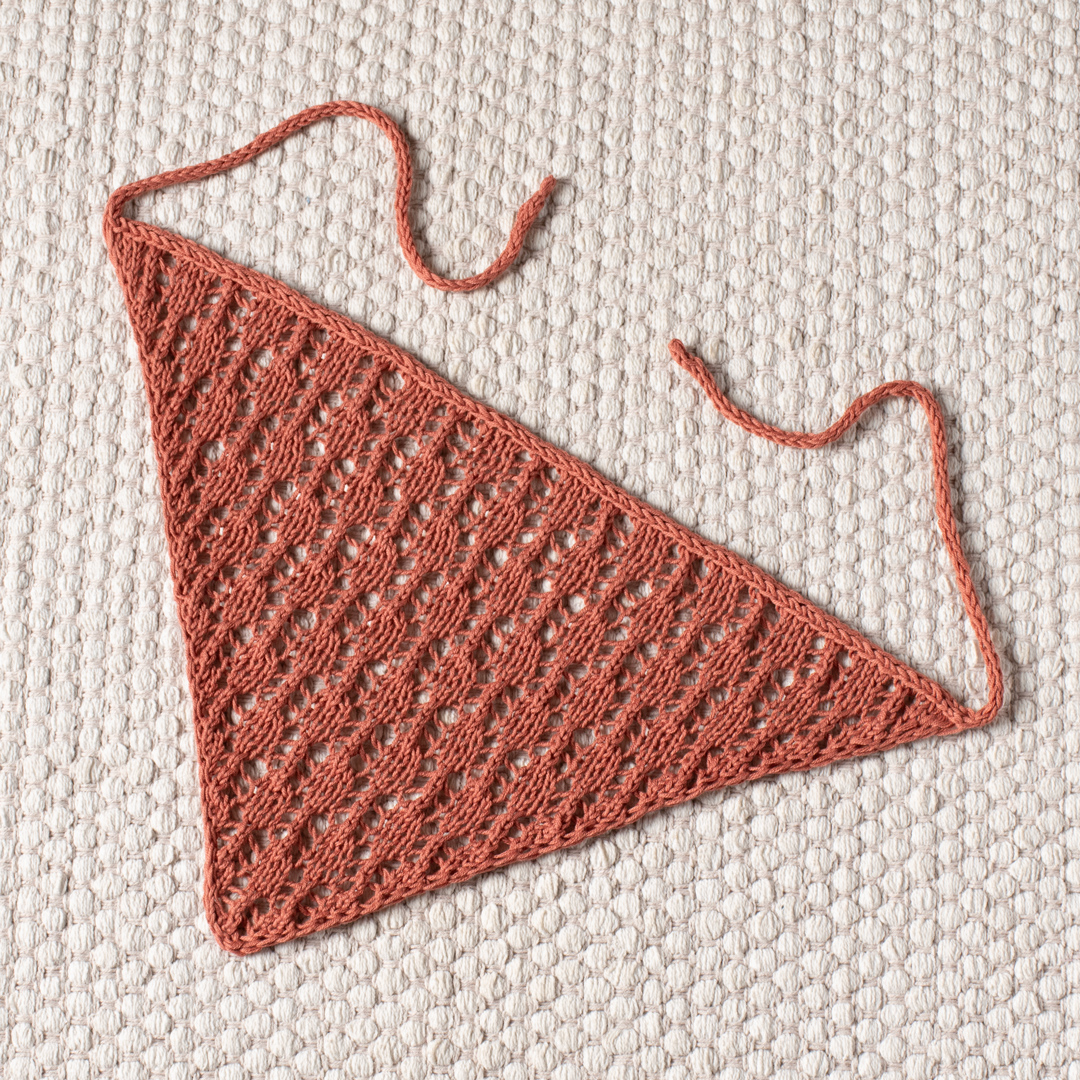
What Makes the Spice Market Bandana Special?
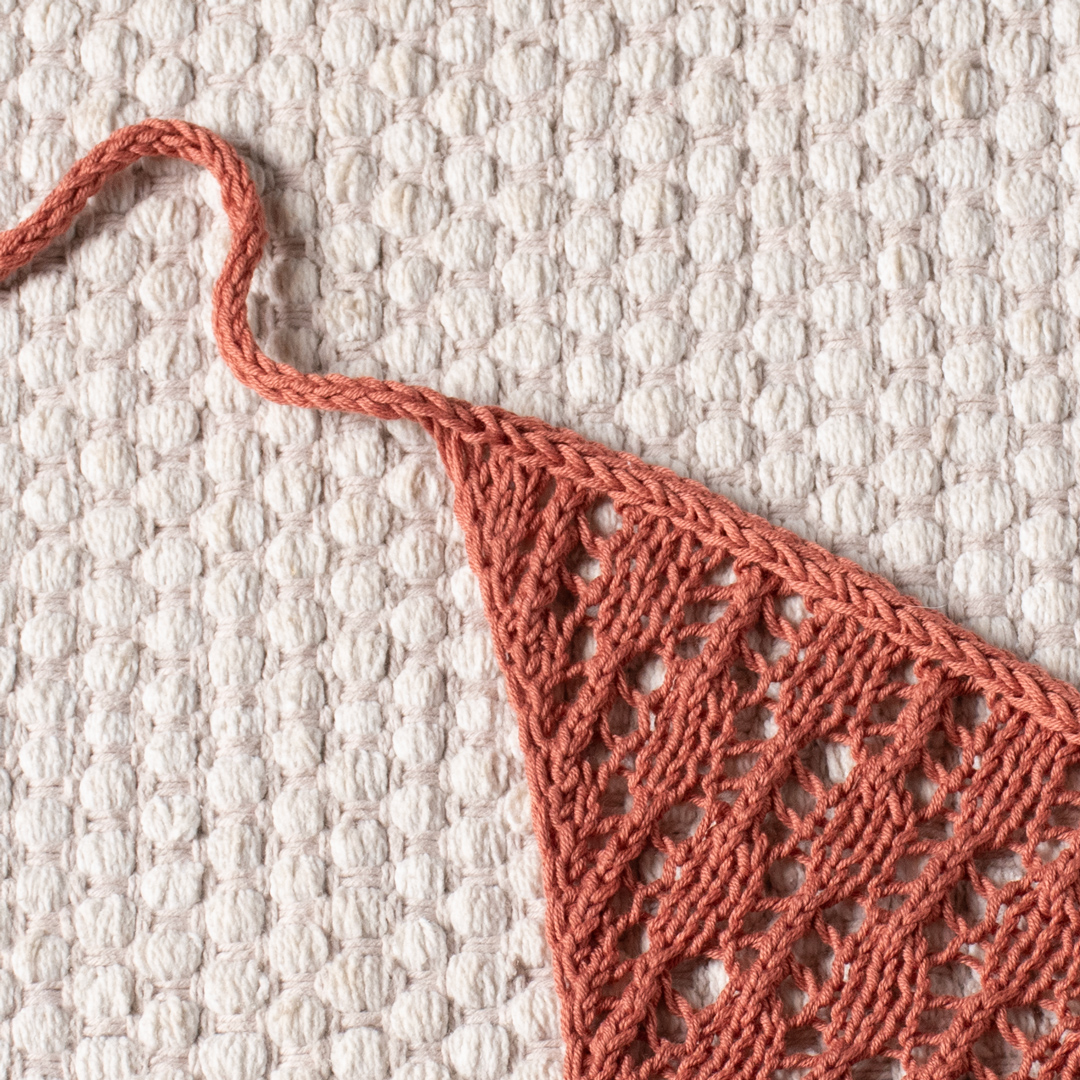
There are several details that give this bandana its polished appearance. The main body is a triangular lace section, while the first and last two stitches of every row create an i-cord-style edging. This edging helps keep the sides neat and prevents them from curling.
The bandana also uses i-cord ties, so there is no need to add a separate fastening system. After the triangular body is completed, the first tie is knitted, connected directly to the live bandana stitches, and continued across the remaining edge. The second tie is then worked from the opposite side.
Another useful feature is the straightforward increase structure. On every right-side increase row, two stitches are added, one near each edge. The pattern uses M1R and M1L increases positioned around the two-stitch i-cord borders. If you prefer a simpler increase technique, the pattern notes that the M1L and M1R increases can be replaced with yarn overs.
Project Overview
The Spice Market Bandana is knitted as one main triangular piece before the i-cord ties are added. You begin with only 5 stitches. The setup section establishes the first lace shaping, and the following pattern rows gradually widen the triangle.
The body is knitted from the bottom upward. Right-side rows contain the increases and lace pattern, while wrong-side rows are kept simple by knitting the first two stitches, purling across, and slipping the final two stitches with yarn in front.
Once the desired length has been reached, the yarn is broken, leaving a 10cm (4″) tail. The live stitches remain on the needle while the first i-cord tie is prepared separately on DPNs.
Finished Size
- Size: One size
- Length without ties: 40cm / 15.75in
- Height: 23cm / 9in
Gauge
10 x 10 cm (4 x 4in) = 24 stitches x 32 rows in stockinette stitch after blocking.
Because the finished measurements and stitch structure depend on the stated gauge, it is important to check your knitting rather than assuming that any sport-weight cotton yarn will produce exactly the same dimensions.
Materials You Will Need
Yarn
The pattern uses Drops Safran in the color red clay (uni color 59), with a quantity of 1 ball.
Drops Safran is a sport-weight cotton yarn, making it well suited to the lightweight summer character of this project. The original pattern specifies the exact yarn and color, so keeping these details in mind is important when following the published specifications.
Main Knitting Needles
You will need 3mm (US 2.5) knitting needles for the bandana.
Needles for the Ties
A pair of 3mm (US 2.5) DPNs is used for the i-cord ties.
Notions
- Tapestry needle
- Measuring tape
- Scissors
Having the measuring tape nearby is especially useful when working the approximately 30 cm i-cord ties and when checking the finished dimensions of the bandana.
Understanding the I-Cord Edges
The i-cord edging is one of the defining construction details of the pattern. Instead of treating the side stitches like ordinary stockinette stitches, the first two stitches are knitted on every row and the final two stitches are slipped with the yarn in front.
The pattern specifically notes that these edge stitches should not be tightened. Keeping the edge stitches relaxed allows the i-cord-style border to form neatly without pulling the triangular fabric inward.
On every row, the edge structure is therefore easy to recognize: begin with k2, work the central section, and finish with sl2. On wrong-side rows, the central section is simply purled to the final two stitches.
Knitting the Triangular Bandana
The main body begins with a small cast-on and grows progressively through increases. This bottom-up construction means that the first rows form the point of the triangle, while later repeats create the wider upper edge.
Cast On
Cast on 5 stitches.
Before starting the lace sequence, make sure the cast-on stitches are comfortable on the needle. The project will immediately begin increasing, so there is no need to create a large starting edge.
Set-Up Rows
Set-Up Row (WS)
k2, p1, sl2.
This short wrong-side row establishes the two-stitch edging on both sides of the work.
Row 1 (RS)
k2, M1R, k1, M1L, sl2 (7sts).
This first right-side row increases the stitch count from 5 to 7 stitches. The two increases are positioned inside the two-stitch edge sections.
Row 2
k2, p to last 2 sts, sl2.
The wrong-side row does not add stitches. Keep the edge stitches relaxed while purling through the center.
Row 3
k2, M1R, yo, k3tog, yo, M1L, sl2 (9sts).
This row introduces the lace movement using yarn overs and a centered k3tog decrease while continuing the increases at both sides.
Row 4
k2, p to last 2 sts, sl2.
Row 5
k2, M1R, k1, yo, k3tog, yo, k1, M1L, sl2 (11sts).
Row 6
k2, p to last 2 sts, sl2.
Row 7
k2, M1R, k2, yo, k3tog, yo, k2, M1L, sl2 (13sts).
Row 8
k2, p to last 2 sts, sl2.
At the end of the setup section, the bandana has reached 13 stitches. The central lace motif is now established, and the repeating six-row pattern can begin.
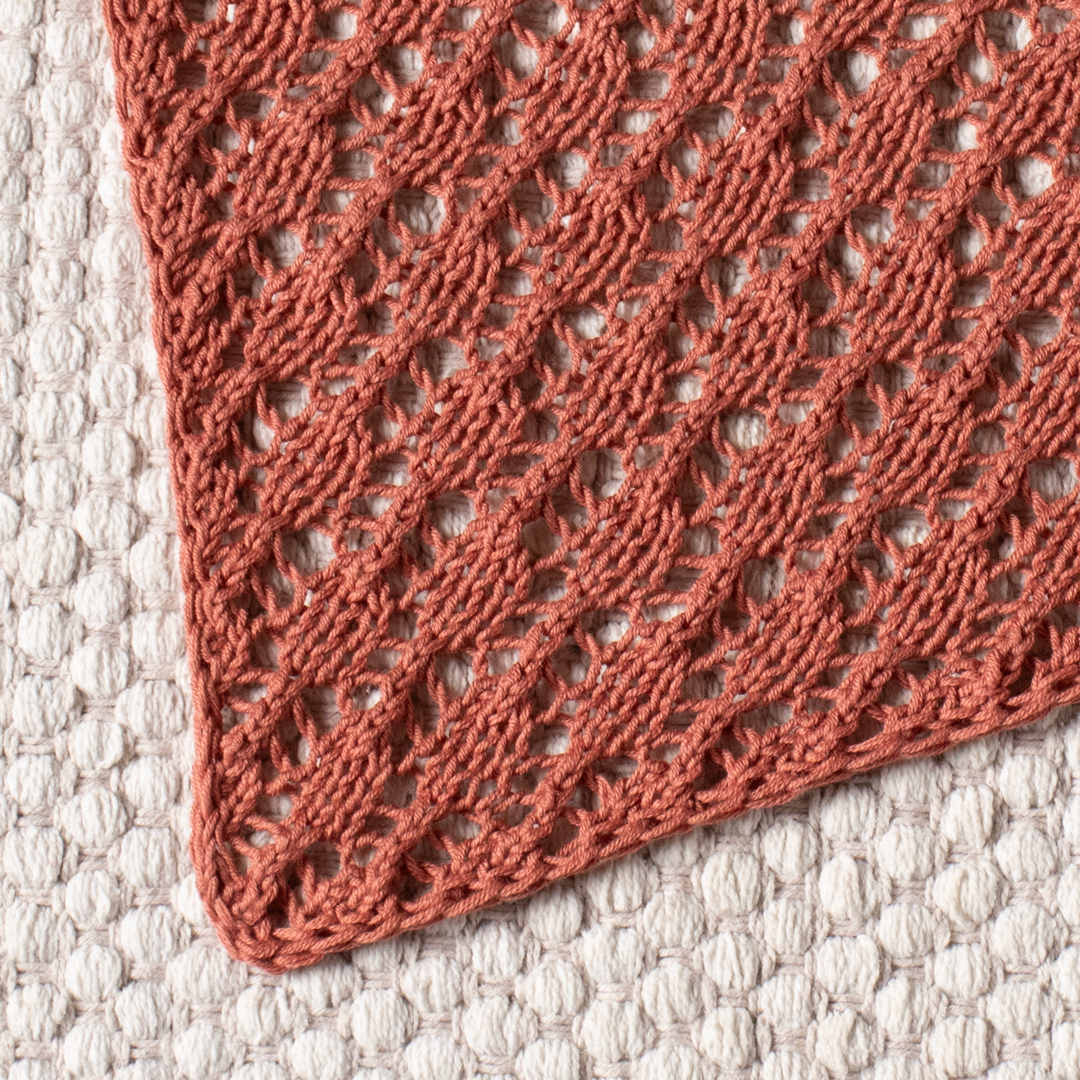
The Six-Row Lace Pattern
The main pattern consists of six rows. Rows 1, 3, and 5 are right-side rows and contain the two increases. Rows 2, 4, and 6 are wrong-side rows and maintain the simple purling structure between the i-cord edges.
Pattern Row 1 (RS)
k2, M1R, *yo, k3tog, yo, k3* to last 5sts, yo, k3tog, yo, M1L, sl2 (2sts increased).
The asterisked section is repeated as instructed until the specified number of stitches remain. Pay close attention to the transition into the final lace section because the last part of the row includes the second edge increase before the final two slipped stitches.
Pattern Row 2 (WS)
k2, p to last 2 sts, sl2.
This row provides a useful checkpoint. There should be two knitted edge stitches at the beginning, a purl section through the center, and two slipped stitches at the end.
Pattern Row 3
k2, M1R, k1, *yo, k3tog, yo, k3* to last 6sts, yo, k3tog, yo, k1, M1L, sl2 (2sts increased).
The additional k1 on each side changes the position of the lace section as the triangle becomes wider.
Pattern Row 4
k2, p to last 2 sts, sl2.
Pattern Row 5
k2, M1R, k2, *yo, k3tog, yo, k3* to last 7sts, yo, k3tog, yo, k2, M1L, sl2 (2sts increased).
Pattern Row 6
k2, p to last 2 sts, sl2.
Repeat rows 1-6 9 more times or until you reach your desired length.
The original pattern deliberately allows flexibility at this point. If you want the specified design, follow the stated number of repeats. If you want to modify the size, you can add or subtract repeats to achieve your desired length.
How the Increases Shape the Triangle
The two-stitch increase on every right-side pattern row is what progressively expands the bandana. One stitch is added near the beginning of the row using M1R, and another is added near the end using M1L.
It is helpful to think of these increases as the two structural points that keep the triangle expanding evenly. The lace motif occupies the center while the edge treatment remains consistent.
The pattern notes specifically instruct you not to tighten the increased stitches. Maintaining a relaxed tension at these points helps the fabric spread naturally instead of creating an overly tight edge.
A Simpler Increase Option
If M1R and M1L increases are unfamiliar, the pattern provides an optional simplification: you can replace the M1L and M1R increases with yarn overs.
This does not change the overall instruction sequence, but it can make the increase technique easier for knitters who are more comfortable with yarn overs. If you choose this alternative, remember that the original pattern’s stated construction uses M1R and M1L.
Finishing the Main Triangle
When you have completed the required repeats or reached your desired length, break the yarn while leaving a 10cm (4″) long tail.
Do not remove the live stitches from the needle. The next construction stage depends on those stitches remaining live while the first i-cord tie is connected to the bandana edge.
Making the First I-Cord Tie
The first tie is worked separately using the 3mm (US 2.5) DPNs. Cast on 3 stitches and do not turn.
Work the following repeated action:
Slip the 3 stitches to the right side of the needle. Knit 3.
Continue knitting the i-cord until the tube measures approximately 30 cm. Do not cut the yarn at this stage.
Keeping the yarn attached is essential because the i-cord will immediately become part of the bandana’s edging.
Connecting the I-Cord to the Bandana
Once the first tie has reached approximately 30 cm, transfer the 3 i-cord stitches to the needle while holding the live bandana stitches.
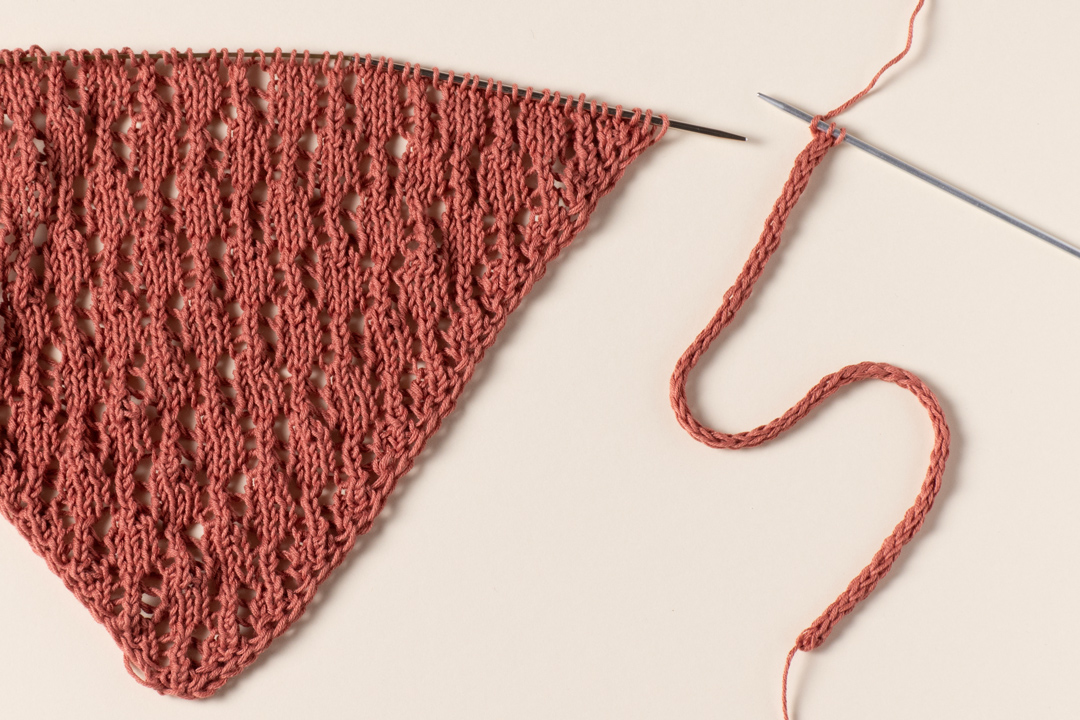
Next, knit the first two i-cord stitches, then work an ssk by knitting the last i-cord stitch together with the first bandana stitch.
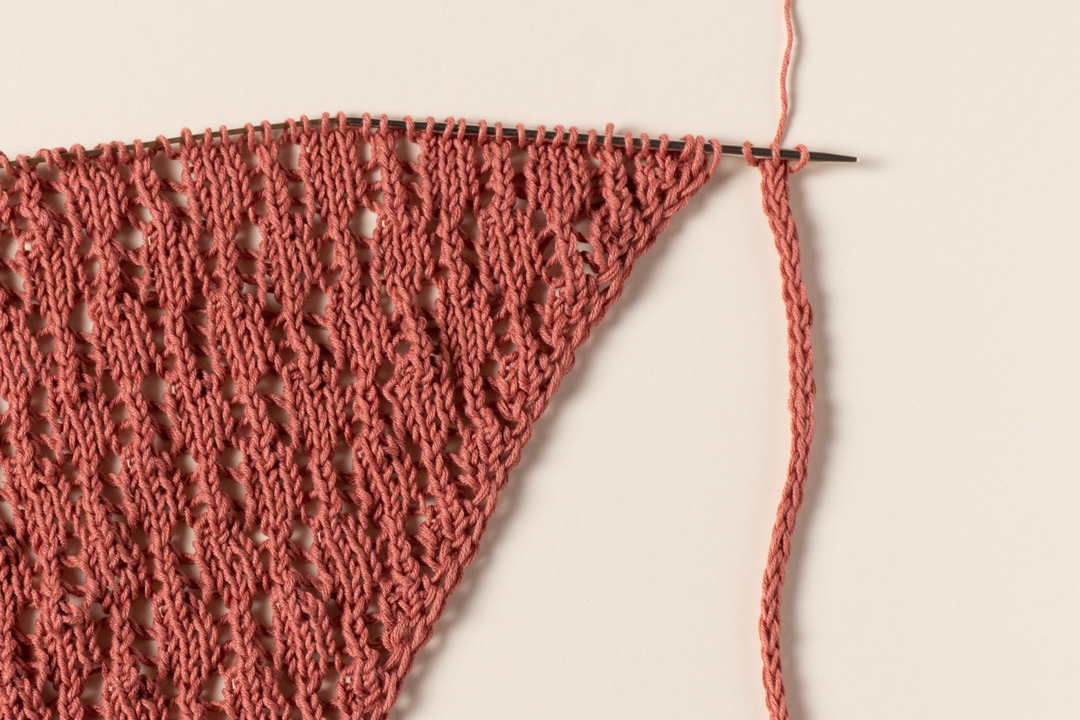
After this connection, transfer the first 3 stitches to the needle while continuing to hold the live bandana stitches.
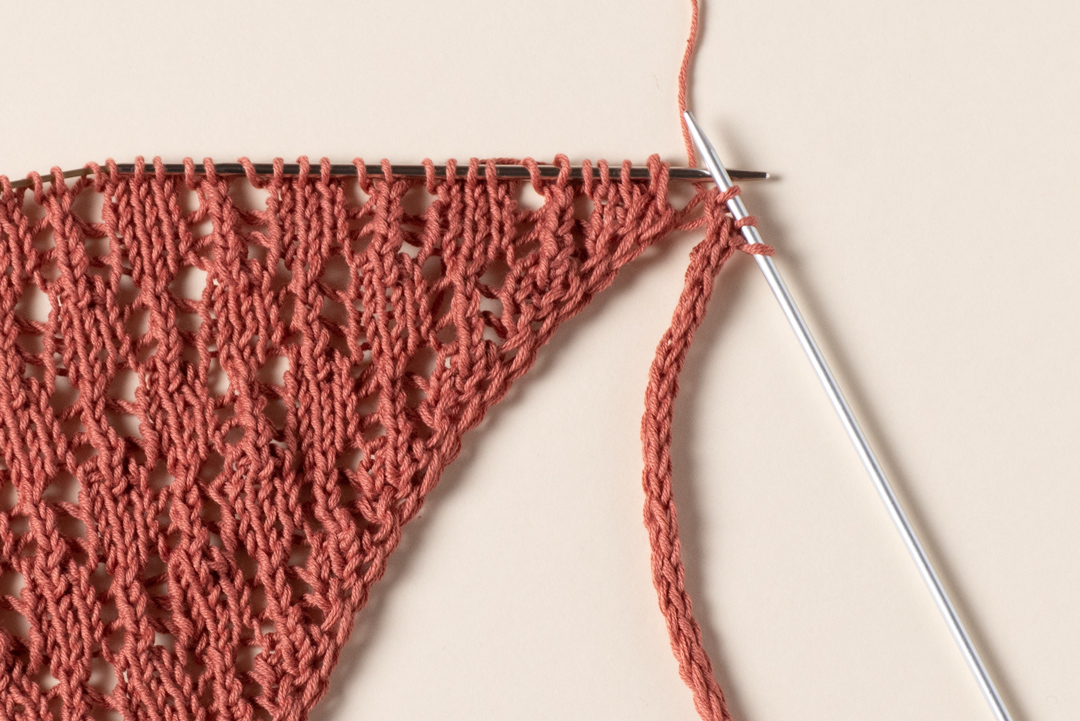
Working the I-Cord Edging Across the Bandana
Repeat the following sequence:
*k2, ssk, transfer 3 stitches to the needle, holding the live bandana stitches*
Continue repeating these steps until you have 3 stitches left.
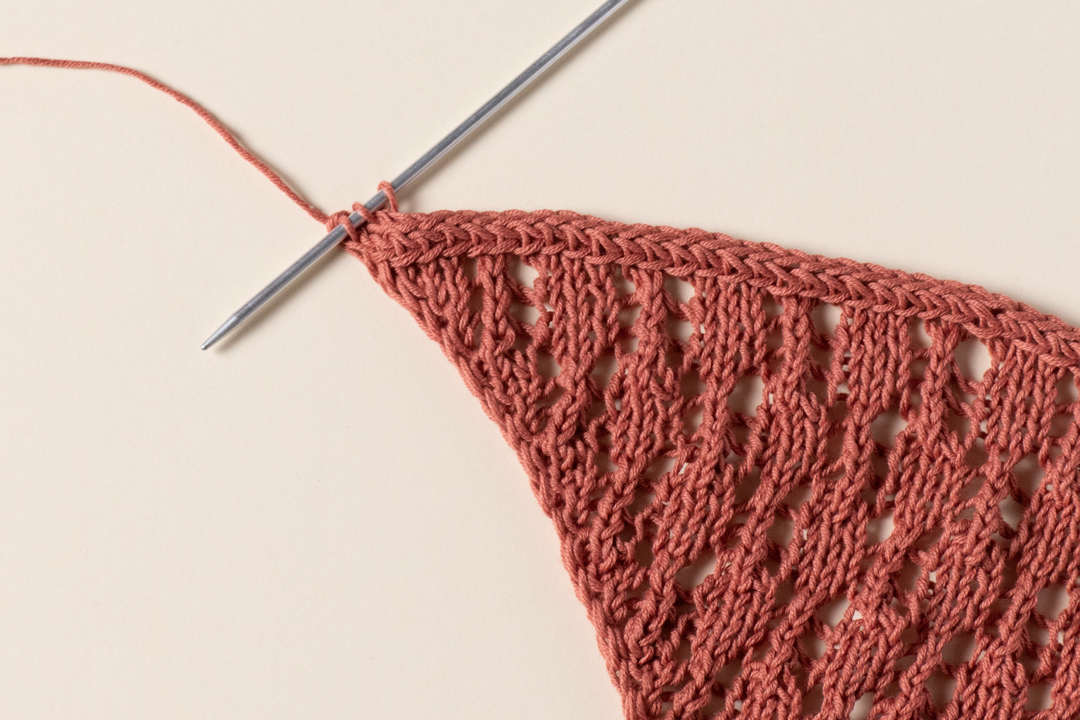
This construction creates a continuous, tidy border while simultaneously incorporating the live bandana stitches into the i-cord. The repeated transfer and ssk steps are therefore an important part of the finished edge rather than a separate decorative detail added afterward.
Making the Second I-Cord Tie
Once only 3 stitches remain, begin the second i-cord tie using the same basic technique as the first one.
Work:
*Slip the 3 stitches to the right side of the needle. Knit 3.*
Continue until the second i-cord tube measures approximately 30 cm.
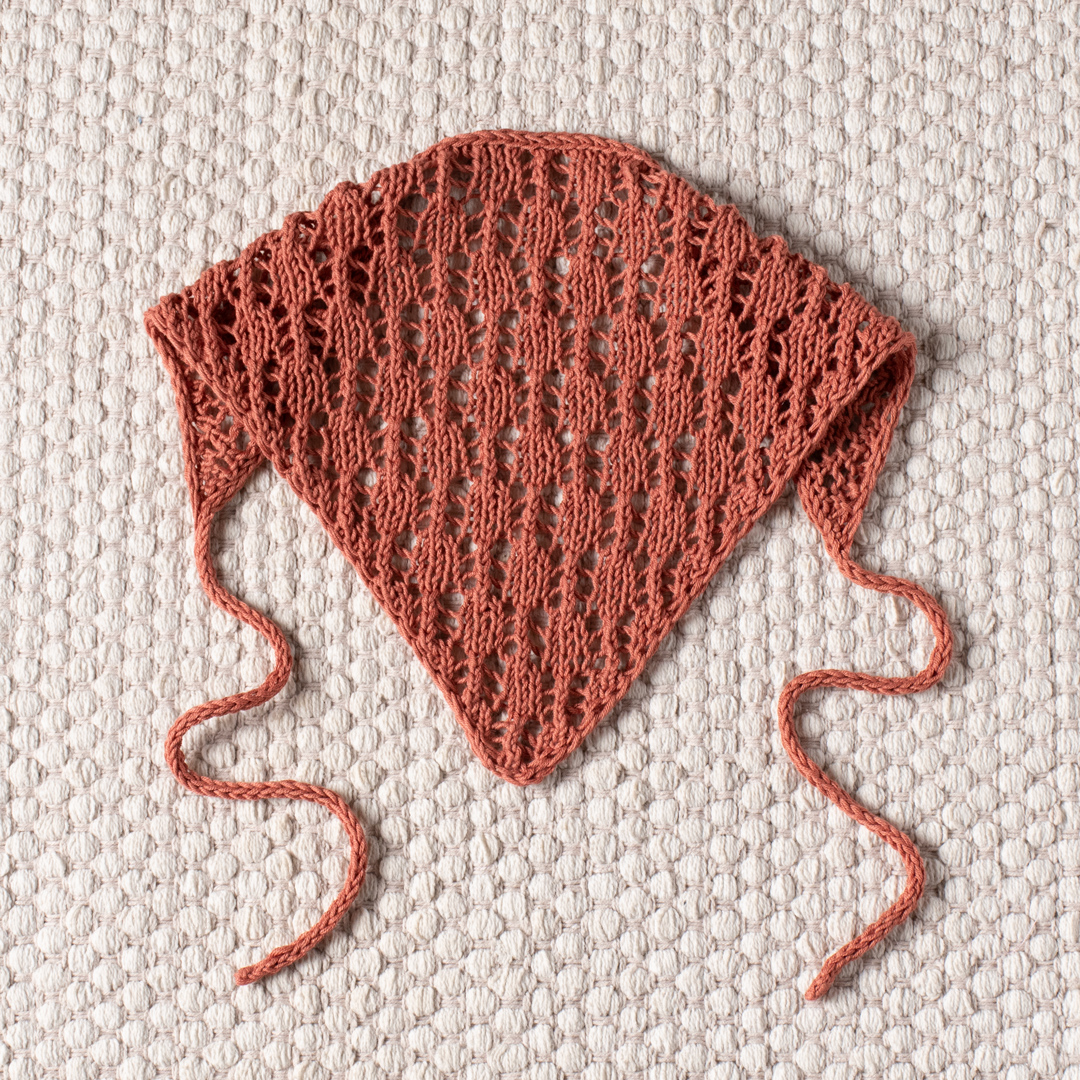
Unlike the first tie, this time the i-cord is finished completely. Bind off, cut the yarn, and weave in the tails.
Understanding the Main Abbreviations
Keeping the abbreviations beside you can make the lace section much easier to follow.
- k – knit.
- k3tog – knit 3 stitches together: slip the next 2 stitches knitwise (slip both stitches together, not one by one) to the right-hand needle, knit the next stitch, pass the 2 slipped stitches over the knit stitch.
- p – purl.
- RS – right side.
- sl – slip stitch as if to purl with yarn in front.
- ssk – slip 1 stitch knitwise, slip the next stitch knitwise, return the 2 stitches back to the left needle, knit those 2 stitches together through the back loops.
- WS – wrong side.
- yo – yarn over.
- *-* – repeat the instructions in between the asterisks the number of times specified.
Beginner Tips for a Cleaner Result
Keep the I-Cord Edges Relaxed
The pattern specifically says not to tighten the edge stitches. This is especially important because the i-cord edging needs enough freedom to sit neatly along the sides of the triangle.
Watch the Increase Locations
The increases always occur on right-side rows and are positioned around the two-stitch edge sections. A useful visual checkpoint is to identify the first two knitted stitches, locate the M1R increase, work through the lace section, then complete the M1L increase before the final two slipped stitches.
Use the Wrong-Side Rows as Checkpoints
Rows 2, 4, and 6 all use the same simple structure: k2, p to last 2 sts, sl2. These repeated rows give you an opportunity to check that the edges remain consistent before beginning the next lace row.
Measure Rather Than Guess
The finished pattern specifies 40cm / 15.75in for the length without ties and 23cm / 9in for the height. The i-cord ties are approximately 30cm each. Use a measuring tape when checking these dimensions rather than relying only on visual estimation.
Quick Construction Checklist
- Cast on 5 stitches.
- Complete the setup rows through Row 8.
- Work the six-row pattern repeat.
- Repeat rows 1-6 9 more times or stop when the desired length is reached.
- Break the yarn and leave a 10cm (4″) tail.
- Keep the live bandana stitches on the needle.
- Cast on 3 stitches on 3mm (US 2.5) DPNs.
- Work the first i-cord to approximately 30 cm.
- Connect the i-cord to the bandana using the stated ssk construction.
- Continue the i-cord edging until only 3 bandana stitches remain.
- Work the second i-cord to approximately 30 cm.
- Bind off, cut the yarn, and weave in the tails.
Common Points to Check While Knitting
If the lace pattern does not appear to be developing correctly, first check whether the right-side rows are being identified correctly. The increases are made on those rows, while the wrong-side rows use the simple purling sequence.
Next, check the edge stitches. The first two stitches should be knitted, and the final two should be slipped with yarn in front. These stitches form the i-cord edging and should not be tightened.
Finally, check the stitch counts given at the end of the setup rows: Row 1 has 7 stitches, Row 3 has 9 stitches, Row 5 has 11 stitches, and Row 7 has 13 stitches. These are useful checkpoints before moving into the repeated pattern section.
Why the Pattern Is Easy to Customize
The triangular body grows through repeated six-row sections, making the length relatively straightforward to modify. The original instructions say to repeat rows 1-6 9 more times or until you reach your desired length.
This means the basic construction does not require changing the lace motif itself. Instead, the number of repeats can be adjusted. If you need a different size, the pattern’s own instructions provide the flexibility to add or subtract repeats.
When modifying the length, continue to pay attention to the relationship between the triangle, the desired measurements, and the eventual placement of the i-cord ties. The pattern’s standard finished measurements are 40cm / 15.75in without ties and 23cm / 9in in height.
Blocking and Finished Appearance
The stated gauge is measured in stockinette stitch after blocking, so blocking is part of the gauge specification. After the knitting is complete, the final fabric can be assessed against the intended measurements.
The lace construction benefits from careful handling because the openwork pattern is created by the combination of yarn overs and k3tog decreases. Keeping the finished piece even and following the specified measurements helps preserve the triangular silhouette of the design.
Final Pattern Reference
For quick reference, the essential project specifications are:
- Size: One size.
- Finished length without ties: 40cm / 15.75in.
- Height: 23cm / 9in.
- Gauge: 24 stitches x 32 rows in 10 x 10 cm (4 x 4in) stockinette stitch after blocking.
- Yarn: Drops Safran, red clay (uni color 59), 1 ball.
- Main needles: 3mm (US 2.5) knitting needles.
- Tie needles: A pair of 3mm (US 2.5) DPNs.
- Notions: Tapestry needle, measuring tape, and scissors.
- Starting stitch count: 5 stitches.
- Setup ending stitch count: 13 stitches after Row 7.
- First i-cord tie: Approximately 30 cm.
- Second i-cord tie: Approximately 30 cm.
Conclusion
The Spice Market Bandana is a compact knitting project that combines a simple triangular construction with an attractive lace stitch and carefully finished i-cord details. The body is built from the bottom upward, increasing by two stitches on the right-side rows while the lace motif develops through yarn overs and k3tog decreases.
The two-stitch i-cord edging gives the bandana a tidy border and helps prevent curling, while the integrated i-cord ties provide a practical way to wear the finished accessory. Because the main body grows through repeatable six-row sections, the design also offers flexibility when you want to adjust the length.
For the cleanest result, keep the edge stitches relaxed, pay close attention to the M1R and M1L positions, use the wrong-side rows as checkpoints, and measure the i-cord ties rather than estimating their length. With the setup rows, lace repeats, i-cord connection, and final tie completed in sequence, the result is a lightweight cotton bandana with a neat handmade finish.