
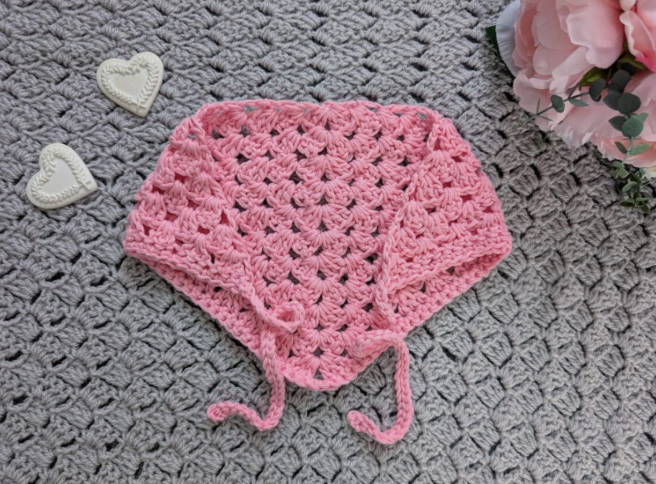

If you love crochet accessories that are quick to make but still have plenty of personality, the Crochet Rose Button Bandana is a wonderful project to add to your handmade wardrobe. This feminine bandana is built around a simple Granny Triangle pattern, making it an approachable project for beginners while still offering enough detail to keep the crocheting interesting.
The design uses aran/medium 4 yarn, a 5.5 mm crochet hook, and a small selection of basic crochet tools. The original version is made with two skeins of Drops Paris in shade 20, pink. The combination of cotton yarn and the simple granny-style construction creates a practical accessory with an elegant, slightly boho appearance.
The main triangular body is worked over 11 rows. Each new row increases the number of granny-style sections, allowing the triangle to grow naturally. Once the main body is complete, the yarn remains attached so that the first tie can be created directly from the bandana. A Single Crochet edging is then worked around the V-shaped section before the second tie is added.
This guide presents the project as a complete crochet workshop, beginning with the materials and gauge and then moving through the triangle, ties, edging, finishing, and beginner checkpoints.
Why Make This Crochet Bandana?
A handmade bandana is one of those small crochet projects that can be both decorative and practical. It does not require the amount of yarn or time associated with a blanket or garment, yet the finished piece can make a noticeable addition to an outfit.
The Rose Button Bandana has an especially feminine appearance. The pink version emphasizes the romantic character of the design, while the granny triangle adds a relaxed handmade quality. The result can work beautifully with casual, cottagecore-inspired, or boho-style outfits.
The construction is also straightforward. There is no complicated shaping, no large number of separate pieces, and no extensive assembly. The main triangle is crocheted first, followed by two integrated ties and a simple edging.
Project Information Before You Start
Here are the essential details for the original pattern:
- Skill level: Easy/beginner
- Yarn: Drops Paris
- Yarn weight: Aran/medium 4
- Fiber: 100% cotton
- Color: Shade 20, pink
- Quantity: 2 skeins
- Crochet hook: 5.5 mm
- Finished size: 8.5 x 18 inches (22 x 46 cm), excluding ties
- Gauge: 4 inches (10 cm) = 5 rows of Granny Triangle pattern
- Main body: 11 rows
- Each tie: Chain 35
Keeping these details available while you work can make it easier to check your progress. The measurements and stitch information above are the specifications of the original pattern.
Materials You Need
- 2 skeins of Drops Paris in shade 20 (pink)
- A 5.5 mm crochet hook
- A pair of scissors
- A tapestry needle
The original design uses Drops Paris, an aran/medium 4, 100% cotton yarn. The pink shade gives the finished accessory its soft and feminine appearance.
The 5.5 mm crochet hook is the specified hook size. If you are following the original design, use the stated yarn and hook combination rather than changing the technical specifications of the pattern.
Understanding the Gauge
The stated gauge is 4 inches (10 cm) for 5 rows of the Granny Triangle pattern.
Gauge gives you a useful reference for the size and development of the crocheted fabric. It is especially useful when working on a project where the finished measurements are provided. The finished body of this bandana measures 8.5 x 18 inches (22 x 46 cm), and this measurement excludes the two ties.
Gauge should be treated as the original pattern information. It is not necessary to change the stated hook size or stitch sequence simply because your personal tension differs.
Abbreviations Used in the Pattern
The pattern uses US crochet terminology, with British terms given in brackets. If you normally crochet using UK terms, reviewing this list before starting is important.
- Ch: chain
- St: stitch
- Sl st: slip stitch
- Sp: space
- SC: Single Crochet (UK Double Crochet)
- DC: Double Crochet (UK Treble Crochet)
- EOR: End of row
Throughout the instructions, the US terminology is retained. In particular, remember that a US Double Crochet is a UK Treble Crochet.
Part One: Creating the Foundation Ring
Begin with a slip knot.
Chain 4, then slip stitch through the first chain to form a ring.
This small ring is the foundation for the entire Granny Triangle. Although it looks tiny at the beginning, the project will expand quickly as each row introduces additional groups of Double Crochet stitches.
For beginners, it can be helpful to keep the center ring neat and clearly defined. The first round of stitches will be worked directly into this circle.
Part Two: Working Row 1
Now begin the first row of the triangular body.
Chain 4. This counts as 1 Double Crochet plus a chain space.
Work 3 Double Crochet stitches in the circle. Then chain 1 and work 1 Double Crochet in the circle.
The first row establishes the basic structure of the granny triangle. The groups of 3 Double Crochet stitches and the chain spaces will become the visual framework for the remaining rows.
At this stage, do not expect to see a large triangle. The shape develops gradually, with each subsequent row adding another section.
Part Three: Expanding the Triangle
The next rows follow the same general principle: begin with chain 4, turn the work, work granny-style groups into the appropriate spaces, and finish with the specified Double Crochet section.
Row 2
Chain 4 (1 DC + chain space), turn your work; place 3 DC inside the next space; chain 1, 3 DC, chain 1, and 1 DC in the next and last space.
Row 3
Chain 4 (1 DC + chain space), turn your work; place 3 DC in the next space; chain 1, 3 DC in the next space; chain 1, 3 DC, chain 1, and 1 DC in the next and last space.
Row 4
Chain 4 (= 1 DC + chain 1 space), turn your work; place 3 DC in the next space; repeat [chain 1, 3 DC in next space] 2 times; chain 1, 3 DC, chain 1, and 1 DC in the next and last space.
After these four rows, the triangle should be visibly developing. One of the easiest ways to follow this construction is to look for the open spaces between the granny clusters. These spaces are the locations where the next groups of 3 Double Crochet stitches are placed.
Keeping Track of the Granny Spaces
The spaces are an important part of this pattern. Beginners sometimes focus so closely on individual stitches that it becomes difficult to see where the next granny cluster belongs. In this project, the open chain spaces provide useful visual landmarks.
Before beginning a new cluster, identify the next space specified in the row. This can help you avoid accidentally placing the 3 Double Crochet stitches into the wrong location.
The triangle grows because the number of these sections increases from row to row. The repeated structure is therefore both the main visual feature and the key to understanding the construction.
Part Four: The Middle of the Triangle
Rows 5 through 8 continue the same Granny Triangle construction.
Row 5: Chain 4 (= 1 DC + chain 1 space), turn your work, place 3 DC in the next space; repeat [chain 1, 3 DC in next space] 3 times; chain 1, 3 DC, chain 1, and 1 DC in the next and last space.
Row 6: Chain 4 (= 1 DC + chain 1 space), turn your work, place 3 DC in the next space; repeat [chain 1, 3 DC in next space] 4 times; chain 1, 3 DC, chain 1, and 1 DC in the next and last space.
Row 7: Chain 4 (= 1 DC + chain 1 space), turn your work, place 3 DC in the next space; repeat [chain 1, 3 DC in next space] 5 times; chain 1, 3 DC, chain 1, and 1 DC in the next and last space.
Row 8: Chain 4 (= 1 DC + chain 1 space), turn your work, place 3 DC in the next space; repeat [chain 1, 3 DC in next space] 6 times; chain 1, 3 DC, chain 1, and 1 DC in the next and last space.

Notice how the repeated section increases by one each time. Row 5 has 3 repeats, Row 6 has 4, Row 7 has 5, and Row 8 has 6.
This is a useful checkpoint, especially if you are learning to read crochet patterns. Rather than trying to memorize the whole project, you can focus on the row you are currently working and the repeat count specified for that row.
Part Five: Completing the Main Triangle
The final three rows bring the main body to its specified 11-row construction.
Row 9: Chain 4 (= 1 DC + chain 1 space), turn your work, place 3 DC in the next space; repeat [chain 1, 3 DC in next space] 7 times; chain 1, 3 DC, chain 1, and 1 DC in the next and last space.
Row 10: Chain 4 (= 1 DC + chain 1 space), turn your work, place 3 DC in the next space; repeat [chain 1, 3 DC in next space] 8 times; chain 1, 3 DC, chain 1, and 1 DC in the next and last space.
Row 11: Chain 4 (= 1 DC + chain 1 space), turn your work, place 3 DC in the next space; repeat [chain 1, 3 DC in next space] 9 times; chain 1, 3 DC, chain 1, and 1 DC in the next and last space.
Do not fasten off.
The instruction to leave the yarn attached is essential because the next step begins immediately with the first tie.
The Seven-Row Repeat Checkpoint
If you want a quick way to verify the progression through the latter part of the triangle, use this sequence:
- Row 5: 3 repeats
- Row 6: 4 repeats
- Row 7: 5 repeats
- Row 8: 6 repeats
- Row 9: 7 repeats
- Row 10: 8 repeats
- Row 11: 9 repeats
This progression is a convenient visual and counting checkpoint. It does not replace the original written instructions, but it can help you recognize the intended expansion of the triangle.
Part Six: Creating the First Tie
With the yarn still attached to the bandana, begin the first tie.
Chain 35.
Skip the first chain and slip stitch through the second chain and every chain across. Continue until you reach the end of the chain.
Once you reach the end, slip stitch through the Double Crochet on the side of the bandana to secure the strap fully onto the project.
Do not fasten off.
The tie is made as a continuous extension from the main piece. This is one of the convenient aspects of the construction because it avoids creating a separate strap and attaching it afterward.

Tips for Making the Tie Neatly
The tie consists of a chain of exactly 35 stitches followed by slip stitches. Because the chain forms a narrow strap, maintaining relatively consistent tension can help it look even.
When you reach the end of the chain, make sure the final slip stitch is worked through the Double Crochet on the side of the bandana as specified. This secures the strap to the main body.
Remember that the first chain is skipped before beginning the slip stitches. This detail is part of the original instructions and should be retained.
Part Seven: Adding the V-Shaped Single Crochet Edging
After completing the first tie, the next stage is to add a Single Crochet edging across the V portion of the bandana.
For Row 1, work Single Crochet across the first side of the V, placing a Single Crochet into each stitch.
When you reach the top of the V, which the original instructions identify as the chain 2 from the previous row, place 2 Single Crochets.
Continue with Single Crochets across the second side of the V.
Do not fasten off.
This edging creates a simple finished border without changing the character of the granny triangle. The top of the V receives 2 Single Crochets, which is an important part of the stated construction.
Part Eight: Creating the Second Tie
Once the V edging is complete, begin the second tie while the yarn remains attached.
Chain 35. Skip the first chain and slip stitch through the second chain and every chain across.
When you reach the end of the chain, slip stitch through the Double Crochet on the side of the bandana to secure the strap fully onto the project.
Now fasten off and tidy all loose ends.

Finishing the Project With a Tidy Edge
Once the second tie has been secured, the crochet construction is complete. The final task is to tidy all loose ends using the tapestry needle.
Take your time with this stage. A handmade accessory is handled frequently, especially around the ties, so securing the loose ends neatly gives the project a clean and finished appearance.
After the ends have been tidied, inspect both sides of the bandana. Make sure the ties are firmly connected and that the Single Crochet edging follows both sides of the V.
How to Check the Shape Before Finishing
The main body should have a clear triangular shape. If the triangle appears uneven, it is useful to review the most recent row before proceeding with the finishing stages.
The Granny Triangle construction depends on consistent placement of the 3 Double Crochet groups into the appropriate spaces. Since the number of repeated sections increases as the rows progress, a missed space can become more noticeable in later rows.
A visual check is particularly useful after Row 11, before starting the first tie. At this point, you have completed the entire main body and can inspect the triangle without the ties affecting your view of its shape.
Beginner-Friendly Stitch Checkpoints
This project can be broken into several manageable checkpoints:
- Form the chain-4 starting ring.
- Complete Row 1 and identify the chain spaces.
- Work through Rows 2–4 while watching the triangle expand.
- Complete Rows 5–8 and check the increasing repeat count.
- Finish Rows 9–11 and confirm the 9 repeats in Row 11.
- Keep the yarn attached and make the first 35-chain tie.
- Work the Single Crochet edging around the V.
- Create the second 35-chain tie.
- Fasten off and tidy all loose ends.
Breaking the pattern into these stages can make it feel much more manageable, especially if this is one of your first projects involving a growing triangle.
Common Problems and Simple Checks
The Triangle Is Not Growing Evenly
If the shape does not appear to be expanding evenly, review the spaces used for the granny clusters. The pattern relies on placing groups of 3 Double Crochet stitches into the specified spaces, so a missed or misplaced cluster can affect the shape.
The Row Feels Different From the Previous One
Check the repeat count for your current row. From Row 5 onward, the repeated section increases progressively from 3 repeats in Row 5 to 9 repeats in Row 11.
You Reached Row 11 and Cut the Yarn
The original instructions say not to fasten off after Row 11. If you are following the pattern as written, the yarn should remain attached for the first tie.
The Two Ties Look Different
Both ties use the same Chain 35 construction. For each tie, skip the first chain, slip stitch through the second and every chain across, and secure the end to the Double Crochet on the side of the bandana.
Styling the Finished Bandana
The finished accessory has a soft feminine character with a slight boho feel. The triangular shape makes it visually distinctive without being overly complicated, while the ties provide a practical way to secure the bandana.
The original pink color is particularly suited to a romantic or cottagecore-inspired wardrobe. Since the designer notes that the project can be crocheted in many different colors, the same construction can also be adapted visually through color selection.
The accessory is particularly appealing during spring and summer, when smaller handmade projects and lightweight accessories can become a fun part of a crochet wardrobe.
Why Drops Paris Is a Good Match for the Design
The original pattern uses Drops Paris, a 100% cotton aran/medium 4 yarn. The designer notes that Drops cotton yarns are soft and easy to crochet with and are available in many different colors.
The yarn category also works well for a quick accessory project. Combined with the 5.5 mm hook, the fabric develops efficiently as the granny triangle grows.
Using the original yarn specification is the simplest way to stay close to the intended project. If making a different color version, the pattern’s construction remains the same while the visual result can change significantly.
Project Checklist
- 2 skeins of Drops Paris, shade 20 pink
- 5.5 mm crochet hook
- Scissors
- Tapestry needle
- US crochet terminology
- 4 inches (10 cm) = 5 rows of Granny Triangle pattern
- 8.5 x 18 inches (22 x 46 cm) finished body size
- 11 Granny Triangle rows
- 35-chain first tie
- Single Crochet V edging
- 35-chain second tie
- Loose ends tidied after fastening off
Frequently Asked Questions
Is the Crochet Rose Button Bandana suitable for a beginner?
Yes. The original pattern is rated easy/beginner. It uses fundamental techniques including chains, Double Crochet, slip stitches, working into spaces, turning rows, and Single Crochet edging.
What yarn is required?
The original pattern calls for 2 skeins of Drops Paris in shade 20, pink. The yarn is aran/medium 4 and 100% cotton.
What size crochet hook should I use?
The specified hook size is 5.5 mm.
What is the finished size?
The bandana body measures 8.5 x 18 inches (22 x 46 cm), excluding the ties on each side.
How many rows make the main triangle?
The Granny Triangle is worked through Row 11.
How many chains are used for each tie?
Each tie begins with Chain 35.
Should I fasten off after the first tie?
No. The instructions say not to fasten off after creating the first tie because the yarn remains attached for the Single Crochet edging and second tie.
What terminology does the pattern use?
The original pattern uses US terms and provides British equivalents in brackets.
Final Review Before Wearing Your Bandana
Before considering the project completely finished, take a moment to check the major construction points. The main body should contain 11 rows of the Granny Triangle pattern. The yarn should have remained attached after Row 11 so that the first tie could be created. The first tie should begin with 35 chains, followed by slip stitches through the second and every chain across.
The V should have its Single Crochet edging, including 2 Single Crochets at the top of the V. The second tie should also begin with 35 chains and be secured to the Double Crochet on the side of the bandana.
Finally, all loose ends should be tidied with the tapestry needle.
Final Thoughts on the Rose Button Bandana

The Crochet Rose Button Bandana is a lovely example of how a simple crochet technique can produce an elegant finished accessory. Its Granny Triangle construction keeps the project approachable, while the increasing rows provide a satisfying sense of progress.
The design is also practical because the ties are created directly from the finished triangle. There is no need to make separate straps or perform complicated assembly. The Single Crochet edging around the V adds a clean finishing detail before the final tie is completed.
With its easy skill level, aran/medium 4 cotton yarn, 5.5 mm hook, and compact finished size, this project is an excellent choice when you want a crochet accessory that can be completed relatively quickly. The original pink color gives it a feminine and romantic character, while the ability to make the design in different colors makes it easy to personalize.
Whether you are a beginner learning how granny triangles work or an experienced crocheter searching for a quick seasonal accessory, the Rose Button Bandana offers a satisfying combination of simple construction and stylish results. Follow the original row sequence, repeat counts, measurements, tie lengths, and finishing instructions carefully, and the small starting ring will gradually become a beautiful handmade bandana.