
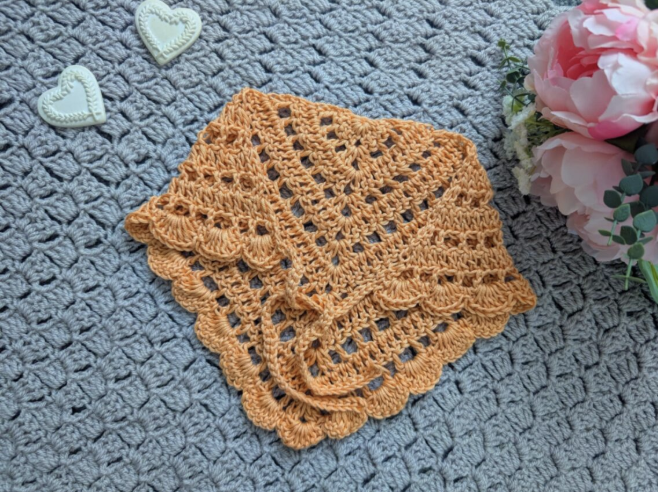
The Crochet Lovely Bandana is a delicate, feminine accessory with a distinctly cottagecore-inspired character. Its lightweight filet crochet body, decorative shell stitch edging, and slender crocheted ties come together to create a project that feels both traditional and fresh. Although the finished bandana has an intricate appearance, the pattern is rated easy and beginner-friendly, making it a lovely project for crocheters who want to practice working with chain spaces, double crochet stitches, shaping, and decorative edging.
This tutorial takes a photo-guided workshop approach. Instead of treating the pattern as one long sequence of instructions, we will look at the project as a series of recognizable construction stages. The foundation ring establishes the starting point, the first few rows create the triangular filet crochet structure, the repeated rows build the main bandana, and the shell edging gives the finished piece its decorative character. Finally, two crocheted ties are formed directly as part of the edging process.
The original design uses Universal Yarns Vireo in Apricot Tart, a beautiful yarn choice for the soft and feminine look of the bandana. Vireo is made from 80% tencel and 20% wool. The project can also be crocheted in many different colors, so the same construction can be used to create different looks while following the same pattern.

Project Overview Before You Begin
This bandana combines two main crochet techniques. The central portion is worked in a filet crochet style, creating an open and airy fabric through a combination of double crochet stitches and chain spaces. Around the outer edge, a shell stitch border adds a more decorative finish. The contrast between the structured center and the scalloped edging is what gives the finished project its delicate appearance.
The construction is also particularly convenient because the ties do not need to be made separately and sewn into place. The first tie is crocheted immediately after the main bandana is complete, and the second tie is formed later while working the edging. This means the ties become integrated into the project rather than requiring a separate sewing step.
The finished size of the bandana, excluding the ties on each side, is 9” x 17.5” (23 cm x 44.5 cm). The pattern uses US crochet terms, with British equivalents supplied in brackets where applicable.
Materials and Pattern Information
- Skill level: Easy / beginner
- Yarn: 1 skein of Universal Yarn Vireo in shade Apricot Tart
- Fiber: 80% tencel and 20% wool
- Crochet hook: 5.5 mm
- Scissors: 1 pair
- Tapestry needle: 1
- Gauge: 4” (10 cm): 6 rows
- Finished size: 9” x 17.5” (23 cm x 44.5 cm), excluding the ties on each side
Before beginning, place all your supplies within easy reach. Because the project uses a relatively small collection of materials, preparation is straightforward. The tapestry needle and scissors are needed at the finishing stage, while the 5.5 mm crochet hook is used throughout the crochet work.
Abbreviations at a Glance
The pattern uses US crochet terminology. Keeping the abbreviations nearby can make the repeated filet crochet rows much easier to follow.
- Ch: chain
- St: stitch
- Sl st: slip stitch
- Sp: space
- SC: Single Crochet (UK Double Crochet)
- DC: Double Crochet (UK Treble Crochet)
- EOR: End of row
One useful point to remember is that the pattern identifies a chain-3 at the beginning of a row as a DC. The instructions also specifically use the phrase “ch 2 space” for the central space at the top of the developing bandana. Keeping these landmarks in mind helps make the construction easier to visualize.
Stage One: Creating the Foundation Ring
The first stage is very small, but it establishes the center from which the entire bandana grows. Begin by making a slip knot. Then chain 4 and slip stitch through the first chain to form a ring.
This small ring is the starting point for the first row. Since the opening will hold the initial double crochet stitches, take a moment to make sure the ring is secure without pulling it excessively tight.
Row 1
Chain 3, which counts as a DC, and then place 5 DC into the ring. Chain 2, followed by 6 DC into the ring.
At this point, the basic center of the bandana has been established. The chain-2 section becomes an important central landmark because subsequent rows will work around this area to create the expanding shape.

Stage Two: Establishing the Filet Crochet Pattern
The second row introduces the openwork character that will become one of the defining features of the bandana. The pattern begins with chain spaces and skipped stitches, creating the visual rhythm associated with filet crochet.
Row 2
Chain 3, which counts as a DC, and turn. Place a DC in the first stitch. Then work the following sequence until the penultimate stitch before the chain-2 space at the top of the project: chain 1, skip 1 stitch, DC.
After reaching the central area, skip the last stitch before the opening and place 2 DC, chain 2, and 2 DC into the chain-2 space. Then skip 1 stitch and continue with DC in the next stitch, chain 1, skip 1 stitch, and DC until the last stitch. Finish by placing 2 DC into the last stitch.
The most important visual landmark in this row is the chain-2 space at the top of the project. It separates the two sides and becomes the point where the shape expands.
Row 3
Chain 3, which counts as a DC, and turn. Place another DC into the first stitch. Continue with DC into the next stitch until reaching the chain-2 space at the top of the project, including the chain spaces.
Place 2 DC, chain 2, and 2 DC into the chain space from the previous row. Continue with DC into each stitch across, including the chain spaces, until the end of the row. Place 2 DC into the last stitch.
Rows 2 and 3 work together as a repeating structure. Row 2 creates the open chain-space rhythm, while Row 3 works across the resulting spaces and stitches. Watching the fabric rather than relying only on the written line can be particularly helpful for beginners.

Stage Three: Building the Main Bandana
Once Rows 2 and 3 are understood, the main body becomes a matter of repeating the established structure. This is one of the most useful places to slow down and develop a consistent rhythm.
Rows 4–12
Alternate Rows 2 and 3, finishing on Row 3.
Although these rows are repetitive, they should not be treated as an opportunity to crochet without checking the work. The center chain-2 space remains a useful checkpoint. Each row should continue to develop from that central point while maintaining the openwork pattern created by the alternating rows.
For a beginner, a helpful approach is to compare the current row with the previous row before turning to the next one. The repeating structure makes it easier to notice an interruption in the pattern early, rather than discovering a mistake several rows later.
The gauge specified by the pattern is 4” (10 cm): 6 rows. Keeping the gauge information in mind is useful when checking the scale of your work, but the original pattern’s stitch and row instructions should remain the primary guide while making the project.
Reading the Shape as You Crochet
One advantage of a photo-guided project is that you can learn to recognize the developing shape instead of seeing the pattern only as a list of abbreviations. The bandana gradually develops around the central chain-2 space, while the alternating filet crochet rows give the fabric its open texture.
Look for three visual clues as you progress. First, the center should remain easy to identify. Second, the chain spaces should create a consistent openwork rhythm. Third, the outer edges should develop in a balanced way on both sides.
These are visual checkpoints rather than additional instructions. They do not replace the written pattern, but they can help you stay oriented while working through Rows 4–12.

Stage Four: Creating the First Tie Without Sewing
Once Row 12 has been completed and the project finishes on Row 3, the first tie begins immediately. One of the charming construction details of this pattern is that the tie is crocheted directly from the project rather than being made separately and sewn on later.
Without fastening off, chain 40. Slip stitch through the second chain from the hook and continue with a slip stitch into each chain across until the end.
Then slip stitch through the first stitch on the project to secure the tie.
Do not fasten off.
Keeping the yarn attached is important because the crochet work continues into the shell stitch edging. This construction keeps the tie integrated with the rest of the bandana and eliminates a separate sewing step for the tie.
Stage Five: Beginning the Shell Stitch Edging
The shell edging changes the character of the project. After the open filet crochet body has been completed, the border introduces groups of seven double crochet stitches that form rounded shell motifs.
Begin with chain 3, which counts as a DC. Place 6 DC into the first chain space on the project, creating the first shell. Then place an SC directly into the next space to anchor the edging.
The border is built by repeating this shell-and-anchor rhythm. Go directly into the next chain space and place 7 DC to form another shell. Then go directly into the next space with SC. Repeat this sequence from the asterisk until reaching the last space on the first side.
At this stage, it can be useful to focus on the relationship between each shell and its anchoring SC. The shell provides the decorative fullness, while the SC secures the border to the next space.

Working Across the Top of the Bandana
When the edging reaches the top of the project, the instructions change slightly to accommodate the central chain-2 space. Skip 2 DC and place 7 DC into the chain-2 space at the very top.
Then skip 2 DC and continue with the border pattern: SC into the next space, followed by 7 DC into the next space. Repeat from the asterisk until reaching the end of the row.
The top chain-2 space is an important construction point, so it is worth taking your time here. The 7 DC worked into this central space create the prominent shell at the top of the bandana, while the skipped stitches on either side help position the shell within the existing shape.
Do not fasten off after completing this edging stage. The pattern continues directly into the second tie.
Stage Six: Crocheting the Second Tie
The second tie mirrors the construction idea used for the first tie. Chain 40, then slip stitch through the second chain from the hook and into each chain across until the end.
Once the chain has been worked back with slip stitches, slip stitch through the first stitch on the project to secure the tie. This creates the second integrated tie without requiring separate attachment or sewing.
After securing the second tie, fasten off and tidy all loose ends.

Finishing the Bandana Neatly
The final finishing instruction is simple: fasten off after completing the second tie and tidy all loose ends. The tapestry needle included in the materials is useful for dealing with the yarn tails neatly.
Finishing is worth treating as part of the project rather than as an afterthought. A delicate filet crochet accessory can look much more polished when the loose ends are carefully tidied and the fabric is allowed to sit neatly in its finished shape.
Before considering the project complete, visually inspect the shell edging from one side to the other. The decorative border should read as a continuous sequence of shells and anchoring stitches. Also check both ties so that they are securely connected to the project.
Beginner Checkpoints for a Smoother Crochet Session
- Foundation checkpoint: Confirm that the chain-4 foundation has been closed with a slip stitch to form a ring.
- Center checkpoint: Keep the chain-2 space at the top easy to identify as the project grows.
- Filet checkpoint: Watch the alternating relationship between Row 2 and Row 3.
- Row checkpoint: Rows 4–12 alternate Rows 2 and 3 and finish on Row 3.
- First-tie checkpoint: The first tie begins without fastening off and uses chain 40.
- Edging checkpoint: Shells consist of 7 DC during the main edging sequence.
- Top checkpoint: The chain-2 space at the very top receives 7 DC for the central shell.
- Second-tie checkpoint: The second tie also begins with chain 40.
- Finishing checkpoint: Fasten off only after securing the second tie and then tidy all loose ends.
Common Beginner Difficulties
Losing Track of the Center
The central chain-2 space is one of the most useful reference points in the pattern. If the work starts to feel confusing, locate this space first and use it to orient yourself. The instructions repeatedly return to this area, so recognizing it can make the written pattern much easier to follow.
Confusing Chain Spaces with Stitches
The filet crochet section intentionally works with chain spaces. Row 3 specifically instructs you to work DC into each stitch across, including chain spaces. Reading that detail carefully is important because the chain spaces are part of the structure of the row.
Forgetting to Continue Without Fastening Off
After completing the main bandana, the first tie begins without fastening off. Likewise, the edging continues into the second tie without fastening off until the final securing step. Keeping the yarn attached at these transition points is part of the construction.
Making the Edging Uneven
The shell border has a repeating rhythm of shells and SC anchors. If the edging begins to look uneven, pause and identify the next chain space before continuing. The goal is to follow the written placement carefully rather than trying to estimate shell positions visually.
Why This Pattern Works Well for Beginners
The Crochet Lovely Bandana is a useful beginner project because it combines repetition with a visually distinctive result. The main body relies on a relatively small collection of stitches and abbreviations, while the alternating rows create a recognizable pattern that becomes easier to read as the work grows.
The design also introduces several useful crochet concepts in one project. You begin by forming a ring, work double crochet stitches into the foundation, practice chain spaces and skipped stitches, turn rows, work into spaces, create an edging, and finish with integrated ties.
At the same time, the project remains manageable because the pattern is classified as easy. The decorative appearance comes largely from the arrangement of familiar stitches rather than from a complicated collection of techniques.
Keeping the Filet Crochet Fabric Looking Delicate
The open spaces are an important visual part of the design. When working the filet crochet body, take care to read the instructions for each row rather than assuming that every row is identical. Rows 2 and 3 have different functions and alternate through Rows 4–12.
It is also helpful to keep the work relaxed enough that the chain spaces remain visible. You do not need to change the pattern to achieve this effect; simply pay attention to the stitch placement described in the original instructions.
Choosing a Color for Your Own Bandana
The original project is crocheted in a beautiful apricot shade, giving the finished accessory a soft and feminine appearance. The pattern can be crocheted in many colors, however, so there is room to interpret the same design in a way that suits your wardrobe or personal crochet style.
A single-color version emphasizes the filet crochet structure and shell border as one continuous design. Different yarn colors can create completely different moods while leaving the construction unchanged. When experimenting with color, the important point is to keep the technical pattern intact rather than changing the stitch sequence.
Quick Pattern Reference
- Make a slip knot.
- Chain 4 and slip stitch through the first chain to form a ring.
- Work Row 1 using the specified DC groups and central chain-2 space.
- Work Row 2 with chain spaces, skipped stitches, and the central 2 DC, ch 2, 2 DC increase area.
- Work Row 3 with DC across, including chain spaces, while maintaining the central chain-2 space.
- Alternate Rows 2 and 3 through Rows 4–12, finishing on Row 3.
- Without fastening off, chain 40 for the first tie.
- Slip stitch back along the tie and secure it to the first stitch on the project.
- Begin the shell stitch edging.
- Work the shells and SC anchors around the first side and across the top.
- Place 7 DC into the chain-2 space at the very top.
- Continue the shell edging around the remaining side.
- Without fastening off, chain 40 for the second tie.
- Slip stitch back along the chain and secure it to the first stitch on the project.
- Fasten off and tidy all loose ends.
Final Project Check
Before putting your finished bandana to use, compare the completed piece with the pattern details. The bandana itself should measure 9” x 17.5” (23 cm x 44.5 cm), excluding the ties on each side. The specified gauge is 4” (10 cm): 6 rows.
Also confirm that the project has been completed using the specified 5.5 mm crochet hook and the stated yarn: 1 skein of Universal Yarn Vireo in shade Apricot Tart. The pattern uses US terms, with British equivalents provided for the listed abbreviations.
Finally, look at the overall construction. The center should show the filet crochet design, the outer edge should feature the shell stitch edging, and the two ties should be integrated directly into the crochet rather than separately sewn into place.
A Delicate Handmade Accessory with a Cottagecore Feel
The Crochet Lovely Bandana brings together a simple construction and a decorative finish in a way that makes the finished accessory feel much more elaborate than the techniques required to make it. The filet crochet center provides an airy foundation, while the shell stitch edging adds the feminine detail that defines the finished look.
The integrated ties are another particularly practical feature. Because each tie is crocheted directly from the project at the appropriate stage, there is no separate tie-making and attachment process. Once the final loose ends have been tidied, the bandana is ready to admire and enjoy.
Whether you are learning filet crochet for the first time or simply looking for a small, elegant crochet project, this pattern offers a satisfying combination of repetition, structure, and decorative detail. By working through the project stage by stage and using the center, chain spaces, rows, shells, and ties as visual checkpoints, beginners can approach the pattern with much greater confidence while preserving the exact construction of the original design.